


SpringSecurity整合OAuth2
一、概述与原理
1.1 、OAuth2.0 是什么?
OAuth(OpenAuthorization)是一个开放标准,允许用户能够让第三方应用访问该用户在某一网站上的存储的私密资源(用户信息、照片、视频、联系人列表、好友列表等),而无需将用户名和密码提供给第三方应用,Oauth仅需要提供一个令牌就可以访问用户存储在特定服务上的资源。
每一个令牌授权一个特定的网站在特定时段内访问特定的资源,OAuth 让用户可以授权第三方网站访问他们存储在另外服务提供者的某些特定信息,而非所有内容。OAuth2.0 为简化客户端开发提供了特定的授权流,包括 Web 应用、桌面应用、移动端应用等。
1.2、OAuth2.0中角色解释
在OAuth2.0的有四个角色需要清楚
| Authorization Server | 认证服务器。用于认证用户,颁发token。如果客户端认证通过,则发放访问资源服务器的令牌 |
|---|---|
| Resource Server | 资源服务器。拥有受保护资源,对非法请求拦截,对请求token解析。如果请求包含正确的访问令牌,则可以访问资源 |
| Client | 客户端。它请求资源服务器时,会带上访问令牌,从而成功访问资源 |
| Resource Owner | 资源拥有者。最终用户,他有访问资源的账号与密码(指的是用户) |
1.3、OAuth2.0的4中授权模式
gitee项目源码练习链接:https://gitee.com/hhgs_admin/springsecurityoauth2-demo
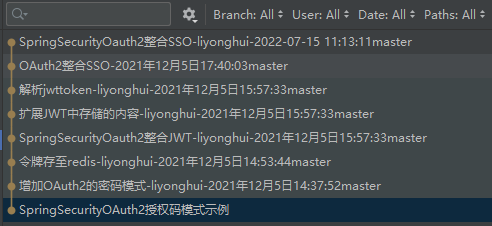
项目git log实操内容

1.3.1、授权码模式(重点 ⭐⭐⭐)
1.3.1.1 原理
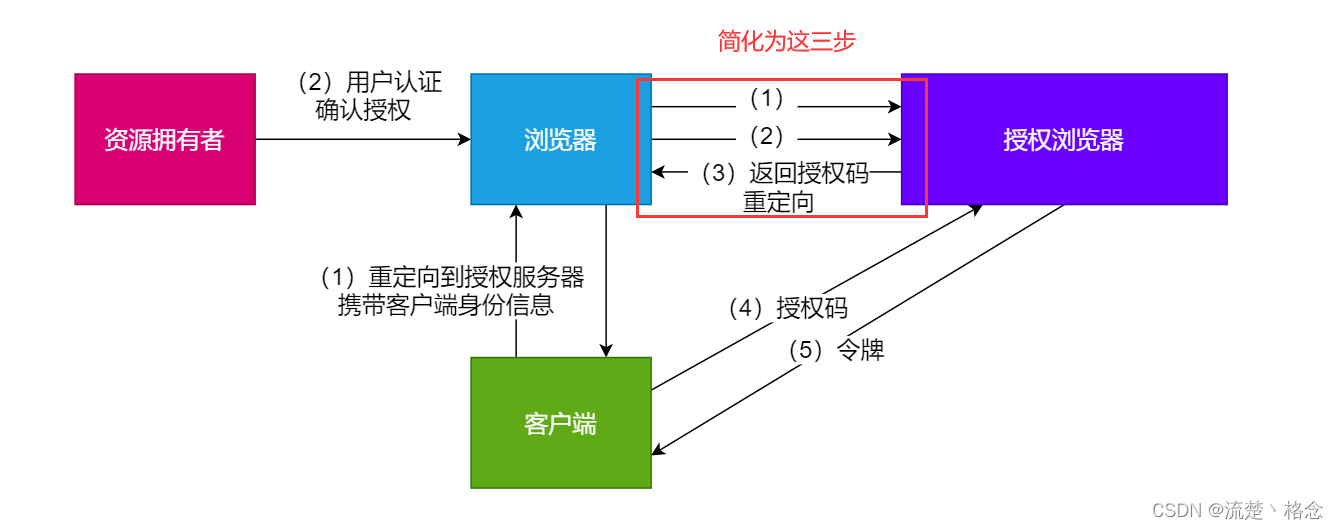
授权码模式:指的是当前应用先向第三方认证系统申请一个授权码,然后再用该码在第三方认证系统中获取令牌,之后每次访问系统资源的时候,将该令牌传到第三方认证授权服务器上进行校验,当前应用本身不具备校验令牌有效性的功能。
这种模式多应用在第三方登录, 例如jd,bilibili使用第三方:微信或qq登录
流程示意图:
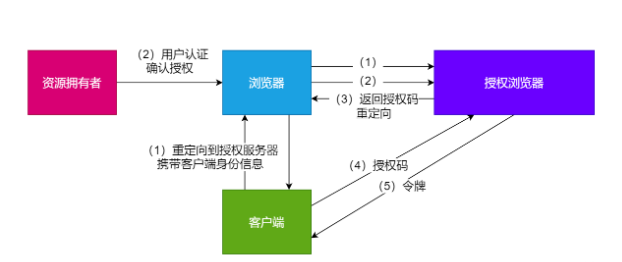
(1)、资源拥有者(客户)打开客户端,客户端要求资源拥有者给予授权,它将浏览器被重定向到授权服务器,客户端给第三方认证服务器发送请求认证,例如:
http://localhost:8080/oauth/authorize?client_id=p2pweb&response_type=code&scope=app&
redirect_uri=http://xx.xx/notify
参数列表如下:
| 参数 | 解释说明 |
|---|---|
| client_id | 客户端接入标识。 |
| response_type | 授权码模式固定为code。 |
| scope | 客户端权限。 |
| redirect_uri | 跳转uri,当授权码申请成功后会跳转到此地址,并在后边带上code参数(授权码)。 |
(2)、浏览器出现向授权服务器授权页面,之后将用户同意授权。
(3)、授权服务器将授权码(AuthorizationCode)转经浏览器发送给client(通过redirect_uri)。
(4)、客户端拿着授权码向授权服务器索要访问access_token,请求如下:
http://localhost:8080/oauth/token?client_id=p2pweb&client_secret=gdjbcd&grant_type=authorization_code&
code=5PgfcD&redirect_uri=http://xx.xx/notify
参数列表如下:
| 参数 | 说明 |
|---|---|
| client_id | 客户端准入标识。 |
| client_secret | 客户端秘钥。 |
| grant_type | 授权类型,填写authorization_code,表示授权码模式 |
| code | 授权码,就是刚刚获取的授权码,注意:授权码只使用一次就无效了,需要重新申请。 |
| redirect_uri | 申请授权码时的跳转url,一定和申请授权码时用的redirect_uri一致 |
(5)、授权服务器返回令牌(access_token)
.
授权码模式【第三方登录常用模式】:
这种模式是四种模式中最安全的一种模式。一般用于Web服务器端应用或第三方的原生App调用资源服务的时候。
因为在这种模式中access_token不会经过浏览器或移动端的App,而是直接从服务端去交换,这样就最大限度的减小了令牌泄漏的风险。
授权码模式不足的地方是每次都要网路请求去校验令牌,这可能导致在高并发的情况下造成系统瓶颈,这里优化点在于令牌可以在当前系统进行校验,后续可以采用JWT的方式存储令牌信息。
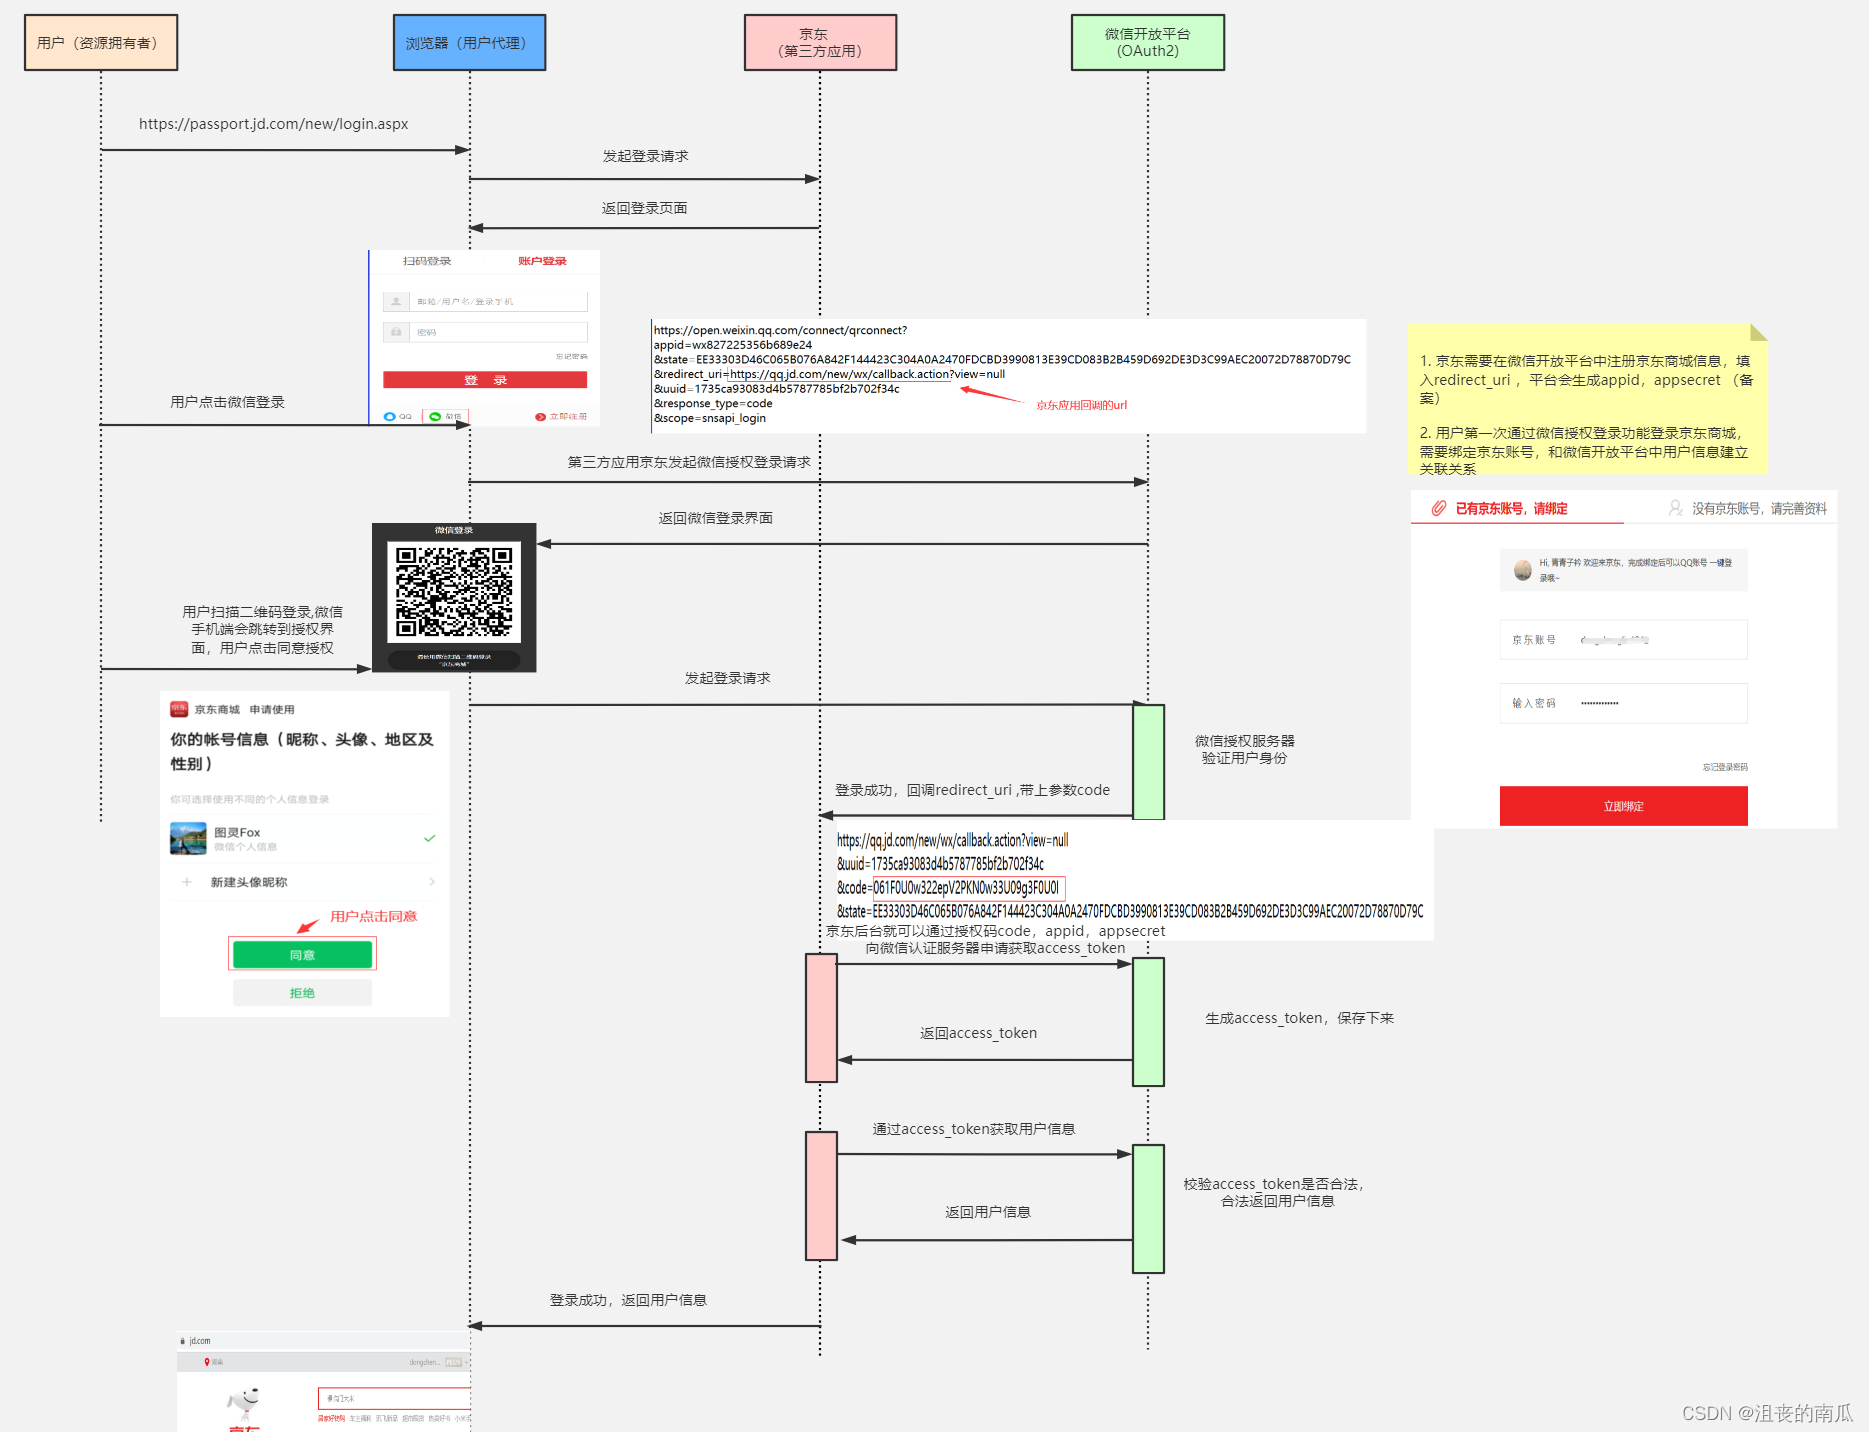
就拿京东直接第三方微信登录示例:京东需要在微信开放平台上注册京东商城信息,填写好回调地址redirect_uri,微信平台会给京东生成appid、appsecret(备案)两个标识,这是在微信后台认证服务中要用到的两个重要唯一的标识
接下来用一张流程图来演示一下授权码模式的流程:例子:京东应用使用第三方微信登录
1.3.1.2 代码
1,导入依赖
      <dependency>
            <groupId>org.springframework.cloud</groupId>
            <artifactId>spring-cloud-starter-security</artifactId>
      </dependency>

      <dependency>
            <groupId>org.springframework.cloud</groupId>
            <artifactId>spring-cloud-starter-oauth2</artifactId>
       </dependency>

     <dependencyManagement>
        <dependencies>
            <dependency>
                <groupId>org.springframework.cloud</groupId>
                <artifactId>spring-cloud-dependencies</artifactId>
                <version>Hoxton.SR12</version>
                <type>pom</type>
                <scope>import</scope>
            </dependency>
        </dependencies>
    </dependencyManagement>
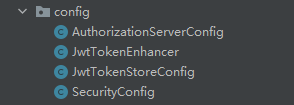
核心配置文件目录如下:
2,配置SecurityConfig
@Configuration
@EnableWebSecurity
public class SecurityConfig extends WebSecurityConfigurerAdapter {

    @Bean
    public PasswordEncoder passwordEncoder() {
        return new BCryptPasswordEncoder();
    }

    @Override
    protected void configure(HttpSecurity http) throws Exception {
        http.csrf().disable()
                .authorizeRequests()
                .antMatchers("/auth/**", "/login/**")
                .permitAll()
                .anyRequest()
                .authenticated()
                .and()
                .formLogin()
                .permitAll();
    }
}
3,配置认证服务器:AuthorizationServerConfig
@Configuration
@EnableAuthorizationServer
public class AuthorizationServerConfig extends AuthorizationServerConfigurerAdapter {

    @Autowired
    private PasswordEncoder passwordEncoder;

    @Override
    public void configure(ClientDetailsServiceConfigurer clients) throws Exception {
        clients.inMemory()
                //配置client-id
                .withClient("super")
                //配置client-secret
                .secret(passwordEncoder.encode("xxx"))
                //配置访问token的有效期
                .accessTokenValiditySeconds(3600)
                //配置redirect-url,用于授权成功后跳转
                //(实际这里写要访问的资源服务器的地址:例如:http://localhost:8080/login)
                .redirectUris("http://www.baidu.com")
                //配置申请的权限范围
                .scopes("user","order","payment")
                //配置grant_type,表示授权类型
                .authorizedGrantTypes("authorization_code");
    }
}
具体测试在gitee上源码项目和md文档中给出具体的测试流程及截图
.
1.3.2、密码模式(重点⭐⭐)
1.3.2.1 原理
密码模式使用较多,适应于第一方的单页面应用以及第一方的原生App,比如:闪聚支付平台运营平台用户使用此模式完成用户登录。 密码模式认证流程如下:
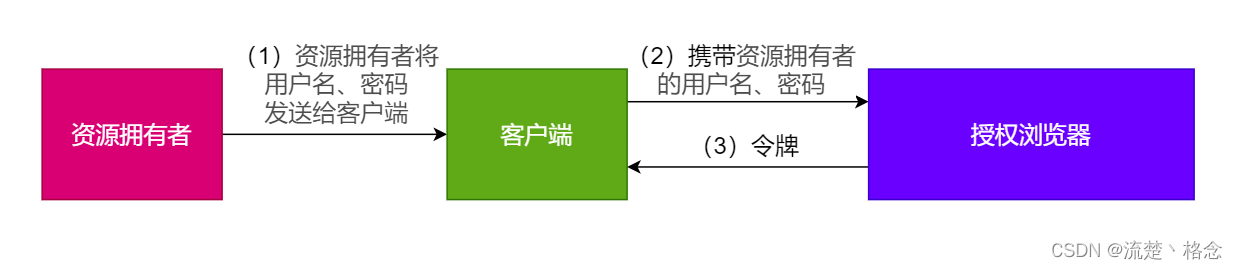
(1)资源拥有者将用户名、密码发送给客户端
(2)客户端拿着资源拥有者的用户名、密码向授权服务器请求令牌(access_token),请求如下:
http://localhost:8080/oauth/token?/uaa/oauth/token?client_id=p2pweb&client_secret=fgsdgrf&
grant_type=password&username=shangsan&password=123456
参数列表如下:
| 参数 | 说明 |
|---|---|
| client_id | 客户端准入标识。 |
| client_secret | 客户端秘钥。 |
| grant_type | 授权类型,填写password表示密码模式 |
| username | 资源拥有者用户名。 |
| password | 资源拥有者密码 |
(3)授权服务器将令牌(access_token)
发送给client 这种模式十分简单,但是却意味着直接将用户敏感信息泄漏给了client,因此这就说明这种模式只能用于client是 我们自己开发的情况下。
因此密码模式一般用于我们自己开发的,第一方原生App或第一方单页面应用。
1.3.2.2 代码
1,配置SecurityConfig
@Configuration
@EnableWebSecurity
public class SecurityConfig extends WebSecurityConfigurerAdapter {

    @Bean
    public PasswordEncoder passwordEncoder() {
        return new BCryptPasswordEncoder();
    }

    // 密码模式对比授权码模式,多增加了这个bean
    @Override
    @Bean
    public AuthenticationManager authenticationManagerBean() throws Exception {
        return super.authenticationManagerBean();
    }

    @Override
    protected void configure(HttpSecurity http) throws Exception {
        http.csrf().disable()
                .authorizeRequests()
                .antMatchers("/auth/**", "/login/**", "/logout/**")
                .permitAll()
                .anyRequest()
                .authenticated()
                .and()
                .formLogin()
                .permitAll();
    }
}
2,配置AuthorizationServerConfig
@Configuration
@EnableAuthorizationServer
public class AuthorizationServerConfig extends AuthorizationServerConfigurerAdapter {

    @Autowired
    private PasswordEncoder passwordEncoder;

    @Autowired
    private UserService userService;
    @Autowired
    private AuthenticationManager authenticationManager;

    /**
     * @description: 使用密码模式所需配置
     * @author liyonghui
     * @date 2021/12/5 14:27
     */
    @Override
    public void configure(AuthorizationServerEndpointsConfigurer endpoints) throws Exception {
        endpoints.authenticationManager(authenticationManager).userDetailsService(userService);
    }

    @Override
    public void configure(ClientDetailsServiceConfigurer clients) throws Exception {
        clients.inMemory()
                //配置client-id
                .withClient("super")
                //配置client-secret
                .secret(passwordEncoder.encode("xxx"))
                //配置访问token的有效期
                .accessTokenValiditySeconds(3600)
                //配置redirect-url,用于授权成功后跳转
                .redirectUris("http://www.baidu.com")
                //配置申请的权限范围
                .scopes("user","order","payment")
                //授权类型-使用密码模式
                .authorizedGrantTypes("password");
    }
}
具体测试在gitee上源码项目和md文档中给出具体的测试流程及截图
.
1.3.3、简化模式(了解⭐)
 简化如下:相对于授权码模式,简化了拿授权码这一步操作,直接向授权服务器中拿令牌

(1)资源拥有者打开客户端,客户端要求资源拥有者给予授权,它将浏览器被重定向到授权服务器,重定向时会附加客户端的身份信息如:
http://localhost:8080/oauth/authorize? client_id=p2pweb&response_type=token&
scope=app&redirect_uri=http://xx.xx/notify
参数列表如下:
| 参数 | 解释说明 |
|---|---|
| client_id | 客户端接入标识。 |
| response_type | 简化模式固定为token。 |
| scope | 客户端权限。 |
| redirect_uri | 跳转uri,当授权码申请成功后会跳转到此地址,并在后边带上code参数(授权码)。 |
参数描述同授权码模式 ,注意response_type=token,说明是简化模式。
(2)浏览器出现向授权服务器授权页面,之后将用户同意授权。
(3)授权服务器将授权码将令牌(access_token)以Hash的形式存放在重定向uri的fargment中发送给浏览器。注:
fragment 主要是用来标识 URI 所标识资源里的某个资源,在 URI 的末尾通过 (#)作为 fragment 的开头, 其中 # 不属于 fragment 的值。如https://domain/index#L18这个 URI 中 L18 就是 fragment 的值。大家只需要 知道js通过响应浏览器地址栏变化的方式能获取到fragment 就行了。
一般来说,简化模式用于第三方单页面应用。
1.3.4、客户端模式(了解⭐)
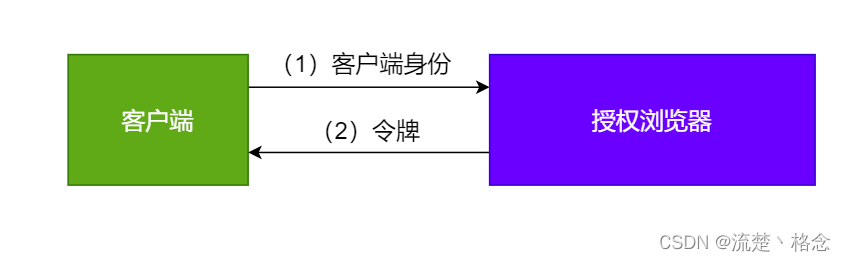
(1)客户端向授权服务器发送自己的身份信息,并请求令牌(access_token)
(2)确认客户端身份无误后,将令牌(access_token)发送给client,请求如下:
http://localhost:8080/oauth/token? client_id=p2pweb&client_secret=fgsdgrf&
grant_type=password&username=shangsan&password=123456

http://localhost:8080/oauth/token?client_id=p2pweb&client_secret=fdafdag&grant_type=client_credentials
参数列表如下:
| 参数 | 说明 |
|---|---|
| client_id | 客户端准入标识。 |
| client_secret | 客户端秘钥。 |
| grant_type | 授权类型,填写client_credentials表示客户端模式 |
这种模式是最方便但最不安全的模式。
因此这就要求我们对client完全的信任,而client本身也是安全的。
因此这种模式一般用来提供给我们完全信任的服务器端服务。比如,合作方系统对接,拉取一组用户信息。
客户端模式适应于没有用户参与的,完全信任的一方或合作方服务器端程序接入。
1.4 、SpringSecurity OAuth2.0 整合JWT(重点⭐⭐⭐)
gitee项目源码练习链接:https://gitee.com/hhgs_admin/springsecurityoauth2-demo
1.4.1、整合JWT
了解JWT是干啥的?: https://blog.csdn.net/qq_45399396/article/details/121721822
1,首先了解Oauth2.0中关于JWT配置的两个关键:JwtAccessTokenConverter 、TokenStore
JwtAccessTokenConverter: 帮助程序在JWT编码的令牌值和OAuth身份验证信息之间进行转换,把自己设置的jwt签名(密钥)加入accessTokenConverter中。
TokenStore:访问令牌转换器的令牌存储对象,初始化时,需要转换器将jwt的密钥设置进去
配置JwtTokenStoreConfig
@Configuration
public class JwtTokenStoreConfig {

    @Bean
    public TokenStore jwtTokenStore() {
         //创建带与之有关联的访问令牌转换器的令牌存储
        return new JwtTokenStore(jwtAccessTokenConverter());
    }

    @Bean
    public JwtAccessTokenConverter jwtAccessTokenConverter() {
        JwtAccessTokenConverter jwtAccessTokenConverter = new JwtAccessTokenConverter();
        // 配置JWT使用的秘钥
        jwtAccessTokenConverter.setSigningKey("test_key");
        return jwtAccessTokenConverter;
    }
}
配置AuthorizationServerConfig
@Configuration
@EnableAuthorizationServer
public class AuthorizationServerConfig extends AuthorizationServerConfigurerAdapter {

    @Autowired
    private PasswordEncoder passwordEncoder;

    @Autowired
    private UserService userService;

    @Autowired
    private AuthenticationManager authenticationManager;

    @Autowired
    private TokenStore jwtTokenStore;

    @Autowired
    private JwtAccessTokenConverter jwtAccessTokenConverter;

    /**
     * @description: 使用密码模式所需配置
     * @author liyonghui
     * @date 2021/12/5 14:27
     */
    @Override
    public void configure(AuthorizationServerEndpointsConfigurer endpoints) throws Exception {
        endpoints.authenticationManager(authenticationManager).userDetailsService(userService)
                //配置存储令牌策略
                .tokenStore(jwtTokenStore)
                .accessTokenConverter(jwtAccessTokenConverter)
        ;
    }

    @Override
    public void configure(ClientDetailsServiceConfigurer clients) throws Exception {
        clients.inMemory()
                //配置client-id
                .withClient("super")
                //配置client-secret
                .secret(passwordEncoder.encode("xxx"))
                //配置redirect-url,用于授权成功后跳转
                .redirectUris("http://www.baidu.com")
                //配置申请的权限范围
                .scopes("user","order","payment")
                //授权类型-使用密码模式
                .authorizedGrantTypes("password")
        ;
    }
}
具体测试在gitee上源码项目和md文档中给出具体的测试流程及截图
.
1.4.2 、JWT内容扩展
1,TokenEnhancer: JWT的内容扩展接口,实现存储访问令牌之前增强访问令牌的策略。
实现TokenEnhancer接口,设置增强内容
public class JwtTokenEnhancer implements TokenEnhancer {

    @Override
    public OAuth2AccessToken enhance(OAuth2AccessToken oAuth2AccessToken, OAuth2Authentication oAuth2Authentication) {
        Map<String, Object> objectObjectHashMap = new HashMap<>();
        objectObjectHashMap.put("enhance", "enhance info");
        objectObjectHashMap.put("ceshi", "测试一下!");
        ((DefaultOAuth2AccessToken) oAuth2AccessToken).setAdditionalInformation(objectObjectHashMap);
        return oAuth2AccessToken;
    }
}
配置JwtTokenStoreConfig
@Configuration
public class JwtTokenStoreConfig {

    @Bean
    public TokenStore jwtTokenStore() {
        return new JwtTokenStore(jwtAccessTokenConverter());
    }

    @Bean
    public JwtAccessTokenConverter jwtAccessTokenConverter() {
        JwtAccessTokenConverter jwtAccessTokenConverter = new JwtAccessTokenConverter();
        //配置JWT使用的秘钥
        jwtAccessTokenConverter.setSigningKey("test_key");
        return jwtAccessTokenConverter;
    }

    @Bean
    public JwtTokenEnhancer jwtTokenEnhancer() {
         // JWT内容增强
        return new JwtTokenEnhancer();
    }
}
配置AuthorizationServerConfig
@Configuration
@EnableAuthorizationServer
public class AuthorizationServerConfig extends AuthorizationServerConfigurerAdapter {

    @Autowired
    private PasswordEncoder passwordEncoder;

    @Autowired
    private UserService userService;

    @Autowired
    private AuthenticationManager authenticationManager;

    @Autowired
    private TokenStore jwtTokenStore;

    @Autowired
    private JwtAccessTokenConverter jwtAccessTokenConverter;

    @Autowired
    private JwtTokenEnhancer jwtTokenEnhancer;

    /**
     * @description: 使用密码模式所需配置
     * @author liyonghui
     * @date 2021/12/5 14:27
     */
    @Override
    public void configure(AuthorizationServerEndpointsConfigurer endpoints) throws Exception {

        List<TokenEnhancer> delegates = new ArrayList<>();
        delegates.add(jwtTokenEnhancer);
        delegates.add(jwtAccessTokenConverter);

        //配置JWT内容增强
        TokenEnhancerChain tokenEnhancerChain = new TokenEnhancerChain();
        tokenEnhancerChain.setTokenEnhancers(delegates);

        endpoints.authenticationManager(authenticationManager).userDetailsService(userService)
                //配置存储令牌策略
                .tokenStore(jwtTokenStore)
                .accessTokenConverter(jwtAccessTokenConverter)
                .tokenEnhancer(tokenEnhancerChain) ;
    }

    @Override
    public void configure(ClientDetailsServiceConfigurer clients) throws Exception {
        clients.inMemory()
                //配置client-id
                .withClient("super")
                //配置client-secret
                .secret(passwordEncoder.encode("xxx"))
                //配置redirect-url,用于授权成功后跳转
                .redirectUris("http://www.baidu.com")
                //配置申请的权限范围
                 .scopes("user","order","payment")
                //授权类型-使用密码模式
                .authorizedGrantTypes("password") ;
    }
}
具体测试在gitee上源码项目和md文档中给出具体的测试流程及截图
.
1.4.3 、解析JWT
主要通过Jwts的paese方法,设置密钥,设置token,通过body()方法拿到解析后的主体
@RestController
@RequestMapping("/user")
public class UserController {
    /**
     * @description: 解析JWT
     * @author liyonghui
     * @date 2021/12/5 16:18
     */
    @RequestMapping("getCurrentUser1")
    public Object getCurrentUser1(Authentication authentication, HttpServletRequest request) {
        String head = request.getHeader("Authorization");
        String token = head.replace("bearer" ,"");

        return Jwts.parser().setSigningKey("test_key".getBytes(StandardCharsets.UTF_8))
                .parseClaimsJws(token)
                .getBody();
    }
}
具体测试在gitee上源码项目和md文档中给出具体的测试流程及截图
.
1.4.4、刷新JWT
这个配置起来简单,就是授权模式配置中,加入刷新令牌的方式,则可以通过refresh_token再去请求获取新的令牌
 @Override
    public void configure(ClientDetailsServiceConfigurer clients) throws Exception {
        clients.inMemory()
                //配置client-id
                .withClient("super")
                //配置client-secret
                .secret(passwordEncoder.encode("xxx"))
                //配置刷新令牌的有效期
                .refreshTokenValiditySeconds(864000)
                //配置redirect-url,用于授权成功后跳转
                .redirectUris("http://localhost:8081/login")
                //自动授权
                .autoApprove(true)
                //配置申请的权限范围
                .scopes("all")
                //授权类型-使用密码模式(添加了刷新令牌 refresh_token)
                .authorizedGrantTypes("password","refresh_token","authorization_code")
        ;
    }
具体测试在gitee上源码项目和md文档中给出具体的测试流程及截图
.
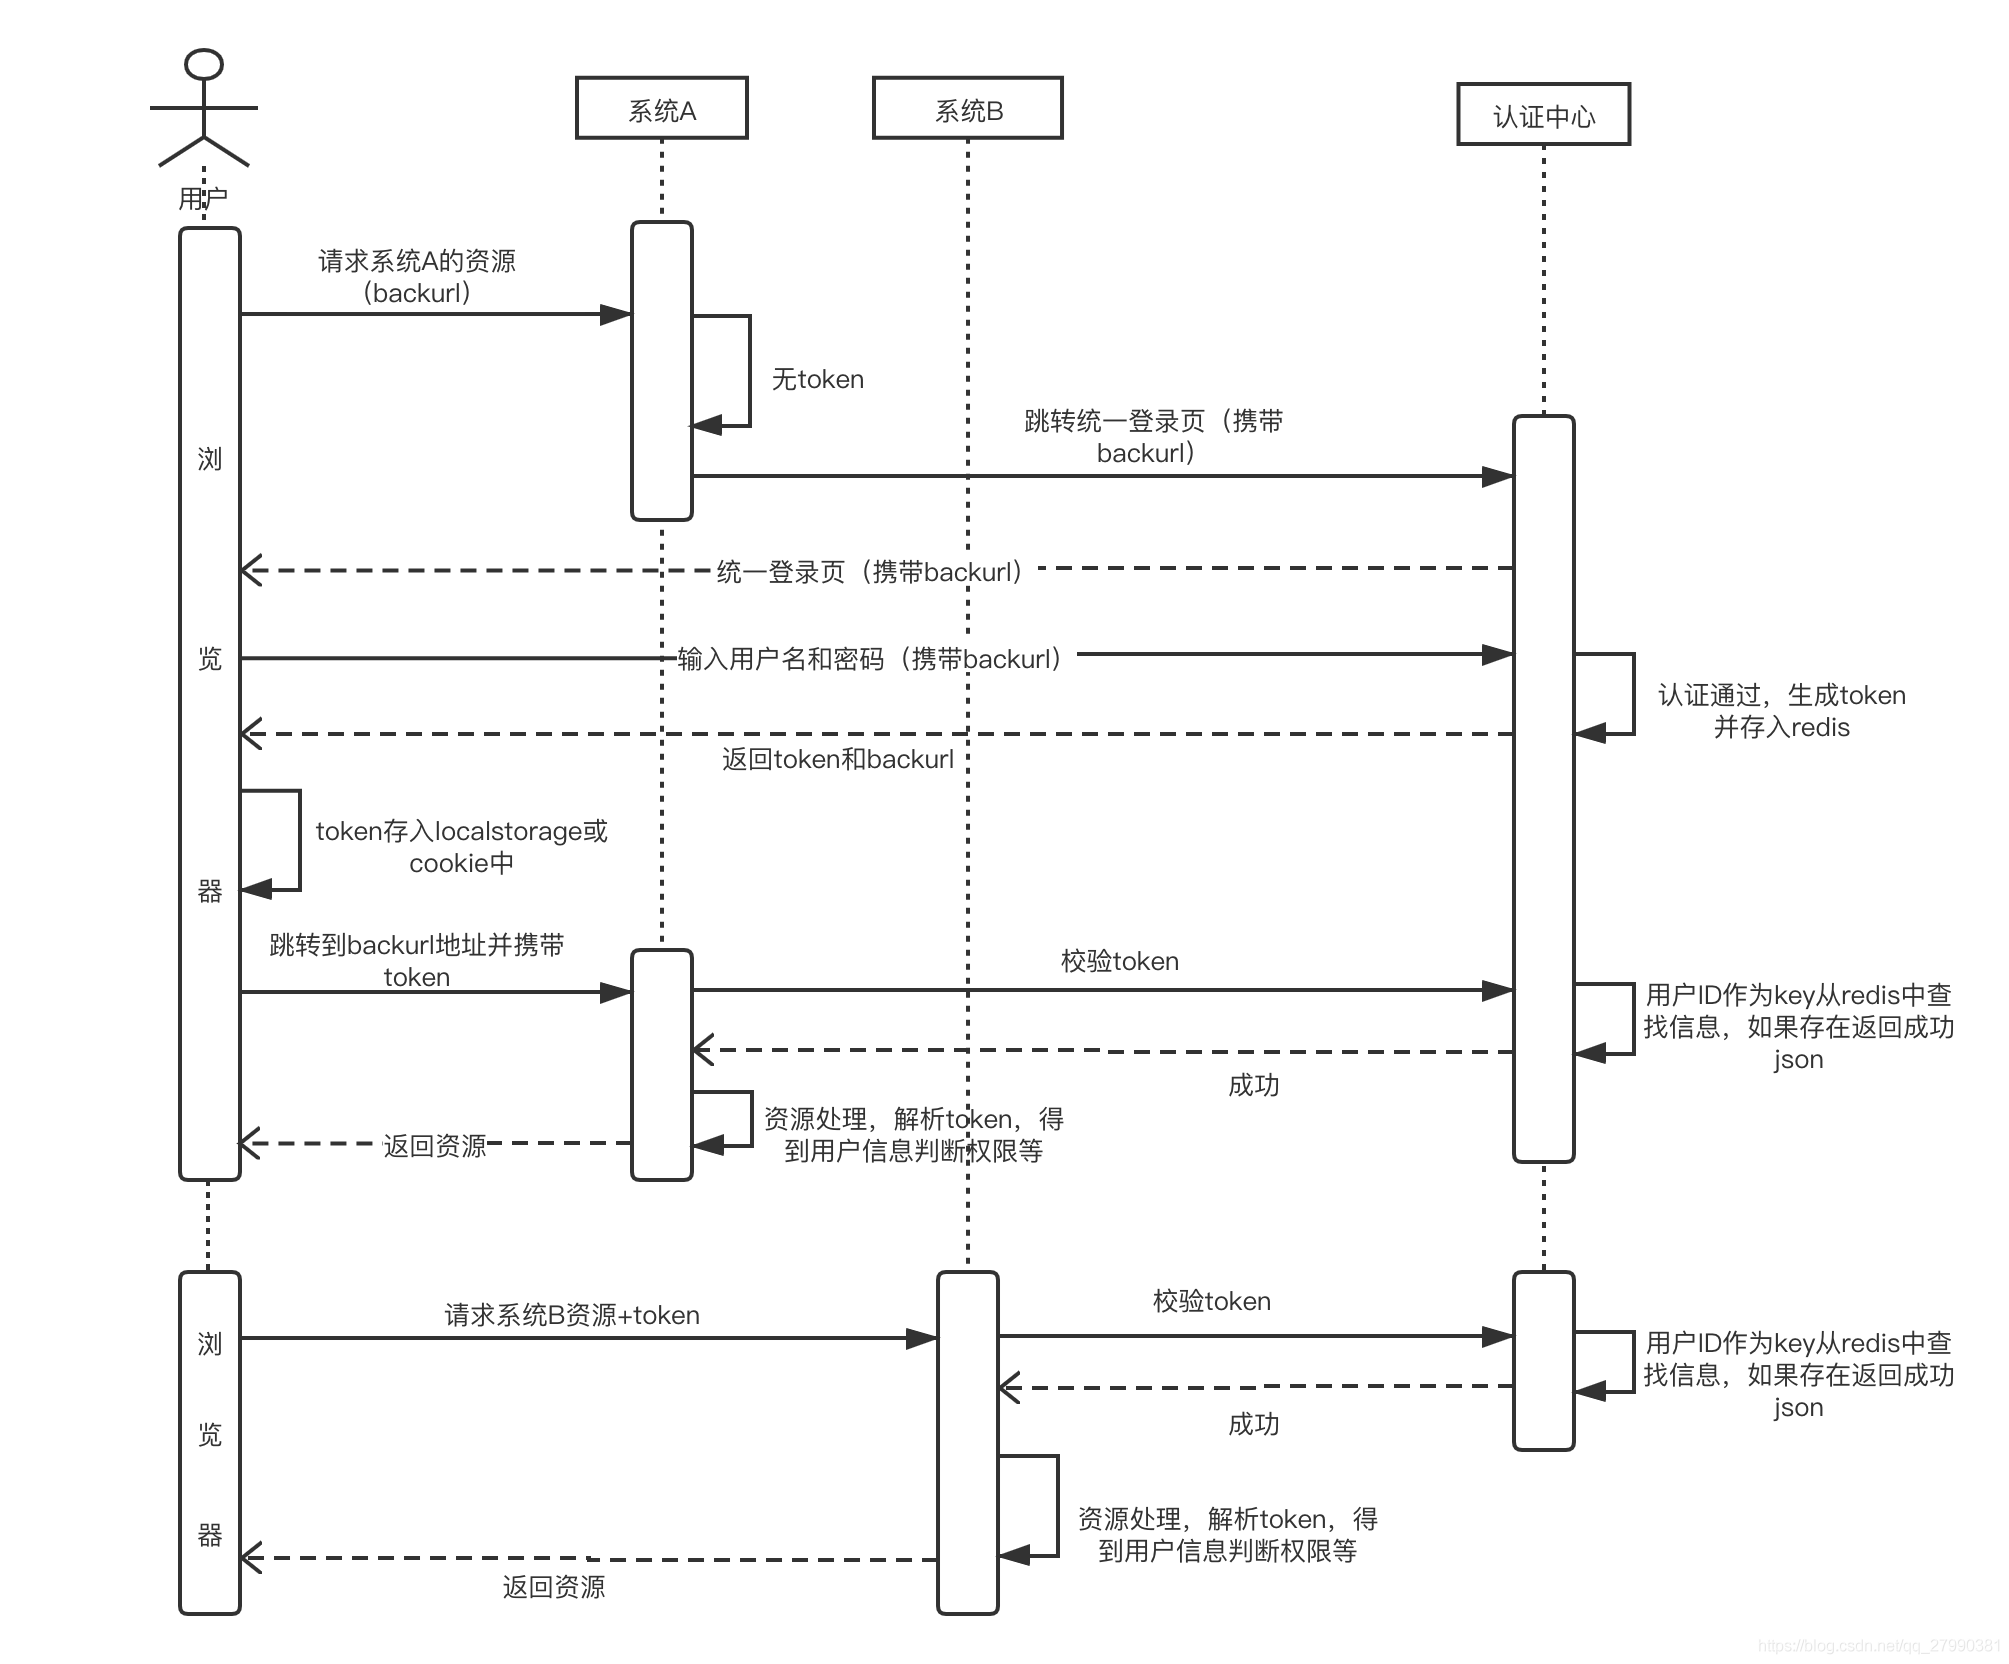
1.5 分布式单点登陆(⭐⭐⭐)
1.5.1 SpringSecurity+ JWT(Token)+Redis 实现单点登陆流程图
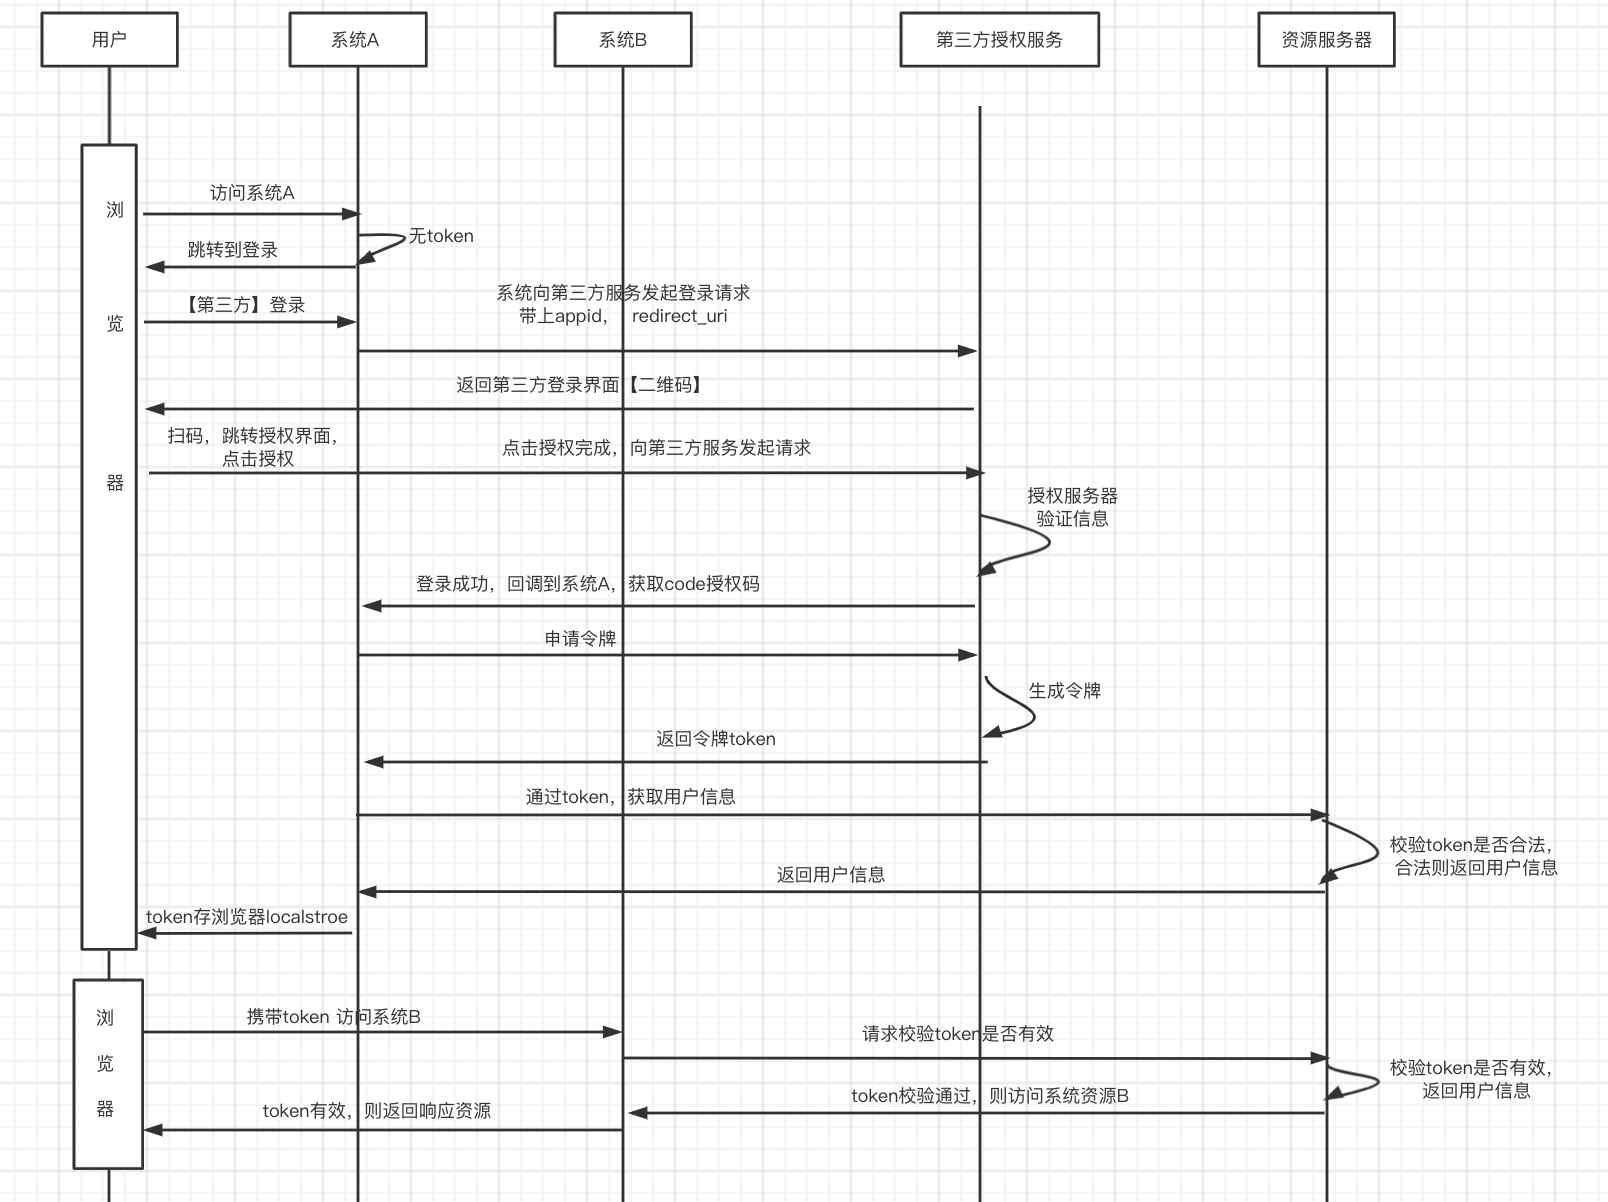
1.5.2 SpringSecurity+ OAuth2.0+JWT(Token) 实现【第三方】单点登陆流程图
应用链接:https://blog.csdn.net/qq_45399396/article/details/128284450
基于第三方登录


 1941
1941


 被折叠的 条评论
为什么被折叠?
被折叠的 条评论
为什么被折叠?
 到【灌水乐园】发言


