


阅读原文
Thymelaf是适用于web和独立环境的服务器端的Java模板引擎,它的主要目标使得模板开发的工作流程优雅自然,它定义的模板HTML可以在浏览器中正确渲染,也可以作为静态原型文件工作,这是它的最大亮点,它提供有适用于spring框架的模块,便于开发人员整合。
一、整合Thymeleaf
1、引入依赖
<!-- thymeleaf依赖 -->
<dependency>
  <groupId>org.springframework.boot</groupId>
  <artifactId>spring-boot-starter-thymeleaf</artifactId>
</dependency>
2、自定义配置
默认情况下不用做任何配置即可满足常规需求,但是为了开发方便需要关闭Thymeleaf缓存,配置如下:
spring.thymeleaf.cache=false
此配置主要是方便我们在模板中修改的内容能够实时的渲染。
3、模板位置
模板位置默认在springboot项目resources/templates下,一般情况下不建议修改此目录。
4、创建测试控制器
@Controller
public class TestController {
@Autowired
MessageSource messageSource;
@RequestMapping("/")
public String index(Model model) {
return "forward:index";
}
@RequestMapping("/index")
public String toIndex(Model model, HttpSession session) {
List<Person> personList = new ArrayList<>();
Person person = new Person("1","张三", "大小伙");
Person person1 = new Person("2","李四", "大姑娘");
Person person2 = new Person("3","王五", "小孩儿");
personList.add(person);
personList.add(person1);
personList.add(person2);
model.addAttribute("person", person);
model.addAttribute("testVariables", "测试");
model.addAttribute("cssStyle", "cssStyle");
model.addAttribute("testClass", "testClass");
model.addAttribute("personList", personList);
model.addAttribute("currentTime", new Date());
session.setAttribute("sessionAttr", "sessionAttr");
ServletContext servletContext = session.getServletContext();
servletContext.setAttribute("applicationAttr", "applicationAttr");
return "index";
}
}
二、参数获取
获取普通属性表达式:${x}
获取请求参数表达式:${param.x}
获取session属性表达式:${session.x}
获取application属性表达式:${application.x}
三、表达式使用
链接表达式:@{}
属性选择表达式:*{}
messge表达式:#{}
片段引用表达式:~{}
内嵌表达式:[[]]
栗子,表达式使用
<h3>变量表达式--${...}</h3>
<p><span th:text="${testVariables}"></span></p>
<h3>选择变量表达式--*{...}</h3>
<p>
<div th:object="${person}">
<p>姓名:<span th:text="*{name}"></span></p>
<p>年龄:<span th:text="*{desc}"></span></p>
</div>
</p>
<h3>链接表达式--@{...}、th:href</h3>
<p>
<!-- 最终转化结果:'http://localhost:8080/gtvg/order/details?orderId=3' -->
<a href="details.html"
th:href="@{http://localhost:8080/gtvg/order/details(orderId=${person.id})}">view</a>
<!-- 最终转化结果:'/gtvg/order/details?orderId=3' -->
<a href="details.html" th:href="@{/order/details(orderId=${person.id})}">view</a>
<!-- 最终转化结果:'/gtvg/order/details/3' -->
<a href="details.html" th:href="@{/order/details/{orderId}(orderId=${person.id})}">view</a>
</p>
message表达式主要用于读取国际化属性配置文件中的属性,springboot默认的属性配置文件名称为:messages,位置为:resource文件夹下。
定义messages.properties文件
welcome= welcome thymeleaf index
栗子,读取messages属性
<p th:text="#{welcome}"></p>
内嵌表达式主要是在js或者css中获取属性变量时使用,例如:
<script>
      var arg1 = '[[${testVariables}]]';
      console.log(arg1);
</script>
这里需要注意一点,如果你的页面是thymeleaf模板,则在js中使用二维数组时,要将括号换行,否则thymeleaf在解析时会将其当做内嵌表达解析,从而导致报错,这也是thymeleaf比较诟病的一特征。
var array = [
                [...],
                [...]
            ];
四、标签使用
thymeleaf的标签库非常丰富,它是一个独立的标签库,没有对html原型页面做任何的侵入操作,由于html对thymeleaf标签无法感知,所以使用此标签库需要定义标签库的描述信息,如下:
<html xmlns:th="http://www.thymeleaf.org" lang="en">
有了此描述信息的定义,html页面就可以感知thymeleaf的标签库了。
1、常用标签
th:href:定义html域href属性
th:id:定义html域id属性
th:name:定义html域name属性
th:value:定义html域value属性
th:class:定义html域class属性
th:attr:自定义属性
以上都是一些常用的标签,当然还有很多属性标签,需要用时可查找thymeleaf官方文档即可
栗子,使用常用标签
<!--最终渲染结果:<input id="user" name="user" placeholder="请输入用户名" value="" data-filter="test">-->
<input th:id="user" th:name="user" th:placeholder="请输入用户名" th:value="''" th:attr="data-filter='test'"
2、文本标签
th:text:输出普通文本
th:utext:输出html文本
栗子,使用文本标签
<p th:text="'<h3>hello world!</h3>'"></p>
<p th:utext="'<h3>hello world!</h3>'"></p>
渲染效果

3、追加前置标签
th:attrappend:正常追加
th:attrprepending:前置追加
栗子,使用追加前置标签
<!-- 最终渲染追加效果 <input type="button" value="Do it!" class="btn warning" /> -->
<input type="button" value="append" class="btn" th:attrappend="class=${' ' + cssStyle}" />
<!-- 最终渲染前置效果 <input type="button" value="Do it!" class="warning btn" /> -->
<input type="button" value="prepending" class="btn" th:attrprepend="class=${cssStyle + ' '}" />
4、条件判断标签
th:if:if判断
th:switch:switch判断
th:case:case匹配
1、使用条件判断标签时,不可避免要使用到运算符,在thymeleaf模板中使用运算符文本别名可以避免html渲染时的转义问题,,文本别名如下:
gt (>), lt (<), ge (>=), le (<=), not (!). eq (==), neq/ne (!=)
2、th:if条件判断规则如下:
1、布尔值为true则为true
2、非0数字则为true
3、任意字符则为true
4、非“false”, “off” or “no”字符串则为true
5、如果为null则为false
栗子,th:if标签使用
<table width="40%" cellpadding="0" cellspacing="0" border="1">
    <tr>
        <td>姓名</td>
        <td>描述</td>
        <td>操作</td>
    </tr>
    <tr th:each="per : ${personList}">
        <td th:text="${per.name}"></td>
        <td th:text="${per.desc}"></td>
        <td><a href="#" th:if="${per.id == '2' && per.name == '李四'}">view</a></td>
    </tr>
</table>
渲染效果

栗子,th:switch、th:case标签使用
 <ul style="list-style-type: decimal" th:switch="${testVariables}">
      <li th:case="'测试'">测试</li>
      <!--*类似于default-->
      <li th:case="*">默认(都匹配不成功)</li>
  </ul>
5、迭代标签
th:each:迭代标签,需要注意的是迭代标签有一个状态变量,默认情况下该变量名称为定义的迭代变量名称后追加Stat,此变量有如下属性可供使用:
1、index:索引,
2、count:数量,
3、current:当前变量,
4、first:是否为第一个列表元素,
5、last:是否为最后一个元素,
6、even:count是否为偶数,
7、odd:count是否为奇数,
8、size:列表元素总数
栗子
<table width="40%" cellpadding="0" cellspacing="0" border="1">
    <tr>
        <td>姓名</td>
        <td>描述</td>
        <td width="70%">其他</td>
    </tr>
    <tr th:each="per : ${personList}">
        <td th:text="${per.name}"></td>
        <td th:text="${per.desc}"></td>
        <td th:text="
        '索引:' + ${perStat.index} +
        ',数量:' +  ${perStat.count} +
        ',当前变量:' + ${perStat.current} +
        ',是否为第一个列表元素:' +  ${perStat.first} +
        ',是否为最后一个元素:' + ${perStat.last} +
        ',count是否为偶数' + ${perStat.even} +
        ',count是否为奇数' + ${perStat.odd} +
        ',列表元素总数:' + ${perStat.size}
"></td>
    </tr>
</table>
渲染效果
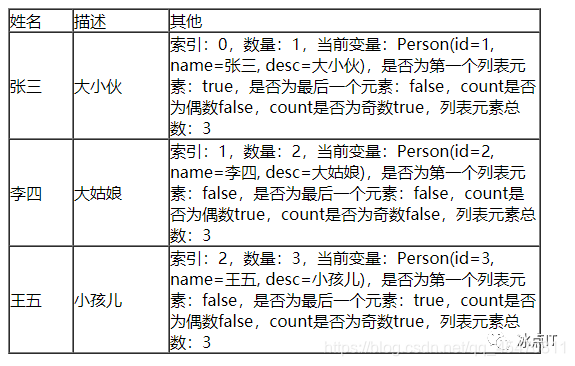
以上只是对迭代状态属性做一演示,无实质意义。
6、自定义标签
关于自定义标签的使用,主要是在开发过程中封装一些公共组件,例如:select、radio等,在使用时直接编写此标签即可,由于本篇文章内容过多,关于自定义标签的使用,我会在下一篇文章中来说明。
五、布局
我们在页面布局时,为了处理公共头部和尾部需要做代码片段的引入,thymeleaf很好的支持了这一功能,只需使用片段表达式和标签即可。
1、片段定义标签:th:fragment
2、片段引用标签:th:insert、th:replace、th: include
3、片段引用标签说明:
th:insert:将片段内容元素直接插入目标元素
th:replace:将目标元素替换为片段内容元素
th:include:只将片段内容包含至目标元素
栗子、定义公共模板
<footer th:fragment="footer(arg1, arg2)">
    公共页脚-传入参数:<span th:text="${arg1}"></span> -- <span th:text="${arg2}"></span>
</footer>
栗子、使用模板
 <!-- 渲染结果:<div><footer>公共页脚</footer></div>-->
  <div th:insert="~{/common/fragment :: footer('test', '测试')}"> </div>
  <!-- 渲染结果: <footer>公共页脚</footer>-->
  <div th:replace="~{/common/fragment :: footer('test', '测试')}">  </div>
  <!-- 渲染结果: <div>公共页脚</div>-->
  <div th:include="~{/common/fragment :: footer('test', '测试')}">  </div>
tips:
/common/fragment:模板路径;
footer('test', '测试'):footer,模板引用,括号中为传入的参数。
六、工具对象使用
所有的thymeleaf内置对象均可通过${#内置对象}的方式获取,下面将常用的工具对象做一演示,更多工具对象的使用可以参考官方文档。
https://www.thymeleaf.org/doc/tutorials/3.0/usingthymeleaf.html#appendix-b-expression-utility-objects
栗子,常用工具对象的使用
<ul style="list-style-type: decimal">
    <li>日期格式化:<span th:text="${#dates.format(currentTime, 'yyyy-MM-dd HH:mm:ss.SSS')}"></span></li>
    <li>金额格式化:<span th:text="${#numbers.formatCurrency(200001.12)}"></span></li>
    <li>list判断为空:<span th:if="${not #lists.isEmpty(personList)}" th:text="'不为空'"></span></li>
</ul>
渲染效果

至此,关于Thymeleaf的使用以及与SpringBoot的整合就介绍完了,有任何的问题和建议可以在博客或公众号后台留言,我会及时处理。
更多最新技术文章,请关注“冰点IT”公众号


 186
186


 被折叠的 条评论
为什么被折叠?
被折叠的 条评论
为什么被折叠?
 到【灌水乐园】发言


