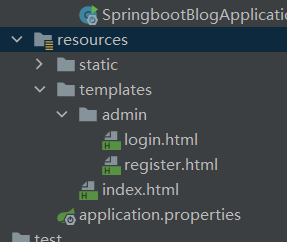
登录页面地址

1.建立数据库
create table users(id bigint(20) not null primary key AUTO_INCREMENT,username varchar(50) not null,password varchar(50) not null,roles text);
2.填入数据
INSERT INTO `users`(`id`, `username`, `password`, `roles`) VALUES (1, 'admin', '12', 'ROLE_ADMIN,ROLE_USER');
INSERT INTO `users`(`id`, `username`, `password`, `roles`) VALUES (2, 'user', '23' 'ROLE_USER');
3.编写user实体类
package com.blog.pojo;

import lombok.AllArgsConstructor;
import lombok.Data;
import lombok.NoArgsConstructor;
import org.springframework.security.core.GrantedAuthority;

import java.util.List;
//这种注解的形式,要加依赖lombok

@Data
@AllArgsConstructor
@NoArgsConstructor
public class Users {
    private Long id;
    private String username;
    private String password;
    private String roles;

    public Users(String username, String encode, List<GrantedAuthority> authorities) {
    }
}
4.依赖及properties配置
 <!--        mybatis提供的-->
        <dependency>
            <groupId>org.mybatis.spring.boot</groupId>
            <artifactId>mybatis-spring-boot-starter</artifactId>
            <version>2.1.3</version>
        </dependency>
        <dependency>
            <groupId>org.springframework.boot</groupId>
            <artifactId>spring-boot-starter-jdbc</artifactId>
        </dependency>
        <dependency>
            <groupId>mysql</groupId>
            <artifactId>mysql-connector-java</artifactId>
            <scope>runtime</scope>
        </dependency>
        <!--        认证security-->
        <dependency>
            <groupId>org.springframework.boot</groupId>
            <artifactId>spring-boot-starter-security</artifactId>
        </dependency>
properties配置
spring.datasource.username=root
spring.datasource.password=root
spring.datasource.url=jdbc:mysql://localhost:3306/sblog?useUnicode=true&characterEncoding=utf-8&serverTimezone=UTC&useSSL=true
spring.datasource.driver-class-name=com.mysql.cj.jdbc.Driver
5.启动类加上映射接口
package com.blog;

import org.mybatis.spring.annotation.MapperScan;
import org.springframework.boot.SpringApplication;
import org.springframework.boot.autoconfigure.SpringBootApplication;

//@MapperScan作用:com.blog.mapper包下面的接口类,注册之后将会变成对应的实现类

@MapperScan("com.blog.mapper")
@SpringBootApplication
public class SpringbootBlogApplication {

    public static void main(String[] args) {
        SpringApplication.run(SpringbootBlogApplication.class, args);
    }

}
6.编写Mapper接口
@Mapper
@Repository
public interface UserMapper {

    //根据账号查询用户信息
   @Select("select * from users where username = #{username}")
   Users getUserInfoByUsername(String username);
}
7.编写第一个service
package com.blog.service;

import com.blog.mapper.UserMapper;
import com.blog.pojo.Users;
import org.springframework.beans.factory.annotation.Autowired;
import org.springframework.stereotype.Service;

@Service
public class UserInfoServiceImpl{
    @Autowired
    private UserMapper userMapper;

    public Users getUserInfo(String username){
        return userMapper.getUserInfoByUsername(username);
    }

}
8.编写controller层
@Controller
public class BaseController {

    @Autowired
    UserInfoServiceImpl userInfoService;

    @RequestMapping  (value = "/admin/login")
    public Users getUser(String name){
      return userInfoService.getUserInfo(name);
    }

}
9.然后编写另一个service,和security认证功能
@Component
public class CustomUserService  implements UserDetailsService {
    @Autowired
    private UserInfoServiceImpl userInfoService;
    @Autowired
    private PasswordEncoder passwordEncoder;
    @Override
    public UserDetails loadUserByUsername(String username) throws UsernameNotFoundException {
        //从数据库尝试获取该用户
        Users user = userInfoService.getUserInfo(username);
        //用户不存在 抛出异常
        if (user == null) {
            throw new UsernameNotFoundException("用户不存在");
        }
        // 得到用户角色
        String role = user.getRoles();

        // 角色集合
        List<GrantedAuthority> authorities = new ArrayList<>();
        // 角色必须以`ROLE_`开头,数据库中没有,则在这里加
        authorities.add(new SimpleGrantedAuthority(role));

        return new User(
                user.getUsername(),
                // 因为数据库是明文,所以这里需加密密码
                passwordEncoder.encode(user.getPassword()),
                authorities
        );
    }
}
编写认证授权功能
package com.blog.config;

import com.blog.service.CustomUserService;
import com.blog.service.UserInfoServiceImpl;
import org.springframework.beans.factory.annotation.Autowired;
import org.springframework.context.annotation.Bean;
import org.springframework.security.config.annotation.authentication.builders.AuthenticationManagerBuilder;
import org.springframework.security.config.annotation.web.builders.HttpSecurity;
import org.springframework.security.config.annotation.web.configuration.EnableWebSecurity;
import org.springframework.security.config.annotation.web.configuration.WebSecurityConfigurerAdapter;
import org.springframework.security.crypto.bcrypt.BCryptPasswordEncoder;
import org.springframework.security.crypto.password.PasswordEncoder;

@EnableWebSecurity
public class SecurityConfig extends WebSecurityConfigurerAdapter {
    @Autowired
    private CustomUserService customUserService;
    @Bean
    public PasswordEncoder passwordEncoder(){
        // 使用BCrypt加密密码
        return new BCryptPasswordEncoder();
    }
    //授权
    @Override
    protected void configure(HttpSecurity http) throws Exception {

        //没有权限会跳到登录页,注意这里要在任何页面都要授权anyRequest()之前,允许登录页面任何时候都可以访问,否则会报localhost重定向过多的错
        http.formLogin()
                .usernameParameter("username")
                .passwordParameter("password")
                .loginPage("/admin/login")
                .and()
                .authorizeRequests()
                .antMatchers("/admin/login").permitAll()
                .antMatchers("/admin/register").permitAll()
                .anyRequest()
                .authenticated();
        http.csrf().disable();//关闭csrf功能
        //注销,logoutUrl:注销成功,跳转的页面,比如首页
        http.logout().logoutSuccessUrl("/");
        //开启记住我功能,cookie,默认保存两周
        http.rememberMe();
    }
    //认证
    //passwordEncoding:密码编码,将前端传过来的密码进行某种方式的加密,否则会报错
    @Override
    protected void configure(AuthenticationManagerBuilder auth) throws Exception {

   		 auth.userDetailsService(customUserService).passwordEncoder(passwordEncoder());

    }
}
然后直接访问就可以啦!


 418
418


 被折叠的 条评论
为什么被折叠?


