


任务调度概述
在企业级应用中,经常会制定一些“计划任务”
即在某个时间点做某件事情
- 核心是以时间为关注点,即在一个特定的时间点,系统执行指定的一个操作
- 任务调度涉及多线程并发、线程池维护、运行时间规则解析、运行现场的保护以恢复等方面
- Quartz框架是一个开源的企业级任务调度服务,已经被作为任务调度的良好解决方案

Quartz
中译: 石英,水晶; 现在常用于钟表的意思…
Quartz框架核心概念
Quartz对任务调度进行了高度抽象,提出了3个核心概念:
- 任务:
就是执行的工作内容。Quartz提供Job接口来支持任务定义 - 触发器:
定义触发Job执行的时间触发规则。Quartz提供Trigger类及其子类支持触发器功能 - 调度器:
Quartz提供了Scheduler接口,将工作任务和触发器绑定,保证任务可以在正确的时间执行
并在org.quartz包中通过接口和类进行了描述…
纯Java实现
环境:
开发工具: Myelicps2014
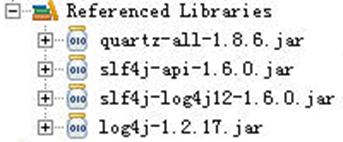
这里选用Quartz 的1.8.6版本,此版本在项目中应用较多,也较为稳定
(需要朋友可以私聊…或自己找…)
纯Java实现Quartz
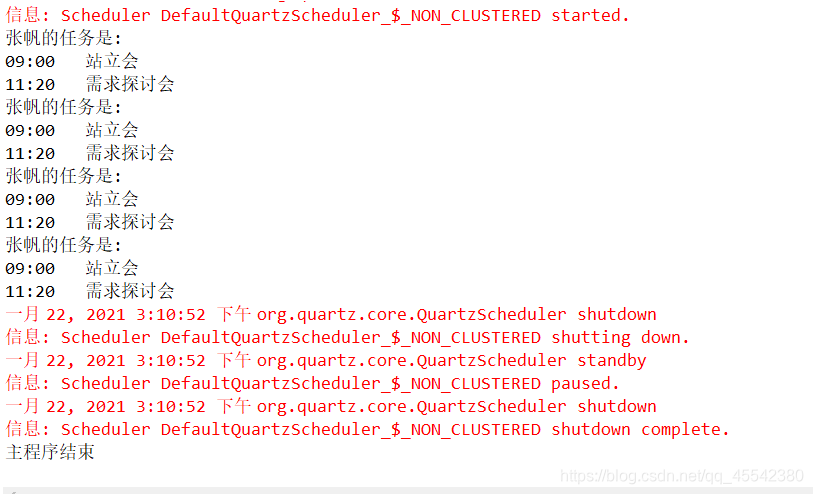
对员工的工作任务进行提醒,实现每3秒钟进行一次任务提醒,定时器在10秒钟后关闭

实体层entity
Plan.java
public class Plan {
	private String time;
	private String task;
	//get/set/toString();
}
业务逻辑层service
业务逻辑层:主要就是执行大量业务的. 往后学习会发现service才是代码最多的…
天真的我最开始尽然认为 Service最简单,后来才发现它啥都干!!
PlanService.java
public class PlanService {
	//模拟一个展示所有工作的场景业务...
	public List<Plan> findPlanList() {
		Plan plan1 = new Plan("09:00", "站立会");
		Plan plan2 = new Plan("11:20", "需求探讨会");
		List<Plan> list = new ArrayList<Plan>();
		list.add(plan1);
		list.add(plan2);
		return list;
	}

	//指定用户输出,该用户惊天的一个定时任务!!
	public void showPlan(String name) {
		System.out.println(name + "的任务是:");

		//调用上面的findPlanList(); 方法打印业务...
		List<Plan> list = this.findPlanList();
		for (Plan plan : list) {
			System.out.println(plan.getTime() + "\t" + plan.getTask());
		}
	}
}
编写com.wsm.task 执行任务类
PlanTask.java
//任务类,主要完成执行任务的方法
public class PlanJob implements Job {		//实现Job接口实现execute();
	//获取业务逻辑类对象
	private PlanService planService = new PlanService();
	@Override
	//execute()方法,在实现类中, 实现该方法以执行具体任务
	//通过参JobExecutionContext 可以获取调度上下文的各种信息,如:任务名称等
	public void execute(JobExecutionContext context) throws JobExecutionException {

		JobDataMap jobDataMap = context.getJobDetail().getJobDataMap();
		//JobDataMap是用来在执行过程中存储必要的数据对象。JobDataMap实现了Java Map接口
		String str = jobDataMap.get("username").toString();		//获取JobDataMap中存储的数据   put()|get()
		//调用业务逻辑方法;
		planService.showPlan(str);
	}
}
com.wsm.run 的 触发器和调度器
RunTask.java
public class RunTask {

	public void run() throws Exception {
		//通过JobDetail创建一个任务实例 		任务名	任务开发组	执行的任务类;
		JobDetail jobDetail = new JobDetail("myJob", "myGroup", PlanJob.class);
		//JobDetail.getJobDataMap();		获取一个JobDataMap可存储一些数据方便后期使用...
		JobDataMap jobDataMap = jobDetail.getJobDataMap();
		jobDataMap.put("username", "张帆");
		//使用SimpleTrigger触发器
		//SimpleTrigger是Trigger的子类,用于创建固定时间间隔的触发规则:  触发器名,常量表示触发器间隔执行,3000毫秒
		SimpleTrigger simpleTrigger = new SimpleTrigger("myTrigger",SimpleTrigger.REPEAT_INDEFINITELY, 3000);
		//设置开始执行时间					当前系统时间 + 1000毫秒 =1秒)
		simpleTrigger.setStartTime(new Date(System.currentTimeMillis() + 1000));
		//创建一个调度器工厂
		SchedulerFactory schedulerFactory = new StdSchedulerFactory();
		Scheduler scheduler = schedulerFactory.getScheduler();	//工厂创建一个调度器;
		scheduler.scheduleJob(jobDetail, simpleTrigger);		//将:任务 和 触发器结合在一起;

		//调度器启动...触发任务
		scheduler.start();
		Thread.sleep(10000);		//主线程休眠1000毫秒,触发任务,是多线程执行,即使主线程休眠程序依旧会执行...
		scheduler.shutdown();		//主线程启动,调度器关闭...(调度器不是多线程所以,触发任务被关闭程序结束...)
	}
}
主程序 main
Test.java
public class Test {
	public static void main(String[] args) throws Exception {
		RunTask runTask = new RunTask();
		runTask.run();
		System.out.println("主程序结束");
	}
}
JobExecutionContext 对象,可以获取调度上下文的各种信息
修改 com.wsm.task
PlanJob.java
//任务类,主要完成执行任务的方法
public class PlanJob implements Job {		//实现Job接口实现execute();
	//获取业务逻辑类对象
	private PlanService planService = new PlanService();

	@Override
	//execute()方法,在实现类中, 实现该方法以执行具体任务
	//通过参JobExecutionContext 可以获取调度上下文的各种信息,如:任务名称等
	public void execute(JobExecutionContext context) throws JobExecutionException {

		JobDataMap jobDataMap = context.getJobDetail().getJobDataMap();
		//JobDataMap是用来在执行过程中存储必要的数据对象。JobDataMap实现了Java Map接口
		String str = jobDataMap.get("username").toString();		//获取JobDataMap中存储的数据   put()|get()

		//新增
		//execute(JobExecutionContext context)参数,可以获取该任务的名称、绑定的触发器的名称和每次任务触发时间
		System.out.print("TriggerName(触发器): " + context.getTrigger().getName()
                + "&TriggerTime:" +new Date()+ "&JobName(任务名):" + context.getJobDetail().getName() + "\t");


		//调用业务逻辑方法;
		planService.showPlan(str);
	}
}
使用CronTrigger
CronTrigger也是Trigger的子类
CronTrigger和SimpleTrigger的对比
| 触发器 | 应用场景 | 使用方式 |
|---|---|---|
| SimpleTrigger | 固定时间间隔的调度任务 | 通过设置触发器的属性:开始时间、结束时间、重复次数、重复间隔等 |
| CronTrigger | 指定时间点的调度任务 | 通过定义 Cron表达式 |
CronTrigger允许用户更精准地控制任务的运行日期和时间,而不仅仅是定义工作的频度
CronTrigger通过Cron表达式定义准确的运行时间点。
创建CronTrigger的语法如下:
CronTrigger cronTrig = new CronTrigger(“触发器名”, “组名”, “Cron表达式”);
要使用CronTrigger,必须掌握Cron表达式
Cron表达式由6~7个由空格分隔的时间元素组成。第7个元素可选
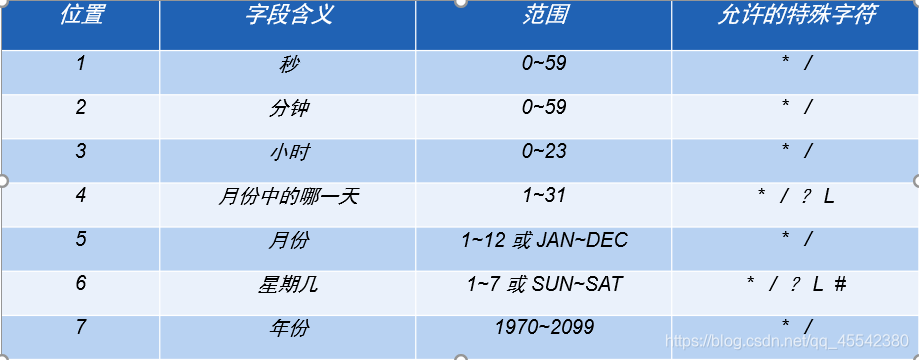
Cron表达式的每个字段,都可以显式地规定一个值
(如49)、一个范围(如1-6)、一个列表(如1,3,5)或者一个通配符(如)*
Cron表达式有几个特殊的字符,说明如下
| 符号 | 作用 |
|---|---|
| - | 中划线,表示一个范围 |
| , | 使用逗号间隔的数据,表示一个列表 |
| * | 表示每一个值,它可以用于所有字段。例如:在小时字段表示每小时 |
| ? | 该字符仅用于“月份中的哪一天”字段和“星期几”字段,表示不指定值 |
| / | 通常表示为x/y,x为起始值,y表示值的增量。 |
| L | 表示最后一天,仅在日期和星期字段中使用 |
| # | 只能用于“星期几”字段,表示这个月的第几个周几。例如:“6#3”指这个月第三个周五 |
常用表达式:
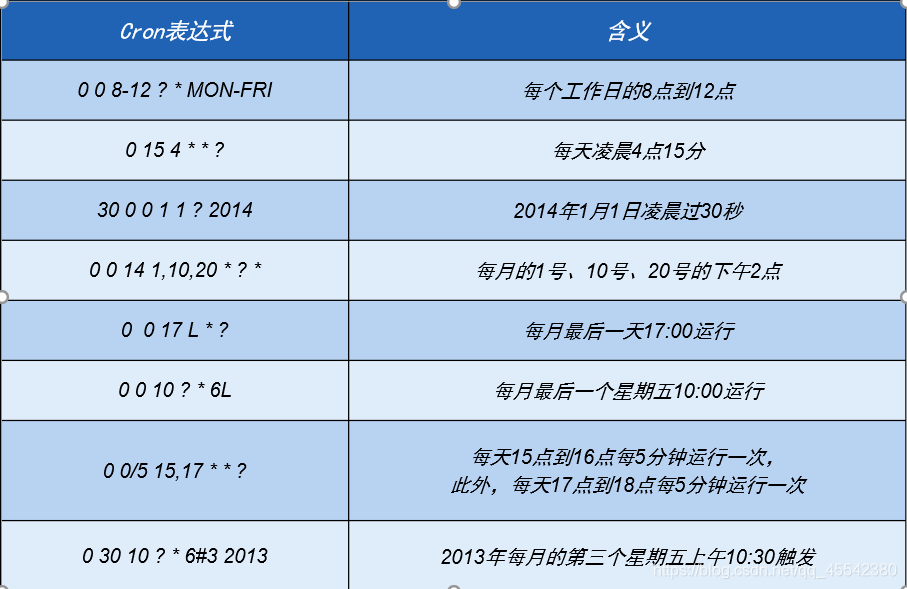
Quartz 使用Crom表达式 实现:
RunTask .Java
public class RunTask {

	public void run() throws Exception {
		//通过JobDetail创建一个任务实例 		任务名	任务开发组	执行的任务类;
		JobDetail jobDetail = new JobDetail("myJob", "myGroup", PlanJob.class);
		JobDataMap jobDataMap = jobDetail.getJobDataMap();
		jobDataMap.put("username", "张帆");


		//新触发器
		//使用cron表达式指定执行时间			调用器名		开发组		指定执行时间(cron:每天16时16分20秒执行..)
		CronTrigger trigger =new CronTrigger("myTrigger","myGroup","20 16 16 * * ?");


		//创建一个调度器工厂
		SchedulerFactory schedulerFactory = new StdSchedulerFactory();
		Scheduler scheduler = schedulerFactory.getScheduler();	//工厂创建一个调度器;
		scheduler.scheduleJob(jobDetail, trigger);				//将:任务 和 触发器结合在一起;

		//调度器启动...触发任务
		scheduler.start();
		//注释...不然主线程关闭..
		//Thread.sleep(10000);		//主线程休眠1000毫秒,触发任务,是多线程执行,即使主线程休眠程序依旧会执行...
		//scheduler.shutdown();		//主线程启动,调度器关闭...(调度器不是多线程所以,触发任务被关闭程序结束...)
	}
}
Spring整合集成 Quartz
Spring对Quartz提供了支持
对Quartz的核心类进行了封装,使开发人员更便捷地实现任务调度
使用声明的方式配置计划任务,大大简化了操作步骤,而且也降低了代码耦合
在Spring中使用Quartz
-
通过扩展QuartzJobBean来创建Quartz任务
需要实现它的executeInternal()方法 -
通过配置JobDetailBean创建一个任务实例,并注入任务数据
-
通过配置SimpleTriggerBean创建触发器规则
通过配置SCronTriggerBean创建触发器 cron 规则 -
配置SchedulerFactoryBean注册任务和触发器
-
通过启动Spring容器启动任务调度
创建一个Spring-web项目

别忘了引入Spring的依赖…
com.wsm.entity 同上
com.wsm.service 同上
com.wsm.task
PlanTask.java
/*
任务类 extends QuartzJobBean 重写方法
	executeInternal()	用来定义要执行的计划任务,并且通过该基类能够以属性的方式注入任务数据
 */
public class PlanTask extends QuartzJobBean {
	//获取业务逻辑对象
	private PlanService planService;
	/**
     * 要定时执行的内容
     */
	@Override
	protected void executeInternal(JobExecutionContext context)
			throws JobExecutionException {
		JobDataMap map = context.getJobDetail().getJobDataMap();
		planService.showPlan(map.getString("username"));
	}
	//业务逻辑的Set方便Spring注入!!
	public void setPlanService(PlanService planService) {
		this.planService = planService;
	}
}
com.wsm.test
Test.java
public class Test {
	public static void main(String[] args) {
		ApplicationContext ac = new ClassPathXmlApplicationContext("applicationContext.xml");
	}
}
关键的Spring配置 applicationContext.xml
applicationContext.xml
<?xml version="1.0" encoding="UTF-8"?>
<beans xmlns="http://www.springframework.org/schema/beans"
	xmlns:xsi="http://www.w3.org/2001/XMLSchema-instance"
	xmlns:p="http://www.springframework.org/schema/p"
	xmlns:context="http://www.springframework.org/schema/context"
	xsi:schemaLocation="http://www.springframework.org/schema/beans http://www.springframework.org/schema/beans/spring-beans-3.1.xsd
		http://www.springframework.org/schema/context http://www.springframework.org/schema/context/spring-context-3.1.xsd">


	<!-- Spring关闭Service -->
	<bean id="planService" class="com.wsm.service.PlanService"></bean>

	<!-- 配置job任务 -->
	<bean id="jobDetailBean" class="org.springframework.scheduling.quartz.JobDetailBean">
		<property name="jobClass" value="com.wsm.task.PlanTask" />
		<property name="jobDataAsMap">
			<map>
				<entry key="username" value="张三丰"></entry>
				<entry key="planService" value-ref="planService"></entry>
			</map>
		</property>
	</bean>

	<!-- 配置触发器 -->
	<!-- 间隔~ -->
<!--  	<bean id="tiggerBean" class="org.springframework.scheduling.quartz.SimpleTriggerBean">
		<property name="jobDetail" ref="jobDetailBean" />
		<property name="repeatInterval" value="3000" />
	</bean>  -->
	<!-- cron表达式~ -->
	<bean id="tiggerBean" class="org.springframework.scheduling.quartz.CronTriggerBean">
		<property name="jobDetail" ref="jobDetailBean"></property>
		<property name="cronExpression" value="10 30 16 * * ?"></property>
	</bean>

	<!-- 配置调度器工厂: -->
	<!-- 触发器——注入了——任务-->		<!-- 所以调度器只需要——注入——触发器即可.. -->
	<bean class="org.springframework.scheduling.quartz.SchedulerFactoryBean">
		<property name="triggers">
			<ref bean="tiggerBean" />	<!-- 注入触发器 -->
		</property>
	</bean>
</beans>
总结:
- 使用Quartz框架实现任务调度的核心是创建任务(Job)、触发器(Trigger)和调度器(Scheduler)。
- Quartz的两种常用触发器:SimpleTrigger和CronTrigger。
- Spring对Quartz的核心组件进行封装,
包括JobDetailBean、SimpleTriggerBean、CronTriggerBean、SchedulerFactoryBean,
使用可以更高效地实现任务调度。 - 通过MethodInvokingJobDetailFactoryBean,允许直接由类方法配置成工作任务
SpringBoot 整合集成 Quartz
- 本篇主要介绍Scheduled来进行定时完成一些操作
- SpringBoot中也已经集成了Quartz
使用:

依赖:
- Boot中已经集成了Quartz,所以,依赖加不加已经无所谓了…
<!--定时任务quartz-->
<dependency>
	<groupId>org.springframework.boot</groupId>
	<artifactId>spring-boot-starter-quartz</artifactId>
</dependency>
任务类 注解:
QuartzWSM.Java
import org.springframework.scheduling.annotation.Scheduled;		//org.springframework 下....
import org.springframework.stereotype.Component;

//Boot 注解,主程序扫描注解,将类加入Spring容器中去!
@Component
public class QuartzWSM {
    //Quartz 注解,指定cron表达式!声明在方法上...
    @Scheduled(cron = "0/30 * * * * ?")
    public void loadGoodsPushRedis(){
        //任务类要执行的代码!   30秒执行一次!
        System.out.println("cron表达式成立,除非执行部分...");
    }
}
以上表示该方法会30秒执行一次
主程序启动注解:
QuartzSpringBoot.Java
import org.springframework.boot.SpringApplication;
import org.springframework.boot.autoconfigure.SpringBootApplication;
import org.springframework.scheduling.annotation.EnableScheduling;

@EnableScheduling            //开启定时器配置!Boot的底层自动配置原理!
@SpringBootApplication
public class QuartzSpringBoot {
    public static void main(String[] args) {
        SpringApplication.run(QuartzSpringBoot.class, args);
    }
}

时间工具类:
- 可以用于很多基础时间的应用… 内部提供了大量的方法…如:
- 获取时间段 获取当然日期的时间段…
- 一个小小的工具类…不用在这么多…了解知道即可!
DateUtil.Java
import java.text.DateFormat;
import java.text.ParseException;
import java.text.SimpleDateFormat;
import java.util.ArrayList;
import java.util.Calendar;
import java.util.Date;
import java.util.List;
/**
 * 处理日期类型变量的工具类
 * @author donghai
 * @version v1.0
 * @since 2017/04/20
 */
public class DateUtil {
    /**
     * 获取两个日期之间的日期
     * @param start 开始日期
     * @param end 结束日期
     * @return 日期字符串格式的集合
     */
    public static List<Date> getBetweenDates(Date start, Date end) {
        List<Date> result = new ArrayList<Date>();
        Calendar tempStart = Calendar.getInstance();
        tempStart.setTime(start);

        Calendar tempEnd = Calendar.getInstance();
        tempEnd.setTime(end);
        while (tempStart.before(tempEnd) || tempStart.equals(tempEnd)) {
            result.add(tempStart.getTime());
            tempStart.add(Calendar.DAY_OF_YEAR, 1);
        }
        return result;
    }

    /**
     * 根据日期字符串返回日期
     * @param source
     * @param format
     * @return
     * @throws ParseException
     */
    public static final Date parse(String source,String format) throws ParseException {
        DateFormat df = new SimpleDateFormat(format);
        return df.parse(source);
    }

    /**
     * 根据日期获取格式化的日期字符串
     * @param date
     * @param format
     * @return
     * @throws ParseException
     */
    public static final String format(Date date,String format) throws ParseException {
        DateFormat df = new SimpleDateFormat(format);
        return df.format(date);
    }
    //时间格式
    public static final String PATTERN_YYYYMMDDHH = "yyyyMMddHH";
    public static final String PATTERN_YYYY_MM_DDHHMM = "yyyy-MM-dd HH:mm";

    /***
     * 从yyyy-MM-dd HH:mm格式转成yyyyMMddHH格式
     * @param dateStr
     * @return
     */
    public static String formatStr(String dateStr,String opattern,String npattern){
        SimpleDateFormat simpleDateFormat = new SimpleDateFormat(opattern);
        try {
            Date date = simpleDateFormat.parse(dateStr);
            simpleDateFormat = new SimpleDateFormat(npattern);
            return simpleDateFormat.format(date);
        } catch (ParseException e) {
            e.printStackTrace();
        }
        return null;
    }

    /***
     * 获取指定日期的凌晨
     * @return
     */
    public static Date toDayStartHour(Date date){
        Calendar calendar = Calendar.getInstance();
        calendar.setTime(date);
        calendar.set(Calendar.HOUR_OF_DAY, 0);
        calendar.set(Calendar.MINUTE, 0);
        calendar.set(Calendar.SECOND, 0);
        calendar.set(Calendar.MILLISECOND, 0);
        Date start = calendar.getTime();
        return start;
    }


    /***
     * 时间增加N分钟
     * @param date
     * @param minutes
     * @return
     */
    public static Date addDateMinutes(Date date,int minutes){
        Calendar calendar = Calendar.getInstance();
        calendar.setTime(date);
        calendar.add(Calendar.MINUTE, minutes);// 24小时制
        date = calendar.getTime();
        return date;
    }

    /***
     * 时间递增N小时
     * @param hour
     * @return
     */
    public static Date addDateHour(Date date,int hour){
        Calendar calendar = Calendar.getInstance();
        calendar.setTime(date);
        calendar.add(Calendar.HOUR, hour);// 24小时制
        date = calendar.getTime();
        return date;
    }

    /***
     * 获取时间菜单
     * @return
     */
    public static List<Date> getDateMenus(){
        //定义一个List<Date>集合,存储所有时间段
        List<Date> dates = getDates(12);
        //判断当前时间属于哪个时间范围
        Date now = new Date();
        for (Date cdate : dates) {
            //开始时间<=当前时间<开始时间+2小时
            if(cdate.getTime()<=now.getTime() && now.getTime()<addDateHour(cdate,2).getTime()){
                now = cdate;
                break;
            }
        }

        //当前需要显示的时间菜单,并循环每次+2
        List<Date> dateMenus = new ArrayList<Date>();
        for (int i = 0; i <5 ; i++) {
            dateMenus.add(addDateHour(now,i*2));
        }
        System.out.println(dateMenus);
        return dateMenus;
    }

    /***
     * 指定时间往后N个时间间隔
     * @param hours
     * @return
     */
    public static List<Date> getDates(int hours) {
        List<Date> dates = new ArrayList<Date>();
        //循环12次
        Date date = toDayStartHour(new Date()); //凌晨
        for (int i = 0; i <hours ; i++) {
            //每次递增2小时,将每次递增的时间存入到List<Date>集合中
            dates.add(addDateHour(date,i*2));
        }
        return dates;
    }

    /***
     * 时间转成yyyyMMddHH
     * @param date
     * @param pattern
     * @return
     */
    public static String data2str(Date date, String pattern){
        SimpleDateFormat simpleDateFormat = new SimpleDateFormat(pattern);
        return simpleDateFormat.format(date);
    }
}
Java 读写Excel
这个操作对于传统项目来说是常见的操作!!建议了解学习
本人这里这是给案例, 深入还需自己了解…
JXL操作Excel
jxl是一个韩国人写的java操作excel的工具
在开源世界中,有两套比较有影响的API可 供使用一个是POI,一个是jExcelAPI
- 其中功能相对POI比较弱一点。但jExcelAPI对中文支持非常好,
- API是纯Java的, 并不 依赖Windows系统,即使运行在Linux下,它同样能够正确的处理Excel文件。
- 另外需要说明的是,这套API对图形和图表的支持很有限,而且 仅仅识别PNG格式。
搭建环境 可参考
jxl.jar,放入项目classpath,安装就完成了。 资源私
基本操作
为了方便操作这里定一个pojo 实体类, 模拟Excel里的数据. 方便读写
要指定Java可是面向对象的, 万物皆可对象!!
把Exce里的每一行数据, 当作一个Java对象Student 学员管理系统
Student.java
public class Student {
	private int id;
	private String name;
	private int age;
	private String address;

	public Student() {
		super();
	}
	public Student(int id, String name, int age, String address) {
		super();
		this.id = id;
		this.name = name;
		this.age = age;
		this.address = address;
	}

	public int getId() {
		return id;
	}

	public void setId(int id) {
		this.id = id;
	}

	public String getName() {
		return name;
	}

	public void setName(String name) {
		this.name = name;
	}

	public int getAge() {
		return age;
	}

	public void setAge(int age) {
		this.age = age;
	}

	public String getAddress() {
		return address;
	}

	public void setAddress(String address) {
		this.address = address;
	}
}
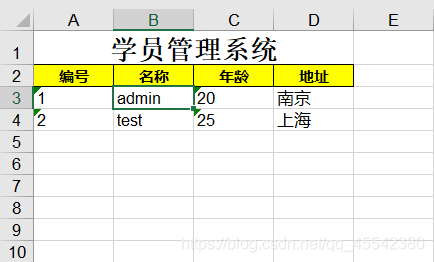
写文件Excel 学员管理系统
Writer.java
import java.io.File;
import java.util.ArrayList;
import java.util.List;

import jxl.Workbook;
import jxl.format.Alignment;
import jxl.format.Border;
import jxl.format.BorderLineStyle;
import jxl.format.Colour;
import jxl.write.Label;
import jxl.write.WritableCellFormat;
import jxl.write.WritableFont;
import jxl.write.WritableSheet;
import jxl.write.WritableWorkbook;

public class Writer {
	public static void main(String[] args) throws Exception {
		//自定义Student集合写入Excel
		List<Student> list = new ArrayList<Student>();
		list.add(new Student(1, "admin", 20, "南京"));
		list.add(new Student(2, "test", 25, "上海"));

		//打开文件,前提文件存在!!
		//也可以直接用Java 在指定盘符创建一个Excel文件!!这里就不搞了!!
		WritableWorkbook book = Workbook.createWorkbook(new File("D://test.xls"));
		//  生成名为“第一页”的工作表,参数0表示这是第一页
		WritableSheet sheet = book.createSheet(" 第一页 ", 0);

		//数据字串格式化						   字体为TIMES宋体,字号16,加粗显示
		WritableFont font1 = new WritableFont(WritableFont.TIMES, 16,WritableFont.BOLD);
		//WritableCellFormat类,这个类非常重要,通过它可以指定单元格的各种属性,后面的单元格格式化中会有更多描述。
		WritableCellFormat format1 = new WritableCellFormat(font1);
		// 把水平对齐方式指定为居中
		format1.setAlignment(jxl.format.Alignment.CENTRE);
		//合并第一列第一行到第4列第一行的所有单元格
		//行列下标从 0 开始这里四个参数为
		//起始列,起始行,结束列,结束行		的合并操作;
		sheet.mergeCells(0, 0, 3, 0);
		//在第一列第一行, 数据为 "学员管理系统" 采用format1格式... 	(这里的0列0行已将是四个单元的合并了...)
		sheet.addCell(new Label(0, 0, "学员管理系统", format1));		//标题

		//内容数据↓↓↓
		//字体Arial 9号字体 加粗
		WritableFont font2 =new WritableFont(WritableFont.ARIAL, 9, WritableFont.BOLD, false);;
		WritableCellFormat titleFormat = new WritableCellFormat (font2);
		//单元格黄色 田字边框 垂直居中对齐
		titleFormat.setBackground(Colour.YELLOW);
		titleFormat.setBorder(Border.ALL, BorderLineStyle.THIN);
		titleFormat.setAlignment(Alignment.CENTRE);

		//加入列数据!!
		sheet.addCell(new Label(0, 1, "编号" ,titleFormat));
		sheet.addCell(new Label(1, 1, "名称",titleFormat));
		sheet.addCell(new Label(2, 1, "年龄",titleFormat));
		sheet.addCell(new Label(3, 1, "地址",titleFormat));

		//循环遍历集合生产内容...
		for (int i = 0 ,row=2; i < list.size(); i++,row++) {
			Student s = (Student)list.get(i);
			sheet.addCell(new Label(0, row,s.getId()+"" ));
			sheet.addCell(new Label(1, row,s.getName()+"" ));
			sheet.addCell(new Label(2, row,s.getAge()+"" ));
			sheet.addCell(new Label(3, row,s.getAddress()+"" ));
		}
		book.write();
		book.close();

	}
}
最后结果:
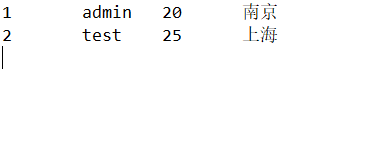
读取Excel文件
如果读一个excel,需要知道它有多少行和多少列,如下操作
Reader.java
import jxl.Cell;
import jxl.Sheet;
import jxl.Workbook;
public class Reader {
	public static void main(String[] args) throws Exception{
		//打开文件,前提文件存在!!
		Workbook book = Workbook.getWorkbook( new File( "D://test.xls" ));
		//获得第一个工作表对象, 一个Excelz中存在多个
		Sheet sheet = book.getSheet(0);
		//得到行数
		int rows = sheet.getRows();
		//int columnum = sheet.getColumns(); 得到列数

		//双层循环遍历!
		for (int i = 2; i < rows; i++) {				//因为行,列   下标0开始:而我们要从第三行读数据!!
			//获取第 i 行数据,返回cell [] 单元格数组;
			Cell [] cells = sheet.getRow(i);
			for (int j = 0; j < cells.length; j++) {	//遍历单元格数组!!
				Cell c = cells[j];						//获取每一个单元格;
				System.out.print(c.getContents()+"\t");	//输出单元格数据!
			}
			System.out.println();						//一行结束换行输出!
		}
	}
}
ExcelAPI还有其他的一些功能,比如插入图片等,这里就不再一一介绍,读者可以自己探索
加油!! 奥利给!


 1050
1050


 被折叠的 条评论
为什么被折叠?
被折叠的 条评论
为什么被折叠?
 到【灌水乐园】发言


