


1、RestFul风格
要求 : 我们需要使用 Restful风格实现我们的crud操作!
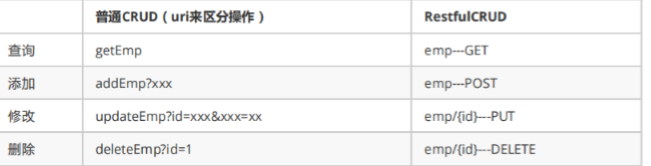
看看一些具体的要求,就是我们小实验的架构;

2、员工列表页面跳转
我们在主页点击Customers,就显示列表页面;我们去修改下
1、将首页的侧边栏Customers改为员工管理
2、a链接添加请求
 <li class="nav-item">
                <a th:href="@{/emps}"
                   th:class="${activeUrl=='list.html'?'nav-link active':'nav-link'}">
                    <svg xmlns="http://www.w3.org/2000/svg" width="24" height="24" viewBox="0 0 24 24" fill="none" stroke="currentColor" stroke-width="2" stroke-linecap="round" stroke-linejoin="round" class="feather feather-users">
                        <path d="M17 21v-2a4 4 0 0 0-4-4H5a4 4 0 0 0-4 4v2"></path>
                        <circle cx="9" cy="7" r="4"></circle>
                        <path d="M23 21v-2a4 4 0 0 0-3-3.87"></path>
                        <path d="M16 3.13a4 4 0 0 1 0 7.75"></path>
                    </svg>
                    员工管理
                </a>
            </li>
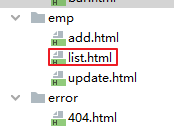
3、将list放在emp文件夹下
4、编写处理请求的controller
package com.loey.controller;

import com.loey.model.Department;
import com.loey.model.Employee;
import com.loey.service.DepartmentService;
import com.loey.service.EmployeeService;
import org.springframework.beans.factory.annotation.Autowired;
import org.springframework.stereotype.Controller;
import org.springframework.ui.Model;
import org.springframework.web.bind.annotation.GetMapping;
import org.springframework.web.bind.annotation.PathVariable;
import org.springframework.web.bind.annotation.PostMapping;

import java.util.List;

@Controller
public class EmployeeController {

    @Autowired
    private EmployeeService employeeService;

    @Autowired
    private DepartmentService departmentService;

     //查询所有员工,返回list页面
    @GetMapping("/emps")
    public String list(Model model){
        Collection<Employee> employees = employeeService.selectAllEmployees();
        model.addAttribute("emps",employees);
        // ThymeleafProperties文件下
        //  前缀:public static final String DEFAULT_PREFIX = "classpath:/templates/";
        //后缀public static final String DEFAULT_SUFFIX = ".html";
        return "emp/list";
    }
}
跳转成功

侧边栏和顶部都相同,我们是不是应该将它抽取出来呢?
3、Thymeleaf 公共页面元素抽取
步骤:
1、抽取公共片段 th:fragment 定义模板名
2、引入公共片段 th:insert 插入模板名
实现:
1、我们来抽取一下,使用list列表做演示!我们要抽取头部nav标签,我们在dashboard中将nav部分定 义一个模板名
<!--顶部相同部分-->
<!-- 定义th:fragment="topbar" -->
<nav th:fragment="topbar" class="navbar navbar-dark sticky-top bg-dark flex-md-nowrap p-0">
    <!--后台主页显示登录用户的信息-->
    <a class="navbar-brand col-sm-3 col-md-2 mr-0"
       href="http://getbootstrap.com/docs/4.0/examples/dashboard/#">
        [[${session.loginUser}]]</a>
    <input class="form-control form-control-dark w-100" type="text"
           placeholder="Search" aria-label="Search">
    <ul class="navbar-nav px-3">
        <li class="nav-item text-nowrap">
            <a class="nav-link" th:href="@{/user/logout}">注销</a>
        </li>
    </ul>
</nav>
2、然后我们在list页面中去引入,可以删掉原来的nav
<!--引入抽取的topbar-->
	<!--模板名 : 会使用thymeleaf的前后缀配置规则进行解析 使用~{模板::标签名}-->
		<div th:insert="~{commons/bar::topbar}"></div>
3、启动再次测试,可以看到已经成功加载过来了!
说明:
除了使用insert插入,还可以使用replace替换,或者include包含,三种方式会有一些小区别,可以见名 知义;
我们使用replace替换,可以解决div多余的问题,可以查看thymeleaf的文档学习
侧边栏也是同理,当做练手,可以也同步一下!
定义模板:
<nav th:fragment="sitebar" class="col-md-2 d-none d-md-block bg-light sidebar">
然后我们在list页面中去引入:
<div th:insert="~{commons/bar::sitebar(activeUrl='list.html')}"></div>
侧边栏激活的问题,它总是激活第一个;按理来说,这应该是动态的才对!
为了重用更清晰,我们建立一个commons文件夹,专门存放公共页面;
我们去页面中引入一下
<div th:replace="~{commons/bar::topbar}"></div>
<div th:replace="~{commons/bar::sitebar}"></div>
侧边栏激活问题:
1、将首页的超链接地址改到项目中
2、我们在a标签中加一个判断,使用class改变标签的值;
<li class="nav-item">
       <a th:href="@{/main.html}"
           th:class="${activeUrl=='main.html'?'nav-link active':'nav-link'}">
            首页 <span class="sr-only">(current)</span>
        </a>
</li>
<a th:href="@{/emps}"
	th:class="${activeUrl=='list.html'?'nav-link active':'nav-link'}">
  员工管理
</a>
3、修改l请求链接
<div th:replace="~{commons/bar::sitebar(activeUrl='main.html')}"></div>
<div th:replace="~{commons/bar::sitebar(activeUrl='emps')}"></div
4、我们刷新页面,去测试一下,OK,动态激活搞定!
4、员工信息页面展示
现在我们来遍历我们的员工信息!顺便美化一些页面,增加添加,修改,删除的按钮!
list.html
<!DOCTYPE html>
<!-- saved from url=(0052)http://getbootstrap.com/docs/4.0/examples/dashboard/ -->
<html lang="en" xmlns:th="http://www.thymeleaf.org">

	<head>
		<meta http-equiv="Content-Type" content="text/html; charset=UTF-8">
		<meta name="viewport" content="width=device-width, initial-scale=1, shrink-to-fit=no">
		<meta name="description" content="">
		<meta name="author" content="">

		<title>Dashboard Template for Bootstrap</title>
		<!-- Bootstrap core CSS -->
		<link th:href="@{/css/bootstrap.min.css}" rel="stylesheet">

		<!-- Custom styles for this template -->
		<link th:href="@{/css/dashboard.css}" rel="stylesheet">
		<style type="text/css">
			/* Chart.js */

			@-webkit-keyframes chartjs-render-animation {
				from {
					opacity: 0.99
				}
				to {
					opacity: 1
				}
			}

			@keyframes chartjs-render-animation {
				from {
					opacity: 0.99
				}
				to {
					opacity: 1
				}
			}

			.chartjs-render-monitor {
				-webkit-animation: chartjs-render-animation 0.001s;
				animation: chartjs-render-animation 0.001s;
			}
		</style>
	</head>
<!--	<script type="text/javascript">
		function deletemyEmp() {
			return confirm();
		}
	</script>-->

	<body>
	<!--引入抽取的topbar-->
	<!--模板名 : 会使用thymeleaf的前后缀配置规则进行解析 使用~{模板::标签名}-->
		<div th:insert="~{commons/bar::topbar}"></div>

		<div class="container-fluid">
			<div class="row">

			<div th:insert="~{commons/bar::sitebar(activeUrl='list.html')}"></div>

				<main role="main" class="col-md-9 ml-sm-auto col-lg-10 pt-3 px-4">
					<h2>
						员工信息
						<span style="float:right">
							<a class=" btn btn-sm btn-success" th:href="@{/addEmp}">添加员工</a>
						</span>
					</h2>

					<div class="table-responsive">
						<table class="table table-striped table-sm">
							<thead>
								<tr>
									<th>员工编号</th>
									<th>员工姓名</th>
									<th>职位</th>
									<th>上级编号</th>
									<th>入职时间</th>
									<th>月薪</th>
									<th>津贴</th>
									<th>所属部门</th>
									<th>操作</th>

								</tr>
							</thead>
							<tbody>
								<tr th:each="emp:${emps}">
<!--									以下两种方式均可-->
									<td>[[${emp.empno}]]</td>
									<td th:text="${emp.getEname()}"></td>
									<td th:text="${emp.getJob()}"></td>
									<td th:text="${emp.getMgr()==null?'无':emp.getMgr()}"></td>
<!--									使用时间格式化工具-->
									<td th:text="${#dates.format(emp.getHiredate(),
									'yyyy/MM/dd')}"></td>
									<td th:text="${emp.getSal()}"></td>
									<td th:text="${emp.getComm()==null?'无':emp.getComm()}"></td>
									<td th:text="${emp.getDepartment().getDname()}"></td>

									<td>
										<!--操作-->
										<a class=" btn btn-sm btn-primary" th:href="@{/updateEmp/} + ${emp.getEmpno()}">编辑</a>
										<a class=" btn btn-sm btn-danger" id="deleteEmp"
										   th:href="@{/deleteEmp/} + ${emp.getEmpno()}"
										>删除</a>
<!--										   th:οnclick="deletemyEmp()"-->

									</td>

								</tr>
							</tbody>
						</table>
					</div>
				</main>
			</div>
		</div>

		<!-- Bootstrap core JavaScript
    ================================================== -->
		<!-- Placed at the end of the document so the pages load faster -->
		<script type="text/javascript" src="js/jquery-3.2.1.slim.min.js"></script>
		<script type="text/javascript" src="js/popper.min.js"></script>
		<script type="text/javascript" src="js/bootstrap.min.js"></script>

		<!-- Icons -->
		<script type="text/javascript" src="js/feather.min.js"></script>
		<script>
			feather.replace()
		</script>

		<!-- Graphs -->
		<script type="text/javascript" src="js/Chart.min.js"></script>
		<script>
			var ctx = document.getElementById("myChart");
			var myChart = new Chart(ctx, {
				type: 'line',
				data: {
					labels: ["Sunday", "Monday", "Tuesday", "Wednesday", "Thursday", "Friday", "Saturday"],
					datasets: [{
						data: [15339, 21345, 18483, 24003, 23489, 24092, 12034],
						lineTension: 0,
						backgroundColor: 'transparent',
						borderColor: '#007bff',
						borderWidth: 4,
						pointBackgroundColor: '#007bff'
					}]
				},
				options: {
					scales: {
						yAxes: [{
							ticks: {
								beginAtZero: false
							}
						}]
					},
					legend: {
						display: false,
					}
				}
			});
		</script>

	</body>

</html>


 1898
1898


 被折叠的 条评论
为什么被折叠?
被折叠的 条评论
为什么被折叠?
 到【灌水乐园】发言


