


一、为什么会有这篇文章?
在前段时间写了一篇博客介绍了Vuex4,可以发现其中有一部分问题是需要解决却未解决的,而新的状态管理工具Pinia对其缺陷已经有了解决方案,并且更好用,更强大
抛弃Vuex:
- vuex4内部有一些小“毛病”,如:从vue3开始,getter不再像计算属性那样缓存
- vuex中同步需要用到mutation,异步需要用到Action。这对刚入行的人来说比较繁琐。而Pinia只有一个Action,既可以在其中使用同步,也可以使用异步。
- Vuex4有一些类型安全相关的问题,它不能完整的支持TypeScript。Pinia已经有了完整的TypeScript支持
- vuex的官网已经声明了Pinia已经成为了默认版本,可以把它称为vuex5
使用Pinia:
- 支持Vue Devtools(Vue调试工具)
- 跟踪动作,时间栈
- 在使用容器的组件中就可以观察刀容器本身
- 支持time travel 更容易的调试功能
PS:
- 在vue2中Pinia使用Vuex的现有接口,所以不能和vuex一起使用
- 针对Vue3中的调试工具支持还不够完美,比如还没有Time-travel
- Vue2和Vue3都支持
- 除了初始化安装和SSR配置之外,两者都是相同的
- 官方文档中主要争对Vue3进行说明,必要的时候会提供Vue2注释88
- 模块热更新
- 无需重新加载页面即可修改您的容器
- 热更新的时候保持任何现有状态
- 支持插件拓展
- 支持服务端渲染
Pinia在使用的角度上来看的话和Vuex几乎是一样的,但这里建议还是先去大概的了解一下Vuex,这边推荐可以看一下这篇文章:Vue拓展_深入浅出Vuex
二、Pinia安装及注册
1.安装
npm install pinia
yarn add pinia
2.注册及使用
我使用的是Vite创建的Vue3项目
其中还使用了Ant Design Vue框架和vite-plugin-vue-layouts插件(可以忽略,如果想了解的可以看一下这篇文章:Vue3插件推荐和介绍)
src/main.ts:
import { createApp } from 'vue'
import App from './App.vue'
import index from './router/index'
import Antd from 'ant-design-vue'
import {createPinia} from 'pinia'
import 'ant-design-vue/dist/antd.css';

const app = createApp(App)
// 创建Pinia实例
const pinia = createPinia()
app.use(index).use(pinia).use(Antd).mount('#app')
三、Pinia的核心概念
Pinia的核心概念有:State,Getters,Actions
1. State
描述:提供唯一的公共数据源(这里的State与Vuex中的State一致)
1.1 创建state
import { defineStore } from 'pinia'

// 1.定义导出容器
// 参数1:容器ID,未来Pinia会把所有的容器挂载到根容器
// 参数2:选项对象
export const useMainStore = defineStore('main', {
  // 用来储存全局状态
  // 1.必须是函数(为了在服务端渲染的时候避免交叉请求导致污染)
  // 2.必须是箭头函数(更方便TS的类型推导)
  state: () => {
    return {
      count: 100,
      sum: 200,
    }
  },
})
1.2 访问state
src/pages/index:
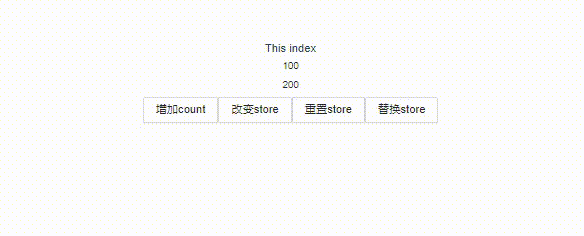
<template>
  <view>This index</view>
  <h5>{{ count }}</h5>
  <h5>{{ sum }}</h5>
  <a-button @click="addCount">增加count</a-button>
  <a-button @click="addCountDemo">改变store</a-button>
  <a-button @click="resetStore">重置store</a-button>
  <a-button @click="replaceStore">替换store</a-button>
</template>

<script setup>
import { useMainStore } from '../store'
import { storeToRefs } from 'pinia'

const mainStore = useMainStore()
// 官方提供的解构方案,不会丢失响应式
const { count, sum } = storeToRefs(mainStore)

// 1.添加修改count方法
const addCount = () => {
  mainStore.count++
}
// 2.改变状态的另一种方法
// 如果需要修改多个数据,建议使用$path批量更新
const addCountDemo = () => {
  // 2.1 返回一个对象
  mainStore.$patch({
    count: mainStore.count + 1,
    sum: 20,
  })

  // 2.2 返回函数
  // mainStore.$patch(state => {
  //   state.count++
  //   state.sum = 220
  // })
}

// 3.重置mainStore状态,使其回到初始值
const resetStore = () => {
  mainStore.$reset()
}

// 4.替换state
const replaceStore = () => {
  mainStore.$state = { count: 300, sum: 300 }
}
</script>
2.Getter
描述:完全等同于Store状态的计算值
2.1.创建Getter
接收state作为参数
src/store/index.ts:
  // 封装计算属性,有缓存功能
  getters: {
    //1.常规封装
    doubleCount(state) {
      return state.count * 2
    },
    doubleOneCount(state): number {
      // 可以通过this访问到整个store实例(在ts中需要定义返回类型)
      return this.count * 2 + 1
    },

    //2.getter组合
    doublePlusCount() {
    // 算术运算的左边必须为数字类型
      return Number(this.doubleOneCount)*2
    },

  },
2.2 使用Getter
src/pages/index.vue:
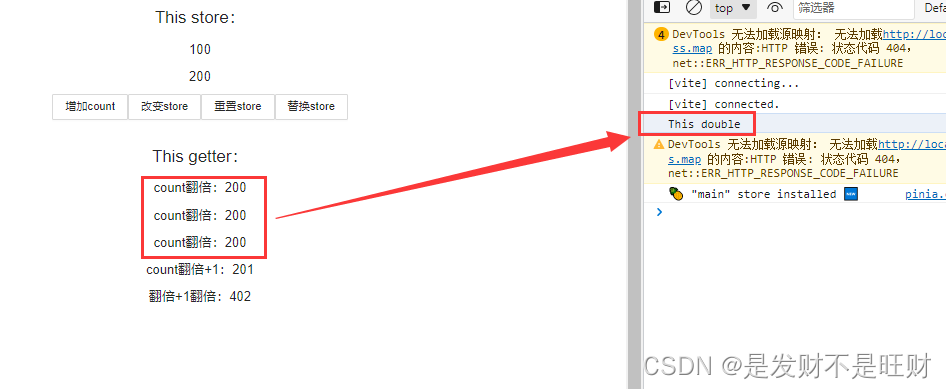
 <view class="getter">
    <h2>This getter:</h2>
    <h3>count翻倍:{{mainStore.doubleCount}}</h3>
    <h3>count翻倍+1:{{mainStore.doubleOneCount}}</h3>
    <h3>翻倍+1翻倍:111111111111111111111111111111111111111111111111111111111111111111111111111111111111111111111111111111111111111111111111111111111111111111111111111111111111111111111111111111111111111111111111{{mainStore.doublePlusCount}}</h3>
  </view>
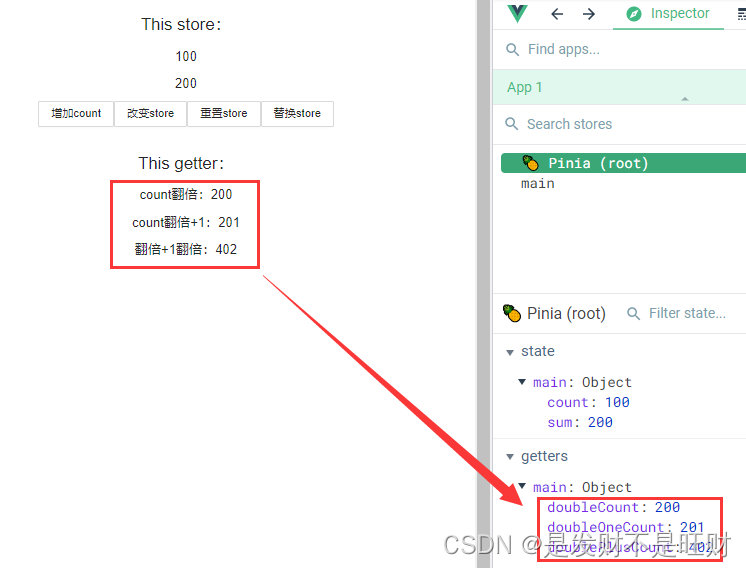
其值也会根据初始值的改变而变更
要注意的是:Getter就算多次使用也只会调用一次
3.Actions
描述:Actions相当于组件种的methods。
与getter不同的是:actions 可以是异步的,你可以在其中await任何API调用和其他操作。
3.1创建actions
src/store/index.ts
  // 封装业务逻辑,修改state
  actions: {
    // PS:不难使用箭头函数定义(this函数绑定外部this)
    changeState(number:number) {
      this.count = number
      this.count++
      this.sum = 121
    },
    // 异步任务
    changeStateDelay(){
      setTimeout(()=>{
        this.count++
        this.sum = 500
      },1000)
    }
  },
3.2 actions的使用
src/pages/index.vue
// Action
// 通常建议将修改store的方法写入到action种,这样便于维护
const actionChang = ()=>{
  mainStore.changeState(20)
}
const changeDelay = ()=>{
  mainStore.changeStateDelay()
}
四、购物车案例
src/api/shop.ts:
export interface TProduct {
  id: number
  title: String
  price: number
  inventory: number//库存
}

const _products: TProduct[] = [
  { id: 1, title: 'iPad 4', price: 4999, inventory: 122 },
  { id: 2, title: '小米平板', price: 2199, inventory: 200 },
  { id: 3, title: '联想小新平板', price: 1299, inventory: 152 },
]

// 获取商品列表
export const getProducts = async ()=>{
  await wait(100)
  return _products
}
// 购买商品
export const buyProducts = async()=>{
  await wait(100)
  return Math.random() >0.5
}
// 模拟异步执行
async function wait(delay:number){
  return new Promise((resolve => setTimeout(resolve,delay)))
}
购物车案例地址:https://gitee.com/TangShixing/basics/tree/master/Vue_Study/Vue_cart


 1429
1429


 被折叠的 条评论
为什么被折叠?
被折叠的 条评论
为什么被折叠?
 到【灌水乐园】发言


