


 本文详细介绍了Java8 Stream API的使用,包括forEach、map、filter、limit、sorted等方法,并展示了如何在商品服务中实现三级分类的增删改查功能。同时,讲解了如何处理前端的树形菜单展示、跨域问题以及利用Nacos进行服务注册。此外,还探讨了逻辑删除、拖拽排序和批量操作的实现,以及如何在数据库中进行相应的操作。
第4章 商品服务-三级分类
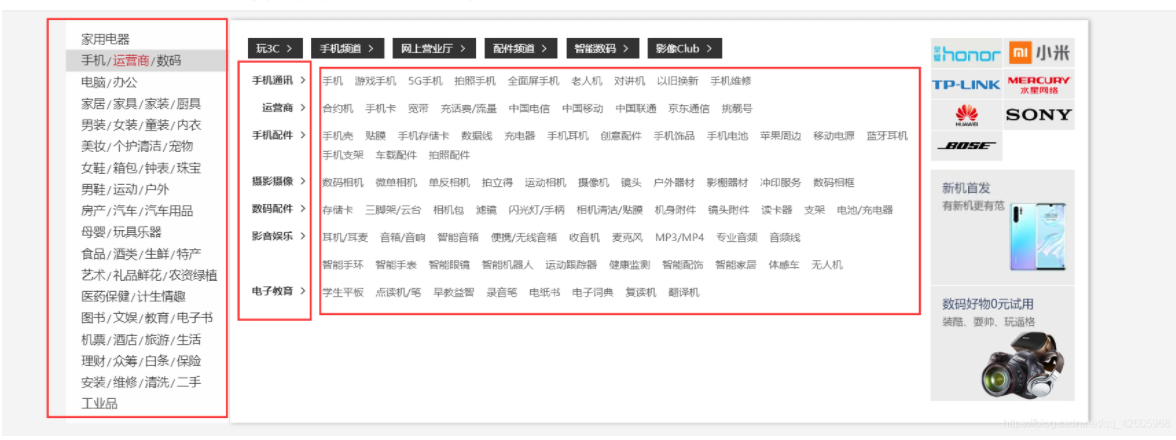
京东三级分类
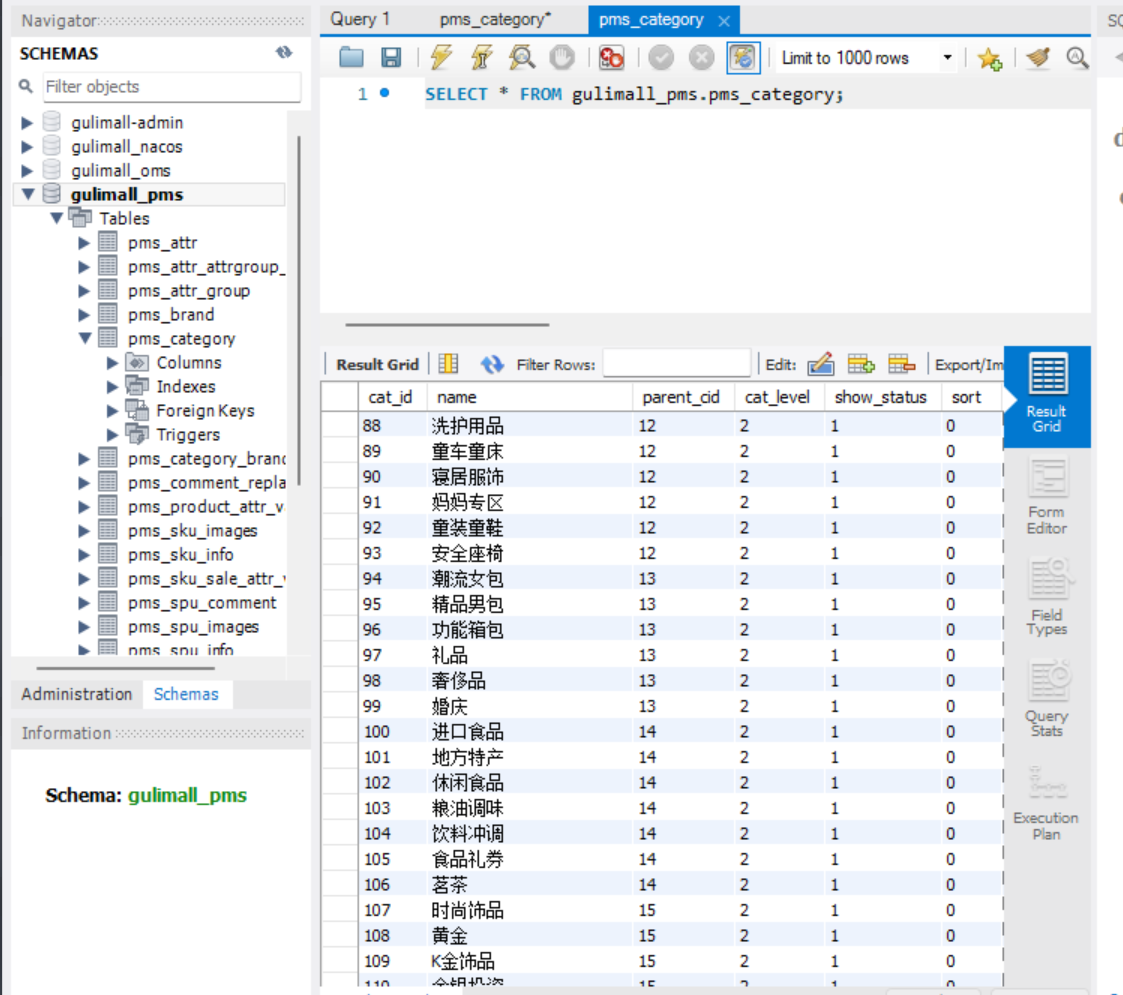
1. 数据库设计-- 三级分类
- SQL脚本
DROP TABLE IF EXISTS `pms_category`;

CREATE TABLE `pms_category` (
                                `cat_id` bigint(20) NOT NULL AUTO_INCREMENT COMMENT '分类id',
                                `name` char(50) DEFAULT NULL COMMENT '分类名称',
                                `parent_cid` bigint(20) DEFAULT NULL COMMENT '父分类id',
                                `cat_level` int(11) DEFAULT NULL COMMENT '层级',
                                `show_status` tinyint(4) DEFAULT NULL COMMENT '是否显示[0-不显示,1显示]',
                                `sort` int(11) DEFAULT NULL COMMENT '排序',
                                `icon` char(255) DEFAULT NULL COMMENT '图标地址',
                                `product_unit` char(50) DEFAULT NULL COMMENT '计量单位',
                                `product_count` int(11) DEFAULT NULL COMMENT '商品数量',
                                PRIMARY KEY (`cat_id`)
) ENGINE=InnoDB AUTO_INCREMENT=1433 DEFAULT CHARSET=utf8mb4 COMMENT='商品三级分类';
- 插入数据
2. 三级分类–增删改查
2.1 查询
2.1.1 后端查询
- controller
@RestController
@RequestMapping("product/category")
public class CategoryController {
    @Autowired
    private CategoryService categoryService;

    /**
     * 查出所有分类以及子分类列表,以树形结构组装
     */
    @RequestMapping("/list/tree")
   // @RequiresPermissions("product:category:list")
    public R list(){ // 不需要参数
        // 获取三级分类数据列表
        List<CategoryEntity> entityList =  categoryService.listWithTree();

        return R.ok().put("data", entityList);
    }
}
- Alt + Enter生成方法接口
public interface CategoryService extends IService<CategoryEntity> {

    PageUtils queryPage(Map<String, Object> params);

    List<CategoryEntity> listWithTree();
}
- Alt + Enter生成方法实现
package com.lif314.gulimall.product.service.impl;

@Service("categoryService")
public class CategoryServiceImpl extends ServiceImpl<CategoryDao, CategoryEntity> implements CategoryService {

    // 注入dao来查询数据库表 -- 也可以使用泛型
//    @Autowired
//    CategoryDao categoryDao;

    @Override
    public List<CategoryEntity> listWithTree() {
        // [1] 查出所有分类 -- 在dao中查询该表

        // 使用泛型 -- baseMapper即对应的dao
        List<CategoryEntity> categoryEntities = baseMapper.selectList(null);// 查询所有

        // [2] 组装成父子树形结构
        return categoryEntities;
    }

}
- 组装为父子属性结构
注意:longl类型的比较不要直接使用,要用到longValue()来比较
CategoryEntity中添加子分类属性
	/**
	 * 子分类
	 */
	@TableField(exist = false) // 数据表中不存在
	private List<CategoryEntity> children;
package com.lif314.gulimall.product.service.impl;

@Service("categoryService")
public class CategoryServiceImpl extends ServiceImpl<CategoryDao, CategoryEntity> implements CategoryService {

    // 注入dao来查询数据库表 -- 也可以使用泛型
//    @Autowired
//    CategoryDao categoryDao;

    @Override
    public List<CategoryEntity> listWithTree() {
        // [1] 查出所有分类 -- 在dao中查询该表

        // 使用泛型 -- baseMapper即对应的dao
        List<CategoryEntity> categoryEntities = baseMapper.selectList(null);//查询所有 没有查询条件null

        // [2] 组装成父子树形结构
        // 找到一级分类 -- 父分类id为0
        List<CategoryEntity> menuTree = categoryEntities.stream().filter( (categoryEntity) -> {
            // 过滤条件
            return categoryEntity.getCatId().longValue() == 0;
            // 一级分类收集为集合
        }).map((menu) -> {
            // 保存每一个菜单的子分类
            menu.setChildren(getChildrens(menu, categoryEntities));
            return menu;
        }).sorted((menu1, menu2) ->{
            // 菜单排序
            return (menu1.getSort() == null?0:menu1.getSort()) - (menu2.getSort() == null?0:menu2.getSort());
        }).collect(Collectors.toList());

        return menuTree;
    }

    /**
     * 递归查找所有菜单的子菜单
     * @param root 当前菜单
     * @param all 所有菜单
     * @return 子菜单
     */
    private List<CategoryEntity> getChildrens(CategoryEntity root, List<CategoryEntity> all) {

        List<CategoryEntity> children = all.stream().filter(categoryEntity -> {
            // 过滤 当菜单的父id等于root菜单的id则为root菜单的子菜单
            return categoryEntity.getParentCid().longValue() == root.getCatId().longValue();  // 注意此处应该用longValue()来比较,否则会出先bug,因为parentCid和catId是long类型
        }).map(categoryEntity -> {
            // 1 找到子菜单
            categoryEntity.setChildren(getChildrens(categoryEntity, all));
            return categoryEntity;
        }).sorted((menu1, menu2) -> {
            // 2 菜单的排序
            return (menu1.getSort() == null?0:menu1.getSort()) - (menu2.getSort() == null?0:menu2.getSort());
        }).collect(Collectors.toList());
        return children;
    }

}
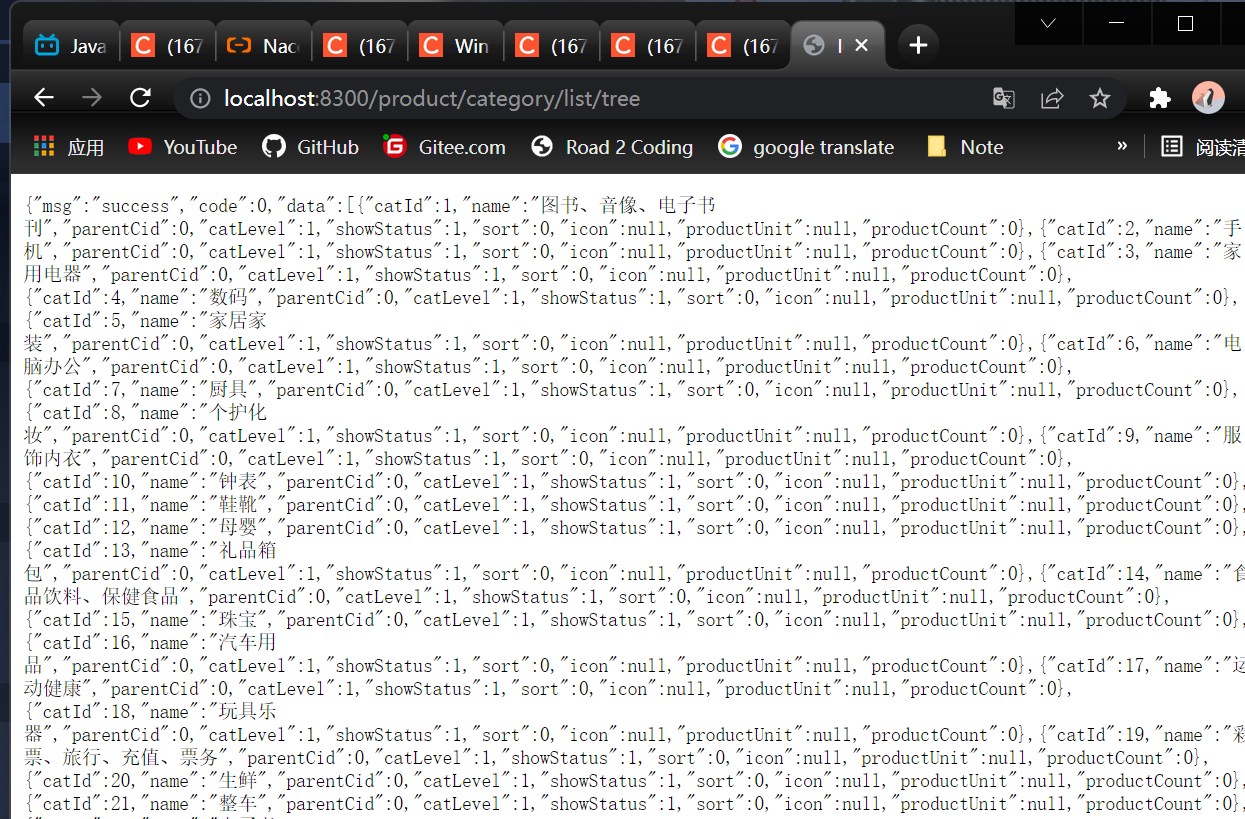
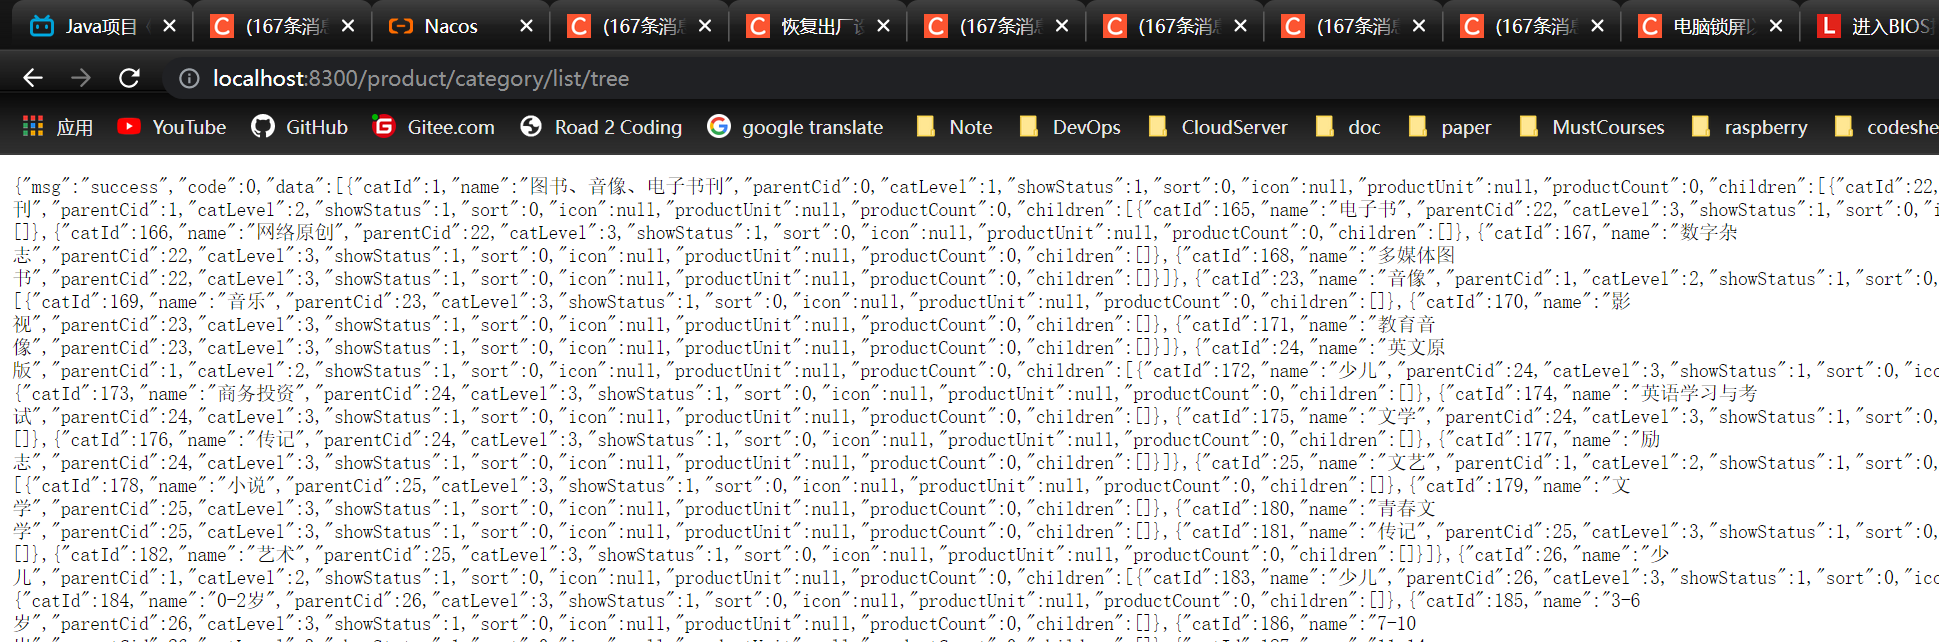
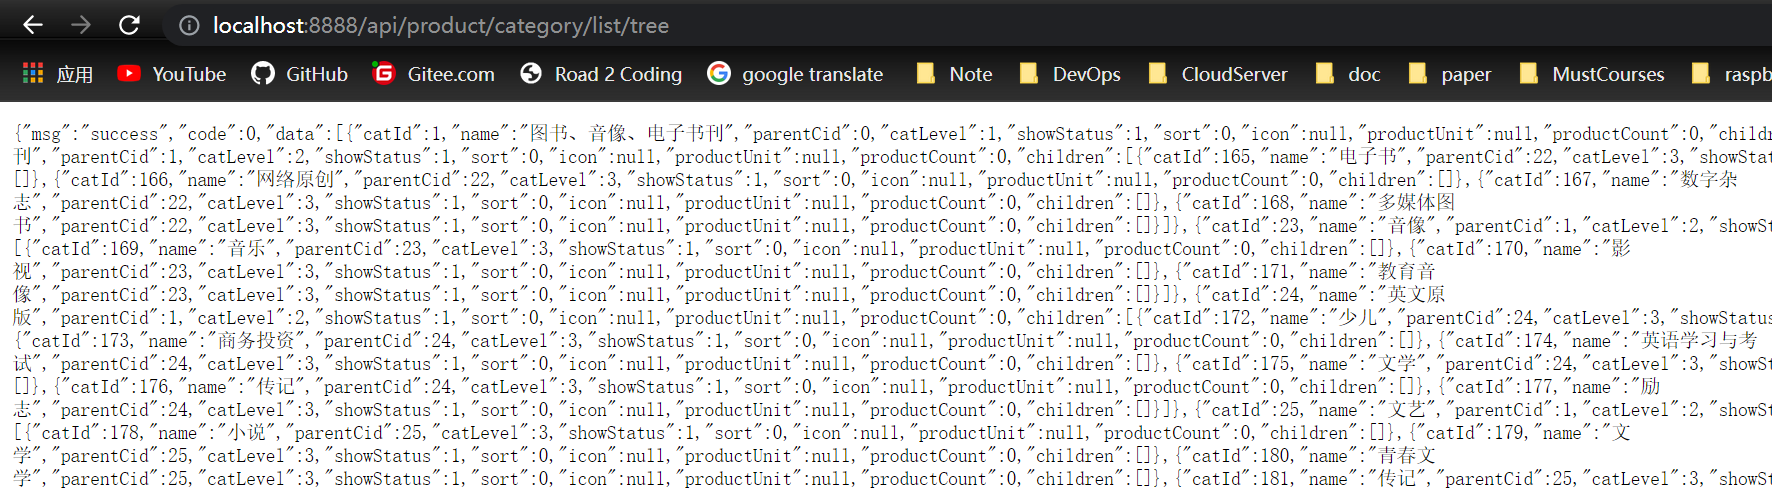
- 测试 http://localhost:8300/product/category/list/tree
2.1.2 前后端联调
- 启动前后端项目,添加商品管理系统
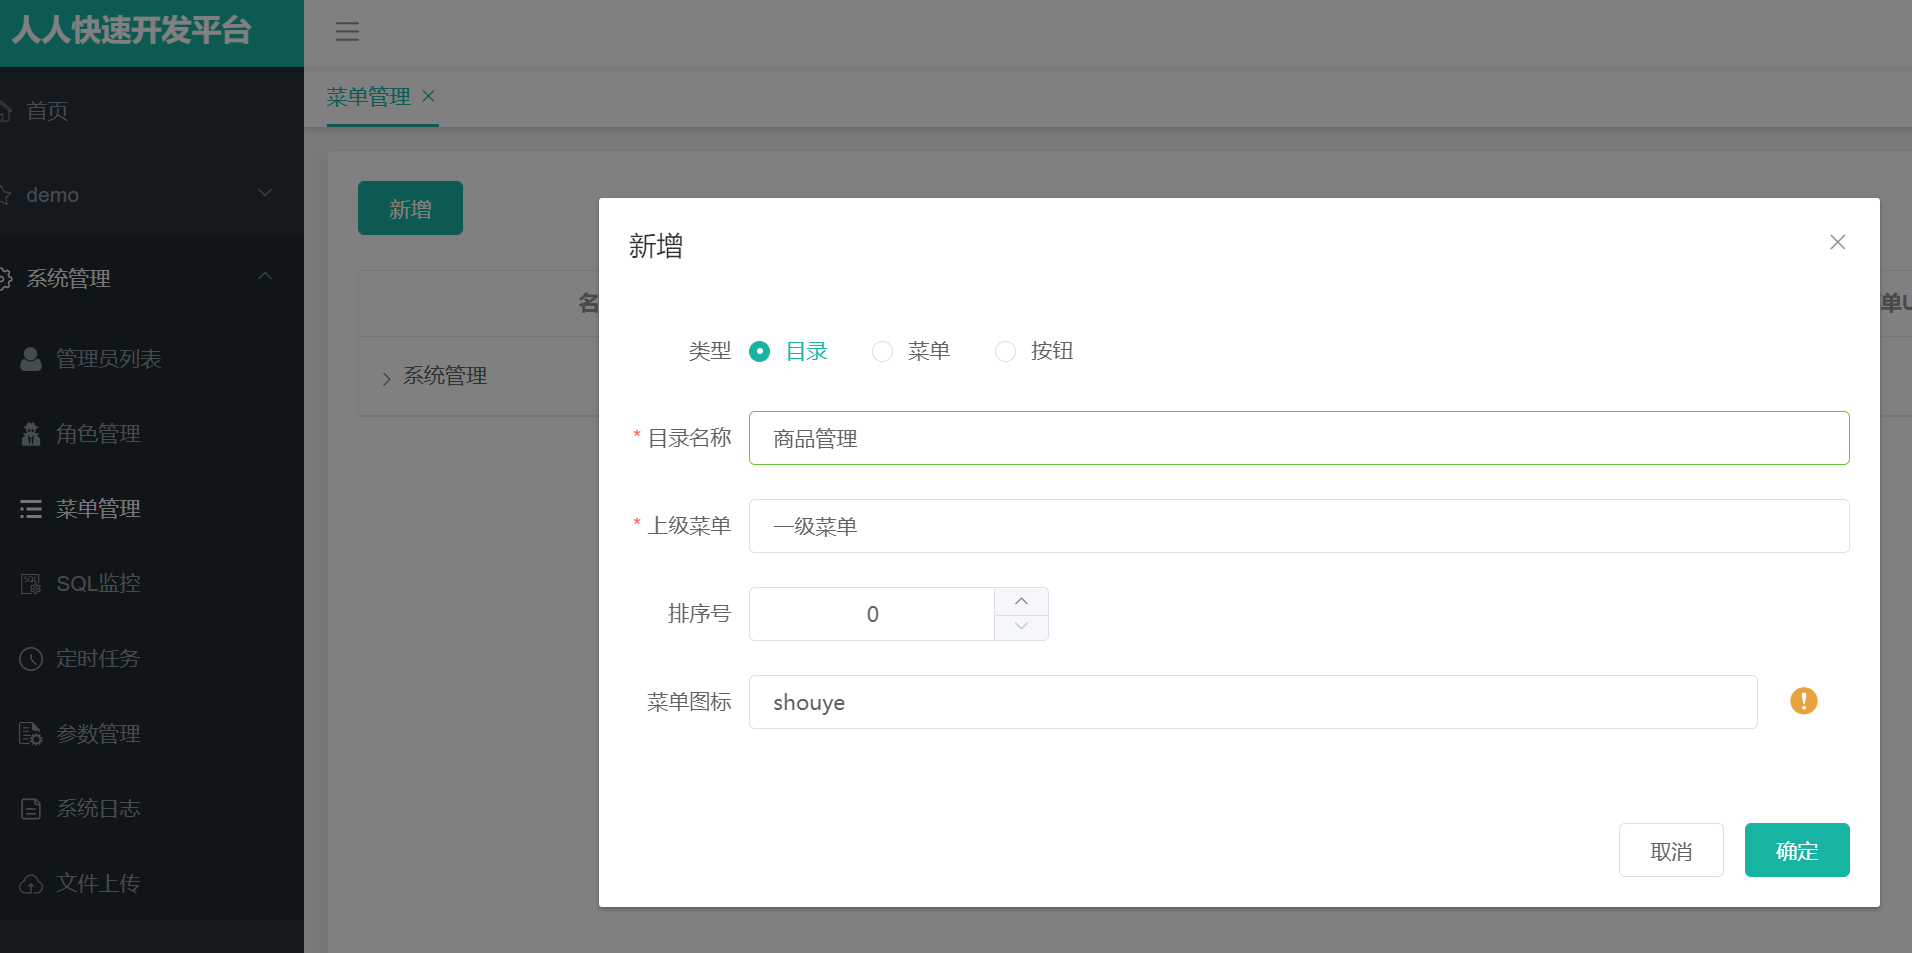
- 商品系统添加菜单
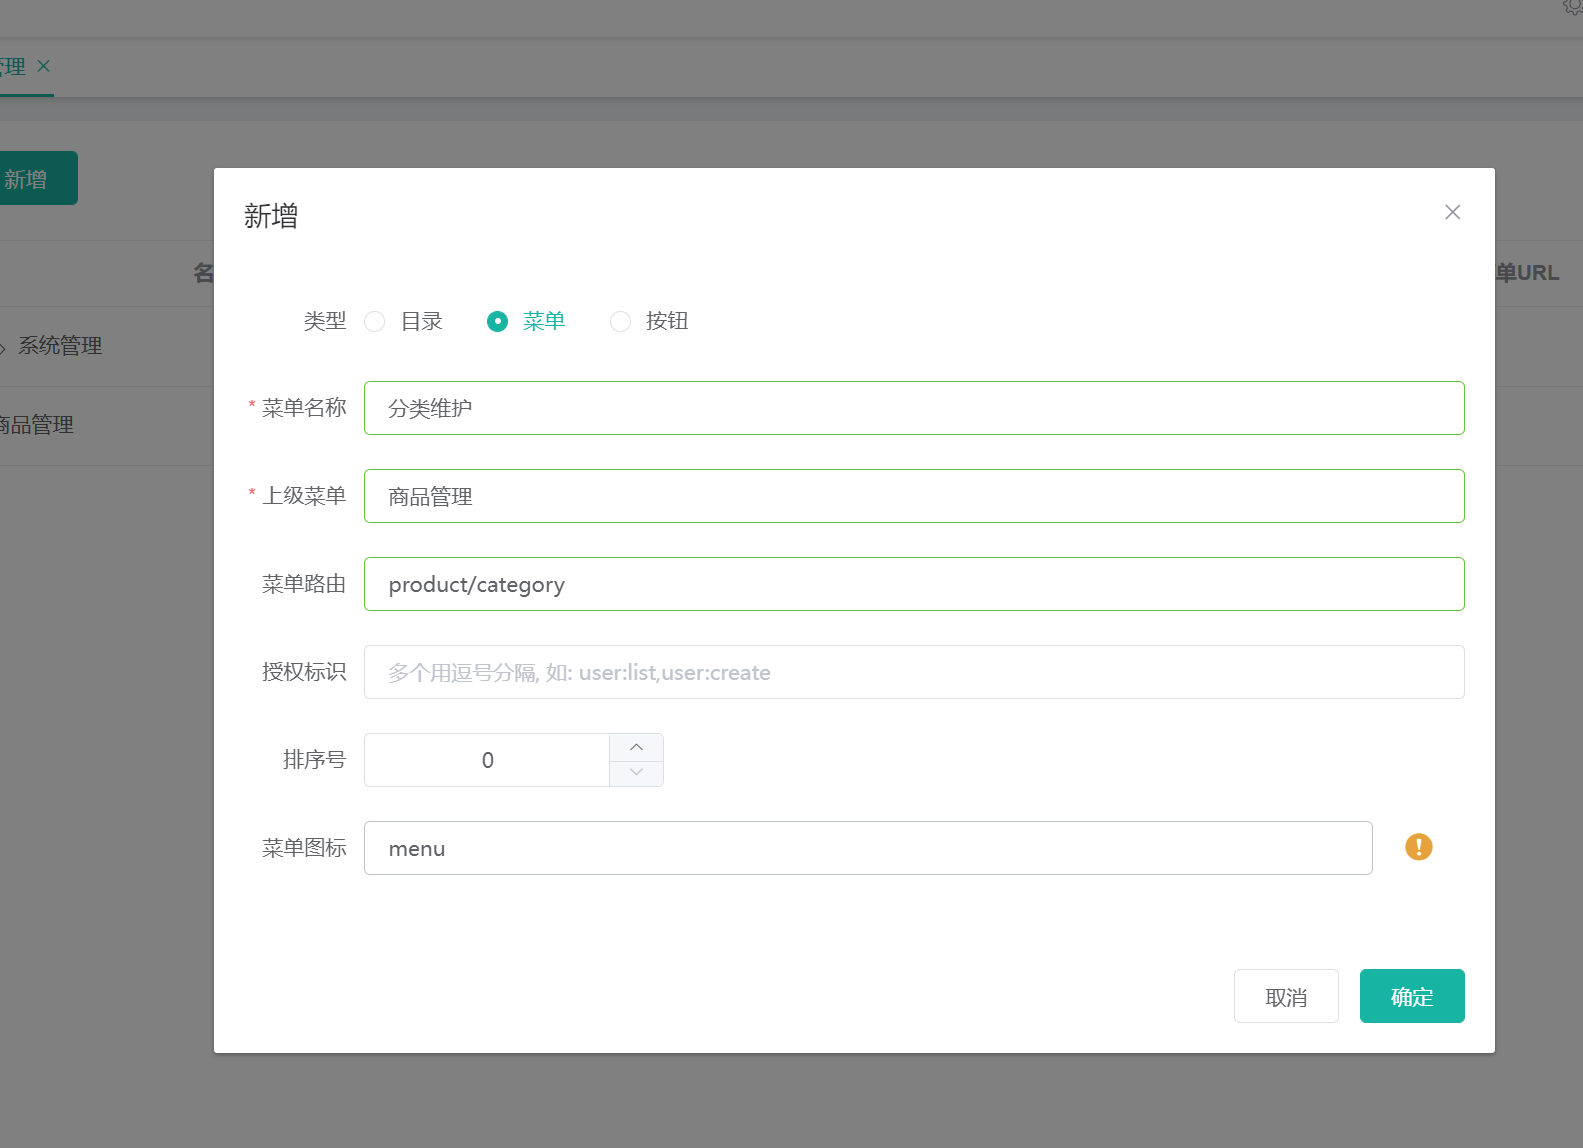
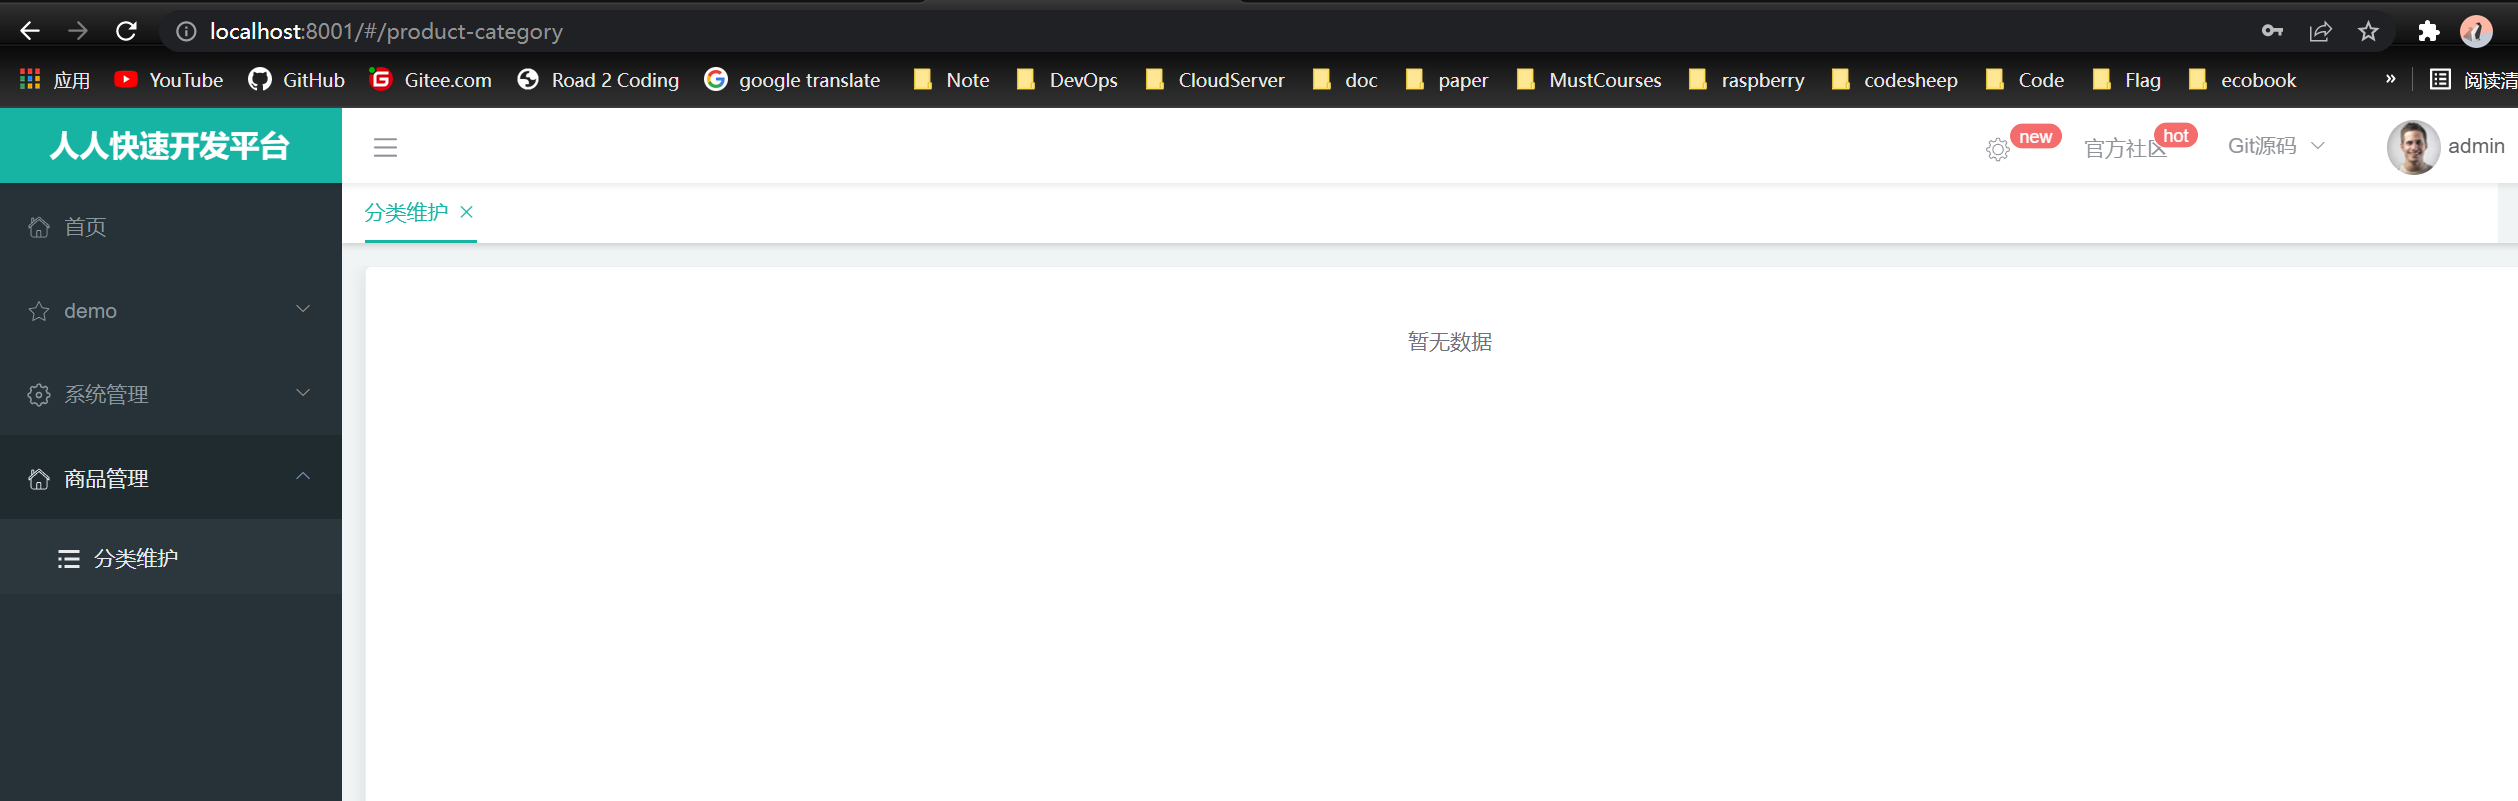
- 访问 http://localhost:8001/#/product-category 展示分类维护信息
# 脚手架规则

- 菜单路由 product/category 转换为URL product-category
- 前端Vue
所以要自定义我们的product/category视图的话,就是创建mudules/product/category.vue

element-ui属性菜单:https://element.eleme.cn/#/zh-CN/component/tree
<template>
    <el-tree :data="data" :props="defaultProps" @node-click="handleNodeClick"></el-tree>
</template>

<script>
export default {
    name: 'category',
    components: {},
    directives: {},
     data() {
      return {
        data: [],
        defaultProps: {
          children: 'children',
          label: 'label'
        }
      };
    },
    mounted() {

    },
    methods: {
        handleNodeClick(data) {
        console.log(data);
      },
      getMenus(){
        this.$http({
          url: this.$http.adornUrl('/product/category/list/tree'),
          method: 'get'
        }).then(data=>{
            console.log(data)
        })
      }
    },
    created(){
        this.getMenus();
    }
};
</script>

<style scoped>

</style>
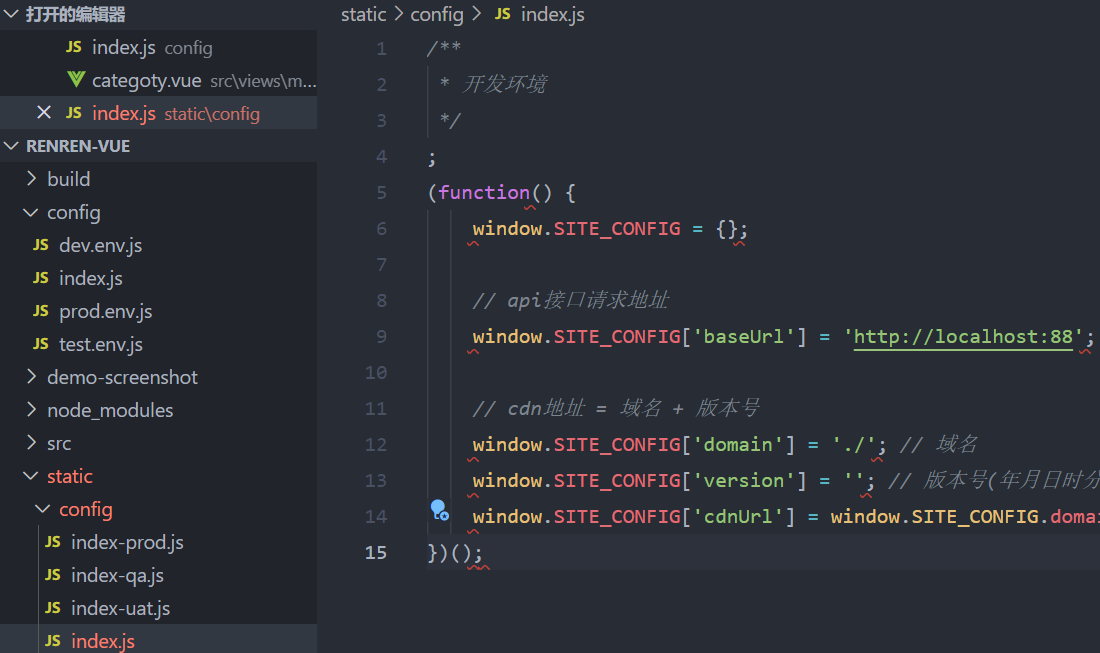
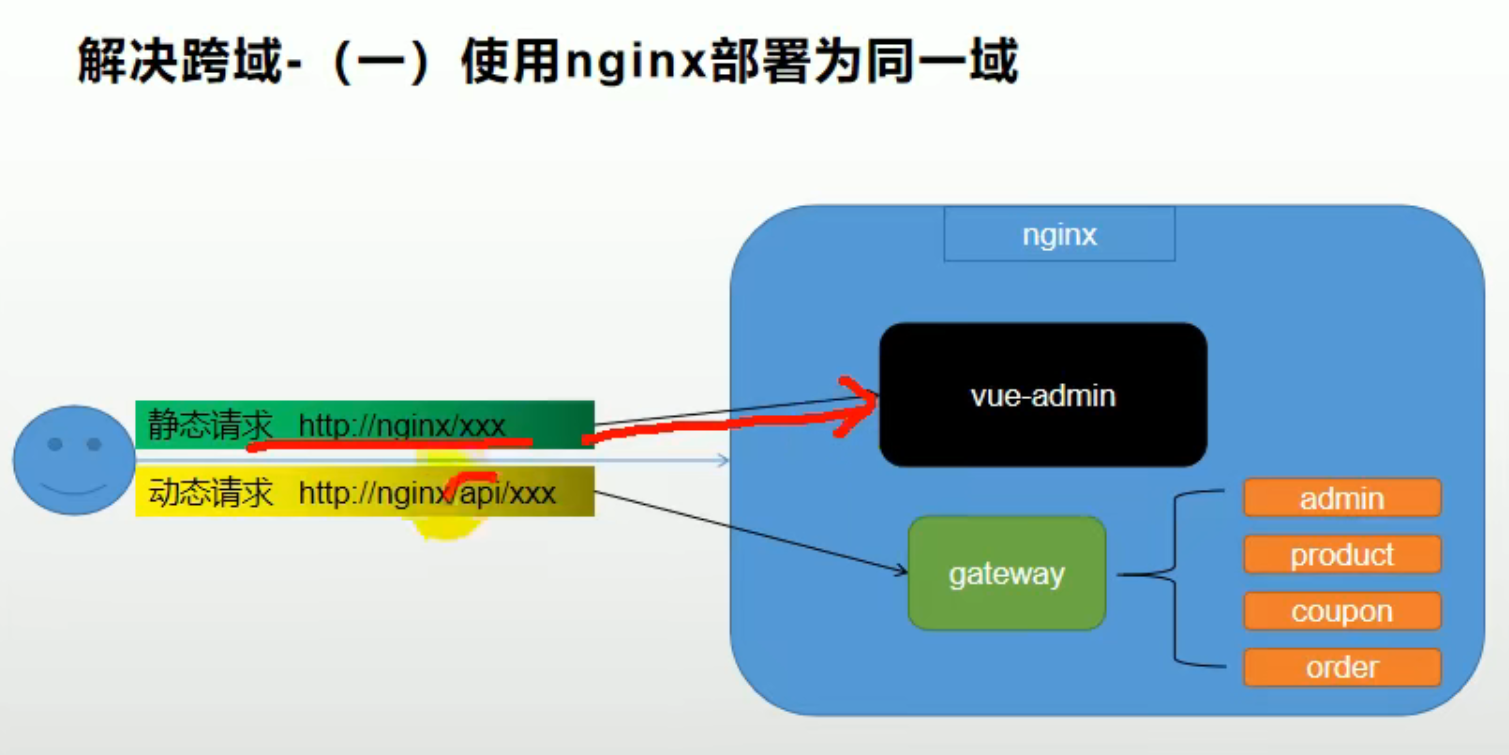
- 前端直接发送到网关 88 在static/config/index.js里
- 引入common依赖
- renren-fast依赖注册到注册中心 application.yml
spring:
  # 模块名
  application:
    name: renren-fast
  # 注册中心
  cloud:
    nacos:
      discovery:
        server-addr: xx.xx.xx.xx:8848
- 开启注册发现功能
package io.renren;

import org.springframework.boot.SpringApplication;
import org.springframework.boot.autoconfigure.SpringBootApplication;
import org.springframework.cloud.client.discovery.EnableDiscoveryClient;

@EnableDiscoveryClient
@SpringBootApplication
public class RenrenApplication {

	public static void main(String[] args) {
		SpringApplication.run(RenrenApplication.class, args);
	}
}
- 网关配置 - 路由转发
Ctrl+Shift+F全局搜索

在static/config/index.js里

window.SITE_CONFIG['baseUrl'] = 'http://localhost:88/api';
		# renren-fast
        - id: admin_route
          uri: lb://renren-fast
          predicates: # 什么情况下路由给它
            - Path=/api/** # 默认前端项目都带上api前缀,指定路径断言
          filters:
            # 重写路径
            - RewritePath=/api/(?<segment>.*),/renren-fast/$\{segment}
- 解决跨域 – 网关中配置跨域
GulimallCorsConfiguration.java
package com.lif314.gulimall.gateway.config;

import org.springframework.context.annotation.Bean;
import org.springframework.context.annotation.Configuration;
import org.springframework.web.cors.CorsConfiguration;
import org.springframework.web.cors.reactive.CorsWebFilter;
import org.springframework.web.cors.reactive.UrlBasedCorsConfigurationSource;

@Configuration
public class GulimallCorsConfiguration {
    @Bean // 添加过滤器
    public CorsWebFilter corsWebFilter(){
        // 基于url跨域,选择reactive包下的
        UrlBasedCorsConfigurationSource source=new UrlBasedCorsConfigurationSource();
        // 跨域配置信息
        CorsConfiguration corsConfiguration = new CorsConfiguration();
        // 允许跨域的头
        corsConfiguration.addAllowedHeader("*");
        // 允许跨域的请求方式
        corsConfiguration.addAllowedMethod("*");
        // 允许跨域的请求来源
        corsConfiguration.addAllowedOrigin("*");
        // 是否允许携带cookie跨域
        corsConfiguration.setAllowCredentials(true);

        // 任意url都要进行跨域配置
        source.registerCorsConfiguration("/**", corsConfiguration);
        return new CorsWebFilter(source);
    }
}
lombok Error : You aren’t using a compiler supported by lombok, so lombok will not work and has been disabled.
因为lombok版本是一般是受spring boot版本管理的,也可以通过升级springboot的版本来提高lombok版本,只要你springboot中引用的Lombok高于上面的版本就可以。
<lombok.version>1.18.22</lombok.version>
An attempt was made to call a method that does not exist. The attempt was made from the following location:
org.reflections.Reflections.expandSuperTypes(Reflections.java:380)
解决方法:删除其选择使用的重复了的jar包,一切正常。
The following method did not exist:
com.google.common.collect.Sets$SetView.iterator()Lcom/google/common/collect/UnmodifiableIterator;
The method’s class, com.google.common.collect.Sets$SetView, is available from the following locations:
jar:file:/D:/AppData/Java/Maven/LocalWarehouse/com/google/guava/guava/18.0/guava-18.0.jar!/com/google/common/collect/Sets$SetView.class
It was loaded from the following location:
file:/D:/AppData/Java/Maven/LocalWarehouse/com/google/guava/guava/18.0/guava-18.0.jar
renren-fast注册到Nacos中 ------- 一切问题来源于版本对应
- Nacos: 2.0.3
- SpringBoot: 2.2.4.RELEASE
- SpringCloud:2.2.7.RELEASE
将SpringBoot版本调至2.3.12.RELEASE,解决`Error creating bean with name 'configurationPropertiesBeans'
出现新的问题:
java.lang.NoSuchMethodError: com.google.common.collect.Sets$SetView.iterator()Lcom/google/common/collect/UnmodifiableIterator;
2.1.3 renren-fast注册到Nacos注册中心
- 引入common依赖包
<!--		引入common依赖:Nacos注册中心/配置中心 -->
		<dependency>
			<groupId>com.lif314.gulimall</groupId>
			<artifactId>gulimall-common</artifactId>
			<version>1.0-SNAPSHOT</version>
		</dependency>
- 配置注册中心地址 application.yml
spring:
  # 模块名
  application:
    name: renren-fast
  # 注册中心
  cloud:
    nacos:
      discovery:
        server-addr: xx.xx.xx.xx:8848
- 启动项目
package io.renren;

import org.springframework.boot.SpringApplication;
import org.springframework.boot.autoconfigure.SpringBootApplication;
import org.springframework.cloud.client.discovery.EnableDiscoveryClient;


@EnableDiscoveryClient
@SpringBootApplication
public class RenrenApplication {

	public static void main(String[] args) {
		SpringApplication.run(RenrenApplication.class, args);
	}
}
- Error
java.lang.NoSuchMethodError: com.google.common.collect.Sets$SetView.iterator()Lcom/google/common/collect/UnmodifiableIterator;
guava版本问题,guava18.0中不存在SetView.iterator()函数,而guava20.0版本中则存在。springfox-swagger2 2.2.7中引入的版本是guava18.0。选择更新springfox-swagger2版本至3.0.0,成功解决问题。
Access to XMLHttpRequest at ‘http://localhost:8888/api/sys/login’ from origin ‘http://localhost:8001’ has been blocked by CORS policy: Response to preflight request doesn’t pass access control check: No ‘Access-Control-Allow-Origin’ header is present on the requested resource.
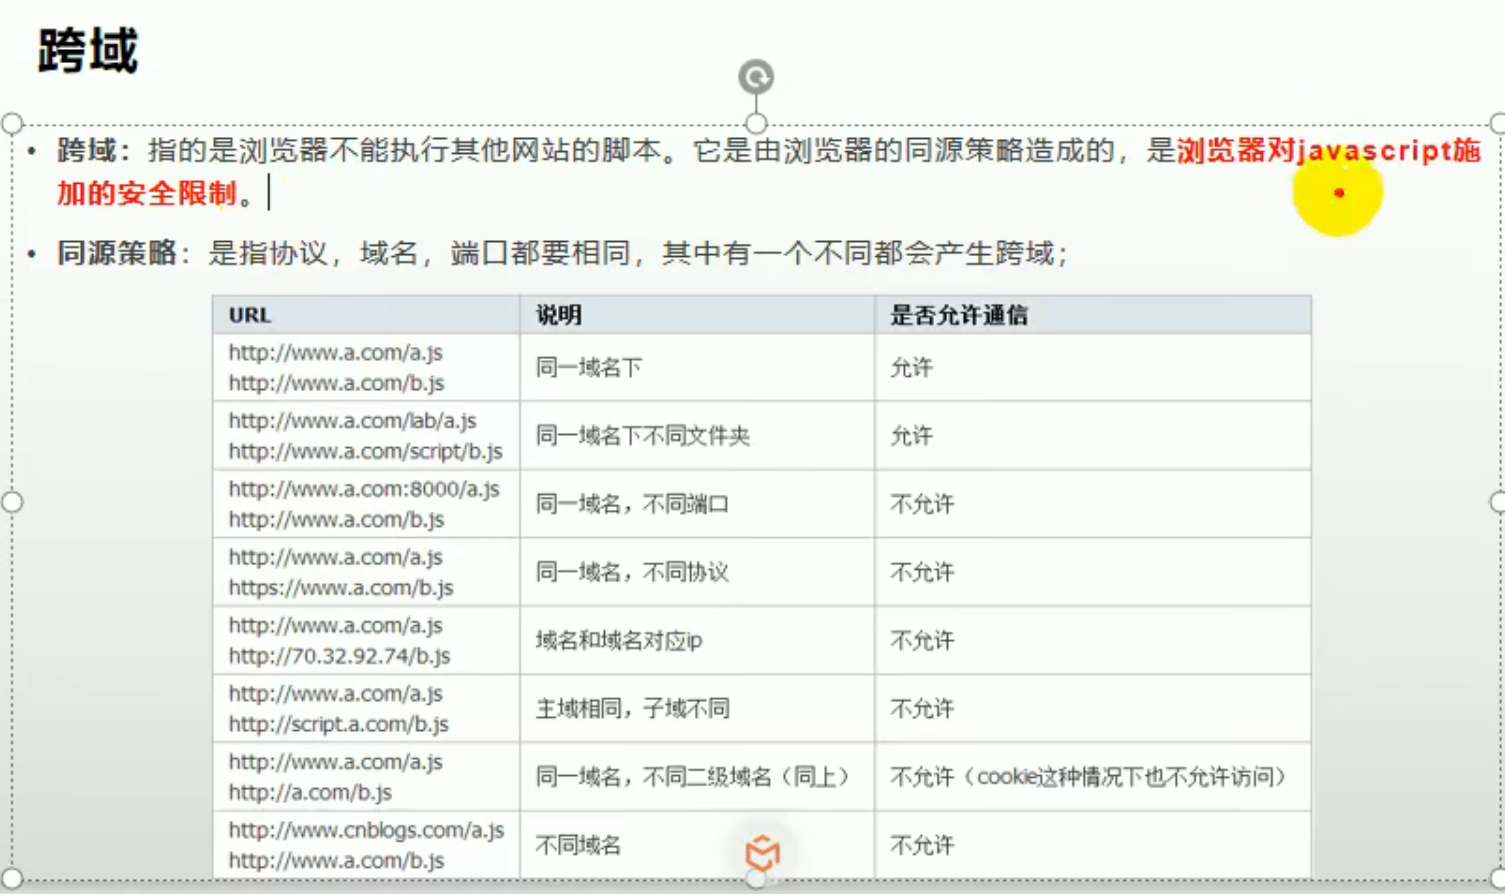
2.1.4 跨域问题
- doc:https://developer.mozilla.org/zh-CN/docs/Web/HTTP/CORS
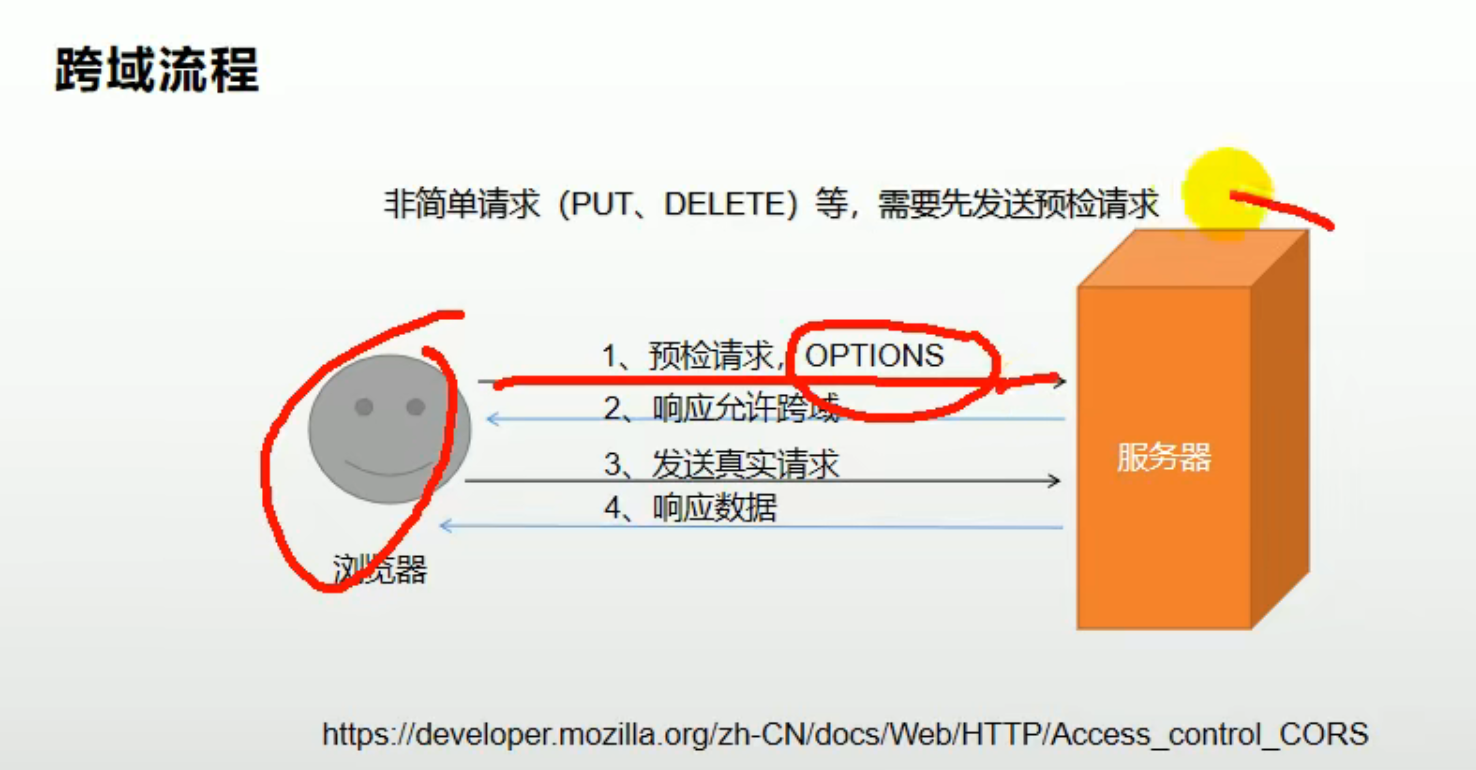

在网关配置跨域
package com.lif314.gulimall.gateway.config;

import org.springframework.context.annotation.Bean;
import org.springframework.context.annotation.Configuration;
import org.springframework.web.cors.CorsConfiguration;
import org.springframework.web.cors.reactive.CorsWebFilter;
import org.springframework.web.cors.reactive.UrlBasedCorsConfigurationSource;

@Configuration
public class GulimallCorsConfiguration {
    @Bean // 添加过滤器
    public CorsWebFilter corsWebFilter(){
        // 基于url跨域,选择reactive包下的
        UrlBasedCorsConfigurationSource source=new UrlBasedCorsConfigurationSource();
        // 跨域配置信息
        CorsConfiguration corsConfiguration = new CorsConfiguration();
        // 允许跨域的头
        corsConfiguration.addAllowedHeader("*");
        // 允许跨域的请求方式
        corsConfiguration.addAllowedMethod("*");
        // 允许跨域的请求来源
        corsConfiguration.addAllowedOrigin("*");
        // 是否允许携带cookie跨域
        corsConfiguration.setAllowCredentials(true);

        // 任意url都要进行跨域配置
        source.registerCorsConfiguration("/**", corsConfiguration);
        return new CorsWebFilter(source);
    }
}
java.lang.IllegalArgumentException: When allowCredentials is true, allowedOrigins cannot contain the special value “*” since that cannot be set on the “Access-Control-Allow-Origin” response header. To allow credentials to a set of origins, list them explicitly or consider using “allowedOriginPatterns” instead.
gateway 方式那就把 corsConfiguration.addAllowedOrigin("");改成 corsConfiguration.addAllowedOriginPattern("");
- 登录成功
2.1.4 商品服务注册到注册中心
- 定义一个product路由规则,进行路径重写:
spring:
  cloud:
    gateway:
      routes:
        - id: product_route
          uri: lb://gulimall-product
          predicates:
            - Path=/api/product/**
          filters:
            - RewritePath=/api/(?<segment>.*),/$\{segment}
-
在nacos中新建命名空间,用命名空间隔离项目,(可以在其中新建gulimall-product.yml)
-
在product项目中新建bootstrap.properties
spring.application.name=gulimall-product

spring.cloud.nacos.config.server-addr=xx.xx.xx.xx:8848
spring.cloud.nacos.config.namespace=product
- 在application.yml中配置注册中心
spring:
  # 服务发现
  cloud:
    nacos:
      discovery:
        server-addr: xx.xx.xx.xx:8848
  # 模块名
  application:
    name: gulimall-product
- 启动服务发现
package com.lif314.gulimall.product;

import org.mybatis.spring.annotation.MapperScan;
import org.springframework.boot.SpringApplication;
import org.springframework.boot.autoconfigure.SpringBootApplication;
import org.springframework.cloud.client.discovery.EnableDiscoveryClient;

@EnableDiscoveryClient
@MapperScan("com.lif314.gulimall.product.dao")
@SpringBootApplication
public class GulimallProductApplication {

    public static void main(String[] args) {
        SpringApplication.run(GulimallProductApplication.class, args);
    }

}
修正:在路由规则的顺序上,将精确的路由规则放置到模糊的路由规则的前面,否则的话,精确的路由规则将不会被匹配到,类似于异常体系中try catch子句中异常的处理顺序。
- 测试 http://localhost:88/api/product/category/list/tree
2.1.5 编写前端展示

- data解构,加上{},把data的地方改成menus
<template>
<!-- element-ui Tree树形菜单 -->
    <el-tree :data="menus" :props="defaultProps" @node-click="handleNodeClick"></el-tree>
</template>

<script>
export default {
    name: 'category',
    components: {},
    directives: {},
     data() {
      return {
        menus: [],
        defaultProps: {
          children: 'children',
          label: 'name' // 显示的标签
        }
      };
    },
    mounted() {

    },
    methods: {
        handleNodeClick(data) {
        // console.log(data);
      },
    //   获取菜单 -- 发送请求模板
      getMenus(){
        this.$http({
          url: this.$http.adornUrl('/product/category/list/tree'),
          method: 'get'
        }).then(({data}) => {
          // 解构data
            // console.log(data.data)
            this.menus = data.data
        })
      }
    },
    created(){
        this.getMenus();
    }
};
</script>

<style scoped>

</style>
- 测试

2.2 删除
2.2.1 前端
前端参考ElementUI官方文档:https://element.eleme.cn/#/zh-CN/component/tree#scoped-slot 自定义节点内容
可以通过两种方法进行树节点内容的自定义:render-content和 scoped slot。
我们使用scoped slot – 在el-tree中添加span标签
 <div class="block">
    <p>使用 scoped slot</p>
    <el-tree
      :data="data"
      show-checkbox
      node-key="id"
      default-expand-all
      :expand-on-click-node="false">
      <span class="custom-tree-node" slot-scope="{ node, data }">
        <span>{{ node.label }}</span>
        <span>
          <el-button
            type="text"
            size="mini"
            @click="() => append(data)">
            Append
          </el-button>
          <el-button
            type="text"
            size="mini"
            @click="() => remove(node, data)">
            Delete
          </el-button>
        </span>
      </span>
    </el-tree>
  </div>


<script>
  let id = 1000;

  export default {
    data() {
      const data = [];
      return {
        data: JSON.parse(JSON.stringify(data)),
        data: JSON.parse(JSON.stringify(data))
      }
    },

    methods: {
      append(data) {
        const newChild = { id: id++, label: 'testtest', children: [] };
        if (!data.children) {
          this.$set(data, 'children', []);
        }
        data.children.push(newChild);
      },

      remove(node, data) {
        const parent = node.parent;
        const children = parent.data.children || parent.data;
        const index = children.findIndex(d => d.id === data.id);
        children.splice(index, 1);
      },
    }
  };
</script>
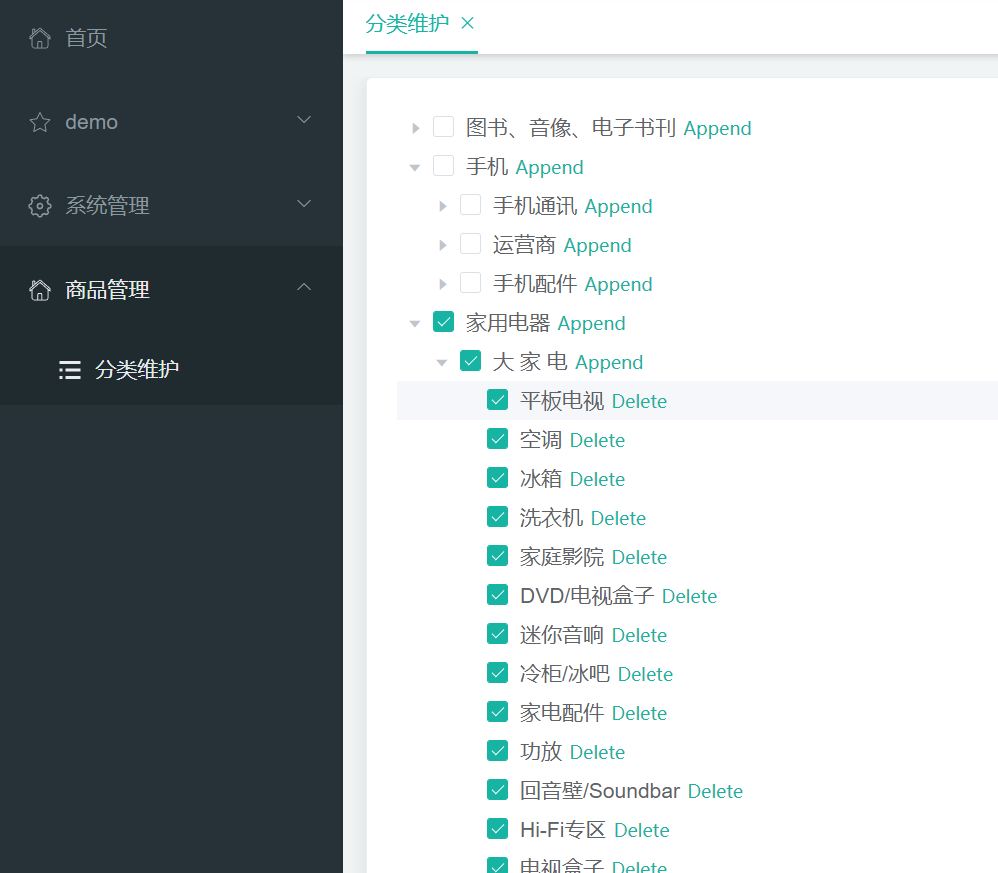
- 页面显示
<!--
    show-checkbox: 节点是否可被选择 显示选择框
    :expand-on-click-node="false" 如果为 false,则只有点箭头图标的时候才会展开或者收
    node-key: 每个树节点用来作为唯一标识的属性,整棵树应该是唯一的
   -->
  <el-tree
    :data="menus"
    show-checkbox
    node-key="catId"
    :props="defaultProps"
    :expand-on-click-node="false"
  >
    <span class="custom-tree-node" slot-scope="{ node, data }">
      <span>{{ node.label }}</span>
      <span>
        <!-- 只有父菜单才显示append-->
        <el-button
          v-if="node.level <= 2"
          type="text"
          size="mini"
          @click="() => append(data)"
        >
          Append
        </el-button>
        <!-- 只用子菜单才显示delete -->
        <el-button
          v-if="node.childNodes.length == 0"
          type="text"
          size="mini"
          @click="() => remove(node, data)"
        >
          Delete
        </el-button>
      </span>
    </span>
  </el-tree>
- 点击删除发送请求 - POST JSON数据
    // 刪除菜單
    remove(node, data) {
      console.log("remove", node, data);
    },
- utils-httpRequest.js中发送请求的工具
/**
 * get请求参数处理
 * @param {*} params 参数对象
 * @param {*} openDefultParams 是否开启默认参数?
 */
http.adornParams = (params = {}, openDefultParams = true) => {
  var defaults = {
    't': new Date().getTime()  // 时间戳
  }


/**
 * post请求数据处理
 * @param {*} data 数据对象
 * @param {*} openDefultdata 是否开启默认数据?
 * @param {*} contentType 数据格式
 *  json: 'application/json; charset=utf-8' 默认json
 *  form: 'application/x-www-form-urlencoded; charset=utf-8'
 */
http.adornData = (data = {}, openDefultdata = true, contentType = 'json') => {
  var defaults = {
    't': new Date().getTime()
  }
  data = openDefultdata ? merge(defaults, data) : data
  return contentType === 'json' ? JSON.stringify(data) : qs.stringify(data)
}
VSCode中添加快捷代码片段:文件–首选项-用户片段
"http-get请求": {
		"prefix": "httpget",
		"body": [
			"this.\\$http({",
			"url: this.\\$http.adornUrl(''),",
			"method: 'get',",
			"params: this.\\$http.adornParams({})",
			"}).then(({data}) => {",
			"})"
		],
		"description": "httpGet请求"
	},
	"http-post请求": {
		"prefix": "httppost",
		"body": [
			"this.\\$http({",
			"url: this.\\$http.adornUrl(''),",
			"method: 'post',",
			"data: this.\\$http.adornData(data, false)",
			"}).then(({data}) => {",
			"})"
		],
		"description": "httpPost请求"
	}
- 删除请求
    // 刪除菜單
    remove(node, data) {
      console.log("remove", node, data);
      var ids = [data.catId]
      this.$http({
        url: this.$http.adornUrl("/product/category/delete"),
        method: "post",
        data: this.$http.adornData(ids, false)
      }).then(({ data }) => {
        console.log("删除成功....")
        this.getMenus(); // 刷新
      });
    },
- 消息提示
MessageBox: https://element.eleme.cn/#/zh-CN/component/message-box#dan-du-yin-yong
删除前弹框提示 - 模板
this.$confirm('此操作将永久删除该文件, 是否继续?', '提示', {
          confirmButtonText: '确定',
          cancelButtonText: '取消',
          type: 'warning'
        }).then(() => {
          this.$message({
            type: 'success',
            message: '删除成功!'
          });
        }).catch(() => {
          this.$message({
            type: 'info',
            message: '已取消删除'
          });
        });
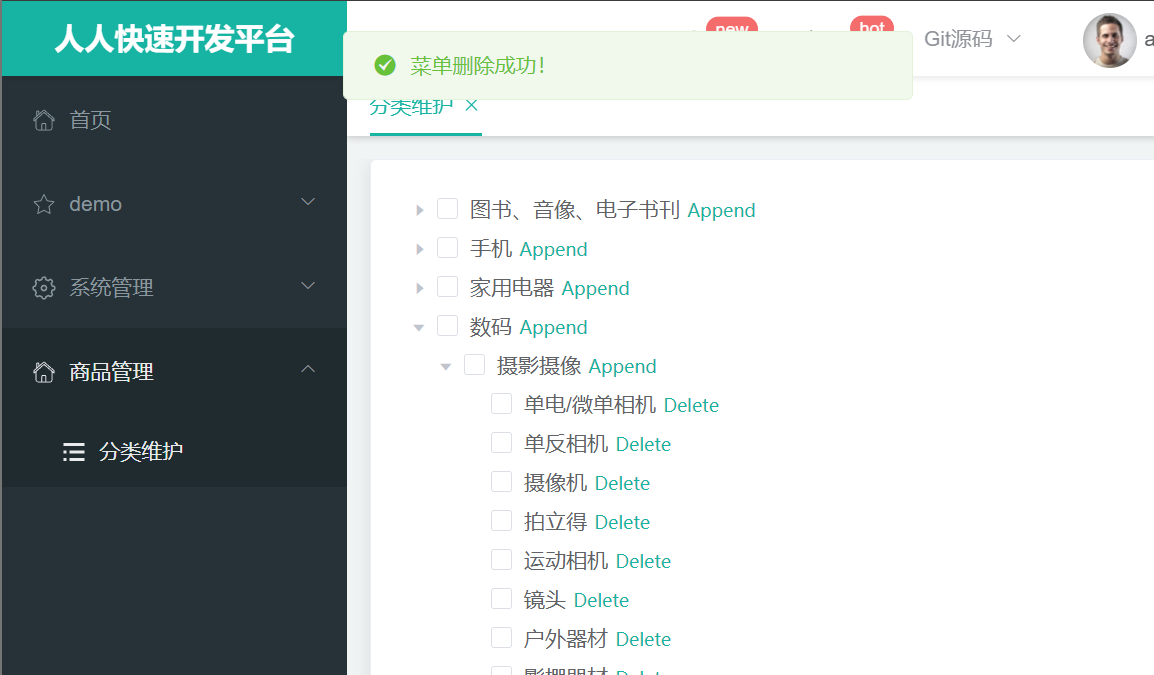
// 刪除菜單
    remove(node, data) {
      // console.log("remove", node, data);
      var ids = [data.catId];
      // 删除前弹框提示
      this.$confirm(`是否删除【${data.name}】菜单?`, "提示", {
        confirmButtonText: "确定",
        cancelButtonText: "取消",
        type: "warning",
      })
        .then(() => {
          this.$http({
            url: this.$http.adornUrl("/product/category/delete"),
            method: "post",
            data: this.$http.adornData(ids, false),
          }).then(({ data }) => {
            // 成功提示消息
            this.$message({
              type: "success",
              message: "菜单删除成功!",
            });
            //console.log("删除成功....");
            this.getMenus(); // 刷新
          });
        }).catch(() => {
          this.$message({
            type: "info",
            message: "已取消删除",
          });
        });
    },
刷新后展开默认菜单节点 - expandedKey
  <el-tree
    :data="menus"
    show-checkbox
    node-key="catId"
    :props="defaultProps"
    :expand-on-click-node="false"
    :default-expanded-keys="expandedKey"
  >


  data() {
    return {
      menus: [],
      expandedKey: [],
      defaultProps: {
        children: "children",
        label: "name", // 显示的标签
      },
    };
  },


            //console.log("删除成功....");
           	this.getMenus(); // 刷新
            // 显示删除后的默认节点
            this.expandedKey = [node.parent.data.catId];
恢复数据库中数据
Error Code: 1175. You are using safe update mode and you tried to update a table without a WHERE that uses a KEY column To disable safe mode, toggle the option in Preferences -> SQL Queries and reconnect.
修改数据库模式 SET SQL_SAFE_UPDATES = 0;
SET SQL_SAFE_UPDATES = 0;

UPDATE gulimall_pms.pms_category SET show_status=1;
2.2.2 后端-逻辑删除
- 删除逻辑
@RequestBody:获取请求体,只有post可以发送请求体
SpringMVC自动将请求体中得数据(json),转化为回应的对象
/**
     * 删除
     */
    @RequestMapping("/delete")
    //@RequiresPermissions("product:category:delete")
    public R delete(@RequestBody Long[] catIds){ // id数组
		categoryService.removeByIds(Arrays.asList(catIds));

        return R.ok();
    }
不能直接使用,需要进行检查
 /**
     * 删除
     *
     * RequestBody获取请求体,只有post可以发送请求体
     * SpringMVC自动将请求体中得数据(json),转化为回应的对象
     */
    @RequestMapping("/delete")
    //@RequiresPermissions("product:category:delete")
    public R delete(@RequestBody Long[] catIds){
		categoryService.removeByIds(Arrays.asList(catIds));
        // 检查当前删除的菜单是否杯别的地方引用后才能删除
        categoryService.removeMenuByIds(Arrays.asList(catIds));
        return R.ok();
    }
    /**
     * 删除菜单那
     * @param asList id数组
     */
    @Override
    public void removeMenuByIds(List<Long> asList) {
        // TODO:检查菜单是否被引用
        baseMapper.deleteBatchIds(asList);
    }
- 逻辑删除
然而多数时候,我们并不希望删除数据,而是标记它被删除了,这就是逻辑删除;

逻辑删除是mybatis-plus 的内容,会在项目中配置一些内容,告诉此项目执行delete语句时并不删除,只是标志位

可以设置show_status(菜单属性)为0,标记它已经被删除。
- MyBatisPLUS中逻辑删除
https://baomidou.com/pages/6b03c5/
说明:

只对自动注入的 sql 起效:

插入: 不作限制
查找: 追加 where 条件过滤掉已删除数据,且使用 wrapper.entity 生成的 where 条件会忽略该字段
更新: 追加 where 条件防止更新到已删除数据,且使用 wrapper.entity 生成的 where 条件会忽略该字段
删除: 转变为 更新
例如:

删除: update user set deleted=1 where id = 1 and deleted=0
查找: select id,name,deleted from user where deleted=0
字段类型支持说明:

支持所有数据类型(推荐使用 Integer,Boolean,LocalDateTime)
如果数据库字段使用datetime,逻辑未删除值和已删除值支持配置为字符串null,另一个值支持配置为函数来获取值如now()
附录:

逻辑删除是为了方便数据恢复和保护数据本身价值等等的一种方案,但实际就是删除。
如果你需要频繁查出来看就不应使用逻辑删除,而是以一个状态去表示。
- 逻辑删除配置
- application.yml 全局配置 – 标志位 show_status (高版本可以省略)
mybatis-plus:
  global-config:
    db-config:
      logic-delete-field: flag # 全局逻辑删除的实体字段名(since 3.3.0,配置后可以忽略不配置步骤2)
      logic-delete-value: 1 # 逻辑已删除值(默认为 1)
      logic-not-delete-value: 0 # 逻辑未删除值(默认为 0)
- 实体类字段上加上
@TableLogic注解
@TableLogic // 逻辑删除字段
private Integer showStatus;
可以给@TableLogi进行配置
public @interface TableLogic {
    String value() default ""; // 未删除值

    String delval() default ""; // 删除值
}
	/**
	 * 是否显示[0-不显示,1显示]
	 */
	@TableLogic(value = "1",delval = "0")// 逻辑删除字段
	private Integer showStatus;
2.3 新增
2.3.1 前端
- 对话框
对话框:https://element.eleme.cn/#/zh-CN/component/dialog#slot
<el-dialog title="提示" :visible.sync="dialogVisible" width="30%">
      <!-- <span>这是一段信息</span> -->
      <span slot="footer" class="dialog-footer">
        <el-button @click="dialogVisible = false">取 消</el-button>
        <el-button type="primary" @click="dialogVisible = false"
          >确 定</el-button
        >
      </span>
    </el-dialog>
绑定dialogVisible – 是否显示对话框
- 添加表单
表单: https://element.eleme.cn/#/zh-CN/component/form#form-item-slot
- 页面
<el-dialog title="提示" :visible.sync="dialogVisible" width="30%">
      <!-- <span>这是一段信息</span> -->
      <el-form :model="category">
        <el-form-item label="分类名称">
          <el-input v-model="category.name" autocomplete="off"></el-input>
        </el-form-item>
      </el-form>
      <span slot="footer" class="dialog-footer">
        <el-button @click="dialogVisible = false">取 消</el-button>
        <el-button type="primary" @click="addCategory">确 定</el-button>
      </span>
    </el-dialog>
- 数据绑定 model
data() {
    return {
      menus: [], // 菜单
      expandedKey: [], // 刷新展开菜单id
      dialogVisible: false, // 对话框显示
      category: { name: "", parentCid: 0, catLevel: 0, showStatus: 1, sort: 0 }, // 表单空对象
      defaultProps: {
        children: "children",
        label: "name", // 显示的标签
      },
    };
- 事件
 // 添加菜单
    append(data) {
      // 打开对话框
      this.dialogVisible = true;
      // 计算相关属性值
      this.category.parentCid = data.catId;
      this.category.catLevel = data.catLevel * 1 + 1;
    },
    // 添加三级分类
    addCategory() {
    	console.log("提交的分类数据:", this.category);
    },
- 发送POST请求
this.$http({
        url: this.$http.adornUrl("/product/category/save"),
        method: "post",
        data: this.$http.adornData(this.category, false),
      }).then(({ data }) => {
        // 成功提示消息
        this.$message({
          type: "success",
          message: "菜单添加成功!",
        });
        // 关闭对话框
        this.dialogVisible = false;
        // 刷新菜单数据
        this.getMenus();
        // 展开默认菜单
        this.expandedKey = [this.category.parentCid];
      });
2.3.2 后端
    /**
     * 保存
     */
    @RequestMapping("/save")
   // @RequiresPermissions("product:category:save")
    public R save(@RequestBody CategoryEntity category){
		categoryService.save(category);

        return R.ok();
    }
2.4 修改
2.4.1 前端
修改
- 添加表单
<!-- 任意菜单可以进行修改 -->
          <el-button
            type="text"
            size="mini"
            @click="edit(data)"
          >
            Edit
          </el-button>
-
对话框复用
-
数据回显
-
修改时将需要修改的字段封装为对象发到后端,防止默认值覆盖数据库中数据
-
在Eidt中数据回显后需要在Append中将数据清空 — 设置为默认值
拖拽效果
通过拖拽改变显示的顺序 – 通过 draggable 属性可让节点变为可拖拽。
- 在el-tree中添加draggable 属性
  <el-tree
      :data="menus"
      show-checkbox
      node-key="catId"
      :props="defaultProps"
      :expand-on-click-node="false"
      :default-expanded-keys="expandedKey"
      draggable
      :allow-drop="allowDrop"
    >
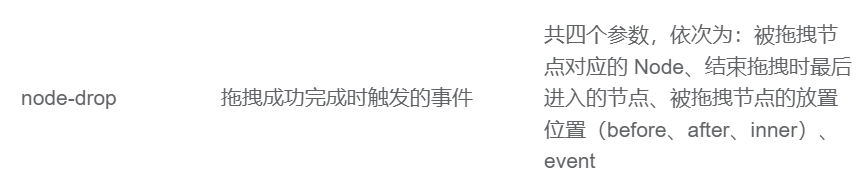
- allow-drop函数:判定是否允许拖拽节点放在指定位置
Function(draggingNode, dropNode, type):拖拽时判定目标节点能否被放置。type 参数有三种情况:‘prev’、‘inner’ 和 ‘next’,分别表示放置在目标节点前、插入至目标节点和放置在目标节点后
判断条件:被拖动的当前节点和所在父节点总层数不能大于3
三级分类拖拽算法:不能拖拽出四级目录,总层级不能大于3
==> 被拖动的当前节点和拖到的目标节点的总层数不能大于3。如把一个2层拖到另一个2层,则会出现4层
- 找出所有子节点,求出最大深度 == 该节点的层数 深度优先算法:递归
    // 拖拽效果
    allowDrop(draggingNode, dropNode, type) {
      // console.log(draggingNode, dropNode, type);
      // 当前节点,目标节点,哪个位置
      // 判断条件:被拖动的当前节点和所在父节点总层数不能大于3
      // 统计被拖动节点的总层数 maxLevel
      this.countNodeLevel(draggingNode.data);
      // 最大深度 -- 拖拽节点的层数
      let deep = this.maxLevel - draggingNode.data.catLevel + 1;
      this.maxLevel = 0; // 重置为0
      if (type == "inner") {
        // 拖到内部
        return deep + dropNode.level <= 3;
      } else {
        return deep + dropNode.parent.level <= 3;
      }

    },
    countNodeLevel(node) {
      this.maxLevel = node.catLevel; // 解决四级拖拽Bug
      // 找到所有节点,求出最大深度 -- 有子节点,递归查询
      if (node.children != null && node.children.length > 0) {
        // 遍历子节点
        for (let i = 0; i < node.children.length; i++) {
          if (node.children[i].catLevel > this.maxLevel) {
            this.maxLevel = this.children[i].catLevel;
          }
          this.countNodeLevel(node.children[i]);
        }
      }
    },
拖拽数据收集:发送给数据库
Events:
- 使用node-drop
 <el-tree
      :data="menus"
      show-checkbox
      node-key="catId"
      :props="defaultProps"
      :expand-on-click-node="false"
      :default-expanded-keys="expandedKey"
      draggable
      :allow-drop="allowDrop"
       @node-drop="handleDrop"
    >
// 处理拖拽成功事件
    handleDrop(draggingNode, dropNode, dropType, ev) {
        console.log('tree drop: ', dropNode.label, dropType);
      },
- 收集节点信息
    // 处理拖拽成功事件
    handleDrop(draggingNode, dropNode, dropType, ev) {
      console.log("tree drop: ", dropNode.label, dropType);
      // 1、当前节点最新的父节点id
      let siblings = null;
      let pCid = 0;
      if (dropType == "before" || dropType == "after") {
        // 拖拽到的节点没有子级菜单
        // 如果称为根级菜单,则父id为null
        pCid =
          dropNode.parent.data.catId == undefined
            ? null
            : dropNode.parent.data.catId;
        // 兄弟节点收集后重新排序
        siblings = dropNode.parent.childNodes;
      } else {
        // 叶子菜单
        pCid = dropNode.data.catId;
        siblings = dropNode.childNodes;
      }
      // 2、当前拖拽节点的最新排序
      for (let i = 0; i < siblings.length; i++) {
        // 整理兄弟节点顺序后包装为对象发给后端
        // 拖拽节点可能导致父子关系变化
        if (siblings[i].data.catId == draggingNode.data.catId) {
          // 如果遍历的是当前正在拖拽的节点
          let catLevel = draggingNode.level;
          if (siblings[i].level != draggingNode.level) {
            // 当前节点的层级发生变化
            catLevel = siblings[i].level;
            // 修改子节点的层级
            this.updateChildNodeLevel(siblings[i]);
          }

          // 需要更改父id
          this.updateNodes.push({
            catId: siblings[i].data.catId,
            sort: i,
            parentCid: pCid,
          });
        } else {
          this.updateNodes.push({ catId: siblings[i].data.catId, sort: i });
        }
      }
      // 3、当前拖拽节点的最新层级
    },
    // 修改子节点的层级
    updateChildNodeLevel(node) {
      if (node.childNodes.length > 0) {
        for (let i = 0; i < node.length; i++) {
          var cNode = node.childNodes[i].data;
          // 更新层级id和level
          this.updateNodes.push({
            catId: cNode.catId,
            catLevel: node.childNodes[i].level,
          });
          // 递归子节点
          this.updateChildNodeLevel(node.childNodes[i]);
        }
      }
    },
- 发送
 // 处理拖拽成功事件
    handleDrop(draggingNode, dropNode, dropType, ev) {
      // console.log("tree drop: ", dropNode.label, dropType);
      // 1、当前节点最新的父节点id
      let siblings = null;
      let pCid = 0;
      if (dropType == "before" || dropType == "after") {
        // 拖拽到的节点没有子级菜单
        // 如果称为根级菜单,则父id为null
        pCid =
          dropNode.parent.data.catId == undefined
            ? null
            : dropNode.parent.data.catId;
        // 兄弟节点收集后重新排序
        siblings = dropNode.parent.childNodes;
      } else {
        // 叶子菜单
        pCid = dropNode.data.catId;
        siblings = dropNode.childNodes;
      }
      // 2、当前拖拽节点的最新排序
      for (let i = 0; i < siblings.length; i++) {
        // 整理兄弟节点顺序后包装为对象发给后端
        // 拖拽节点可能导致父子关系变化
        if (siblings[i].data.catId == draggingNode.data.catId) {
          // 如果遍历的是当前正在拖拽的节点
          let catLevel = draggingNode.level;
          if (siblings[i].level != draggingNode.level) {
            // 当前节点的层级发生变化
            catLevel = siblings[i].level;
            // 修改子节点的层级
            this.updateChildNodeLevel(siblings[i]);
          }

          // 需要更改父id
          this.updateNodes.push({
            catId: siblings[i].data.catId,
            sort: i,
            parentCid: pCid,
          });
        } else {
          this.updateNodes.push({ catId: siblings[i].data.catId, sort: i });
        }
      }
      // 3、当前拖拽节点的最新层级
      // 发送给后端、
      this.$http({
        url: this.$http.adornUrl("product/category/update/sort"),
        method: "post",
        data: this.$http.adornData(this.updateNodes, false),
      }).then(({ data }) => {
        this.$message({
          message: "菜单层级拖拽成功!",
          type: success,
        });
        // 刷新菜单
        this.getMenus();
        // 设置默认展开菜单,上一次拖拽的菜单
        this.expandedKey = [pCid];
        // 清空历史
        this.updateNodes = [];
        this.maxLevel = 0;
      });
    },
- 后端同步数据库
    /**
     * 修改拖拽后的节点顺序
     */
    @RequestMapping("/update/sort")
    //@RequiresPermissions("product:category:update")
    public R updateSort(@RequestBody CategoryEntity[] category){
        // 收集数据,按照id进行更新,只更新对应字段的内容
        categoryService.updateBatchById(Arrays.asList(category));
        return R.ok();
    }
拖拽优化
- 允许开关
Switch开关:https://element.eleme.cn/#/zh-CN/component/switch#methods
添加组件并绑定draggable
    <!-- 拖拽功能 -->
    <el-switch v-model="draggable" active-text="开启拖拽" inactive-text="关闭拖拽">
    </el-switch>
    <!-- element-ui Tree树形菜单 -->
    <!--
    show-checkbox: 节点是否可被选择 显示选择框
    :expand-on-click-node="false" 如果为 false,则只有点箭头图标的时候才会展开或者收
    node-key: 每个树节点用来作为唯一标识的属性,整棵树应该是唯一的
   -->
    <el-tree
      :data="menus"
      show-checkbox
      node-key="catId"
      :props="defaultProps"
      :expand-on-click-node="false"
      :default-expanded-keys="expandedKey"
      :draggable = "draggable"
      :allow-drop="allowDrop"
      @node-drop="handleDrop"
    >
- 统一提交数据,防止频繁与数据库交互
<!-- 拖拽功能 -->
    <el-switch
      v-model="draggable"
      active-text="开启拖拽"
      inactive-text="关闭拖拽"
    >
    </el-switch>
    <el-button v-if="draggable" @click="batchSave">批量保存</el-button>
- 发送请求 添加全局变量pCid
// 批量保存
    batchSave() {
      // 发送给后端
      this.$http({
        url: this.$http.adornUrl("product/category/update/sort"),
        method: "post",
        data: this.$http.adornData(this.updateNodes, false),
      }).then(({ data }) => {
        this.$message({
          message: "菜单层级拖拽成功!",
          type: success,
        });
        // 刷新菜单
        this.getMenus();
        // 设置默认展开菜单,上一次拖拽的菜单
        this.expandedKey = [this.pCid];
        // 清空历史数据
        this.updateNodes = [];
        this.maxLevel = 0;
        this.pCid = 0;
      });
    },
- 在计算能不能拖拽之前是使用数据库中的值,现在直接使用当前节点的level数据
    countNodeLevel(node) {
      this.maxLevel = node.level; // 解决四级拖拽Bug
      // 找到所有节点,求出最大深度 -- 有子节点,递归查询
      if (node.childNodes != null && node.childNodes.length > 0) {
        // 遍历子节点
        for (let i = 0; i < node.children.length; i++) {
          if (node.childNodes[i].level > this.maxLevel) {
            this.maxLevel = this.childNodes[i].level;
          }
          this.countNodeLevel(node.childNodes[i]);
        }
      }
    },
2.4.2 后端
修改
    /**
     * 信息 --- 查询数据用于前端回显
     */
    @RequestMapping("/info/{catId}")
    //@RequiresPermissions("product:category:info")
    public R info(@PathVariable("catId") Long catId){
		CategoryEntity category = categoryService.getById(catId);

        return R.ok().put("data", category);
    }

    /**
     * 修改
     */
    @RequestMapping("/update")
    //@RequiresPermissions("product:category:update")
    public R update(@RequestBody CategoryEntity category){
		categoryService.updateById(category);

        return R.ok();
    }
2.5 批量删除
- 添加按钮
<el-button @click="batchDelete">批量删除</el-button>
- 点击批量删除,找到tree组件中被选中的节点
getCheckedNodes 若节点可被选择(即 show-checkbox为true),则返回目前被选中的节点所组成的数组(leafOnly, includeHalfChecked) 接收两个 boolean 类型的参数,1. 是否只是叶子节点,默认值为 false2. 是否包含半选节点,默认值为false
调用组件中的方法
- 先要给组件一个
ref标识menuTree - 调用组件中的方法:
this.$refs.menuTree.getCheckedNodes()
    <el-tree
      :data="menus"
      show-checkbox
      node-key="catId"
      :props="defaultProps"
      :expand-on-click-node="false"
      :default-expanded-keys="expandedKey"
      :draggable="draggable"
      :allow-drop="allowDrop"
      @node-drop="handleDrop"
      ref="menuTree"
    >
- 使用
// 批量删除
  batchDelete() {
    // (leafOnly, includeHalfChecked) 接收两个 boolean 类型的参数,1. 是否只是叶子节点,默认值为 `false` 2. 是否包含半选节点,默认值为 `false`
    let checkedNodes = this.$refs.menuTree.getCheckedNodes();
    let catIds = [];
    // console.log("被选中的元素:",this.$refs.menuTree.getCheckedNode())
    for (let i = 0; i < checkedNodes.length; i++) {
      catIds.push(checkedNodes.catId);
    }
    // 删除前弹框提示
    this.$confirm(`是否批量删除选中菜单?`, "提示", {
      confirmButtonText: "确定",
      cancelButtonText: "取消",
      type: "warning",
    }).then(() => {
      this.$http({
        url: this.$http.adornUrl("/product/category/delete"),
        method: "post",
        data: this.$http.adornData(catIds, false),
      }).then(({ data }) => {
        this.$message({
          message: "批量删除成功!",
          type: success,
        });
        // 刷新菜单
        this.getMenus();
      });
    });
  },
3. Java 8 Stream
Java 8 API添加了一个新的抽象称为流Stream,可以让你以一种声明的方式处理数据。
Stream 使用一种类似用 SQL 语句从数据库查询数据的直观方式来提供一种对 Java 集合运算和表达的高阶抽象。
这种风格将要处理的元素集合看作一种流, 流在管道中传输, 并且可以在管道的节点上进行处理, 比如筛选, 排序,聚合等。
元素流在管道中经过中间操作(intermediate operation)的处理,最后由最终操作(terminal operation)得到前面处理的结果。
+--------------------+       +------+   +------+   +---+   +-------+
| stream of elements +-----> |filter+-> |sorted+-> |map+-> |collect|
+--------------------+       +------+   +------+   +---+   +-------+
以上的流程转换为 Java 代码为:
List<Integer> transactionsIds =
widgets.stream()
             .filter(b -> b.getColor() == RED)
             .sorted((x,y) -> x.getWeight() - y.getWeight())
             .mapToInt(Widget::getWeight)
             .sum();
3.1 Stream
Stream(流)是一个来自数据源的元素队列并支持聚合操作
- 元素是特定类型的对象,形成一个队列。 Java中的Stream并不会存储元素,而是按需计算。
- 数据源 流的来源。 可以是集合,数组,I/O channel, 产生器generator 等。
- 聚合操作 类似SQL语句一样的操作, 比如filter, map, reduce, find, match, sorted等。
和以前的Collection操作不同, Stream操作还有两个基础的特征:
- Pipelining: 中间操作都会返回流对象本身。 这样多个操作可以串联成一个管道, 如同流式风格(fluent style)。 这样做可以对操作进行优化, 比如延迟执行(laziness)和短路( short-circuiting)。
- 内部迭代: 以前对集合遍历都是通过Iterator或者For-Each的方式, 显式的在集合外部进行迭代, 这叫做外部迭代。 Stream提供了内部迭代的方式, 通过访问者模式(Visitor)实现。
3.2 生成流
在 Java 8 中, 集合接口有两个方法来生成流:
- stream() − 为集合创建串行流。
- parallelStream() − 为集合创建并行流。
List<String> strings = Arrays.asList("abc", "", "bc", "efg", "abcd","", "jkl");
List<String> filtered = strings.stream().filter(string -> !string.isEmpty()).collect(Collectors.toList());
3.3 forEach
Stream 提供了新的方法 ‘forEach’ 来迭代流中的每个数据。以下代码片段使用 forEach 输出了10个随机数
Random random = new Random();
random.ints().limit(10).forEach(System.out::println);
3.4 Map
map 方法用于映射每个元素到对应的结果,以下代码片段使用 map 输出了元素对应的平方数:
List<Integer> numbers = Arrays.asList(3, 2, 2, 3, 7, 3, 5);
// 获取对应的平方数
List<Integer> squaresList = numbers.stream().map( i -> i*i).distinct().collect(Collectors.toList());
3.5 filter
filter 方法用于通过设置的条件过滤出元素。以下代码片段使用 filter 方法过滤出空字符串:
List<String>strings = Arrays.asList("abc", "", "bc", "efg", "abcd","", "jkl"); // 获取空字符串的数量
long count = strings.stream().filter(string -> string.isEmpty()).count();
3.6 limit
limit 方法用于获取指定数量的流。 以下代码片段使用 limit 方法打印出 10 条数据:
Random random = new Random(); random.ints().limit(10).forEach(System.out::println);
3.7 sorted
sorted 方法用于对流进行排序。以下代码片段使用 sorted 方法对输出的 10 个随机数进行排序:
Random random = new Random(); random.ints().limit(10).sorted().forEach(System.out::println);
3.8 并行(parallel)程序
parallelStream 是流并行处理程序的代替方法。以下实例我们使用 parallelStream 来输出空字符串的数量:
List<String> strings = Arrays.asList("abc", "", "bc", "efg", "abcd","", "jkl"); // 获取空字符串的数量
long count = strings.parallelStream().filter(string -> string.isEmpty()).count();
我们可以很容易的在顺序运行和并行直接切换。
3.9 Collectors
Collectors 类实现了很多归约操作,例如将流转换成集合和聚合元素。Collectors 可用于返回列表或字符串:
List<String>strings = Arrays.asList("abc", "", "bc", "efg", "abcd","", "jkl");

List<String> filtered = strings.stream().filter(string -> !string.isEmpty()).collect(Collectors.toList());  System.out.println("筛选列表: " + filtered);

String mergedString = strings.stream().filter(string -> !string.isEmpty()).collect(Collectors.joining(", ")); System.out.println("合并字符串: " + mergedString);
3.10 统计
另外,一些产生统计结果的收集器也非常有用。它们主要用于int、double、long等基本类型上,它们可以用来产生类似如下的统计结果。
List<Integer> numbers = Arrays.asList(3, 2, 2, 3, 7, 3, 5);

IntSummaryStatistics stats = numbers.stream().mapToInt((x) -> x).summaryStatistics();

System.out.println("列表中最大的数 : " + stats.getMax());

System.out.println("列表中最小的数 : " + stats.getMin());

System.out.println("所有数之和 : " + stats.getSum());

System.out.println("平均数 : " + stats.getAverage());
s.asList(“abc”, “”, “bc”, “efg”, “abcd”,"", “jkl”); // 获取空字符串的数量
long count = strings.stream().filter(string -> string.isEmpty()).count();
### 3.6 limit

limit 方法用于获取指定数量的流。 以下代码片段使用 limit 方法打印出 10 条数据:

```java
Random random = new Random(); random.ints().limit(10).forEach(System.out::println);
3.7 sorted
sorted 方法用于对流进行排序。以下代码片段使用 sorted 方法对输出的 10 个随机数进行排序:
Random random = new Random(); random.ints().limit(10).sorted().forEach(System.out::println);
3.8 并行(parallel)程序
parallelStream 是流并行处理程序的代替方法。以下实例我们使用 parallelStream 来输出空字符串的数量:
List<String> strings = Arrays.asList("abc", "", "bc", "efg", "abcd","", "jkl"); // 获取空字符串的数量
long count = strings.parallelStream().filter(string -> string.isEmpty()).count();
我们可以很容易的在顺序运行和并行直接切换。
3.9 Collectors
Collectors 类实现了很多归约操作,例如将流转换成集合和聚合元素。Collectors 可用于返回列表或字符串:
List<String>strings = Arrays.asList("abc", "", "bc", "efg", "abcd","", "jkl");

List<String> filtered = strings.stream().filter(string -> !string.isEmpty()).collect(Collectors.toList());  System.out.println("筛选列表: " + filtered);

String mergedString = strings.stream().filter(string -> !string.isEmpty()).collect(Collectors.joining(", ")); System.out.println("合并字符串: " + mergedString);
3.10 统计
另外,一些产生统计结果的收集器也非常有用。它们主要用于int、double、long等基本类型上,它们可以用来产生类似如下的统计结果。
List<Integer> numbers = Arrays.asList(3, 2, 2, 3, 7, 3, 5);

IntSummaryStatistics stats = numbers.stream().mapToInt((x) -> x).summaryStatistics();

System.out.println("列表中最大的数 : " + stats.getMax());

System.out.println("列表中最小的数 : " + stats.getMin());

System.out.println("所有数之和 : " + stats.getSum());

System.out.println("平均数 : " + stats.getAverage());


 被折叠的 条评论
为什么被折叠?
被折叠的 条评论
为什么被折叠?
 到【灌水乐园】发言


