


文章目录
一、测试环境
基于这个篇博客的环境来进行配置:OpenStack Stein版部署
二、查询当前openstack的网络类型
[root@controller ~]# openstack network agent list
+--------------------------------------+--------------------+------------+-------------------+-------+-------+---------------------------+
| ID                                   | Agent Type         | Host       | Availability Zone | Alive | State | Binary                    |
+--------------------------------------+--------------------+------------+-------------------+-------+-------+---------------------------+
| 3adf1be0-6bb2-4407-97a8-4650c853c37a | Linux bridge agent | compute    | None              | :-)   | UP    | neutron-linuxbridge-agent |
| 608949e5-f0de-451e-9c58-d43d47901ed8 | DHCP agent         | controller | nova              | :-)   | UP    | neutron-dhcp-agent        |
| 8bbbd0b9-80ee-49d7-936c-2d357847c0a6 | Linux bridge agent | controller | None              | :-)   | UP    | neutron-linuxbridge-agent |
| b237a133-3ecd-485a-8270-dd5708a175cd | Metadata agent     | controller | None              | :-)   | UP    | neutron-metadata-agent    |
| e98685f1-f6f3-499a-89f1-5b215cbe0a8d | L3 agent           | controller | nova              | :-)   | UP    | neutron-l3-agent          |
+--------------------------------------+--------------------+------------+-------------------+-------+-------+---------------------------+
三、neutron的配置(controller节点)
原来的配置不动,只需要修改如下几个文件里面的内容即可
1. 关闭Linuxbridge服务
[root@controller ~]# systemctl stop neutron-linuxbridge-agent.service
[root@controller ~]# systemctl disable neutron-linuxbridge-agent.service
Removed symlink /etc/systemd/system/multi-user.target.wants/neutron-linuxbridge-agent.service.
2. 重建neutron数据库
MariaDB [(none)]> DROP DATABASE neutron;
MariaDB [(none)]> CREATE DATABASE neutron;
MariaDB [(none)]> GRANT ALL PRIVILEGES ON neutron.* TO 'neutron'@'localhost' IDENTIFIED BY '000000';
MariaDB [(none)]> GRANT ALL PRIVILEGES ON neutron.* TO 'neutron'@'%' IDENTIFIED BY '000000';
3. 安装openvswitch软件包
[root@controller ~]# yum install openstack-neutron-openvswitch -y
4. 配置ML2 插件
修改如下内容即可
[root@controller ~]# vi /etc/neutron/plugins/ml2/ml2_conf.ini
[ml2]
type_drivers = flat,vlan,vxlan
tenant_network_types = vxlan
mechanism_drivers = openvswitch,l2population
extension_drivers = port_security
[ml2_type_flat]
flat_networks = provider
[securitygroup]
enable_ipset = true
[ml2_type_vxlan]
vni_ranges = 1:1000
[ml2_type_vlan]
network_vlan_ranges = default:3001:4000
5. 配置ML3 插件
[root@controller ~]# vi /etc/neutron/l3_agent.ini
[DEFAULT]
verbose = true
interface_driver = neutron.agent.linux.interface.OVSInterfaceDriver
external_network_bridge = br-ex
6. 配置openvswitch_agent
[root@controller ~]# vi /etc/neutron/plugins/ml2/openvswitch_agent.ini
[ovs]
tunnel_bridge = br-tun
local_ip = 192.168.100.10   #隧道IP地址即管理网卡IP地址
integration_bridge = br-int
tenant_network_type = vxlan
tunnel_type = vxlan
tunnel_id_ranges = 1:1000
enable_tunneling = true
bridge_mappings = provider:br-ex
prevent_arp_spoofing = true
[agent]
tunnel_types = vxlan
l2_population = true
[securitygroup]
firewall_driver = neutron.agent.linux.iptables_firewall.OVSHybridIptablesFirewallDriver
enable_security_group = true
7. 配置dhcp
[root@controller ~]# vi /etc/neutron/dhcp_agent.ini
[DEFAULT]
interface_driver = neutron.agent.linux.interface.OVSInterfaceDriver
dhcp_driver = neutron.agent.linux.dhcp.Dnsmasq
enable_isolated_metadata = true
8. 初始化neutron数据库
[root@controller ~]# su -s /bin/sh -c "neutron-db-manage --config-file /etc/neutron/neutron.conf --config-file /etc/neutron/plugins/ml2/ml2_conf.ini upgrade head" neutron
9. 启动openswitch服务
[root@controller ~]# systemctl restart neutron-server.service neutron-openvswitch-agent.service neutron-dhcp-agent.service neutron-metadata-agent.service neutron-l3-agent.service
[root@controller ~]# systemctl enable neutron-server.service neutron-openvswitch-agent.service neutron-dhcp-agent.service neutron-metadata-agent.service neutron-l3-agent.service
四、neutron的配置(compute节点)
1. 关闭Linuxbridge服务
[root@compute ~]# systemctl stop neutron-linuxbridge-agent.service
[root@compute ~]# systemctl disable neutron-linuxbridge-agent.service
2. 安装openvswitch软件包
[root@controller ~]# yum install openstack-neutron-openvswitch -y
3. 配置openvswitch_agent
[root@compute ~]# vi /etc/neutron/plugins/ml2/openvswitch_agent.ini
[ovs]
tunnel_bridge = br-tun
local_ip = 192.168.100.20   #隧道IP地址 管理网卡IP地址
integration_bridge = br-int
tenant_network_type = vxlan
tunnel_type = vxlan
tunnel_id_ranges = 1:1000
enable_tunneling = true
[agent]
tunnel_types = vxlan
l2_population = true
[securitygroup]
firewall_driver = neutron.agent.linux.iptables_firewall.OVSHybridIptablesFirewallDriver
enable_security_group = true
4. 启动openswitch服务
[root@compute ~]# systemctl start neutron-openvswitch-agent.service
[root@compute ~]# systemctl enable neutron-openvswitch-agent.service
五、控制节点执行以下操作
1. 查询网络的类型是否为OVS
[root@controller ~]# openstack network agent list
+--------------------------------------+--------------------+------------+-------------------+-------+-------+---------------------------+
| ID                                   | Agent Type         | Host       | Availability Zone | Alive | State | Binary                    |
+--------------------------------------+--------------------+------------+-------------------+-------+-------+---------------------------+
| 1e651e34-d239-43fb-8af7-553411afe406 | Open vSwitch agent | compute    | None              | :-)   | UP    | neutron-openvswitch-agent |
| 2f8e4601-47ae-4ce6-8c8f-9ed7b3fe648c | Metadata agent     | controller | None              | :-)   | UP    | neutron-metadata-agent    |
| 41e68b12-2003-4534-97a4-107bb0390cb7 | Linux bridge agent | compute    | None              | XXX   | UP    | neutron-linuxbridge-agent |
| 825f9141-08bd-47f7-8cc5-7eeee9cbb522 | DHCP agent         | controller | nova              | :-)   | UP    | neutron-dhcp-agent        |
| a6bf0bf8-508e-4bb0-9540-2c41c00b83bd | Open vSwitch agent | controller | None              | :-)   | UP    | neutron-openvswitch-agent |
| f62de0be-8a0a-4037-b3b7-01070c10c885 | L3 agent           | controller | nova              | :-)   | UP    | neutron-l3-agent          |
+--------------------------------------+--------------------+------------+-------------------+-------+-------+---------------------------+

删除没有用的Linuxbridge信息
[root@controller ~]# openstack network agent delete 41e68b12-2003-4534-97a4-107bb0390cb7
2. 删除之前留下的Linuxbridge网桥信息
不操作这一步添加br-ex会报错
先使用 brctl delif 网桥名称  绑定网卡的名称 这条命令解除网卡的绑定
 brctl delif brq59014ca7-b8 ens34

然后down掉对应的网桥 在进行删除即可
[root@controller ~]# ifconfig brq59014ca7-b8 down
[root@controller ~]# ifconfig brqdb369f01-a7 down
[root@controller ~]# ifconfig  vxlan-1 down
[root@controller ~]# brctl show   查看网桥信息
bridge name     bridge id               STP enabled     interfaces
brq59014ca7-b8          8000.000000000000       no
brqdb369f01-a7          8000.000000000000       no
[root@controller ~]# brctl delbr brq59014ca7-b8
[root@controller ~]# brctl delbr brqdb369f01-a7
[root@controller ~]# brctl show
bridge name     bridge id               STP enabled     interfaces
3. 添加br-ex网桥
[root@controller ~]# ovs-vsctl add-br br-ex
[root@controller ~]# ovs-vsctl add-port br-ex ens34

然后重启以下控制节点和计算节点的网络服务即可
4. 查看ovs的状态
br-ex 上网用的主要连接外部网卡
br-tun 隧道网卡,建立隧道的
br-int 确保云主机可以上网的
br-tun这里会显示隧道的IP地址
[root@controller ~]# ovs-vsctl show
[root@controller ~]# ovs-vsctl show
8f6d9ea5-4be3-409e-af6e-e9c2b1783dfe
    Manager "ptcp:6640:127.0.0.1"
        is_connected: true
    Bridge br-ex
        Controller "tcp:127.0.0.1:6633"
            is_connected: true
        fail_mode: secure
        Port "ens34"
            Interface "ens34"
        Port br-ex
            Interface br-ex
                type: internal
        Port phy-br-ex
            Interface phy-br-ex
                type: patch
                options: {peer=int-br-ex}
    Bridge br-tun
        Controller "tcp:127.0.0.1:6633"
            is_connected: true
        fail_mode: secure
        Port "vxlan-c0a86414"
            Interface "vxlan-c0a86414"
                type: vxlan
                options: {df_default="true", egress_pkt_mark="0", in_key=flow, local_ip="192.168.100.10", out_key=flow, remote_ip="192.168.100.20"}
        Port patch-int
            Interface patch-int
                type: patch
                options: {peer=patch-tun}
        Port br-tun
            Interface br-tun
                type: internal
六、dashboard界面正常创建网络
1. 创建完成如下图

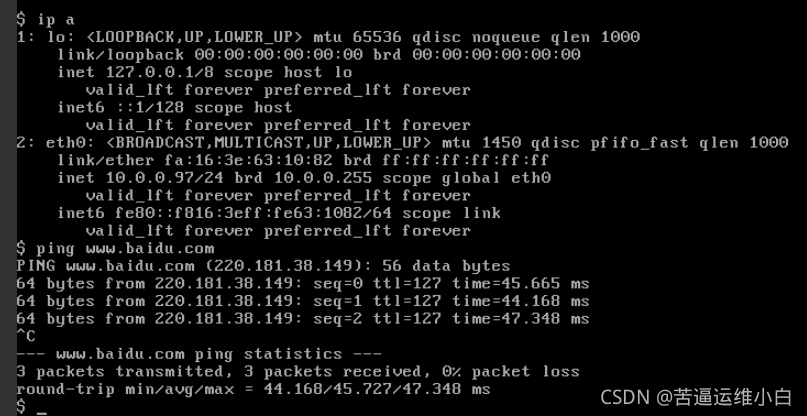
2. 创建云主机访问百度测试


 758
758


 被折叠的 条评论
为什么被折叠?
被折叠的 条评论
为什么被折叠?
 到【灌水乐园】发言


