照着狂神的视频写的
环境搭建
- 勾选 web,thymeleaf,springsecurity

-
导入前端素材
-
编写controller 页面跳转
@Controller public class RouterController { @RequestMapping({"/","/index"}) public String toIndex(){ return "index"; } @RequestMapping("/toLogin") public String toLogin(){ return "views/login"; } @RequestMapping("/level1/{id}") public String toLevel1(@PathVariable("id") String id){ return "views/level1/" + id; } @RequestMapping("/level2/{id}") public String toLevel2(@PathVariable("id") String id){ return "views/level2/" + id; } @RequestMapping("/level3/{id}") public String toLevel3(@PathVariable("id") String id){ return "views/level3/" + id; } } -
先删除springsecurity的依赖,如果不删除就会使用默认的安全设置
<!--<dependency>-->
   <!--<groupId>org.springframework.boot</groupId>-->
   <!--<artifactId>spring-boot-starter-security</artifactId>-->
<!--</dependency>-->
No active profile set, falling back to default profiles: default启动服务,测试能正常跳转
用户认证和授权
导入springsecurity依赖
<dependency>
    <groupId>org.springframework.boot</groupId>
    <artifactId>spring-boot-starter-security</artifactId>
</dependency>
编写自定义config
使用 @EnableWebSecurity 注解,继承 WebSecurityConfigurerAdapter
@EnableWebSecurity
public class SecurityConfig extends WebSecurityConfigurerAdapter {

    /**
     * 授权 允许指定用户访问指定链接
     * @param http
     * @throws Exception
     */
    @Override
    protected void configure(HttpSecurity http) throws Exception {
        // 首页所有人都能访问,功能页只有对应权限的用户才能访问
        // 权限规则
        http.authorizeRequests()
                // 添加请求路径 任何人都可以访问
                .antMatchers("/").permitAll()
                // 添加请求路径 指定角色才能访问
                .antMatchers("/level1/**").hasRole("vip1")
                .antMatchers("/level2/**").hasRole("vip2")
                .antMatchers("/level3/**").hasRole("vip3");

        // 没有权限就跳转到登录页,没设置就跳转到默认登录页
        http.formLogin();


    }

    /**
     * 认证 用户名密码角色认证
     * @param auth
     * @throws Exception
     */
    @Override
    protected void configure(AuthenticationManagerBuilder auth) throws Exception {
        // 从内存中验证身份,还可以使用数据库认证 使用new BCryptPasswordEncoder() 加密密码
        auth.inMemoryAuthentication().passwordEncoder(new BCryptPasswordEncoder())
                // 添加用户 用户名 密码编码 角色
                .withUser("guest").password(new BCryptPasswordEncoder().encode("123456")).roles("vip1")
                // 使用and 再次添加用户
                .and()
                .withUser("starry").password(new BCryptPasswordEncoder().encode("123456")).roles("vip2","vip3")
                .and()
                .withUser("root").password(new BCryptPasswordEncoder().encode("123456")).roles("vip1","vip2","vip3");
    }
}
启动访问,访问 Level-1-1 跳转到springsecurity默认的登录页面
- 登录 root 用户,可访问 Level 1,Level 2,Level 3
- 访问 http://localhost:8080/login,登录 starry 用户,可访问 Level 2,Level 3
- 访问 http://localhost:8080/login,登录 guest 用户,可访问 Level 1
注销及权限控制
configure(HttpSecurity http) 添加方法,开启注销
// 开启注销 默认url是/logout 注销成功后跳转到首页
http.logout().logoutSuccessUrl("/");

// 如果logout显示404就关闭跨站请求伪造的支持
//http.csrf().disable();
html添加注销按钮
<!--登录注销-->
<div class="right menu">
    <!--未登录-->
    <a class="item" th:href="@{/toLogin}">
        <i class="address card icon"></i> 登录
    </a>
    <a class="item" th:href="@{/logout}">
        <i class="sign-out icon"></i> 注销
    </a>
    <!--已登录
    <a th:href="@{/usr/toUserCenter}">
        <i class="address card icon"></i> admin
    </a>
    -->
</div>
权限不同展示不同页面
导入 thymeleaf和springsecurity5整合 的依赖
<dependency>
    <groupId>org.thymeleaf.extras</groupId>
    <artifactId>thymeleaf-extras-springsecurity5</artifactId>
    <version>3.0.4.RELEASE</version>
</dependency>
如果未登录显示 登录 按钮,登录后显示 用户名 和 注销 按钮
导入 spring-security 约束
<html lang="en" xmlns:th="http://www.thymeleaf.org"
      xmlns:sec="http://www.thymeleaf.org/extras/spring-security">
<div class="right menu">
	<!--如果是已认证就显示用户名-->
    <div sec:authorize="isAuthenticated()">
        <a class="item">
            用户名: <span sec:authentication="name"></span>
        </a>
    </div>

    <!--未登录-->
    <!-- 如果授权不是已认证-->
    <div sec:authorize="!isAuthenticated()">
        <a class="item" th:href="@{/toLogin}">
            <i class="address card icon"></i> 登录
        </a>
    </div>
    <!-- 如果授权是已认证 -->
    <div sec:authorize="isAuthenticated()">
        <a class="item" th:href="@{/logout}">
            <i class="sign-out icon"></i> 注销
        </a>
    </div>
</div>


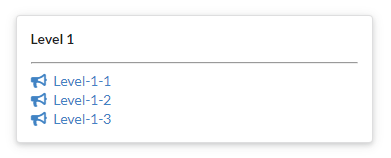
动态展示页面
在每个菜单的 div 上加上标签控制
<!-- 菜单根据角色动态显示 -->
<!-- 如果授权角色是vip1就显示 Level 1菜单 -->
<div class="column" sec:authorize="hasRole('vip1')">
...Level 1
<div class="column" sec:authorize="hasRole('vip2')">
...Level 2
<div class="column" sec:authorize="hasRole('vip3')">
...Level 3
- 启动服务,访问
http://localhost:8080/login,而不是右上角的登录按钮,因为我们开启的登录页面是springsecurity默认的登录页,还未设置指定的登录页 - 登录 guest 账号,只显示 level1菜单

- 登录 starry 账号,显示 level2 level3菜单

- 登录 root 账号,显示 level1 level2 level3菜单

记住账号及定制首页
configure(HttpSecurity http) 添加方法,开启记住账号
// 开启记住账号
http.rememberMe();
重启服务,可以看见有了记住账号复选框,勾选记住账号会把cookie存在本地,浏览器关闭后再次访问不用登录,浏览器直接使用cookie验证身份

configure(HttpSecurity http) 修改方法,设置登录页面
// loginPage 设置登录页面的url,默认是/login,我们设置为自己定义的/toLogin会跳转到views/login.html
// loginProcessingUrl 设置接收表单地址的url
http.formLogin().loginPage("/toLogin").loginProcessingUrl("/login") ;
修改 login.html 的表单提交地址
<form th:action="@{/login}" method="post">
启动服务,点击登录按钮,输入账号,可以正常登录
修改表单提交参数,账号的name属性改为 name,密码的name属性改为 pwd
<input type="text" placeholder="Username" name="name">
<input type="password" name="pwd">
重启服务,发现登录失败,地址栏显示 http://localhost:8080/toLogin?error
- 登录失败后重定向到登录页url后拼接
error,因为我们设置的登录页url是/toLogin,在后面拼接error,就是/toLogin?error,如果没设置默认就是/login?error - springsecurity的表单验证参数用户名默认为
username,密码默认为password
configure(HttpSecurity http) 修改方法,设置登录表单参数
http.formLogin().loginPage("/toLogin").loginProcessingUrl("/login")
                .usernameParameter("username")
                .passwordParameter("password");
首页添加记住账号
<div class="field">
   <input type="checkbox" name="remember"> 记住账号
</div>
设置记住账号的验证参数
// 开启记住账号,设置记住账号的验证参数
http.rememberMe().rememberMeParameter("remember")


 1196
1196


 被折叠的 条评论
为什么被折叠?


