


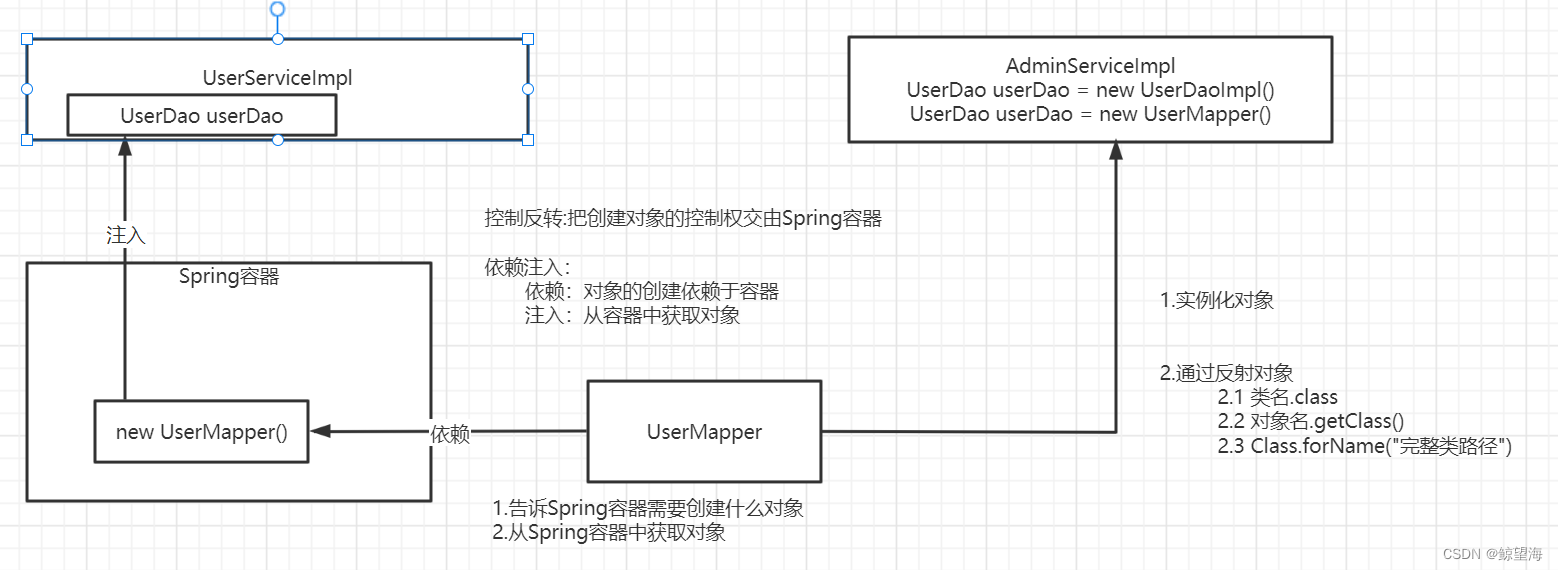
SpringIOC
1. 配置文件方式
a. (在pom.xml中)导入Spring容器的坐标
当前工程下的pom.xml
若,当前工程为某一项目的子工程,则引入Spring容器的配置统一 在父工程的pom.xml文件下配置
  <!--Spring容器-->
  <!-- https://mvnrepository.com/artifact/org.springframework/spring-context -->
  <dependency>
    <groupId>org.springframework</groupId>
    <artifactId>spring-context</artifactId>
    <version>5.2.9.RELEASE</version>
  </dependency>
b. 创建Spring.xml(resources下的)配置文件
Spring-config.xml为自定义名字
其路径在当前项目的resources下
为当前项目的Spring配置文件(之一)
<!--向 Spring 容器注册一个 Bean-->
<!--        这个name就是将来获取UserDao对象的对象名     class就是UserDao实例化的路径(基于反射原理实现)-->
    <bean name="userDao" class="com.qf.ran.dao.impl.UserDaoImpl"/>
<!--    这种方法获取的对象 都是通过反射调用该类的无参构造实例化而来的 是不携带参数的-->
	<bean name="userDao2" class="com.qfedu.demo.dao.UserDao"/>
-
关于bean配置时选id 还是name 的问题
**像这种id时 u1,u2,u3 都是可以获取到该bean的;但这种name 只有在name为 (u1,u2,u3) 时 才能获取到这个bean
但这种区别一般用不到 一般也不会这样设置**
-
两种模式
-
懒加载 / 非懒加载
懒加载概念:用到的时候再加载对象
<!-- lazy-init:决定是否懒加载 默认为 false --> <bean class="com.qf.ran.dao.impl.UserDaoImpl" id="userDao" lazy-init="true"/> -
单例 / 非单例
单例概念:全程只创建对象,每次调用的时候都是反复对该对象操作;
非单例概念:每次调用的时候都创建出新的对象,每次操作都是对其各自不同的对象进行。
属性: scope:决定是否为单例模式,默认为单例模式;
属性值:prototype:非单例模式 singleton:单例模式。
<bean class="com.qf.ran.dao.impl.UserDaoImpl" id="userDao" scope="prototype"/>
-
-
三种赋值(基本属性的,注入)
要是想再向Spring容器里注册bean的时候,同时要告诉Spring对象的属性是什么,用以下的方法
-
通过constructor-arg 标签配置
需要相应的构造方法"满参\半参"
Spring容器会自动匹配自有的带参构造方法进行调用
<!--实例--> <bean name="u3" class="com.qfedu.demo.entity.User"> <constructor-arg name="id" value="1001" /> <constructor-arg name="address" value="guangzhou"/> <constructor-arg name="userName" value="zhangsan"/> </bean> -
通过set方法进行设置参数值
通过property 标签来获取set方法来给对象赋值,注意的是Spring容器时根据name的值来判断响应的set方法,get方法也一样(通过name值判断)
<bean name="u5" class="com.qfedu.demo.entity.User"> <property name="id" value="1003"/> <property name="address" value="shenzhen"/> <property name="userName" value="lisi"/> </bean> -
p 名称空间注入(本质也是调用set方法注入)
<bean name="u6" class="com.qfedu.demo.entity.User" p:id="1004" p:address="shanghai" p:userName="zhaoliu"/> -
-
两个工厂注入(复杂属性的,注入)(暂不会,暂没用到)
c. 加载配置文件创建Spring容器
也可以说是:读取 xml 中的 class 属性,利用反射创建出来一个 Bean
//通过文件系统寻找,传递相对路径
//ApplicationContext context = new FileSystemXmlApplicationContext("src/main/resources/spring-config.xml");

ApplicationContext context = new ClassPathXmlApplicationContext("spring-config.xml");
//上下两种写法都行,两个都是,先通过配置文件名获取当前配置文件,再自动通过Bean中的class信息加载需要创建的对象。。。可设置懒加载
ClassPathXmlApplicationContext cpac = new ClassPathXmlApplicationContext("spring-config.xml");
d. 通过 getBean() 从容器中获取指定的对象
通过getBean() 获取已依赖的对象
一、传入自定义的name值 (或) id值,再传入所需获取对象类的反射对象
//案例
UserController userController = context.getBean("userController", UserController.class);

@Test
public void testGetBean(){
    ApplicationContext context = new ClassPathXmlApplicationContext("spring-config.xml");
    //User user = (User)context.getBean("user");
    User user = context.getBean("user", User.class);
    System.out.println(user);
}
二、也可以通过,只传入自定义的name值 (或) id值
//案例
public class UserDaoImplTest {
    private UserDao userDao;
    @Test
    public void testDeleteBean(){
        ApplicationContext context = new ClassPathXmlApplicationContext("spring-config.xml");
        this.userDao = (UserDao)context.getBean("userDao");
        System.out.println(this.userDao.选择调用的方法);
    }
}
2. 注解方式
a. 在Spring.xml文件下添加注解扫描支持
其中的 base-packege值为需要扫描的包路径
<!--案例-->
<context:component-scan base-package="com.qf.ran"/>
b. 依赖注解
告诉Spring容器,该地方新创建对象需要依赖Spring容器来替代完成
【直接】把对应的注解 注释到对应类的上面就行了
-
@Controller 支持控制层的注解(controller)
-
@Repository 支持持久层的注解(dao)
-
@Service 支持业务逻辑层的注解(service)
-
@Conponent 支持所有的类的注解(通用)
c. 注入注解
-
**@Autowired **
默认根据类型来查找再Spring容器中创建的对象
默认元素值为true,设置为false代表注入的对象可以为null
//实例 @Autowired(false) -
**@Resource **
默认根据之前自定义的 name值获取对象进行注入,如果没有为@Resource设置元素 name值则默认使用类型
SpringAOP
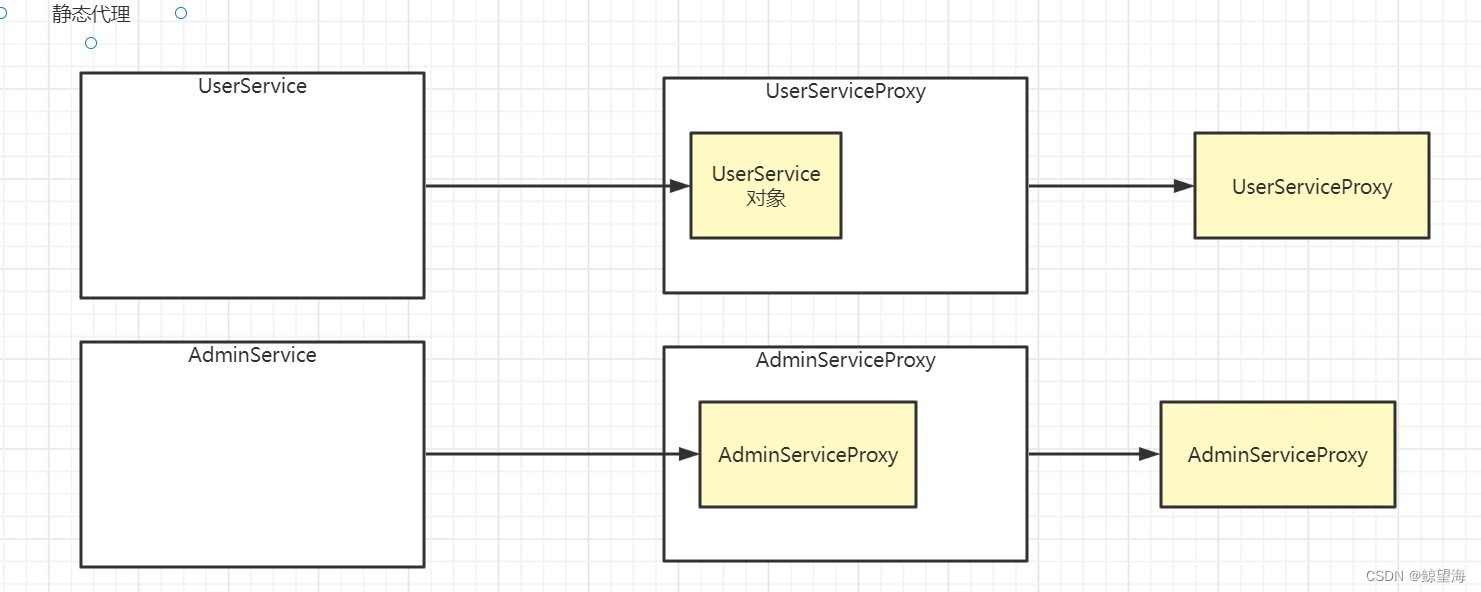
静态代理
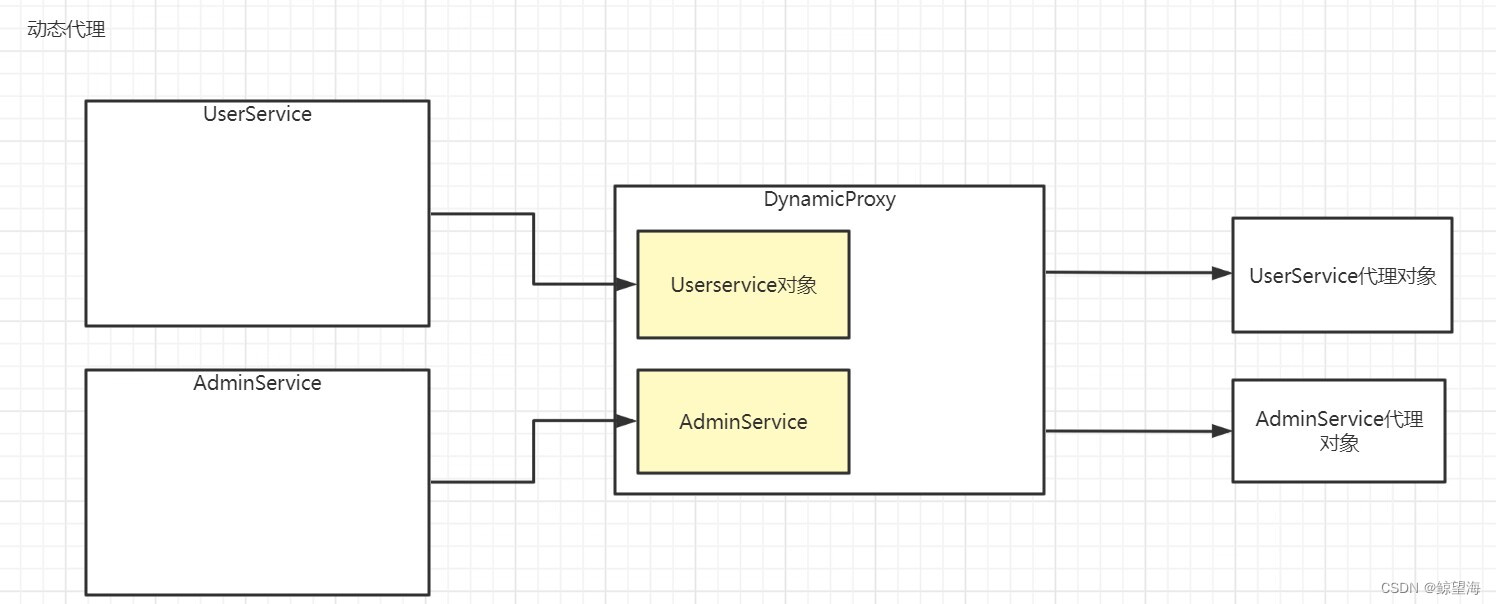
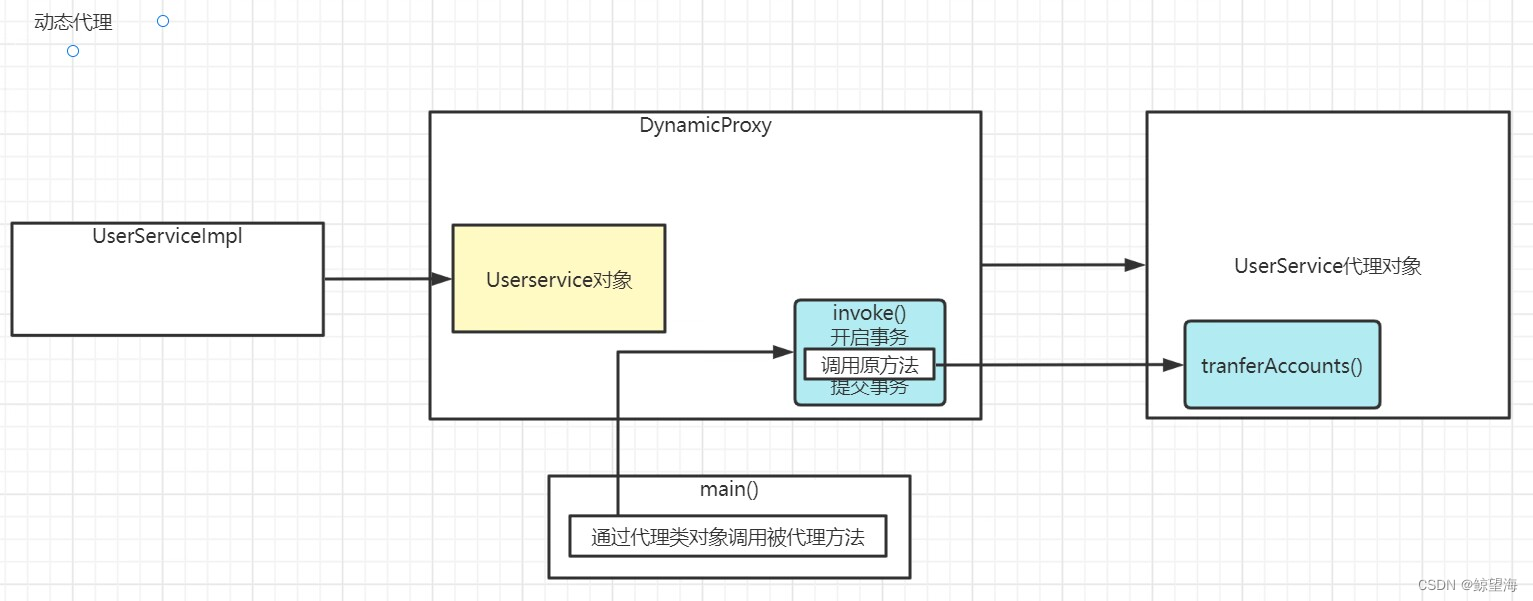
动态代理
动态代理Spring
1. xml配置方式
实例
<?xml version="1.0" encoding="UTF-8"?>
<beans xmlns="http://www.springframework.org/schema/beans"
       xmlns:xsi="http://www.w3.org/2001/XMLSchema-instance"
       xmlns:aop="http://www.springframework.org/schema/aop"
       xsi:schemaLocation="http://www.springframework.org/schema/beans
       http://www.springframework.org/schema/beans/spring-beans.xsd
       http://www.springframework.org/schema/aop
       https://www.springframework.org/schema/aop/spring-aop.xsd">
    <!--配置增强类对象(通知对象)-->
    <bean class="com.qf.ran.advice.TransactionAdvice" name="transactionAdvice"/>

    <!--配置需要植入(需要增强)的对象目标-->
    <aop:config>
        <!--
            配置切点
            第一个 * 代表通配所有方法返回值,填写指定数据类型代表返回值必须为指定数据类型
            第二个 * 代表通配所有的ServiceImpl
            第三个 * 代表通配类里所有的方法
        -->
        <!--<aop:pointcut id="transactionPC" expression="execution(* com.qf.ran.service.impl.*ServiceImpl.*(..))"/>-->
        <aop:pointcut id="transactionPC" expression="execution(* com.qf.ran.service.impl.UserServiceImpl.transferAccounts1(..))"/>
        <!--设置增强类 ref 连接增强类 bean 对象的 name 属性-->
        <aop:aspect ref="transactionAdvice">
            <!--
                方法出现异常,返回增强和环绕增强的环绕后不执行
            -->
            <!-- aop:around 代表环绕增强-->
            <aop:around method="around" pointcut-ref="transactionPC"/>
            <!--前置增强-->
            <aop:before method="before" pointcut-ref="transactionPC"/>
            <!--后置增强-->
            <aop:after method="after" pointcut-ref="transactionPC"/>
            <!--异常正常-->
            <aop:after-throwing method="afterThrowing" pointcut-ref="transactionPC"/>
            <!--返回增强-->
            <aop:after-returning method="afterReturning" pointcut-ref="transactionPC"/>

        </aop:aspect>
    </aop:config>
</beans>
包含配置内容(纯配置文件)
a. 增强类对象
<!--样例-->
<bean class="项目下的,java(src设置)下,需要配置增强的对象,的相对路径" name="自定义设置的名字" />
<!--实例,及其详细注解-->

<!--配置增强类对象(通知对象)-->
<bean class="com.qf.ran.advice.TransactionAdvice" name="transactionAdvice"/>
b. 需要植入增强的目标对象
c. 同时需要设置需要调用的增强方法,及改方法的类型
<!--样例-->

<aop:config>
	<aop:pointcut id="自定义的id,用于后边方法的关联" expression="需要植入增强的目标对象,在java(src设置)下的相对路径" />
    <aop:aspect>
    	<aop:around method="对应增强类内,命名的增强方法的,方法名" pointcut-ref="对应上边自定义的id值" />
    	<aop:before method="同上" pointcut-ref="同上"/>
        <aop:after method="同上" pointcut-ref="同上"/>
        <aop:after-throwing method="同上" pointcut-ref="同上"/>
        <aop:after-returning method="同上" pointcut-ref="同上"/>
    </aop:aspect>
</aop:config>
<!--实例,及其详细注解-->

<aop:config>
        <!--
            配置切点
            第一个 * 代表通配所有方法返回值,填写指定数据类型代表返回值必须为指定数据类型
            第二个 * 代表通配所有的ServiceImpl
            第三个 * 代表通配类里所有的方法
        -->
        <!--<aop:pointcut id="transactionPC" expression="execution(* com.qf.ran.service.impl.*ServiceImpl.*(..))"/>-->
        <aop:pointcut id="transactionPC" expression="execution(* com.qf.ran.service.impl.UserServiceImpl.transferAccounts1(..))"/>
        <!--设置增强类 ref 连接增强类 bean 对象的 name 属性-->
        <aop:aspect ref="transactionAdvice">
            <!--
                方法出现异常,返回增强和环绕增强的环绕后不执行
            -->
            <!-- aop:around 代表环绕增强-->
            <aop:around method="around" pointcut-ref="transactionPC"/>
            <!--前置增强-->
            <aop:before method="before" pointcut-ref="transactionPC"/>
            <!--后置增强-->
            <aop:after method="after" pointcut-ref="transactionPC"/>
            <!--异常正常-->
            <aop:after-throwing method="afterThrowing" pointcut-ref="transactionPC"/>
            <!--返回增强-->
            <aop:after-returning method="afterReturning" pointcut-ref="transactionPC"/>
        </aop:aspect>
    </aop:config>
2. 注解配置方式
实例
@Component
/*代表切面类*/
@Aspect
public class TransactionAdvice {
    //配置切点
    @Pointcut("execution(* com.qf.ran.service.impl.UserServiceImpl.transferAccounts1(..))")
    public void transactionPC(){

    }

    @Before("TransactionAdvice.transactionPC()")
    public void before(){
        System.out.println("前置增强");
    }

    @After("TransactionAdvice.transactionPC()")
    public void after(){
        System.out.println("后置增强");
    }

    @AfterThrowing("TransactionAdvice.transactionPC()")
    public void afterThrowing(){
        System.out.println("异常增强(回滚事务)");
    }

    @AfterReturning("TransactionAdvice.transactionPC()")
    public void afterReturning(){
        System.out.println("返回结果后");
    }

    @Around("TransactionAdvice.transactionPC()")
    public Object around(ProceedingJoinPoint point) throws Throwable {
        System.out.println("环绕前");
        //调用被增强的方法
        Object respBean = point.proceed();
        System.out.println("环绕后");
        return respBean;
    }

}
<?xml version="1.0" encoding="UTF-8"?>
<beans xmlns="http://www.springframework.org/schema/beans"
       xmlns:xsi="http://www.w3.org/2001/XMLSchema-instance"
       xmlns:context="http://www.springframework.org/schema/context"
       xmlns:aop="http://www.springframework.org/schema/aop"
       xsi:schemaLocation="http://www.springframework.org/schema/beans
       http://www.springframework.org/schema/beans/spring-beans.xsd
       http://www.springframework.org/schema/context
       https://www.springframework.org/schema/context/spring-context.xsd http://www.springframework.org/schema/aop https://www.springframework.org/schema/aop/spring-aop.xsd">
    <!--开启 IOC 注解扫描-->
    <context:component-scan base-package="com.qf.ran"/>

    <!--开启 AOP 注解支持,默认支持jdk动态代理-->
    <aop:aspectj-autoproxy/>

    <!-- proxy-target-class 设置为 true 则代表使用 cglib的动态代理-->
    <aop:aspectj-autoproxy proxy-target-class="true"/>
</beans>
包含配置内容
a. 切面类,同时配置切点,及该切面类的增强方法
@Component
/*代表切面类*/
@Aspect
public class 自定义切面类名字 {
    //配置切点
    @Pointcut("execution(需要增强的服务层类的,内部方法)")
    public void 自定义切点名字(){

    }

    @Before("自定义切面类名字.自定义切点名字()")
    public void before(){
        //前置增强
    }

    @After("自定义切面类名字.自定义切点名字()")
    public void after(){
        //后置增强
    }

    @AfterThrowing("自定义切面类名字.自定义切点名字()")
    public void afterThrowing(){
       //异常增强(回滚事务)
    }

    @AfterReturning("自定义切面类名字.自定义切点名字()")
    public void afterReturning(){
        //返回结果后
    }

    @Around("自定义切面类名字.自定义切点名字()")
    public Object around(ProceedingJoinPoint point) throws Throwable {
        //环绕前
        //调用被增强的方法
        Object respBean = point.proceed();
        //环绕后
    }

}
b. 配置文件
<?xml version="1.0" encoding="UTF-8"?>
<beans xmlns="http://www.springframework.org/schema/beans"
       xmlns:xsi="http://www.w3.org/2001/XMLSchema-instance"
       xmlns:context="http://www.springframework.org/schema/context"
       xmlns:aop="http://www.springframework.org/schema/aop"
       xsi:schemaLocation="http://www.springframework.org/schema/beans
       http://www.springframework.org/schema/beans/spring-beans.xsd
       http://www.springframework.org/schema/context
       https://www.springframework.org/schema/context/spring-context.xsd http://www.springframework.org/schema/aop https://www.springframework.org/schema/aop/spring-aop.xsd">

    <!--开启 IOC 注解扫描-->
    <context:component-scan base-package="com.qf.ran"/>

    <!--开启 AOP 注解支持,默认支持jdk动态代理-->
    <aop:aspectj-autoproxy/>
</beans>
SpringMVC
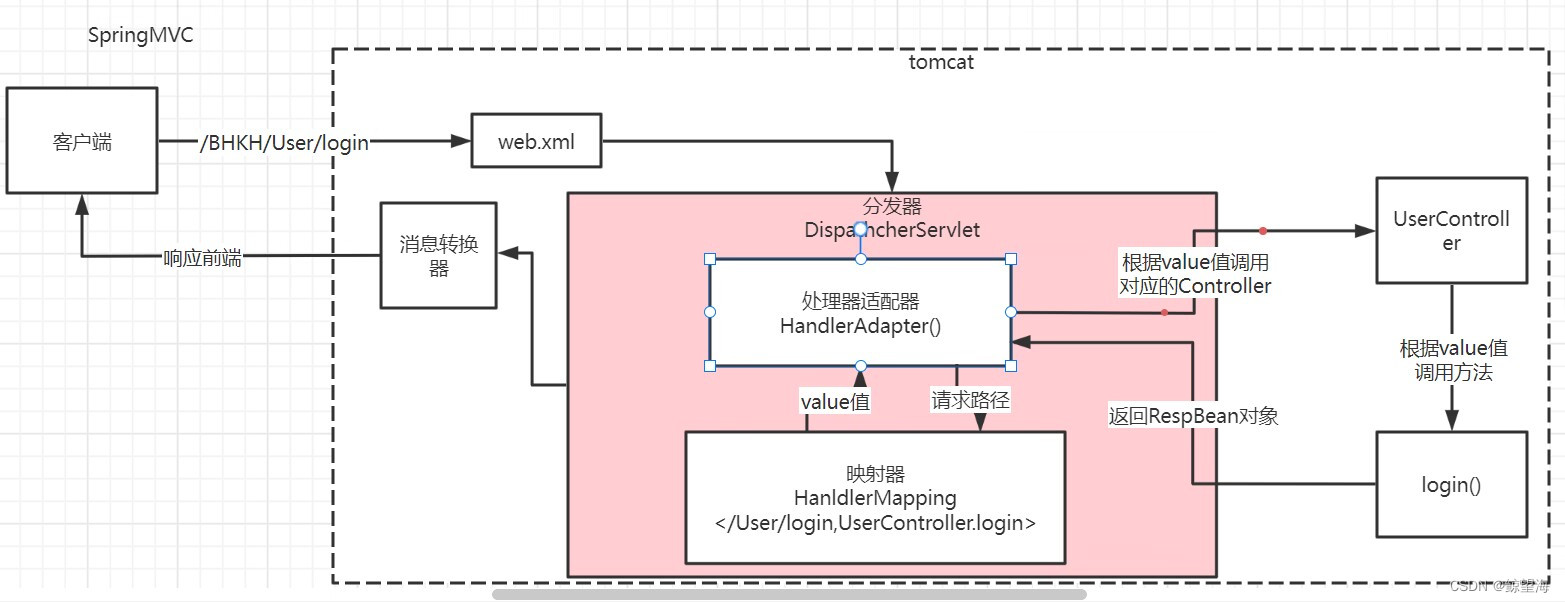
1. 注解内容:
控制层类对象的注解
//实例

@Controller
@RequestMapping("/User") //填写的是自定义控制层代号名
public class UserController {

    @RequestMapping("/login") //填写的是自定义方法名
    public void login(){
        System.out.println("登录方法");
    }

    @RequestMapping("/register") //填写的是自定义方法名
    public void register(){
        System.out.println("注册方法");
    }
}
-
@Controller : SpringIOC扫描注解,且用注解标记一个类为Controller类
(该类同时需要使用 @RequestMapping “请求映射器” 来注解其中的映射方法)
——该注解只是定义了一个控制器类
-
@RequestMapping : 注解解决请求的方法
——该注解的方法才是真正处理请求的处理器
2. Spring.xml配置文件
<!--实例-->


<?xml version="1.0" encoding="UTF-8"?>
<beans xmlns="http://www.springframework.org/schema/beans"
       xmlns:xsi="http://www.w3.org/2001/XMLSchema-instance"
       xmlns:context="http://www.springframework.org/schema/context"
       xmlns:mvc="http://www.springframework.org/schema/mvc"
       xsi:schemaLocation="http://www.springframework.org/schema/beans
       http://www.springframework.org/schema/beans/spring-beans.xsd
       http://www.springframework.org/schema/context
       https://www.springframework.org/schema/context/spring-context.xsd
       http://www.springframework.org/schema/mvc
       https://www.springframework.org/schema/mvc/spring-mvc.xsd">
        <!--开启 SpringIOC 注解扫描-->
        <context:component-scan base-package="com.qf.ran"/>
        <!--开启 SpringMVC 注解支持 -->
        <mvc:annotation-driven/>
</beans>
- 开启SpringIOC的注解扫描
- 开启SpringMVC的注解支持
a. 业务层转换成web.xml配置
<!--实例-->

<!DOCTYPE web-app PUBLIC
 "-//Sun Microsystems, Inc.//DTD Web Application 2.3//EN"
 "http://java.sun.com/dtd/web-app_2_3.dtd" >

<web-app>
  <display-name>Archetype Created Web Application</display-name>

  <!--配置编码过滤器-->
  <filter>
    <filter-name>CharacterEncodingFilter</filter-name>
    <filter-class>org.springframework.web.filter.CharacterEncodingFilter</filter-class>
    <init-param>
      <param-name>encoding</param-name>
      <param-value>UTF-8</param-value>
    </init-param>
  </filter>
  <filter-mapping>
    <filter-name>CharacterEncodingFilter</filter-name>
    <url-pattern>/*</url-pattern>
  </filter-mapping>

  <!--配置 SpringMVC 分发器-->
  <servlet>
    <servlet-name>DispatcherServlet</servlet-name>
    <servlet-class>org.springframework.web.servlet.DispatcherServlet</servlet-class>
    <!--初始化方法-->
    <init-param>
      <param-name>contextConfigLocation</param-name>
      <!--加载配置文件-->
      <param-value>classpath:spring-context.xml</param-value>
    </init-param>
  </servlet>
  <servlet-mapping>
    <servlet-name>DispatcherServlet</servlet-name>
    <url-pattern>/</url-pattern>
  </servlet-mapping>

</web-app>
分析web.xml配置的主要两点:
-
- 配置编码过滤器
-
- 配置SpringMVC分发器
- 2.1 初始化方法
- 2.2 加载配置文件
<!--1.配置编码过滤器-->

  <!--配置编码过滤器-->
  <filter>
    <filter-name>CharacterEncodingFilter</filter-name>
    <filter-class>org.springframework.web.filter.CharacterEncodingFilter</filter-class>
    <init-param>
      <param-name>encoding</param-name>
      <param-value>UTF-8</param-value>
    </init-param>
  </filter>
  <filter-mapping>
    <filter-name>CharacterEncodingFilter</filter-name>
    <url-pattern>/*</url-pattern>
  </filter-mapping>
<!--2.  配置SpringMVC分发器
	- 2.1  初始化方法
	- 2.2  加载配置文件-->

  <!--配置 SpringMVC 分发器-->
  <servlet>
    <servlet-name>DispatcherServlet</servlet-name>
    <servlet-class>org.springframework.web.servlet.DispatcherServlet</servlet-class>
    <!--初始化方法-->
    <init-param>
      <param-name>contextConfigLocation</param-name>
      <!--加载配置文件-->
      <param-value>classpath:spring-context.xml</param-value>
    </init-param>
  </servlet>
  <servlet-mapping>
    <servlet-name>DispatcherServlet</servlet-name>
    <url-pattern>/</url-pattern>
  </servlet-mapping>
b. pom.xml配置(导入依赖包)
-
depedencies //依赖关系 内导入包
    <!-- Servlet jar包-->
<dependency>
    <groupId>javax.servlet</groupId
    <artifactId>javax.servlet-api</artifactId>
    <version>4.0.1</version>
</dependency>

    <!-- SpringMVC jar包-->
<dependency>
    <groupId>org.springframework</groupId>
    <artifactId>spring-webmvc</artifactId>
    <version>5.2.9.RELEASE</version>
</dependency>
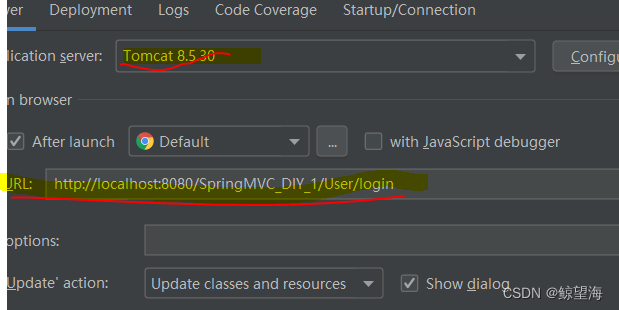
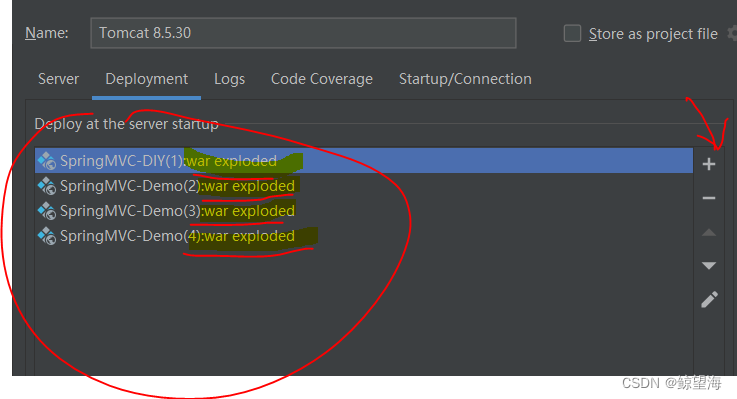
c. Tomcat配置
-
更改配置的url路径
-
(非必须)配置对应的Tomcat版本
- 添加Tomcat中,Deplotment中,需要部署到服务器上的项目"war打包格式 exploded样式"
3. 处理:请求和响应
a. 需要的jar包
<dependencies>
        <!--SpringMVC -->
        <dependency>
            <groupId>org.springframework</groupId>
            <artifactId>spring-webmvc</artifactId>
            <version>${spring-version}</version>
        </dependency>

        <!-- fastjson-->
        <dependency>
            <groupId>com.alibaba</groupId>
            <artifactId>fastjson</artifactId>
            <version>1.2.73</version>
        </dependency>

    <!--该包为个人自己的封装包:具体内容代码如下-->
        <dependency>
            <groupId>com.lyz</groupId>
            <artifactId>DBManagerUtils</artifactId>
            <version>1.0.0</version>
        </dependency>

        <dependency>
            <groupId>mysql</groupId>
            <artifactId>mysql-connector-java</artifactId>
            <version>5.1.48</version>
        </dependency>

        <dependency>
            <groupId>org.springframework</groupId>
            <artifactId>spring-test</artifactId>
            <version>${spring-version}</version>
        </dependency>
    </dependencies>
-
解析DBManagerUtils个人封装包
其底层是封装了JDBC的调用与处理,进阶替代可以选用Mybatis
-
DBManager.javapackage com.qf.ran.utils; import java.io.IOException; import java.sql.Connection; import java.sql.DriverManager; import java.sql.SQLException; import java.util.Properties; /* * @author:Ran * @since:JDK 1.8 * @Date:2022/9/15 */ public class DBUtils { private static String className; private static String url; private static String username; private static String password; static{ //给静态属性赋值 Properties properties = new Properties(); try { properties.load(DBUtils.class.getClassLoader().getResourceAsStream("jdbc.properties")); className = properties.getProperty("className"); url = properties.getProperty("url"); username = properties.getProperty("username"); password = properties.getProperty("password"); } catch (IOException e) { e.printStackTrace(); } } /** * 获取连接对象 * @return */ public static Connection getConnection(){ Connection connection = null; try { //1.加载驱动 Class.forName(className); //2.通过 DriverManager 对象获取连接对象 connection = DriverManager.getConnection(url, username, password); } catch (ClassNotFoundException e) { e.printStackTrace(); } catch (SQLException e) { e.printStackTrace(); } return connection; } //关闭资源 public static void closeAll(AutoCloseable ... autoCloseables){ for (AutoCloseable autoCloseable : autoCloseables) { try { if(autoCloseable != null){ autoCloseable.close(); } } catch (Exception e) { e.printStackTrace(); } } } } -
DBUtils.javapackage com.qf.ran.utils; import java.io.IOException; import java.sql.Connection; import java.sql.DriverManager; import java.sql.SQLException; import java.util.Properties; /* * @author:Ran * @since:JDK 1.8 * @Date:2022/9/15 */ public class DBUtils { private static String className; private static String url; private static String username; private static String password; static{ //给静态属性赋值 Properties properties = new Properties(); try { properties.load(DBUtils.class.getClassLoader().getResourceAsStream("jdbc.properties")); className = properties.getProperty("className"); url = properties.getProperty("url"); username = properties.getProperty("username"); password = properties.getProperty("password"); } catch (IOException e) { e.printStackTrace(); } } /** * 获取连接对象 * @return */ public static Connection getConnection(){ Connection connection = null; try { //1.加载驱动 Class.forName(className); //2.通过 DriverManager 对象获取连接对象 connection = DriverManager.getConnection(url, username, password); } catch (ClassNotFoundException e) { e.printStackTrace(); } catch (SQLException e) { e.printStackTrace(); } return connection; } //关闭资源 public static void closeAll(AutoCloseable ... autoCloseables){ for (AutoCloseable autoCloseable : autoCloseables) { try { if(autoCloseable != null){ autoCloseable.close(); } } catch (Exception e) { e.printStackTrace(); } } } }
-
b. Spring 配置文件添加消息转换器
-
完整实例
<?xml version="1.0" encoding="UTF-8"?> <beans xmlns="http://www.springframework.org/schema/beans" xmlns:xsi="http://www.w3.org/2001/XMLSchema-instance" xmlns:context="http://www.springframework.org/schema/context" xmlns:mvc="http://www.springframework.org/schema/mvc" xsi:schemaLocation="http://www.springframework.org/schema/beans http://www.springframework.org/schema/beans/spring-beans.xsd http://www.springframework.org/schema/context https://www.springframework.org/schema/context/spring-context.xsd http://www.springframework.org/schema/mvc https://www.springframework.org/schema/mvc/spring-mvc.xsd"> <context:component-scan base-package="com.qf.ran"/> <!--开启 SpringMVC 注解支持 --> <mvc:annotation-driven/> <!--配置消息转换器--> <mvc:annotation-driven> <mvc:message-converters register-defaults="false"> <!--把响应信息通过 fastjson 转换为 json 格式数据--> <bean class="com.alibaba.fastjson.support.spring.FastJsonHttpMessageConverter"> <property name="supportedMediaTypes"> <list> <value>text/html;charset=utf-8</value> <value>application/json;charset=utf-8</value> </list> </property> </bean> </mvc:message-converters> </mvc:annotation-driven> </beans>- 内部关键部分
 <context:component-scan base-package="自定义SpringIOC扫描的路径"/>
        <!--开启 SpringMVC 注解支持 -->
        <mvc:annotation-driven/>

        <!--配置消息转换器-->
        <mvc:annotation-driven>
            <mvc:message-converters register-defaults="false">
                <!--把响应信息通过 fastjson 转换为 json 格式数据-->
                <bean class="com.alibaba.fastjson.support.spring.FastJsonHttpMessageConverter">
                   <property name="supportedMediaTypes">
                       <list>
                           <value>text/html;charset=utf-8</value>
                           <value>application/json;charset=utf-8</value>
                       </list>
                   </property>
                </bean>
            </mvc:message-converters>
        </mvc:annotation-driven>
c. 项目下的web.xml配置
-
完整实例
<!DOCTYPE web-app PUBLIC "-//Sun Microsystems, Inc.//DTD Web Application 2.3//EN" "http://java.sun.com/dtd/web-app_2_3.dtd" > <web-app> <display-name>Archetype Created Web Application</display-name> <!--配置编码过滤器--> <filter> <filter-name>CharacterEncodingFilter</filter-name> <filter-class>org.springframework.web.filter.CharacterEncodingFilter</filter-class> <init-param> <param-name>encoding</param-name> <param-value>UTF-8</param-value> </init-param> </filter> <filter-mapping> <filter-name>CharacterEncodingFilter</filter-name> <url-pattern>/*</url-pattern> </filter-mapping> <!--配置 SpringMVC 分发器--> <servlet> <servlet-name>DispatcherServlet</servlet-name> <servlet-class>org.springframework.web.servlet.DispatcherServlet</servlet-class> <!--初始化方法--> <init-param> <param-name>contextConfigLocation</param-name> <!--加载配置文件--> <param-value>classpath:Spring-context.xml</param-value> </init-param> </servlet> <servlet-mapping> <servlet-name>DispatcherServlet</servlet-name> <url-pattern>/</url-pattern> </servlet-mapping> <!--默认访问--> <servlet-mapping> <servlet-name>default</servlet-name> <url-pattern>*.html</url-pattern> </servlet-mapping> <servlet-mapping> <servlet-name>default</servlet-name> <url-pattern>*.js</url-pattern> </servlet-mapping> <servlet-mapping> <servlet-name>default</servlet-name> <url-pattern>*.css</url-pattern> </servlet-mapping> </web-app>-
配置编码过滤器
<!--配置编码过滤器--> <filter> <filter-name>CharacterEncodingFilter</filter-name> <filter-class>org.springframework.web.filter.CharacterEncodingFilter</filter-class> <init-param> <param-name>encoding</param-name> <param-value>UTF-8</param-value> </init-param> </filter> <filter-mapping> <filter-name>CharacterEncodingFilter</filter-name> <url-pattern>/*</url-pattern> </filter-mapping> -
配置SpringMVC分发器
<!--配置 SpringMVC 分发器--> <servlet> <servlet-name>DispatcherServlet</servlet-name> <servlet-class>org.springframework.web.servlet.DispatcherServlet</servlet-class> <!--初始化方法--> <init-param> <param-name>contextConfigLocation</param-name> <!--加载配置文件--> <param-value>classpath:Spring-context.xml</param-value> </init-param> </servlet> <servlet-mapping> <servlet-name>DispatcherServlet</servlet-name> <url-pattern>/</url-pattern> </servlet-mapping> -
配置默认访问
  <!--默认访问-->
  <servlet-mapping>
    <servlet-name>default</servlet-name>
    <url-pattern>*.html</url-pattern>
  </servlet-mapping>
  <servlet-mapping>
    <servlet-name>default</servlet-name>
    <url-pattern>*.js</url-pattern>
  </servlet-mapping>
  <servlet-mapping>
    <servlet-name>default</servlet-name>
    <url-pattern>*.css</url-pattern>
  </servlet-mapping>
-
<特殊功能处理>: SpringMVC 文件上传
a. 需要额外加载的jar包
<!--文件上传-->
<dependency>
     <groupId>commons-fileupload</groupId>
     <artifactId>commons-fileupload</artifactId>
     <version>1.4</version>
</dependency>
b. Spring 配置文件添加文件上传的配置,指定文件上传的大小和编码格式
<!--文件上传的配置-->
<bean id="multipartResolver" class="org.springframework.web.multipart.commons.CommonsMultipartResolver">
        <!--文件上传的大小限制-->
        <property name="maxUploadSize" value="104857600"/>
        <!--文件上传的编码格式-->
        <property name="defaultEncoding" value="UTF-8"/>
</bean>
c~d: 步骤的完整实例代码
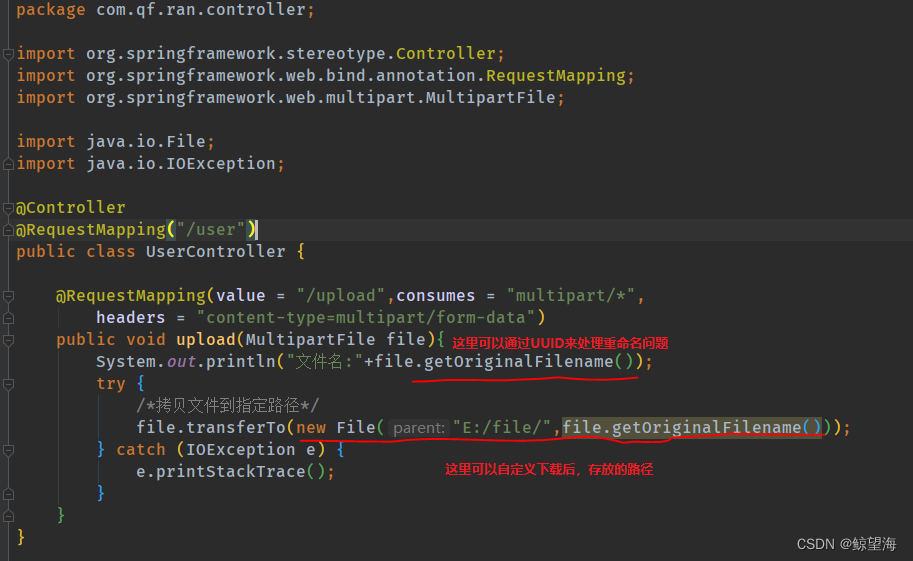
package com.qf.ran.controller;

import org.springframework.stereotype.Controller;
import org.springframework.web.bind.annotation.RequestMapping;
import org.springframework.web.multipart.MultipartFile;

import java.io.File;
import java.io.IOException;

@Controller
@RequestMapping("/user")
public class UserController {

    @RequestMapping(value = "/upload",consumes = "multipart/*",
        headers = "content-type=multipart/form-data")
    public void upload(MultipartFile file){
        System.out.println("文件名:"+file.getOriginalFilename());
        try {
            /*拷贝文件到指定路径*/
            file.transferTo(new File("E:/file/",file.getOriginalFilename()));
        } catch (IOException e) {
            e.printStackTrace();
        }
    }
}
c. 对应方法的注解@RequestMapping上,而外添加元素consumes=“multipart/*”, headers=“content-type=multipart/form-data”
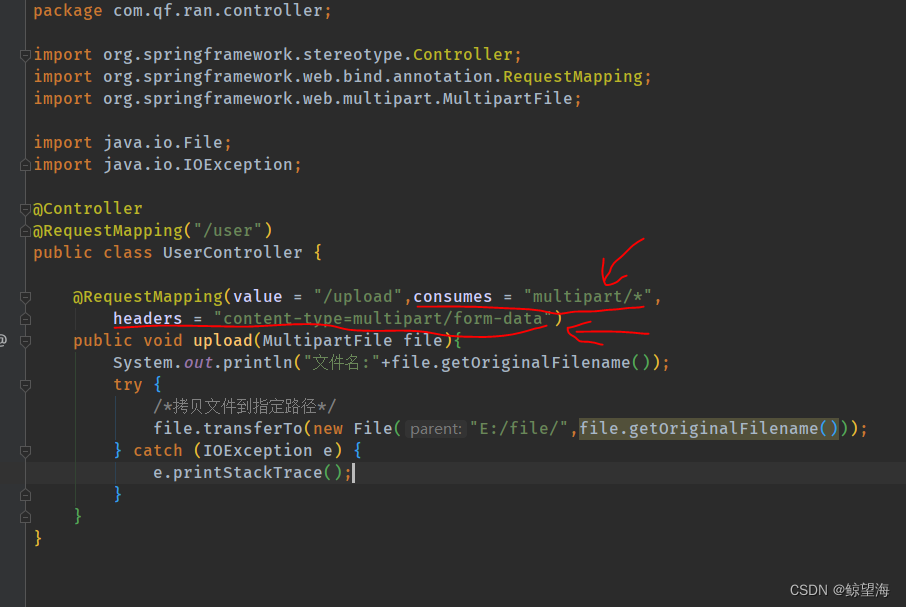
d. 给上传方法传入MultipartFile file参数
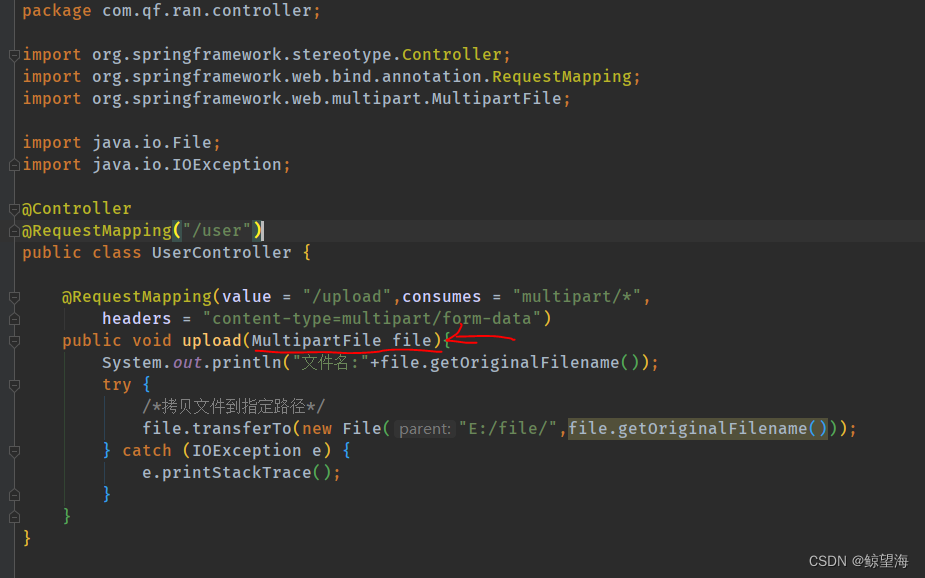
e. 通过getOriginamFilename() 获取文件名"这里可以而外加上UUID方法防重名",再通过transferTo() 进行文件拷贝


 869
869


 被折叠的 条评论
为什么被折叠?
被折叠的 条评论
为什么被折叠?
 到【灌水乐园】发言


