


思维导图
本文主要分析ServletWebServerApplicationContext源码
SpringBoot Web容器应用上下文(这是个人的翻译, 如有不足之处还望指出, 大佬勿喷!!!)
1.自我思考及复盘
备注: 自我思考及复盘是为了养成带着问题阅读源码及阅读完源码后总结,是个人的学习及实践见解, 如有不足之处还望指出, 大佬勿喷!!!
1.1 自我思考
- what-是什么?
servlet web 服务器(如tomcat)的应用上下文 - why-为什么,作用?
因为要支持spring boot的内嵌即外部web服务应用上下文加载、初始化、刷新、使用、停止等 - how–如何工作的?原理
- 继承、实现应用上下文初始化、刷新、使用、停止方法
- 准备刷新Servlet 服务器上下文环境,初始化Servlet 服务器 beanfactory,加载其beanfactory定义信息
- 系统配置Servlet 服务器 beanfactory,并激活BeanFactoryPostProcessors
- 注册相关的BeanPostProcessors,初始化及注册相关的MessageSource、时间广播器、事件监听器
- 热加载Servlet 服务器 单例bean,完成其刷新过程
- SpringBoot容器使用Servlet 服务器,停止调用销毁方法。
- 如果是我,将会如何设计?使用到哪些设计模式?
- 将使用模板方法:针对不同的Servlet 服务器套用对应模板,重写模板方法
- 策略模式:根据内嵌还是外置的服务器去调用对应的加载运行方法
1.2 复盘
- 用到哪些设计模式?
- 其中DefaultSingletonBeanRegistry有用到单例模式(双重检测)获取Bean,代码中未列出,补充一下:
// DefaultSingletonBeanRegistry.java
public Object getSingleton(String beanName){
    //参数true设置标识允许早期依赖
    return getSingleton(beanName,true);
}
protected Object getSingleton(String beanName, boolean allowEarlyReference) {
    //检查缓存中是否存在实例
    Object singletonObject = this.singletonObjects.get(beanName);
    if (singletonObject == null && isSingletonCurrentlyInCreation(beanName)) {
        //如果为空,则锁定全局变量并进行处理。
        synchronized (this.singletonObjects) {
            //如果此bean正在加载,则不处理
            singletonObject = this.earlySingletonObjects.get(beanName);
            if (singletonObject == null && allowEarlyReference) {
                //当某些方法需要提前初始化的时候则会调用addSingleFactory 方法将对应的ObjectFactory初始化策略存储在singletonFactories
                ObjectFactory<?> singletonFactory = this.singletonFactories.get(beanName);
                if (singletonFactory != null) {
                    //调用预先设定的getObject方法
                    singletonObject = singletonFactory.getObject();
                    //记录在缓存中,earlysingletonObjects和singletonFactories互斥
                    this.earlySingletonObjects.put(beanName, singletonObject);
                    this.singletonFactories.remove(beanName);
                }
            }
        }
    }
    return (singletonObject != NULL_OBJECT ? singletonObject : null);
}
- 在AnnotationConfigServletWebServerApplicationContext有用到策略模式及适配器模式:详见下文
SpringBoot(十二)启动流程分析之创建应用上下文AnnotationConfigServletWebServerApplicationContext
2.概述
- SpringApplication#createApplicationContext() 方法,根据不同的 Web 应用类型,创建不同的 Spring 容器,如下:
	// SpringApplication.java

	protected ConfigurableApplicationContext createApplicationContext() {
		Class<?> contextClass = this.applicationContextClass;
		// 根据 webApplicationType 类型,获得 ApplicationContext 类型
		if (contextClass == null) {
			try {
				switch (this.webApplicationType) {
				case SERVLET:
					contextClass = Class.forName(DEFAULT_SERVLET_WEB_CONTEXT_CLASS);
					break;
				case REACTIVE:
					contextClass = Class.forName(DEFAULT_REACTIVE_WEB_CONTEXT_CLASS);
					break;
				default:
					contextClass = Class.forName(DEFAULT_CONTEXT_CLASS);
				}
			}
			catch (ClassNotFoundException ex) {
				throw new IllegalStateException(
						"Unable create a default ApplicationContext, please specify an ApplicationContextClass", ex);
			}
		}
		// 创建 ApplicationContext 对象
		return (ConfigurableApplicationContext) BeanUtils.instantiateClass(contextClass);
	}
- 本文主要分享SERVLET 类型对应的 Spring 容器类型 AnnotationConfigServletWebServerApplicationContext 类,类图如下:
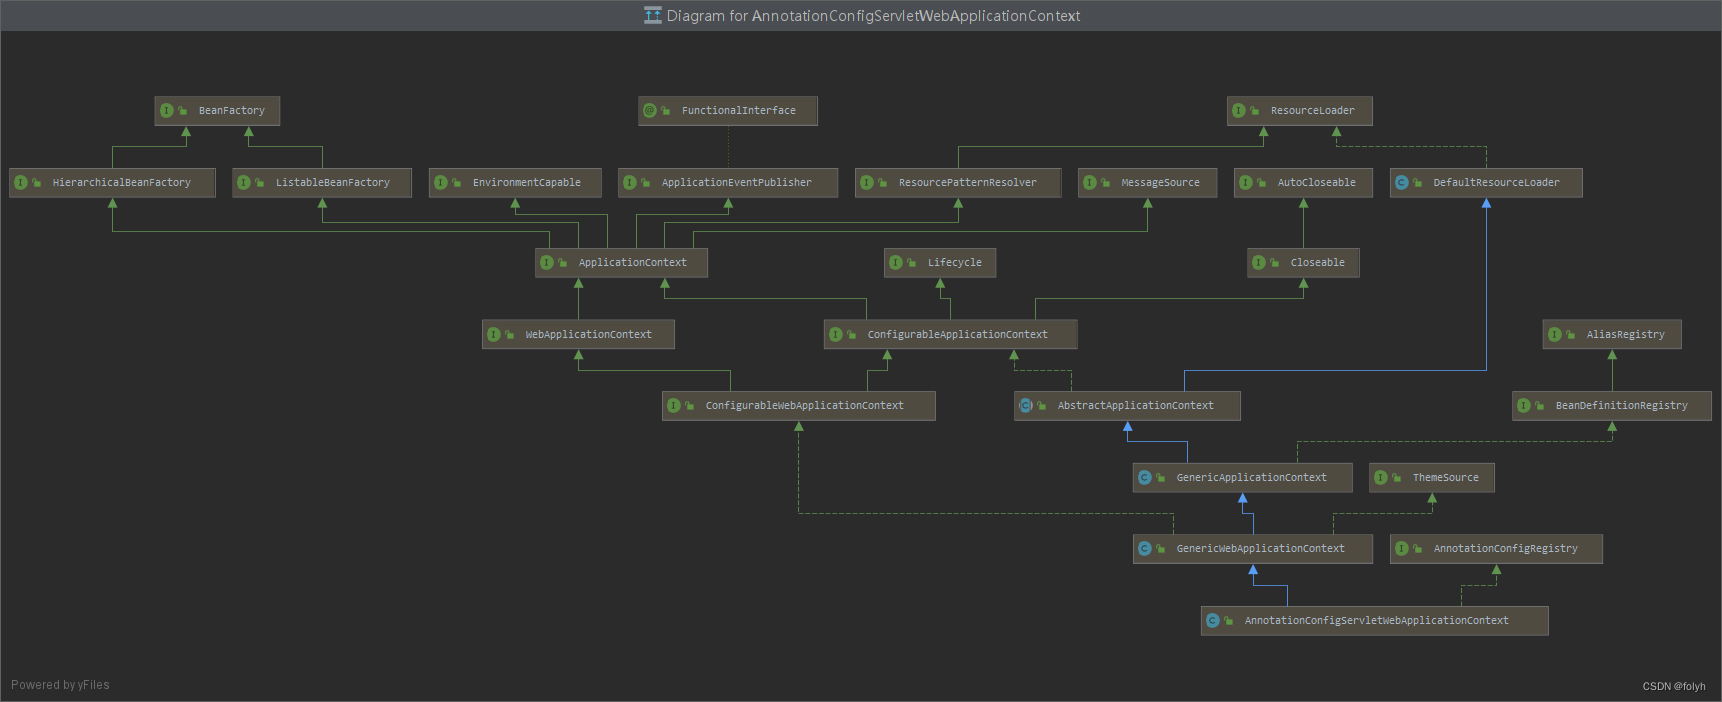
(蓝色实线是类继承关系;绿色虚线是接口实现关系;绿色实线是接口与接口之间关系–可以用extends词)
3.ServletWebServerApplicationContext
实现 ConfigurableWebServerApplicationContext 接口,获得管理 WebServer 的能力;继承 GenericWebApplicationContext 类,Spring Boot 使用 Servlet Web 服务器的 ApplicationContext 实现类。
核心方法refresh()向上继承了AbstractApplicationContext#refresh()方法
	// AbstractApplicationContext.java
	// `#refresh()` 方法

	@Override
	public void refresh() throws BeansException, IllegalStateException {
		synchronized (this.startupShutdownMonitor) {

				.......

				// Allows post-processing of the bean factory in context subclasses.
				postProcessBeanFactory(beanFactory);  // <1>

				// Invoke factory processors registered as beans in the context.
				invokeBeanFactoryPostProcessors(beanFactory);

				// Register bean processors that intercept bean creation.
				registerBeanPostProcessors(beanFactory);

				// Initialize message source for this context.
				initMessageSource();

				// Initialize event multicaster for this context.
				initApplicationEventMulticaster();

				// Initialize other special beans in specific context subclasses.
				onRefresh(); // <2>

				// Check for listener beans and register them.
				registerListeners();

				// Instantiate all remaining (non-lazy-init) singletons.
				finishBeanFactoryInitialization(beanFactory);

				// Last step: publish corresponding event.
				finishRefresh(); // <3>
			}

			........
	}
3.1 #refresh() 方法
备注:#refresh() 方法本质还是调用上面AbstractApplicationContext的核心#refresh(),这里另外做了异常处理
3.1.1 初始化Spring 容器
// ServletWebServerApplicationContext.java

@Override
public final void refresh() throws BeansException, IllegalStateException {
	try {
		super.refresh();
	} catch (RuntimeException ex) {
		// <X> 如果发生异常,停止 WebServer
		stopAndReleaseWebServer();
		throw ex;
	}
}
3.1.2 #stopAndReleaseWebServer()方法停止 WebServer
// ServletWebServerApplicationContext.java

private void stopAndReleaseWebServer() {
    // 获得 WebServer 对象,避免被多线程修改了
    WebServer webServer = this.webServer;
    if (webServer != null) {
        try {
            // 停止 WebServer 对象
            webServer.stop();
            // 置空 webServer
            this.webServer = null;
        } catch (Exception ex) {
            throw new IllegalStateException(ex);
        }
    }
}
3.2 #postProcessBeanFactory(beanFactory)方法
覆写 #postProcessBeanFactory(ConfigurableListableBeanFactory beanFactory) 方法,代码如下:
	@Override
	protected void postProcessBeanFactory(ConfigurableListableBeanFactory beanFactory) {
		// <1.1> 注册 WebApplicationContextServletContextAwareProcessor
		beanFactory.addBeanPostProcessor(new WebApplicationContextServletContextAwareProcessor(this));
		// <1.2> 忽略 ServletContextAware 接口。
		beanFactory.ignoreDependencyInterface(ServletContextAware.class);
		// <2> 注册 ExistingWebApplicationScopes
		registerWebApplicationScopes();
	}
3.2.1 <1.1> 处,注册 WebApplicationContextServletContextAwareProcessor 。
- WebApplicationContextServletContextAwareProcessor 的作用,主要是处理实现 ServletContextAware 接口的 Bean 。
- 在这个处理类,初始化这个 Bean 中的 ServletContext 属性。
- 这样在实现 ServletContextAware 接口的 Bean 中就可以拿到 ServletContext 对象了,Spring 中 Aware 接口就是这样实现的。
- 这样,就可以从 webApplicationContext 中,获得 ServletContext 和 ServletConfig 属性。
代码如下:
// WebApplicationContextServletContextAwareProcessor.java

public class WebApplicationContextServletContextAwareProcessor extends ServletContextAwareProcessor {

	private final ConfigurableWebApplicationContext webApplicationContext;

	public WebApplicationContextServletContextAwareProcessor(ConfigurableWebApplicationContext webApplicationContext) {
		Assert.notNull(webApplicationContext, "WebApplicationContext must not be null");
		this.webApplicationContext = webApplicationContext;
	}

	@Override
	protected ServletContext getServletContext() {
		ServletContext servletContext = this.webApplicationContext.getServletContext();
		return (servletContext != null) ? servletContext : super.getServletContext();
	}

	@Override
	protected ServletConfig getServletConfig() {
		ServletConfig servletConfig = this.webApplicationContext.getServletConfig();
		return (servletConfig != null) ? servletConfig : super.getServletConfig();
	}

}
3.2.2 <1.2> 处,忽略 ServletContextAware 接口
- 因为实现 ServletContextAware 接口的 Bean 在 <1.1> 中的 WebApplicationContextServletContextAwareProcessor 中已经处理了。
3.2.3 <2> 处,注册 ExistingWebApplicationScopes 方法
调用 #registerWebApplicationScopes() ,代码如下:
	private void registerWebApplicationScopes() {
	 	// 创建 ExistingWebApplicationScopes 对象
		ExistingWebApplicationScopes existingScopes = new ExistingWebApplicationScopes(getBeanFactory());
		// 注册 ExistingWebApplicationScopes 到 WebApplicationContext 中
		WebApplicationContextUtils.registerWebApplicationScopes(getBeanFactory());
		// 恢复
		existingScopes.restore();
	}
3.3 #onRefresh()方法
在容器初始化时,完成 WebServer 的创建(不包括启动),代码如下:
	@Override
	protected void onRefresh() {
		// <1> 调用父方法
		super.onRefresh();
		try {
		// <2>创建 WebServer
			createWebServer();
		}
		catch (Throwable ex) {
			throw new ApplicationContextException("Unable to start web server", ex);
		}
	}
3.3.1 #createWebServer() 方法
创建 WebServer 对象
	// ServletWebServerApplicationContext.java
	private void createWebServer() {
		WebServer webServer = this.webServer;
		ServletContext servletContext = getServletContext();
		// <1> 如果 webServer 为空,说明未初始化
		if (webServer == null && servletContext == null) {
			// <1.1> 获得 ServletWebServerFactory 对象
			ServletWebServerFactory factory = getWebServerFactory();
			// <1.2> 获得 ServletContextInitializer 对象
			// <1.3> 创建(获得) WebServer 对象
			this.webServer = factory.getWebServer(getSelfInitializer());
		}
		else if (servletContext != null) {
			try {
				getSelfInitializer().onStartup(servletContext);
			}
			catch (ServletException ex) {
				throw new ApplicationContextException("Cannot initialize servlet context", ex);
			}
		}
		// <3> 初始化 PropertySource
		initPropertySources();
	}
(1)<1> 处,如果 webServer 为空,说明未初始化。
- <1.1> 处,调用 #getWebServerFactory() 方法,获得 ServletWebServerFactory 对象。
-
默认情况下,此处返回的会是 org.springframework.boot.web.embedded.tomcat.TomcatServletWebServerFactory 对象。
-
在我们引入 spring-boot-starter-web 依赖时,默认会引入 spring-boot-starter-tomcat 依赖。此时,org.springframework.boot.autoconfigure.web.servlet.ServletWebServerFactoryConfiguration 在自动配置时,会配置出 TomcatServletWebServerFactory Bean 对象。因此,此时会获得 TomcatServletWebServerFactory 对象。
-
代码如下:
	// ServletWebServerApplicationContext.java
	protected ServletWebServerFactory getWebServerFactory() {
		// Use bean names so that we don't consider the hierarchy
		// 获得 ServletWebServerFactory 类型对应的 Bean 的名字们
		String[] beanNames = getBeanFactory().getBeanNamesForType(ServletWebServerFactory.class);
		// 如果是 0 个,抛出 ApplicationContextException 异常,因为至少要一个
		if (beanNames.length == 0) {
			throw new ApplicationContextException("Unable to start ServletWebServerApplicationContext due to missing "
					+ "ServletWebServerFactory bean.");
		}
		// 如果是 > 1 个,抛出 ApplicationContextException 异常,因为不知道初始化哪个
		if (beanNames.length > 1) {
			throw new ApplicationContextException("Unable to start ServletWebServerApplicationContext due to multiple "
					+ "ServletWebServerFactory beans : " + StringUtils.arrayToCommaDelimitedString(beanNames));
		}
		// 获得 ServletWebServerFactory 类型对应的 Bean 对象
		return getBeanFactory().getBean(beanNames[0], ServletWebServerFactory.class);
	}
- <1.2> 处,调用 #getSelfInitializer() 方法,获得 ServletContextInitializer 对象。
返回的是 ServletContextInitializer 匿名对象,内部会调用 #selfInitialize(servletContext) 方法。该方法会在 WebServer 创建后,进行初始化。
代码如下:
// ServletWebServerApplicationContext.java

private org.springframework.boot.web.servlet.ServletContextInitializer getSelfInitializer() {
	return this::selfInitialize; // 和下面等价
//        return new ServletContextInitializer() {
//
//            @Override
//            public void onStartup(ServletContext servletContext) throws ServletException {
//                selfInitialize(servletContext);
//            }
//
//        };
}
- <1.3> 处,创建(获得) WebServer 对象。
调用 ServletWebServerFactory#getWebServer(ServletContextInitializer) 方法。
(2)<3> 处,调用父 #initPropertySources() 方法,初始化 PropertySource
3.3.2 #selfInitialize()
初始化 WebServer ,代码如下:
	// ServletWebServerApplicationContext.java
	private void selfInitialize(ServletContext servletContext) throws ServletException {
		// <1> 添加 Spring 容器到 servletContext 属性中。
		prepareWebApplicationContext(servletContext);
		// <2> 注册 ServletContextScope
		registerApplicationScope(servletContext);
		// <3> 注册 web-specific environment beans ("contextParameters", "contextAttributes")
		WebApplicationContextUtils.registerEnvironmentBeans(getBeanFactory(), servletContext);
		// <4> 获得所有 ServletContextInitializer ,并逐个进行启动
		for (ServletContextInitializer beans : getServletContextInitializerBeans()) {
			beans.onStartup(servletContext);
		}
	}
(1)<1> 处,添加 Spring 容器到 servletContext 属性中。
调用 #prepareWebApplicationContext(ServletContext servletContext) 方法,
- 通过 处,从 servletContext 的属性种,可以拿到其拥有的 Spring 容器。
- 通过 处,Spring 容器的 servletContext 属性,可以拿到 ServletContext 对象。
代码如下:
	protected void prepareWebApplicationContext(ServletContext servletContext) {
		// 如果已经在 ServletContext 中,则根据情况进行判断。
		Object rootContext = servletContext.getAttribute(WebApplicationContext.ROOT_WEB_APPLICATION_CONTEXT_ATTRIBUTE);
		if (rootContext != null) {
			// 如果是相同容器,抛出 IllegalStateException 异常。说明可能有重复的 ServletContextInitializers 。
			if (rootContext == this) {
				throw new IllegalStateException(
						"Cannot initialize context because there is already a root application context present - "
								+ "check whether you have multiple ServletContextInitializers!");
			}
			// 如果不同容器,则直接返回
			return;
		}
		Log logger = LogFactory.getLog(ContextLoader.class);
		servletContext.log("Initializing Spring embedded WebApplicationContext");
		try {
			// <X> 设置当前 Spring 容器到 ServletContext 中
			servletContext.setAttribute(WebApplicationContext.ROOT_WEB_APPLICATION_CONTEXT_ATTRIBUTE, this);
			// 打印日志
			if (logger.isDebugEnabled()) {
				logger.debug("Published root WebApplicationContext as ServletContext attribute with name ["
						+ WebApplicationContext.ROOT_WEB_APPLICATION_CONTEXT_ATTRIBUTE + "]");
			}
			// <Y> 设置到 `servletContext` 属性中。
			setServletContext(servletContext);
			// 打印日志
			if (logger.isInfoEnabled()) {
				long elapsedTime = System.currentTimeMillis() - getStartupDate();
				logger.info("Root WebApplicationContext: initialization completed in " + elapsedTime + " ms");
			}
		}
		catch (RuntimeException | Error ex) {
			logger.error("Context initialization failed", ex);
			servletContext.setAttribute(WebApplicationContext.ROOT_WEB_APPLICATION_CONTEXT_ATTRIBUTE, ex);
			throw ex;
		}
	}
(2)<2> 处,注册 ServletContextScope
调用 #registerApplicationScope(ServletContext servletContext) 方法,代码如下:
	// ServletWebServerApplicationContext.java
	private void registerApplicationScope(ServletContext servletContext) {
		ServletContextScope appScope = new ServletContextScope(servletContext);
		getBeanFactory().registerScope(WebApplicationContext.SCOPE_APPLICATION, appScope);
		// Register as ServletContext attribute, for ContextCleanupListener to detect it.
		servletContext.setAttribute(ServletContextScope.class.getName(), appScope);
	}
(3)<3> 处,注册 web-specific environment beans。
- 调用 WebApplicationContextUtils#registerEnvironmentBeans(ConfigurableListableBeanFactory bf, ServletContext sc) 方法
- 这样,从 BeanFactory 中,也可以获得到 servletContext
代码如下:
public static void registerEnvironmentBeans(ConfigurableListableBeanFactory bf, @Nullable ServletContext servletContext, @Nullable ServletConfig servletConfig) {
        if (servletContext != null && !bf.containsBean("servletContext")) {
            bf.registerSingleton("servletContext", servletContext);
        }

        if (servletConfig != null && !bf.containsBean("servletConfig")) {
            bf.registerSingleton("servletConfig", servletConfig);
        }

        HashMap attributeMap;
        Enumeration attrNameEnum;
        String attrName;
        if (!bf.containsBean("contextParameters")) {
            attributeMap = new HashMap();
            if (servletContext != null) {
                attrNameEnum = servletContext.getInitParameterNames();

                while(attrNameEnum.hasMoreElements()) {
                    attrName = (String)attrNameEnum.nextElement();
                    attributeMap.put(attrName, servletContext.getInitParameter(attrName));
                }
            }

            if (servletConfig != null) {
                attrNameEnum = servletConfig.getInitParameterNames();

                while(attrNameEnum.hasMoreElements()) {
                    attrName = (String)attrNameEnum.nextElement();
                    attributeMap.put(attrName, servletConfig.getInitParameter(attrName));
                }
            }

            bf.registerSingleton("contextParameters", Collections.unmodifiableMap(attributeMap));
        }

        if (!bf.containsBean("contextAttributes")) {
            attributeMap = new HashMap();
            if (servletContext != null) {
                attrNameEnum = servletContext.getAttributeNames();

                while(attrNameEnum.hasMoreElements()) {
                    attrName = (String)attrNameEnum.nextElement();
                    attributeMap.put(attrName, servletContext.getAttribute(attrName));
                }
            }

            bf.registerSingleton("contextAttributes", Collections.unmodifiableMap(attributeMap));
        }

    }
3.4 finishRefresh()
在容器初始化完成时,启动 WebServer 。覆写 #finishRefresh() 方法,代码如下:
// ServletWebServerApplicationContext.java

@Override
protected void finishRefresh() {
    // <1> 调用父方法
    super.finishRefresh();
    // <2> 启动 WebServer
    WebServer webServer = startWebServer();
    // <3> 如果创建 WebServer 成功,发布 ServletWebServerInitializedEvent 事件
    if (webServer != null) {
        publishEvent(new ServletWebServerInitializedEvent(webServer, this));
    }
}
3.4.1 <1> 处,调用 #finishRefresh() 方法,执行父逻辑
	protected void finishRefresh() {
		// Clear context-level resource caches (such as ASM metadata from scanning).
		clearResourceCaches();

		// Initialize lifecycle processor for this context.
		initLifecycleProcessor();

		// Propagate refresh to lifecycle processor first.
		getLifecycleProcessor().onRefresh();

		// Publish the final event.
		publishEvent(new ContextRefreshedEvent(this));

		// Participate in LiveBeansView MBean, if active.
		LiveBeansView.registerApplicationContext(this);
	}
3.4.2 <2> 处,启动 WebServer
调用 #startWebServer() 方法,代码如下:
// ServletWebServerApplicationContext.java

private WebServer startWebServer() {
	WebServer webServer = this.webServer;
	if (webServer != null) {
		webServer.start();
	}
	return webServer;
}
3.5 onClose() 关闭 WebServer
// ServletWebServerApplicationContext.java

@Override
protected void onClose() {
    // 调用父方法
    super.onClose();
    // 停止 WebServer
    stopAndReleaseWebServer();
}
	private void stopAndReleaseWebServer() {
		WebServer webServer = this.webServer;
		if (webServer != null) {
			try {
				webServer.stop();
				this.webServer = null;
			}
			catch (Exception ex) {
				throw new IllegalStateException(ex);
			}
		}
	}
4.AnnotationConfigServletWebServerApplicationContext
- 继承 ServletWebServerApplicationContext 类,实现 AnnotationConfigRegistry 接口,进一步提供了两个功能:
- 从指定的 basePackages 包中,扫描 BeanDefinition 们。
- 从指定的 annotatedClasses 注解的配置类(Configuration)中,读取 BeanDefinition 们。
4.1 构造方法
	// AnnotationConfigServletWebServerApplicationContext.java

	private final AnnotatedBeanDefinitionReader reader;

	private final ClassPathBeanDefinitionScanner scanner;

	private final Set<Class<?>> annotatedClasses = new LinkedHashSet<>();

	private String[] basePackages;

	/**
	 * 需要被 {@link #reader} 读取的注册类们
	 */
	public AnnotationConfigServletWebServerApplicationContext() {
		this.reader = new AnnotatedBeanDefinitionReader(this);
		this.scanner = new ClassPathBeanDefinitionScanner(this);
	}

	/**
	 * 需要被 {@link #scanner} 扫描的包
	 */
	public AnnotationConfigServletWebServerApplicationContext(DefaultListableBeanFactory beanFactory) {
		super(beanFactory);
		this.reader = new AnnotatedBeanDefinitionReader(this);
		this.scanner = new ClassPathBeanDefinitionScanner(this);
	}

	public AnnotationConfigServletWebServerApplicationContext(Class<?>... annotatedClasses) {
		this();
		// <1> 注册指定的注解的类们
		register(annotatedClasses);
		// 初始化 Spring 容器
		refresh();
	}

	public AnnotationConfigServletWebServerApplicationContext(String... basePackages) {
		this();
		// <2> 扫描指定包
		scan(basePackages);
		// 初始化 Spring 容器
		refresh();
	}

}
4.1.1 <1> 处,注册指定的注解的类们.
- 如果已经传入 annotatedClasses 参数,则调用 #register(Class<?>… annotatedClasses) 方法,设置到 annotatedClasses 中。
- 然后,调用 #refresh() 方法,初始化 Spring 容器。
代码如下:
	// AnnotationConfigServletWebServerApplicationContext.java
	@Override
	// 实现自 AnnotationConfigRegistry 接口
	public final void register(Class<?>... annotatedClasses) {
		Assert.notEmpty(annotatedClasses, "At least one annotated class must be specified");
		this.annotatedClasses.addAll(Arrays.asList(annotatedClasses));
	}
4.1.2 <2> 处扫描指定包
- 如果已经传入 basePackages 参数,则调用 #scan(String… basePackages) 方法,设置到 annotatedClasses 中。
- 然后,调用 #refresh() 方法,初始化 Spring 容器。代码如下:
	@Override
	public final void scan(String... basePackages) {
		Assert.notEmpty(basePackages, "At least one base package must be specified");
		this.basePackages = basePackages;
	}
4.2 prepareRefresh
- 在 Spring 容器初始化前,需要清空 scanner 的缓存。
- 覆写 #prepareRefresh() 方法,代码如下:
// AnnotationConfigServletWebServerApplicationContext.java

@Override // 实现自 AbstractApplicationContext 抽象类
protected void prepareRefresh() {
    // 清空 scanner 的缓存
    this.scanner.clearCache();
    // 调用父类
    super.prepareRefresh();
}
4.3 postProcessBeanFactory
- 覆写 #postProcessBeanFactory(ConfigurableListableBeanFactory beanFactory) 方法,执行 BeanDefinition 的读取。代码如下:
// AnnotationConfigServletWebServerApplicationContext.java

@Override
protected void postProcessBeanFactory(ConfigurableListableBeanFactory beanFactory) {
    // 调用父类
    super.postProcessBeanFactory(beanFactory);
    // 扫描指定的包
    if (this.basePackages != null && this.basePackages.length > 0) {
        this.scanner.scan(this.basePackages);
    }
    // 注册指定的注解的类们定的
    if (!this.annotatedClasses.isEmpty()) {
        this.reader.register(ClassUtils.toClassArray(this.annotatedClasses));
    }
}
上一篇跳转—Java源码(二)Spring Application Context 下一篇跳转—Java源码(三)SpringBoot Web容器应用上下文
本篇文章主要参考链接如下:
持续更新中…
随心所往,看见未来。Follow your heart,see light!
欢迎点赞、关注、留言,一起学习、交流!


 1609
1609


 被折叠的 条评论
为什么被折叠?
被折叠的 条评论
为什么被折叠?
 到【灌水乐园】发言


