


Spring总结
maven依赖管理
使用maven时可能会偶然混合使用不同版本的 Spring JAR。例如,您可能会发现第三方库或另一个 Spring 项目将传递性依赖项引入了较旧的发行版。如果您忘记自己明确声明直接依赖项,则可能会出现各种意外问题。
为了克服这些问题,Maven 支持“物料 Lists”(BOM)依赖项的概念。您可以在dependencyManagement部分中导入spring-framework-bom,以确保所有 spring 依赖项(直接和传递)都处于同一版本。
<dependencyManagement>
    <dependencies>
        <dependency>
            <groupId>org.springframework</groupId>
            <artifactId>spring-framework-bom</artifactId>
            <version>4.3.21.RELEASE</version>
            <type>pom</type>
            <scope>import</scope>
        </dependency>
    </dependencies>
</dependencyManagement>
spring-context的maven依赖项
<dependencies>
    <dependency>
        <groupId>org.springframework</groupId>
        <artifactId>spring-context</artifactId>
        <version>4.3.21.RELEASE</version>
        <scope>runtime</scope>
    </dependency>
</dependencies>
spring日志
Spring 底层选择的是 JCL做为日志门面 + JUL 作为日志实现,而 SpringBoot 选择的是 SLF4J 做为日志门面 + Logback 作为日志实现。那我们本篇就来看看在 Spring 中到底可以如何组合使用各种日志框架+日志实现。
将日志改成slf4j+log4j
引入日志框架 Slf4j + 引入并配置 Log4j
首先引入 slf4j 及 log4j 的相关依赖
<dependency>
    <groupId>org.springframework</groupId>
    <artifactId>spring-context</artifactId>
    <version>4.3.20.RELEASE</version>
</dependency>
<!-- log4j的日志实现 -->
<dependency>
    <groupId>log4j</groupId>
    <artifactId>log4j</artifactId>
    <version>1.2.17</version>
</dependency>
<!-- slf4j日志门面 -->
<dependency>
    <groupId>org.slf4j</groupId>
    <artifactId>slf4j-api</artifactId>
    <version>1.7.28</version>
</dependency>
<!-- 该包是转换包,实现slf4j-api接口,调用log4j的实现 -->
<dependency>
    <groupId>org.slf4j</groupId>
    <artifactId>slf4j-log4j12</artifactId>
    <version>1.7.25</version>
</dependency>
因为早期 log4j 压根不知道有一slf4j 的日志门面,所以加入适配器 slf4j-log412.jar 实现 slf4j 的接口,真正实现功能调用。
public class MainClass {

    // import org.slf4j.Logger;
    // import org.slf4j.LoggerFactory;
    // slf4j 是通过 LoggerFactory 去获取 Logger
    private static Logger logger = LoggerFactory.getLogger(MainClass.class.getName());

    // private static Logger logger = Logger.getLogger(MainClass.class.getName());

    public static void main(String[] args) {
        AnnotationConfigApplicationContext context = new AnnotationConfigApplicationContext(MainConfig.class);

        logger.info("let's go");
        context.start();
    }
}
引入日志框架 Slf4j + 引入并配置 Logback
还是首先引入 slf4j 和 logback 的依赖
<dependency>
    <groupId>org.springframework</groupId>
    <artifactId>spring-context</artifactId>
    <version>4.3.20.RELEASE</version>
</dependency>
<dependency>
    <groupId>ch.qos.logback</groupId>
    <artifactId>logback-core</artifactId>
    <version>1.2.3</version>
</dependency>
<dependency>
    <groupId>ch.qos.logback</groupId>
    <artifactId>logback-classic</artifactId>
    <version>1.2.3</version>
</dependency>
<dependency>
    <groupId>org.slf4j</groupId>
    <artifactId>slf4j-api</artifactId>
    <version>1.7.28</version>
</dependency>
使用同上,因为均是使用slf4j作为日志门面
配置日志的格式需要一个logback.xml的文件
<?xml version="1.0" encoding="UTF-8"?>
<configuration>

	<!-- 设置如何输出到控制台 -->
    <appender name="CONSOLE" class="ch.qos.logback.core.ConsoleAppender">
        <encoder>
            <!--格式化输出:%d表示日期,%thread表示线程名,%-5level:级别从左显示5个字符宽度%msg:日志消息,%n是换行符-->
            <pattern>%d{HH:mm:ss.SSS} [%thread] %-5level %logger{36} - %msg%n</pattern>
        </encoder>
    </appender>

    <!-- 日志级别 -->
    <root level="DEBUG">
        <appender-ref ref="CONSOLE" />
    </root>
</configuration>
IOC
IoC 也称为“依赖注入”(DI)。这是一个过程,在此过程中,对象仅通过构造函数参数,工厂方法的参数或在对象实例从工厂方法构造或返回后设置的属性来定义其依赖关系,即与它们一起使用的其他对象。然后,容器在创建 Bean 时“注入”那些依赖项。此过程从根本上来说是相反的,因此名称为控件反转(IoC),它是通过使用类的直接构造或* Service Locator *模式之类的机制来控制其依赖项的实例化或位置的。
IOC的使用形式
主要存在两种形式,一种是xml,另一种是注解的方式。
XML配置
xml的基本结构
<?xml version="1.0" encoding="UTF-8"?>
<beans xmlns="http://www.springframework.org/schema/beans"
    xmlns:xsi="http://www.w3.org/2001/XMLSchema-instance"
    xsi:schemaLocation="http://www.springframework.org/schema/beans
        http://www.springframework.org/schema/beans/spring-beans.xsd">

    <bean id="..." class="...">
        <!-- collaborators and configuration for this bean go here -->
    </bean>

    <bean id="..." class="...">
        <!-- collaborators and configuration for this bean go here -->
    </bean>

    <!-- more bean definitions go here -->

</beans>
标签说明:
1、id属性命名必须满足XML的命名规范,因为id其实是XML中就做了限定的。就相当于一个Java变量的命名:不能以数字,符号开始,不能有空格,如123,?ad,"ab "等都是不规范的,Spring在初始化时就会报错:
org.xml.sax.SAXParseException: Attribute value “?ab” of type ID must be a name
2、name属性则没有第一条的限定,但不能带空格,如"a b"," abc",这时,虽然初始化时不会报错,但在getBean()则会报错:
org.springframework.beans.factory.NoSuchBeanDefinitionException: No bean named ‘a b’ is defined
3、配置文件中不允许出现两个id相同的,否则在初始化时即会报下述错误:
org.xml.sax.SAXParseException: Attribute value “aa” of type ID must be unique within the document.
补充:如果id和name都没有指定,则用类全名作为name,如
,则可以通过getBean(“com.ste.BeanImpl”)返回该实例。
4.properties中的name表示的是参数的名称,ref则是指bean配置文件中的bean名称
采用xml的方式进行注入:

DAO
public class StudentDao {
    public void test(){
        System.out.println("this is a test case");
    }
}
Service
public class StudentService {

    private StudentDao studentDao;

    public void test(){
        studentDao.test();
    }

    public void setStudentDao(StudentDao studentDao) {
        this.studentDao = studentDao;
    }

}
Controller
import com.wcr.service.StudentService;
import org.springframework.context.ApplicationContext;
import org.springframework.context.support.ClassPathXmlApplicationContext;

public class StudentController {


    public void test(){
        //实例化容器
        ApplicationContext context = new ClassPathXmlApplicationContext("spring.xml");
        StudentService studentService = (StudentService) context.getBean("studentService");
        studentService.test();
    }

    public static void main(String[] args) {
        new StudentController().test();
    }
}
spring.xml
<?xml version="1.0" encoding="UTF-8"?>
<beans xmlns="http://www.springframework.org/schema/beans"
       xmlns:xsi="http://www.w3.org/2001/XMLSchema-instance"
       xsi:schemaLocation="http://www.springframework.org/schema/beans
        http://www.springframework.org/schema/beans/spring-beans.xsd">


    <bean id="studentService" class="com.wcr.service.StudentService">
        <!-- collaborators and configuration for this bean go here -->
        <!--        这种方式的注入需要提供set方法-->
        <property name="studentDao" ref="studentDao"/>
    </bean>

    <bean id="studentDao" class="com.wcr.dao.StudentDao">
        <!-- collaborators and configuration for this bean go here -->
    </bean>

    <!-- more bean definitions go here -->

</beans>
第二种是基于注解的方式
xml文件开启注解
<?xml version="1.0" encoding="UTF-8"?>
<beans xmlns="http://www.springframework.org/schema/beans"
       xmlns:xsi="http://www.w3.org/2001/XMLSchema-instance"
       xmlns:context="http://www.springframework.org/schema/context"
       xsi:schemaLocation="http://www.springframework.org/schema/beans
        http://www.springframework.org/schema/beans/spring-beans.xsd
        http://www.springframework.org/schema/context
        http://www.springframework.org/schema/context/spring-context.xsd">

    <context:annotation-config/>

</beans>
@Resource注解是Java自身的注解,@Autowired注解是Spring的注解.
@Resource注解有两个重要的属性,分别是name和type,如果name属性有值,则使用byName的自动注入策略,将值作为需要注入bean的名字,如果type有值,则使用byType自动注入策略,将值作为需要注入bean的类型.如果既不指定name也不指定type属性,这时将通过反射机制使用byName自动注入策略。即@Resource注解默认按照名称进行匹配,名称可以通过name属性进行指定,如果没有指定name属性,当注解写在字段上时,默认取字段名,按照名称查找,当找不到与名称匹配的bean时才按照类型进行装配。但是需要注意的是,如果name属性一旦指定,就只会按照名称进行装配。
@Autowired注解是spring的注解,此注解只根据type进行注入,不会去匹配name.但是如果只根据type无法辨别注入对象时,就需要配合使用@Qualifier注解或者@Primary注解使用.
bean的定义

id:唯一标识一个bean
name:可以有多个,充当bean的别名,如果有多个当getBean的时候会返回最后注入的一个
factory-method:静态工厂注入,通过工厂方法注入bean
factory-bean:实例工厂,通过他提供到的方法进行bean的注入
依赖注入
依赖注入(DI)是一个过程,在此过程中,对象仅通过构造函数参数,工厂方法的参数或在构造对象实例后在对象实例上设置的属性来定义其依赖关系,即与它们一起使用的其他对象或从工厂方法返回。然后,容器在创建 Bean 时“注入”那些依赖项。此过程从根本上讲是相反的,因此,通过使用类的直接构造或服务定位符模式,bean 本身控制其依赖项的实例化或位置的名称控制反转(IoC)。
使用 DI 原理,代码更简洁,当为对象提供依赖项时,去耦会更有效。该对象不查找其依赖项,并且不知道依赖项的位置或类。这样,您的类就变得更易于测试,尤其是当依赖项依赖于接口或抽象 Base Class 时,它们允许在单元测试中使用存根或模拟实现。
构造方法注入
提供构造方法,配置constructor-arg
<?xml version="1.0" encoding="UTF-8"?>
<beans xmlns="http://www.springframework.org/schema/beans"
       xmlns:xsi="http://www.w3.org/2001/XMLSchema-instance"
       xsi:schemaLocation="http://www.springframework.org/schema/beans
        http://www.springframework.org/schema/beans/spring-beans.xsd">


    <bean id="studentService" class="com.wcr.service.StudentService">
        <!-- collaborators and configuration for this bean go here -->
        <!--        这种方式的注入需要提供set方法-->
<!--        <property name="studentDao" ref="studentDao"/>-->
        <constructor-arg name="studentDao" ref="studentDao"/>
    </bean>

    <bean id="studentDao" class="com.wcr.dao.StudentDao">
        <!-- collaborators and configuration for this bean go here -->
    </bean>

    <!-- more bean definitions go here -->

</beans>
package com.wcr.service;

import com.wcr.dao.StudentDao;

public class StudentService {

    private StudentDao studentDao;

    public StudentService(StudentDao studentDao) {
        this.studentDao = studentDao;
    }

    public void test(){
        studentDao.test();
    }
}
构造函数参数解析匹配使用参数的类型进行。如果 Bean 定义的构造函数参数中不存在潜在的歧义,则在实例化 Bean 时,在 Bean 定义中定义构造函数参数的 Sequences 就是将这些参数提供给适当的构造函数的Sequences。也就是说他是根据参数的类型去寻找对应的构造函数。
1.如果基本数据类型的注入,spring就无法知道注入的是什么类型的数据,type标签就可以解决简单值注入的问题。
<bean id="exampleBean" class="examples.ExampleBean">
    <constructor-arg index="0" value="7500000"/>
    <constructor-arg index="1" value="42"/>
</bean>
2.另一种问题就是如果存在两个相同类型的数据,也可能会导致歧义的发生,index可以指定参数的出现顺序,从而解决歧义。
<bean id="exampleBean" class="examples.ExampleBean">
    <constructor-arg index="0" value="7500000"/>
    <constructor-arg index="1" value="42"/>
</bean>
如果根据参数无法匹配到对应的构造器,则无法进行注入。
setter注入
基于setter的DI 是通过在调用无参数构造函数或无参数static工厂方法以实例化您的 bean 之后,在 bean 上调用 setter 方法来完成的。只需要提供对应参数的set方法,他会使用无参构造之后使用对应属性的set来注入属性。
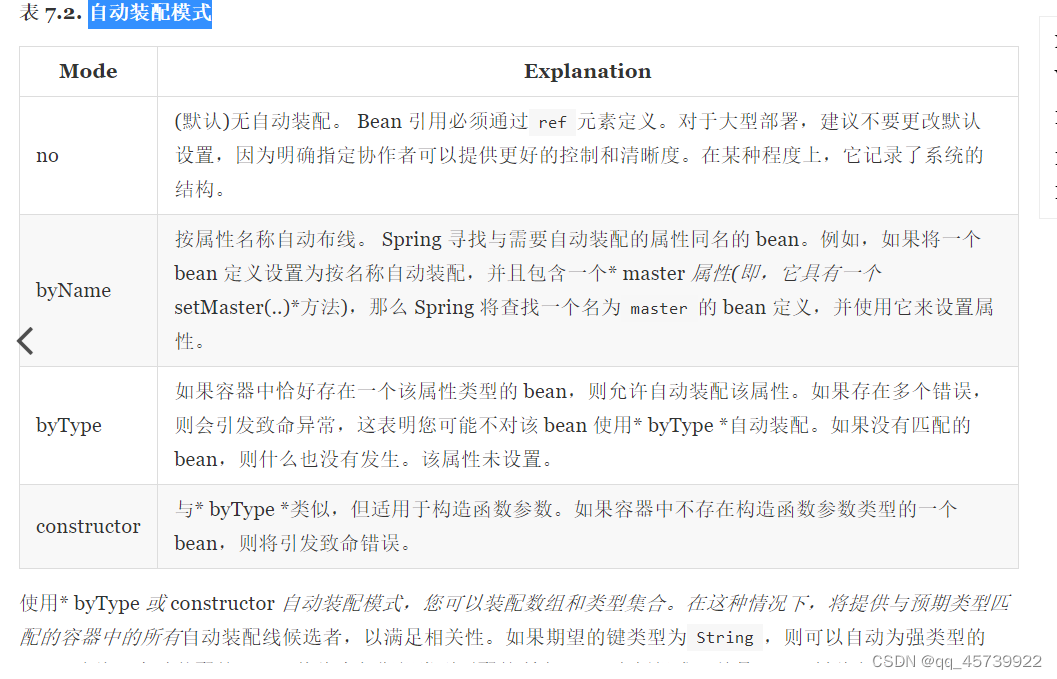
autowire自动装配
Spring 容器可以* autowire *合作 bean 之间的关系。您可以允许 Spring 通过检查ApplicationContext的内容来自动为您的 bean 解决协作者(其他 bean)。自动装配具有以下优点:
自动装配可以大大减少指定属性或构造函数参数的需要。 (在此方面,其他机制(例如 Bean 模板在本章其他地方讨论)也很有价值。)
随着对象的 Developing,自动装配可以更新配置。例如,如果您需要向类中添加一个依赖项,则无需修改配置即可自动满足该依赖项。因此,自动装配在开发过程中特别有用,而不必担心当代码库变得更稳定时切换到显式接线的选择。
自动装配模式
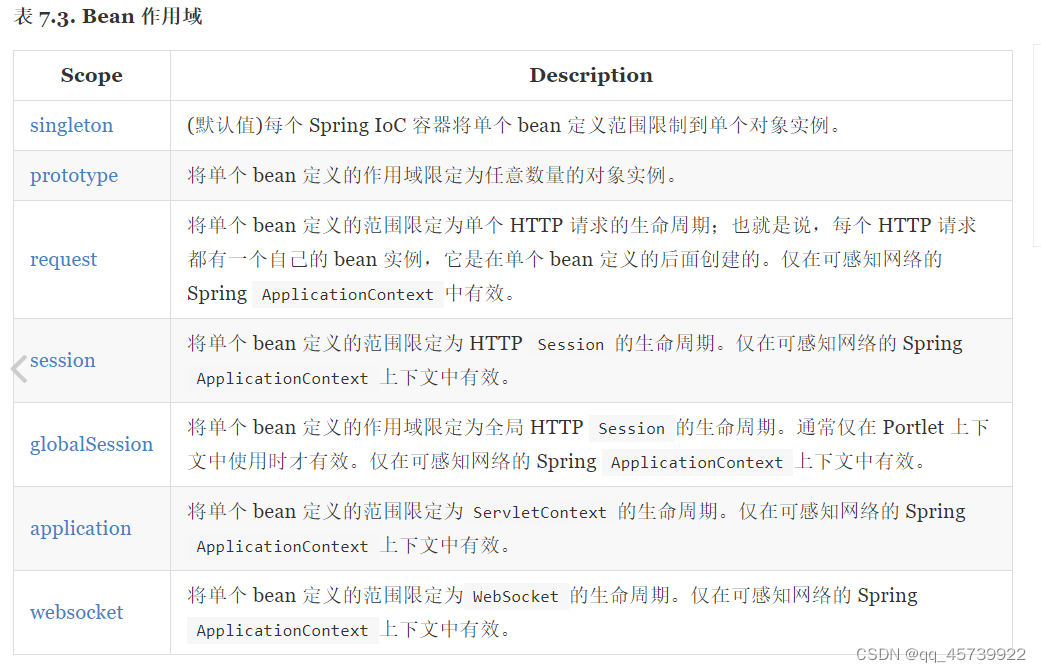
Bean的作用域
FactoryBean
factory *的对象实现org.springframework.beans.factory.FactoryBean接口。
FactoryBean接口是可插入 Spring IoC 容器的实例化逻辑的点。如果您拥有复杂的初始化代码,而不是(可能)冗长的 XML,可以用 Java 更好地表达,则可以创建自己的FactoryBean,在该类中编写复杂的初始化,然后将自定义FactoryBean插入容器。
Factory界面提供了三种方法:
Object getObject():返回此工厂创建的对象的实例。实例可以共享,具体取决于该工厂是否返回单例或原型。
boolean isSingleton():如果此FactoryBean返回单例,则返回true,否则返回false。
Class getObjectType():返回getObject()方法或null返回的对象类型(如果事先未知)。
FactoryBean概念和接口在 Spring 框架中的许多地方都使用过; Spring 本身提供了 50 多个FactoryBean接口的实现。
当您需要向容器请求一个实际的FactoryBean实例本身而不是它产生的 bean 时,请在调用ApplicationContext的getBean()方法时在该 bean 的 ID 前面加上“&”符号(&)。因此,对于 ID 为myBean的给定FactoryBean,在容器上调用getBean(“myBean”)会返回FactoryBean的乘积;而调用getBean(“&myBean”)会返回FactoryBean实例本身。


 2242
2242


 被折叠的 条评论
为什么被折叠?
被折叠的 条评论
为什么被折叠?
 到【灌水乐园】发言


