


一、部署redis集群
1.环境
[root@haproxy01 ~]# vim /etc/hosts
192.168.183.188 haproxy01
192.168.183.189 haproxy02
192.168.183.190 redis01
192.168.183.191 redis02
192.168.183.192 redis03
架构图
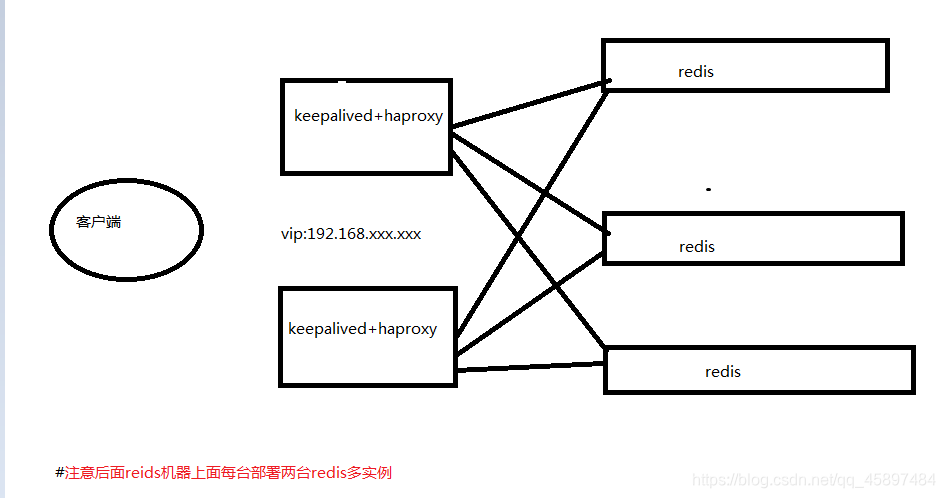
2.安装redis实例(6节点)(使用yum安装)
# 安装redis最新yum源
[root@redis01 ~]# yum -y install http://rpms.famillecollet.com/enterprise/remi-release-7.rpm
# 安装redis
[root@redis01 ~]# yum -y --enablerepo=remi install redis
# 创建实例目录
[root@redis01 ~]# mkdir -p /redis/{6001,6002}/{conf,data,log}
# 修改实例配置文件
[root@redis01 ~]# cd /redis/6001/conf/
[root@redis01 conf]# ls
[root@redis01 conf]# cat >> redis.conf << EOF
bind 0.0.0.0
protected-mode no
port 6001
dir /redis/6001/data
cluster-enabled yes
cluster-config-file /redis/6001/conf/nodes.conf
cluster-node-timeout 5000
appendonly yes
daemonize yes
pidfile /redis/6001/redis.pid
logfile /redis/6001/log/redis.log
EOF
[root@redis01 conf]# sed 's/6001/6002/g' redis.conf > /redis/6002/conf/redis.conf
3.检查redis启动情况
# 编写启动脚本
[root@redis01 conf]# cd /usr/local/
[root@redis01 local]# vim start-redis-cluster.sh
#!/bin/bash
REDIS_HOME=/usr/bin
REDIS_CONF=/redis
$REDIS_HOME/redis-server $REDIS_CONF/6001/conf/redis.conf
$REDIS_HOME/redis-server $REDIS_CONF/6002/conf/redis.conf
# 给脚本添加执行权限
[root@redis01 local]# chmod +x start-redis-cluster.sh
# 执行脚本
[root@redis01 local]# bash start-redis-cluster.sh
[root@redis01 local]# ps aux | grep redis
root      48596  0.1  0.8 216444  8392 ?        Ssl  21:26   0:00 /usr/bin/redis-server 0.0.0.0:6001 [cluster]
root      48602  0.1  0.8 216444  8396 ?        Ssl  21:26   0:00 /usr/bin/redis-server 0.0.0.0:6002 [cluster]
root      49092  0.0  0.0 112728   968 pts/0    S+   21:26   0:00 grep --color=auto redis
4.创建集群
[root@redis01 local]# redis-cli --cluster create 192.168.183.190:6001 192.168.183.190:6002 192.168.183.191:6001 192.168.183.191:6002 192.168.183.192:6001 192.168.183.192:6002 --cluster-replicas 1
>>> Performing hash slots allocation on 6 nodes...
Master[0] -> Slots 0 - 5460
Master[1] -> Slots 5461 - 10922
Master[2] -> Slots 10923 - 16383
Adding replica 192.168.183.191:6002 to 192.168.183.190:6001
Adding replica 192.168.183.192:6002 to 192.168.183.191:6001
Adding replica 192.168.183.190:6002 to 192.168.183.192:6001
M: 98ce60fda33371c9623ff70e73b40d9f4dcb7568 192.168.183.190:6001
   slots:[0-5460] (5461 slots) master
S: 70b214888e13d96ae0c71f094f01a109b29226c7 192.168.183.190:6002
   replicates 32ba87a08347e81297cb1dabb2af6229bc7be7da
M: 04ab77bb15eed991dbe81240f82b1797c4da8303 192.168.183.191:6001
   slots:[5461-10922] (5462 slots) master
S: 21ad0bfc5ef45beee540d9a214cbb8b08bc95b27 192.168.183.191:6002
   replicates 98ce60fda33371c9623ff70e73b40d9f4dcb7568
M: 32ba87a08347e81297cb1dabb2af6229bc7be7da 192.168.183.192:6001
   slots:[10923-16383] (5461 slots) master
S: 857ee0ba75ddd4fd542e5e881a3eb6c74abdf1f9 192.168.183.192:6002
   replicates 04ab77bb15eed991dbe81240f82b1797c4da8303
Can I set the above configuration? (type 'yes' to accept): yes
>>> Nodes configuration updated
>>> Assign a different config epoch to each node
>>> Sending CLUSTER MEET messages to join the cluster
Waiting for the cluster to join
..
>>> Performing Cluster Check (using node 192.168.183.190:6001)
M: 98ce60fda33371c9623ff70e73b40d9f4dcb7568 192.168.183.190:6001
   slots:[0-5460] (5461 slots) master
   1 additional replica(s)
M: 32ba87a08347e81297cb1dabb2af6229bc7be7da 192.168.183.192:6001
   slots:[10923-16383] (5461 slots) master
   1 additional replica(s)
S: 21ad0bfc5ef45beee540d9a214cbb8b08bc95b27 192.168.183.191:6002
   slots: (0 slots) slave
   replicates 98ce60fda33371c9623ff70e73b40d9f4dcb7568
S: 70b214888e13d96ae0c71f094f01a109b29226c7 192.168.183.190:6002
   slots: (0 slots) slave
   replicates 32ba87a08347e81297cb1dabb2af6229bc7be7da
S: 857ee0ba75ddd4fd542e5e881a3eb6c74abdf1f9 192.168.183.192:6002
   slots: (0 slots) slave
   replicates 04ab77bb15eed991dbe81240f82b1797c4da8303
M: 04ab77bb15eed991dbe81240f82b1797c4da8303 192.168.183.191:6001
   slots:[5461-10922] (5462 slots) master
   1 additional replica(s)
[OK] All nodes agree about slots configuration.
>>> Check for open slots...
>>> Check slots coverage...
[OK] All 16384 slots covered.

# 查看redis进程是否已经切换为集群状态
[root@redis01 local]# ps aux | grep redis
root      48596  0.1  0.8 219004  8648 ?        Ssl  21:26   0:00 /usr/bin/redis-server 0.0.0.0:6001 [cluster]
root      48602  0.1  1.0 225148 10792 ?        Ssl  21:26   0:00 /usr/bin/redis-server 0.0.0.0:6002 [cluster]
root      56742  0.0  0.0 112728   972 pts/0    R+   21:33   0:00 grep --color=auto redis
# 查看集群中的节点
[root@redis01 local]# redis-cli -c -p 6001
127.0.0.1:6001> cluster nodes
32ba87a08347e81297cb1dabb2af6229bc7be7da 192.168.183.192:6001@16001 master - 0 1593783344862 5 connected 10923-16383
21ad0bfc5ef45beee540d9a214cbb8b08bc95b27 192.168.183.191:6002@16002 slave 98ce60fda33371c9623ff70e73b40d9f4dcb7568 0 1593783345876 4 connected
70b214888e13d96ae0c71f094f01a109b29226c7 192.168.183.190:6002@16002 slave 32ba87a08347e81297cb1dabb2af6229bc7be7da 0 1593783343549 5 connected
857ee0ba75ddd4fd542e5e881a3eb6c74abdf1f9 192.168.183.192:6002@16002 slave 04ab77bb15eed991dbe81240f82b1797c4da8303 0 1593783345569 6 connected
98ce60fda33371c9623ff70e73b40d9f4dcb7568 192.168.183.190:6001@16001 myself,master - 0 1593783345000 1 connected 0-5460
04ab77bb15eed991dbe81240f82b1797c4da8303 192.168.183.191:6001@16001 master - 0 1593783345063 3 connected 5461-10922
5.集群验证
127.0.0.1:6001> set name txc
-> Redirected to slot [5798] located at 192.168.183.191:6001
OK
192.168.183.191:6001> quit
[root@redis01 local]# redis-cli -c -p 6002
127.0.0.1:6002> get name
-> Redirected to slot [5798] located at 192.168.183.191:6001
"txc"
# 登录测试
[root@redis01 local]# redis-cli -h 192.168.183.190 -p 6002
192.168.183.190:6002>
# 检查节点状态
[root@redis01 local]# redis-cli --cluster check 192.168.183.190:6001
192.168.183.190:6001 (98ce60fd...) -> 0 keys | 5461 slots | 1 slaves.
192.168.183.192:6001 (32ba87a0...) -> 0 keys | 5461 slots | 1 slaves.
192.168.183.191:6001 (04ab77bb...) -> 1 keys | 5462 slots | 1 slaves.
[OK] 1 keys in 3 masters.
0.00 keys per slot on average.
>>> Performing Cluster Check (using node 192.168.183.190:6001)
M: 98ce60fda33371c9623ff70e73b40d9f4dcb7568 192.168.183.190:6001
   slots:[0-5460] (5461 slots) master
   1 additional replica(s)
M: 32ba87a08347e81297cb1dabb2af6229bc7be7da 192.168.183.192:6001
   slots:[10923-16383] (5461 slots) master
   1 additional replica(s)
S: 21ad0bfc5ef45beee540d9a214cbb8b08bc95b27 192.168.183.191:6002
   slots: (0 slots) slave
   replicates 98ce60fda33371c9623ff70e73b40d9f4dcb7568
S: 70b214888e13d96ae0c71f094f01a109b29226c7 192.168.183.190:6002
   slots: (0 slots) slave
   replicates 32ba87a08347e81297cb1dabb2af6229bc7be7da
S: 857ee0ba75ddd4fd542e5e881a3eb6c74abdf1f9 192.168.183.192:6002
   slots: (0 slots) slave
   replicates 04ab77bb15eed991dbe81240f82b1797c4da8303
M: 04ab77bb15eed991dbe81240f82b1797c4da8303 192.168.183.191:6001
   slots:[5461-10922] (5462 slots) master
   1 additional replica(s)
[OK] All nodes agree about slots configuration.
>>> Check for open slots...
>>> Check slots coverage...
[OK] All 16384 slots covered.
二、部署keepalived,实现主从热备、秒级切换
1.环境
192.168.183.188 haproxy01(keepalived、haproxy)
192.168.183.189 haproxy02(keepalived、haproxy)
192.168.183.100 vip
2.安装keepalived
# haproxy01上配置
[root@haproxy01 ~]# yum -y install keepalived
3.修改配置文件
(1)haproxy01上keepalived配置
[root@haproxy01 keepalived]# mv keepalived.conf{,.bak}
[root@haproxy01 keepalived]# vim keepalived.conf
! Configuration File for keepalived

global_defs {
        router_id Haproxy_1
}

vrrp_script chk_haproxy {
        script "/etc/keepalived/check_haproxy.sh"
        interval 2
        weight 2
}

vrrp_instance VI_1 {
        state BACKUP
        interface ens33
        virtual_router_id 51
        priority 100
        advert_int 1
        authentication {
                auth_type PASS
        				auth_pass 1111
    		}

    		track_script {
                chk_haproxy
        }

    		virtual_ipaddress {
        				192.168.183.100/24
    		}
}
[root@haproxy01 keepalived]# vim check_haproxy.sh
#!/bin/bash
ps aux | grep haproxy
if [ $? -ne 0 ]
then
        /usr/bin/systemctl stop keepalived
fi
[root@haproxy01 keepalived]# chmod +x check_haproxy.sh
(2)haproxy02上keepalived配置
[root@haproxy02 keepalived]# mv keepalived.conf{,.bak}
[root@haproxy02 keepalived]# vim keepalived.conf
! Configuration File for keepalived

global_defs {
        router_id Haproxy_2
}

vrrp_script chk_haproxy {
        script "/etc/keepalived/check_haproxy.sh"
        interval 2
        weight 2
}

vrrp_instance VI_1 {
        state BACKUP
        interface ens33
        virtual_router_id 51
        priority 100
        advert_int 1
        authentication {
                auth_type PASS
                auth_pass 1111
        }

        track_script {
                chk_haproxy
        }

        virtual_ipaddress {
                192.168.183.100/24
        }
}
[root@haproxy02 keepalived]# vim check_haproxy.sh
#!/bin/bash
ps aux | grep haproxy
if [ $? -ne 0 ]
then
        /usr/bin/systemctl stop keepalived
fi
[root@haproxy02 keepalived]# chmod +x check_haproxy.sh
4.开启服务,验证vip
[root@haproxy01 keepalived]# systemctl start keepalived
[root@haproxy01 keepalived]# ip a
1: lo: <LOOPBACK,UP,LOWER_UP> mtu 65536 qdisc noqueue state UNKNOWN group default qlen 1000
    link/loopback 00:00:00:00:00:00 brd 00:00:00:00:00:00
    inet 127.0.0.1/8 scope host lo
       valid_lft forever preferred_lft forever
    inet6 ::1/128 scope host
       valid_lft forever preferred_lft forever
2: ens33: <BROADCAST,MULTICAST,UP,LOWER_UP> mtu 1500 qdisc pfifo_fast state UP group default qlen 1000
    link/ether 00:0c:29:2f:a1:1e brd ff:ff:ff:ff:ff:ff
    inet 192.168.183.188/24 brd 192.168.183.255 scope global noprefixroute ens33
       valid_lft forever preferred_lft forever
    inet 192.168.183.100/24 scope global secondary ens33
       valid_lft forever preferred_lft forever
    inet6 fe80::e108:c677:6246:9c33/64 scope link noprefixroute
       valid_lft forever preferred_lft forever

[root@haproxy02 keepalived]# systemctl start keepalived.service
[root@haproxy02 keepalived]# ip a
1: lo: <LOOPBACK,UP,LOWER_UP> mtu 65536 qdisc noqueue state UNKNOWN group default qlen 1000
    link/loopback 00:00:00:00:00:00 brd 00:00:00:00:00:00
    inet 127.0.0.1/8 scope host lo
       valid_lft forever preferred_lft forever
    inet6 ::1/128 scope host
       valid_lft forever preferred_lft forever
2: ens33: <BROADCAST,MULTICAST,UP,LOWER_UP> mtu 1500 qdisc pfifo_fast state UP group default qlen 1000
    link/ether 00:0c:29:eb:79:a1 brd ff:ff:ff:ff:ff:ff
    inet 192.168.183.189/24 brd 192.168.183.255 scope global noprefixroute ens33
       valid_lft forever preferred_lft forever
    inet6 fe80::e108:c677:6246:9c33/64 scope link tentative noprefixroute dadfailed
       valid_lft forever preferred_lft forever
    inet6 fe80::a6d3:943b:8686:30ee/64 scope link noprefixroute
       valid_lft forever preferred_lft forever
三、部署haproxy,实现访问6379端口时,轮询访问六个节点
1.安装haproxy
[root@haproxy01 ~]# yum -y install haproxy
[root@haproxy02 ~]# yum -y install haproxy
2.修改haproxy配置文件
[root@haproxy01 ~]# cd /etc/haproxy/
[root@haproxy01 haproxy]# mv haproxy.cfg{,.bak}
[root@haproxy01 haproxy]# vim haproxy.cfg
global
    log                     127.0.0.1 local2
    chroot                  /var/lib/haproxy
    pidfile                 /var/run/haproxy.pid
    maxconn                 4000
    user                    haproxy
    group                   haproxy
    daemon

defaults
    mode                    http
    log                     global
    option                  dontlognull
    retries                 3
    maxconn                 3000
    contimeout              50000
    clitimeout              50000
    srvtimeout              50000

listen stats
    bind                    *:8888
    stats                   enable
    stats                   hide-version
    stats uri               /haproxystats
    stats realm             Haproxy\ stats
    stats auth              admin:admin
    stats admin             if TRUE

frontend web
    option                   httplog
    option                   http-server-close
    option forwardfor        except 127.0.0.0/8
    mode                     tcp
    bind                     *:6379

listen redis
    bind *:6379
    mode tcp
    balance roundrobin
    server redis1 192.168.183.190:6001 weight 1  check inter 1s rise 2 fall 2
    server redis2 192.168.183.190:6002 weight 1  check inter 1s rise 2 fall 2
    server redis3 192.168.183.191:6001 weight 1  check inter 1s rise 2 fall 2
    server redis4 192.168.183.191:6002 weight 1  check inter 1s rise 2 fall 2
    server redis5 192.168.183.192:6001 weight 1  check inter 1s rise 2 fall 2
    server redis6 192.168.183.192:6002 weight 1  check inter 1s rise 2 fall 2

[root@haproxy02 ~]# cd /etc/haproxy/
[root@haproxy02 haproxy]# mv haproxy.cfg{,.bak}
[root@haproxy02 haproxy]# vim haproxy.cfg
global
    log                     127.0.0.1 local2
    chroot                  /var/lib/haproxy
    pidfile                 /var/run/haproxy.pid
    maxconn                 4000
    user                    haproxy
    group                   haproxy
    daemon

defaults
    mode                    http
    log                     global
    option                  dontlognull
    retries                 3
    maxconn                 3000
    contimeout              50000
    clitimeout              50000
    srvtimeout              50000

listen stats
    bind                    *:8888
    stats                   enable
    stats                   hide-version
    stats uri               /haproxystats
    stats realm             Haproxy\ stats
    stats auth              admin:admin
    stats admin             if TRUE

frontend web
    option                   httplog
    option                   http-server-close
    option forwardfor        except 127.0.0.0/8
    mode                     tcp
    bind                     *:6379

listen redis
    bind *:6379
    mode tcp
    balance roundrobin
    server redis1 192.168.183.190:6001 weight 1  check inter 1s rise 2 fall 2
    server redis2 192.168.183.190:6002 weight 1  check inter 1s rise 2 fall 2
    server redis3 192.168.183.191:6001 weight 1  check inter 1s rise 2 fall 2
    server redis4 192.168.183.191:6002 weight 1  check inter 1s rise 2 fall 2
    server redis5 192.168.183.192:6001 weight 1  check inter 1s rise 2 fall 2
    server redis6 192.168.183.192:6002 weight 1  check inter 1s rise 2 fall 2
3.haproxy rsyslog日志配置
# 开启rsyslog记录haproxy日志功能
[root@haproxy01 haproxy]# vim /etc/rsyslog.conf
# 把下面四条注释去掉
15 #$ModLoad imudp
16 #$UDPServerRun 514
19 #$ModLoad imtcp
20 #$InputTCPServerRun 514
# 添加一行
local12.* /var/log/haproxy/haproxy.log

# 修改rsyslog配置文件
[root@haproxy01 haproxy]# vim /etc/sysconfig/rsyslog
SYSLOGD_OPTIONS="-r -m 0 -c 2"

# 重启rsyslog,启动haproxy
[root@haproxy01 haproxy]# systemctl restart rsyslog.service
[root@haproxy01 haproxy]# systemctl start haproxy.service
# 查看haproxy是否启动
[root@haproxy01 haproxy]# ps -ef | grep haproxy
root      99875      1  0 15:44 ?        00:00:00 /usr/sbin/haproxy-systemd-wrapper -f /etc/haproxy/haproxy.cfg -p /run/haproxy.pid
haproxy   99876  99875  0 15:44 ?        00:00:00 /usr/sbin/haproxy -f /etc/haproxy/haproxy.cfg -p /run/haproxy.pid -Ds
haproxy   99877  99876  0 15:44 ?        00:00:00 /usr/sbin/haproxy -f /etc/haproxy/haproxy.cfg -p /run/haproxy.pid -Ds
root     102454   1267  0 15:48 pts/0    00:00:00 grep --color=auto haproxy


# 开启rsyslog记录haproxy日志功能
[root@haproxy02 haproxy]# vim /etc/rsyslog.conf
# 把下面四条注释去掉
15 #$ModLoad imudp
16 #$UDPServerRun 514
19 #$ModLoad imtcp
20 #$InputTCPServerRun 514
# 添加一行
local12.* /var/log/haproxy/haproxy.log

# 修改rsyslog配置文件
[root@haproxy02 haproxy]# vim /etc/sysconfig/rsyslog
SYSLOGD_OPTIONS="-r -m 0 -c 2"

# 重启rsyslog,启动haproxy
[root@haproxy02 haproxy]# systemctl restart rsyslog.service
[root@haproxy02 haproxy]# systemctl start haproxy.service
# 查看haproxy是否启动
[root@haproxy02 haproxy]# ps -ef | grep haproxy
root     102913      1  0 15:47 ?        00:00:00 /usr/sbin/haproxy-systemd-wrapper -f /etc/haproxy/haproxy.cfg -p /run/haproxy.pid
haproxy  102914 102913  0 15:47 ?        00:00:00 /usr/sbin/haproxy -f /etc/haproxy/haproxy.cfg -p /run/haproxy.pid -Ds
haproxy  102915 102914  0 15:47 ?        00:00:00 /usr/sbin/haproxy -f /etc/haproxy/haproxy.cfg -p /run/haproxy.pid -Ds
root     103187   1219  0 15:47 pts/0    00:00:00 grep --color=auto haproxy
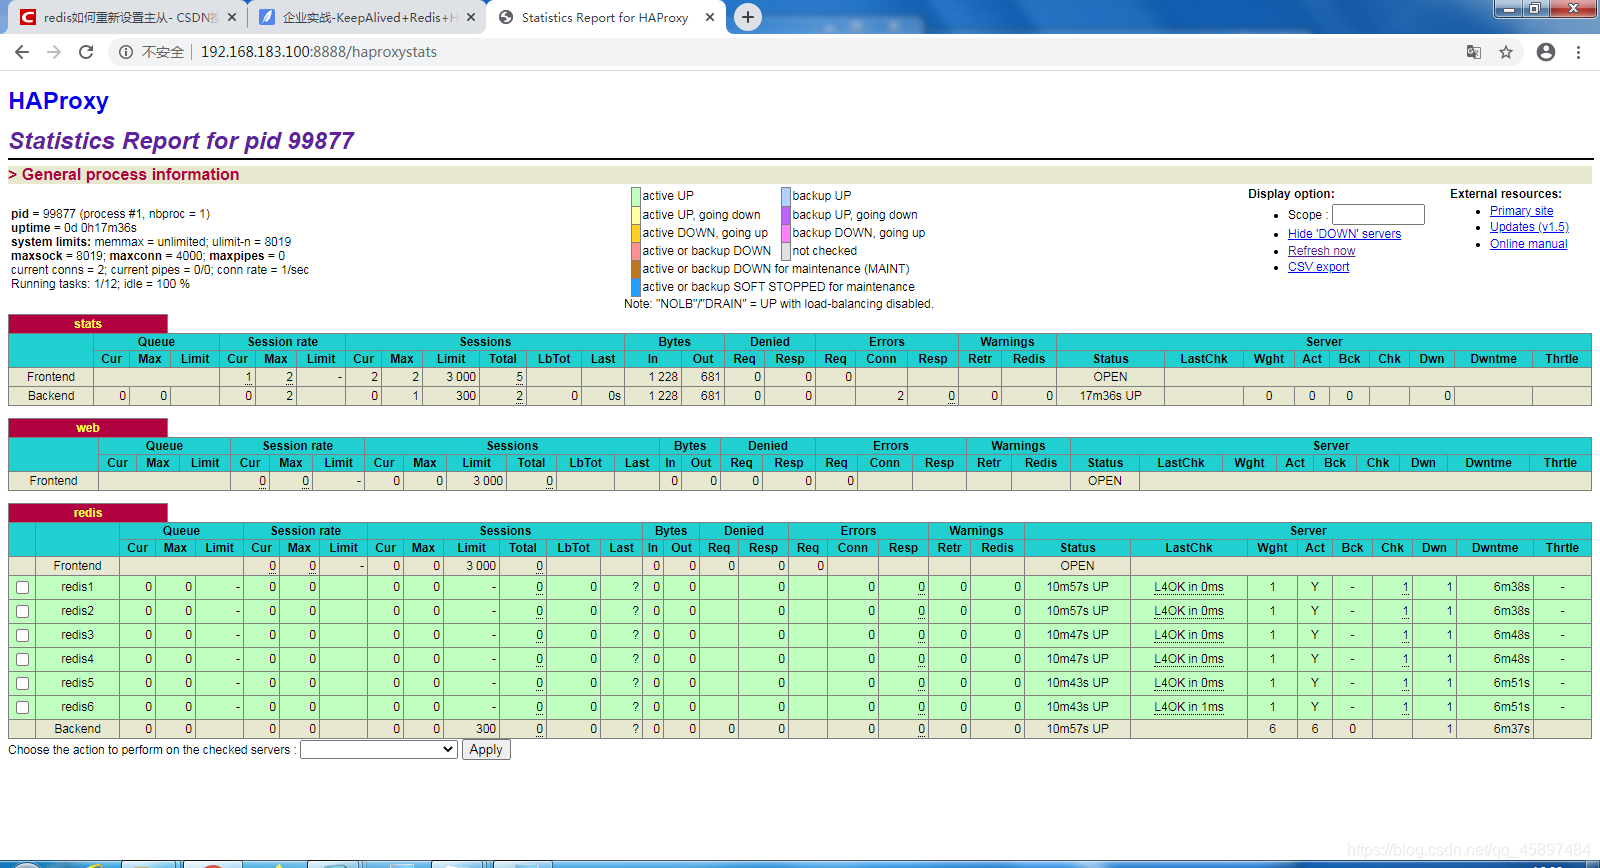
四、web访问
使用vip+端口号+haproxy配置文件内设置的url 进行访问


 2184
2184


 被折叠的 条评论
为什么被折叠?
被折叠的 条评论
为什么被折叠?
 到【灌水乐园】发言


