


个人简介
👀个人主页: 前端杂货铺
⚡开源项目: rich-vue3 (基于 Vue3 + TS + Pinia + Element Plus + Spring全家桶 + MySQL)
🙋♂️学习方向: 主攻前端方向,正逐渐往全干发展
📃个人状态: 研发工程师,现效力于中国工业软件事业
🚀人生格言: 积跬步至千里,积小流成江海
🥇推荐学习:🍖开源 rich-vue3 🍍前端面试宝典 🍉Vue2 🍋Vue3 🍓Vue2/3项目实战 🥝Node.js实战 🍒Three.js🌕个人推广:每篇文章最下方都有加入方式,旨在交流学习&资源分享,快加入进来吧
| 内容 | 参考链接 |
|---|---|
| THREE.JS 专栏 | Three.js 入门 |
前言
大家好,这里是前端杂货铺。
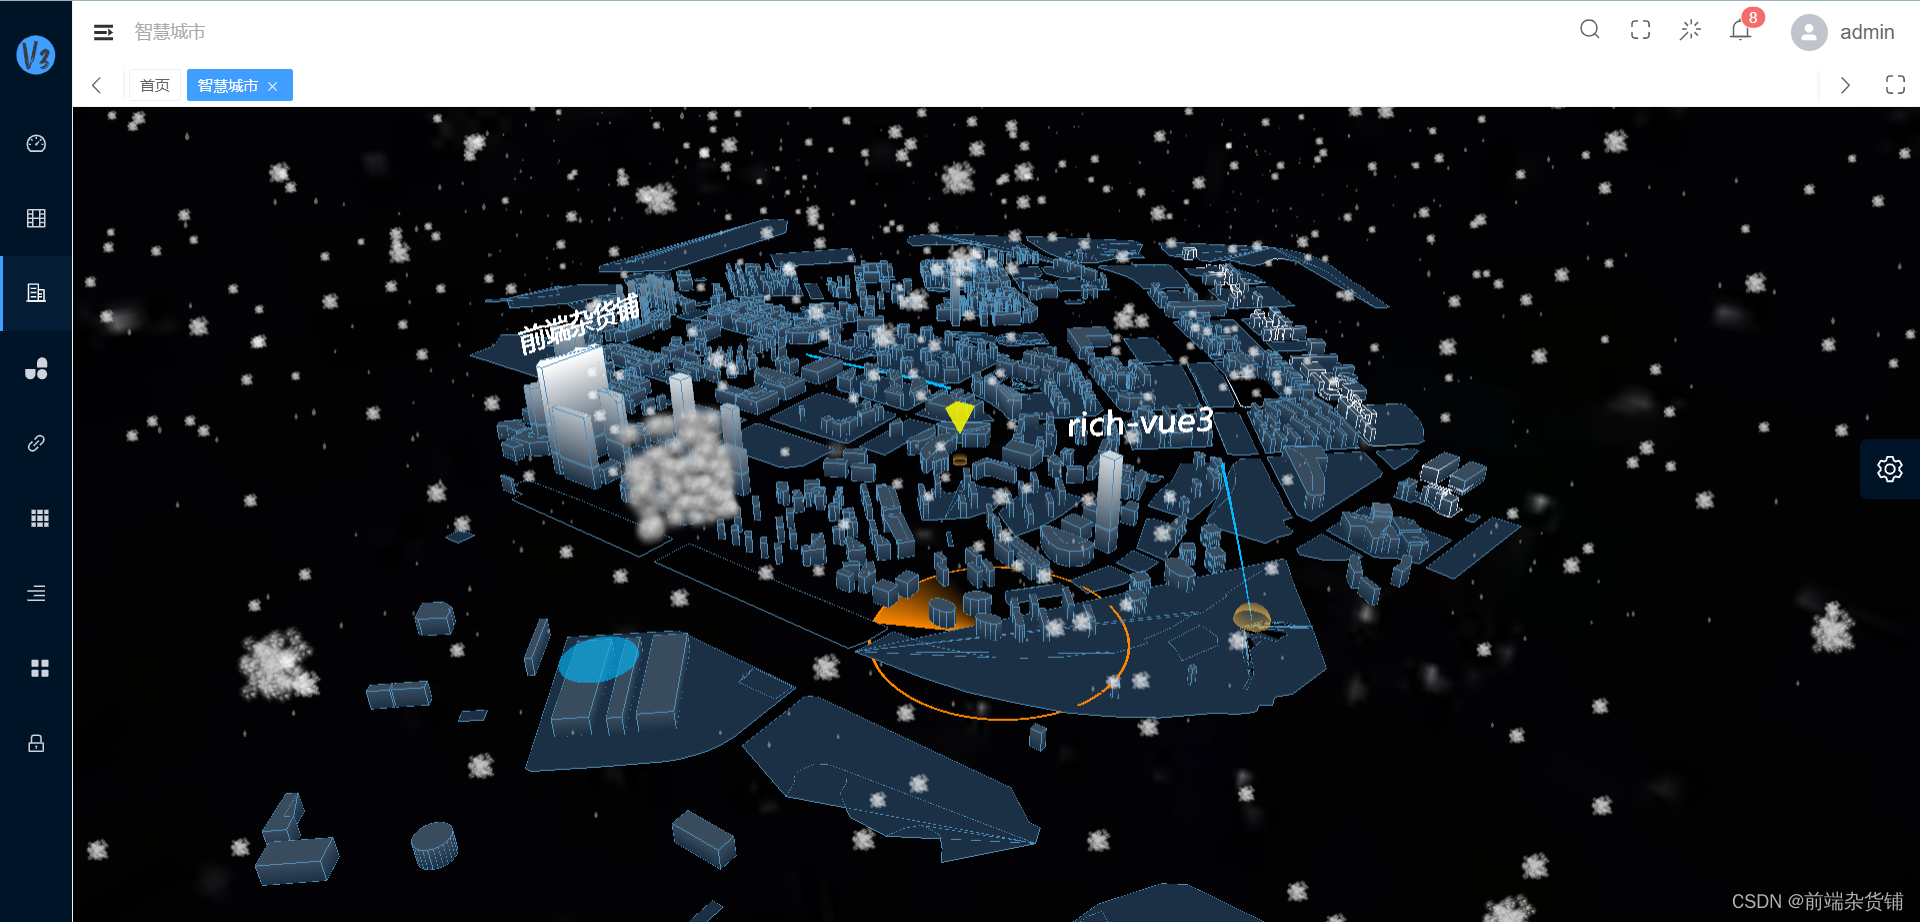
这篇文章我们使用 Vue3+TypeScript+Three.js 等主流前端技术,打造 雨雪交加的智慧城市 项目。
three.js-雨雪交加的智慧城市
项目源码 => 请点击此处自行获取 [github] rich-vue3
如果此项目对你有些帮助,欢迎给个免费的 Star !!!(Thanks♪(・ω・)ノ)
项目概况
源码路径
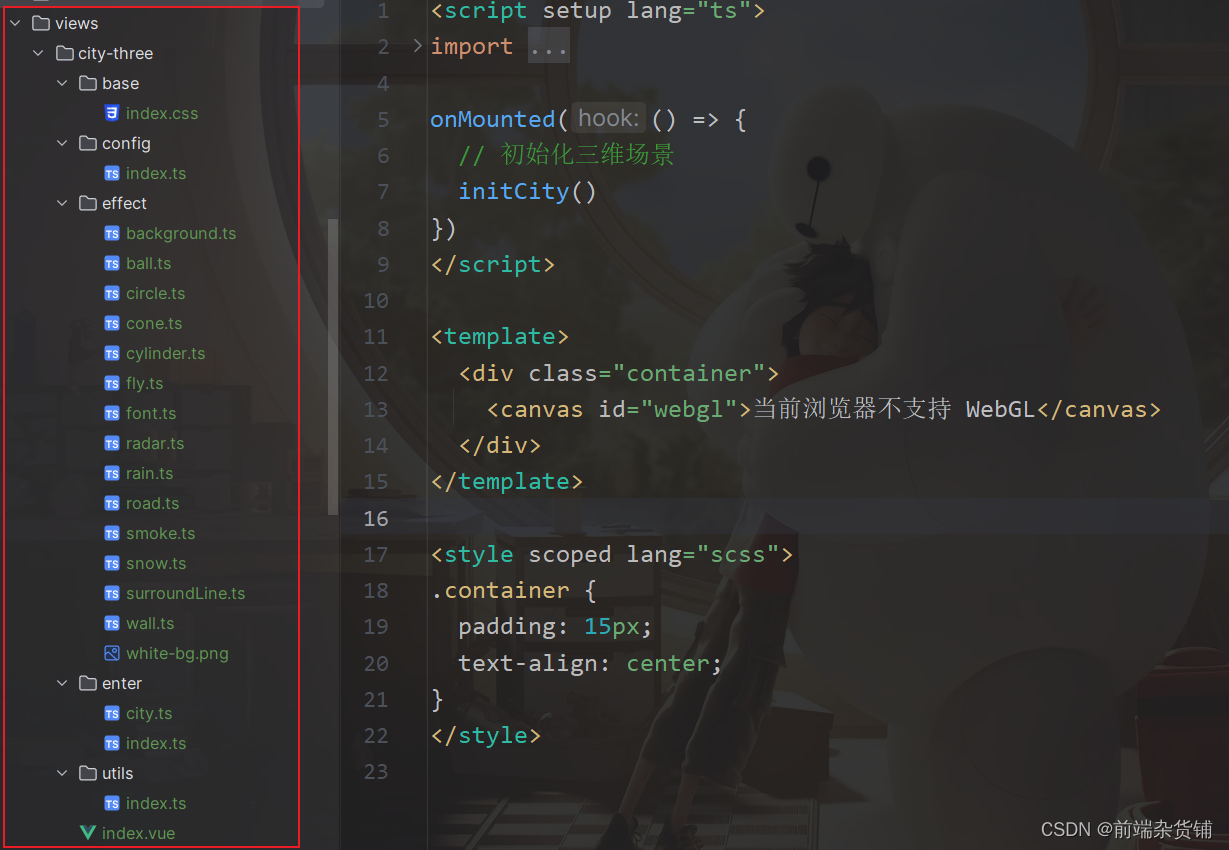
该项目已被托管到 rich-vue3 中,具体源码在 rich-vue3 项目的 rich-vue3-webapp/src/views/city-three 路径。
文件结构与职责
下面是该项目涉及到文件的基本结构:
- base/index.css:页面的基础样式
- config/index.ts:存储项目中需要使用的颜色
- effect/…: 各种效果及特效,包括 天空盒子、扩散半球、扩散圆、旋转四棱锥、飞线、文字、雷达、雨、路径运动、烟雾、雪、建筑物外围线条、透明墙等
- enter/initCity.ts:初始化场景、 创建城市实例、监听浏览器变化、动画
- enter/city.ts:城市类,加载城市模型、初始化各种效果、点击聚焦和滑动滑轮缩放
- utils/index.ts:封装加载城市模型的方法
- index.vue:基本 UI,初始化项目的入口
城市类代码如下,在 initEffect() 方法中会创建很多种效果。
import { loadFBX } from "../utils"
import * as THREE from "three"
import * as TWEEN from "@tweenjs/tween.js"
import { SurroundLine } from "@/views/city-three/effect/surroundLine"
import { Background } from "@/views/city-three/effect/background"
import { Radar } from "../effect/radar"
import { Wall } from "../effect/wall"
import { Circle } from "@/views/city-three/effect/circle"
import { Ball } from "@/views/city-three/effect/ball"
import { Cone } from "@/views/city-three/effect/cone"
import { Fly } from "@/views/city-three/effect/fly"
import { Road } from "@/views/city-three/effect/road"
import { Font } from "@/views/city-three/effect/font"
import { Snow } from "@/views/city-three/effect/snow"
import { Rain } from "@/views/city-three/effect/rain"
import { Smoke } from "@/views/city-three/effect/smoke";

export class City {
  private readonly scene: any
  private readonly camera: any
  private readonly controls: any
  private tweenPosition: any
  private tweenRotation: any
  private flag: boolean
  private readonly height: { value: number }
  private readonly time: { value: number }
  private readonly top: { value: number }
  private readonly effect: {
    snow: any
    rain: any
    smoke: any
  }
  constructor(scene: object, camera: object, controls: any) {
    this.scene = scene
    this.camera = camera
    this.controls = controls
    this.flag = false
    this.tweenPosition = null
    this.tweenRotation = null

    this.height = {
      value: 5
    }

    this.time = {
      value: 0
    }

    this.top = {
      value: 0
    }

    // 雪、雨、烟雾
    this.effect = {
      snow: null,
      rain: null,
      smoke: null
    }

    this.loadCity()
  }

  loadCity() {
    // 加载城市模型,并且渲染到画布
    loadFBX("model/beijing.fbx").then((object: any) => {
      object.traverse((child: any) => {
        if (child.isMesh) {
          new SurroundLine(this.scene, child, this.height, this.time)
        }
      })
      this.initEffect()
    })
  }

  // 初始化效果,各个功能点都放在了这里
  initEffect() {
    new Background(this.scene)

    new Radar(this.scene, this.time)

    new Wall(this.scene, this.time)

    new Circle(this.scene, this.time)

    new Ball(this.scene, this.time)

    new Cone(this.scene, this.top, this.height)

    new Fly(this.scene, this.time)

    new Road(this.scene, this.time)

    new Font(this.scene)

    this.effect.snow = new Snow(this.scene)

    this.effect.rain = new Rain(this.scene)

    this.effect.smoke = new Smoke(this.scene)

    // 点击选择
    this.addClick()

    this.addWheel()
  }

  addClick() {
    let flag = true
    document.onmousedown = () => {
      flag = true
      document.onmousemove = () => {
        flag = false
      }
    }
    document.onmouseup = (event) => {
      if (flag) {
        this.clickEvent(event)
      }
      document.onmousemove = null
    }
  }

  // 场景跟随鼠标坐标缩放
  addWheel() {
    const body: HTMLElement = document.body
    // @ts-ignore
    body.onmousewheel = (event: MouseEvent) => {
      // 鼠标当前的坐标
      const x = (event.clientX / window.innerWidth) * 2 - 1
      const y = -(event.clientY / window.innerHeight) * 2 + 1

      const value = 30

      const vector = new THREE.Vector3(x, y, 0.5)
      vector.unproject(this.camera)
      vector.sub(this.camera.position).normalize()

      // @ts-ignore
      if (event.wheelDelta > 0) {
        this.camera.position.x += vector.x * value
        this.camera.position.y += vector.y * value
        this.camera.position.z += vector.z * value

        this.controls.target.x += vector.x * value
        this.controls.target.y += vector.y * value
        this.controls.target.z += vector.z * value
      } else {
        this.camera.position.x -= vector.x * value
        this.camera.position.y -= vector.y * value
        this.camera.position.z -= vector.z * value

        this.controls.target.x -= vector.x * value
        this.controls.target.y -= vector.y * value
        this.controls.target.z -= vector.z * value
      }
    }
  }

  // 点击聚焦
  clickEvent(event: MouseEvent) {
    // 归一化坐标(将鼠标位置归一化为设备坐标。x 和 y 方向的取值范围是 (-1 to +1))
    const x = (event.clientX / window.innerWidth) * 2 - 1
    const y = -(event.clientY / window.innerHeight) * 2 + 1

    // 创建设备坐标(三维)
    const standardVector = new THREE.Vector3(x, y, 0.5)
    // 转化为世界坐标 (将此向量 (坐标) 从相机的标准化设备坐标 (NDC) 空间投影到世界空间)
    const worldVector = standardVector.unproject(this.camera)
    // 做序列化
    const ray = worldVector.sub(this.camera.position).normalize()

    // 实现点击选中
    // 创建一个射线发射器,用来发射一条射线
    const raycaster = new THREE.Raycaster(this.camera.position, ray)
    // 返回射线碰撞到的物体
    const intersects = raycaster.intersectObjects(this.scene.children, true)

    let point3d = null
    if (intersects.length) {
      point3d = intersects[0]
    }

    if (point3d) {
      const proportion = 3
      // 开始动画修改观察点
      const time = 1000

      this.tweenPosition = new TWEEN.Tween(this.camera.position)
        .to({ x: point3d.point.x * proportion, y: point3d.point.y * proportion, z: point3d.point.y * proportion }, time)
        .start()

      this.tweenRotation = new TWEEN.Tween(this.camera.rotation)
        .to({ x: this.camera.rotation.x, y: this.camera.rotation.y, z: this.camera.rotation.z }, time)
        .start()
    }
  }

  start(delta: number) {
    for (const key in this.effect) {
      // @ts-ignore
      this.effect[key] && this.effect[key].animation()
    }

    if (this.tweenPosition && this.tweenRotation) {
      this.tweenPosition.update()
      this.tweenRotation.update()
    }

    this.height.value += 0.4
    if (this.height.value > 160) {
      this.height.value = 5
    }

    this.time.value += delta

    if (this.top.value > 15 || this.top.value < 0) {
      this.flag = !this.flag
    }

    this.top.value += this.flag ? -0.8 : 0.8
  }
}
写在最后
由于本项目涉及到的代码较多,在本篇文章中就不一一讲解了,感兴趣的同学可以去下载项目源码自行学习,有问题的话可以评论区一起讨论交流~
好啦,本篇文章到这里就要和大家说再见啦,祝你这篇文章阅读愉快,你下篇文章的阅读愉快留着我下篇文章再祝!
参考资料:
- Three.js 官方文档
- WebGL+Three.js 入门与实战【作者:慕课网_yancy】


 4万+
4万+


 被折叠的 条评论
为什么被折叠?
被折叠的 条评论
为什么被折叠?
 到【灌水乐园】发言


