


原文博客地址
1、配置信息
注: 文章中所用()中的内容皆为提示,如(controller AND compute)表示 此命令在两台节点都需要执行。
使用 VM 虚拟机进行实验。
| 主机名 | IP地址 |
|---|---|
| controller | 内网(仅主机模式):192.168.20.10/24、外网(Nat模式):192.168.10.10/24 |
| compute | 内网(仅主机模式):192.168.20.20/24、外网(Nat模式):192.168.10.20/24 |
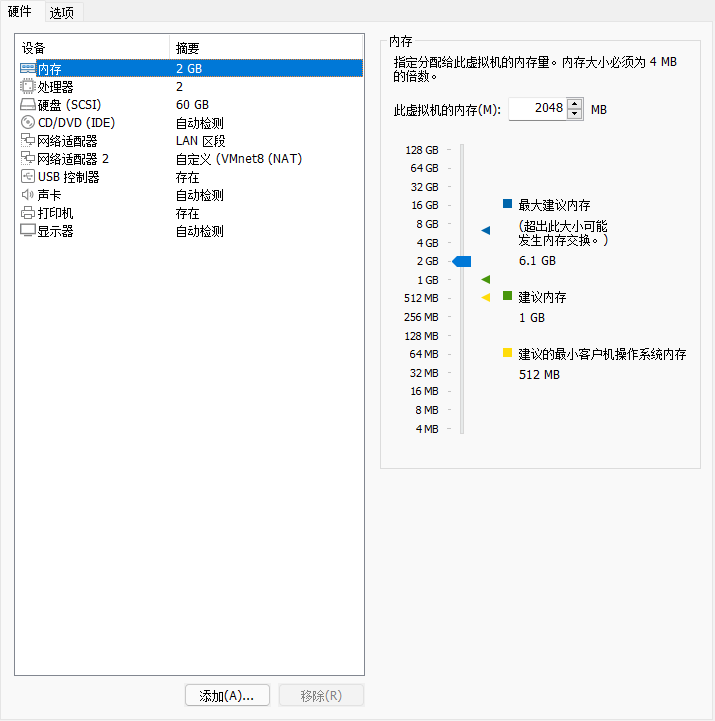
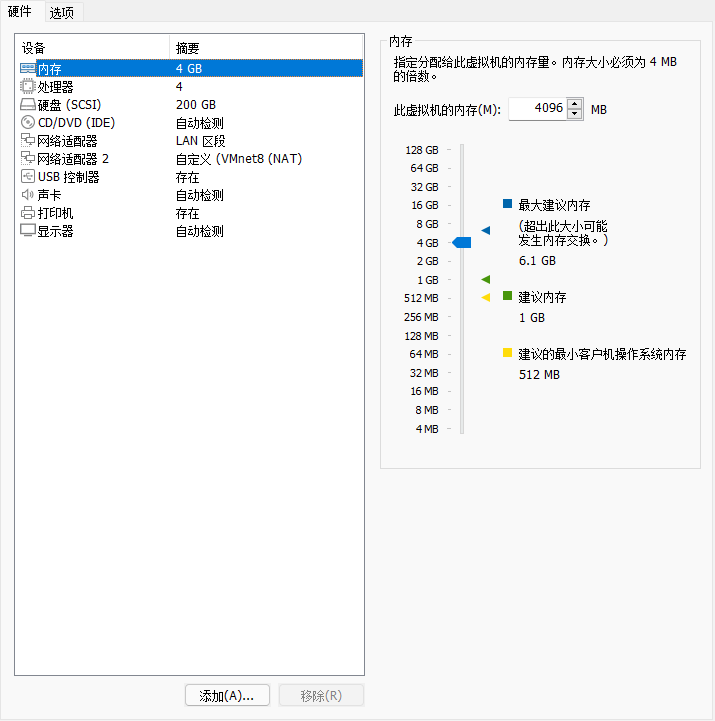
虚拟机配置截图
######提示######
内网请使用 仅主机模式 不要学我用LAN 不然后面就会后悔的😱
- controller节点配置(处理器处开启 虚拟化支持)
- compute节点配置(处理器处开启 虚拟化支持)
2、安装基础操作系统
CentOS7系统选择1804版本:CentOS-7-x86_64-DVD-1804.iso
| 百度云盘 | 提取码 |
|---|---|
| https://pan.baidu.com/s/1SLha9Cih1VAv77qmup2LJA | vyto |
controller 和 compute 节点安装过程是一致的,要将磁盘空间大部分放置在 “/” 根目录下,compute节点后续需要做swift、cinder分区,要预留 100G 左右的硬盘空间。
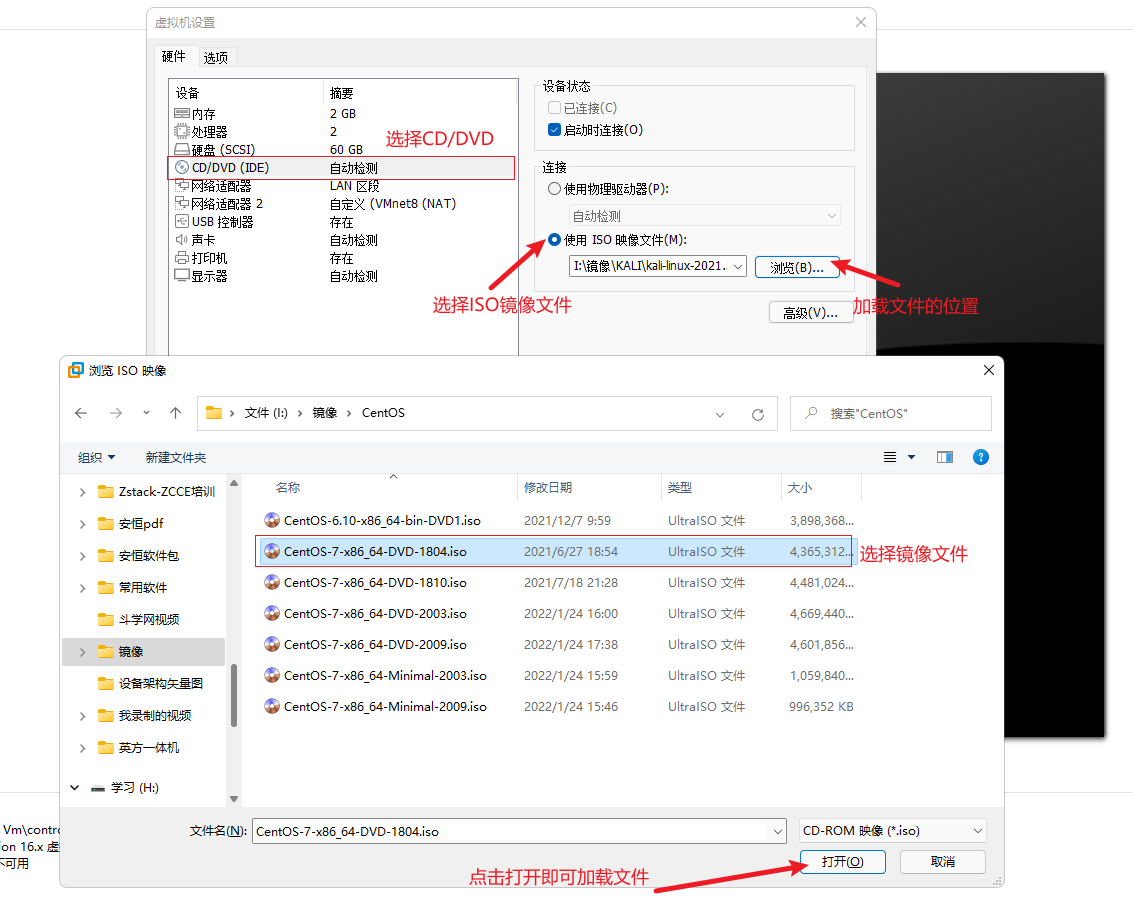
安装过程图文描述
将CentOS-7-x86_64-DVD-1804.iso镜像,加载到虚拟机镜像挂载的位置,最后点击确定,然后就可以点击开机。(两台虚拟机都要先安装好系统)

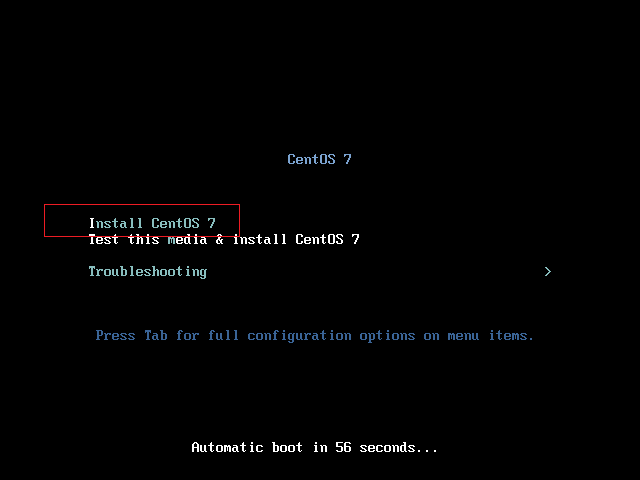
Install CentOS7  安装CentOS7系统、Test this media & install CentOS 7 检测后再安装系统。这里直接选择 安装系统就可以。
节点分区配置: /boot	1024M 、/	50G(compute节点根目录分50G即可,剩余 最少100G可以供之后使用)。


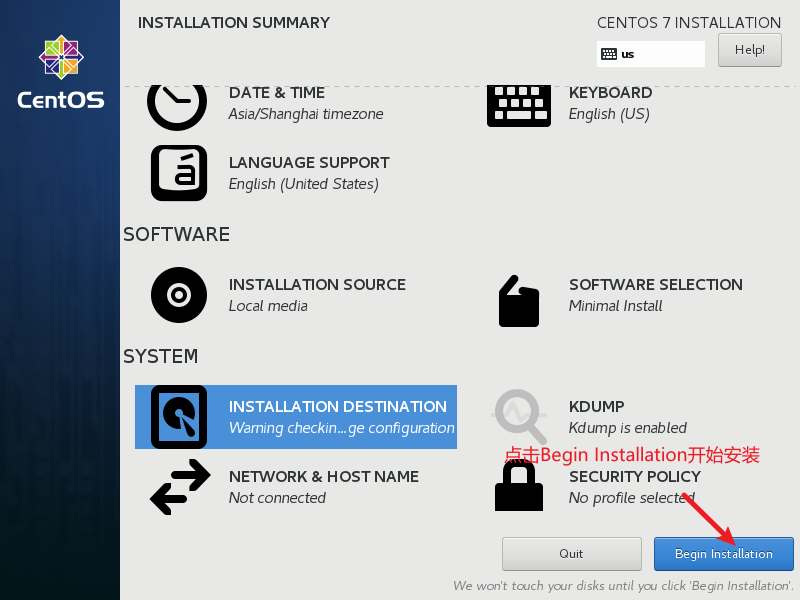
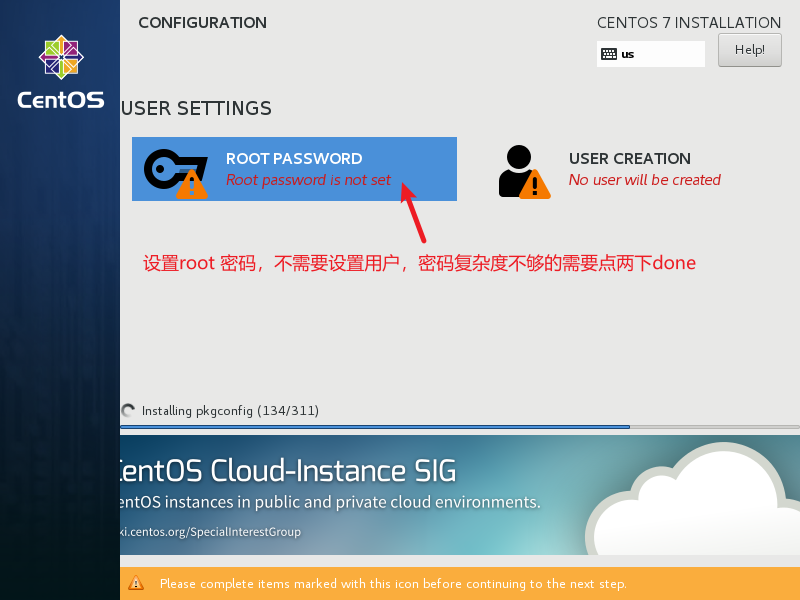
z系统安装完成后点击 reboot 重启一下。(等待系统安装完成中 …15m…)
3、系统基础环境配置
3.1、网络服务配置
设置IP地址,两台虚拟机使用网卡1互通,使用网卡2与外界通信。
#修改主机名
(controller节点)
[root@localhost ~]# hostnamectl set-hostname controller
[root@localhost ~]# bash
[root@controller ~]# hostnamectl
   Static hostname: controller
         Icon name: computer-vm
           Chassis: vm
        Machine ID: a0389ebcbc904f9d9b13f58e5cd79d71
           Boot ID: 90b6977ddd124ebeac294728b7dd35d6
    Virtualization: vmware
  Operating System: CentOS Linux 7 (Core)
       CPE OS Name: cpe:/o:centos:centos:7
            Kernel: Linux 3.10.0-862.el7.x86_64
      Architecture: x86-64

(compute节点)
[root@localhost ~]# hostnamectl set-hostname compute
[root@localhost ~]# bash
[root@compute ~]#
[root@compute ~]# hostnamectl
   Static hostname: compute
         Icon name: computer-vm
           Chassis: vm
        Machine ID: 5b19796e31564946b6d308c2cf1619a2
           Boot ID: d65a5777e5b64fe58c648313cdc1554d
    Virtualization: vmware
  Operating System: CentOS Linux 7 (Core)
       CPE OS Name: cpe:/o:centos:centos:7
            Kernel: Linux 3.10.0-862.el7.x86_64
      Architecture: x86-64

# 关闭防火墙(controller AND compute)
[root@controller ~]# systemctl stop firewalld
[root@controller ~]# systemctl disable firewalld
Removed symlink /etc/systemd/system/multi-user.target.wants/firewalld.service.
Removed symlink /etc/systemd/system/dbus-org.fedoraproject.FirewallD1.service.

#关闭selinux(controller AND compute)
[root@compute ~]# setenforce
usage:  setenforce [ Enforcing | Permissive | 1 | 0 ]
[root@compute ~]# setenforce 0
[root@compute ~]# getenforce
Permissive
(此配置为临时生效命令,永久生效,配置为下)
[root@controller ~]# cat /etc/selinux/config

# This file controls the state of SELinux on the system.
# SELINUX= can take one of these three values:
#     enforcing - SELinux security policy is enforced.
#     permissive - SELinux prints warnings instead of enforcing.
#     disabled - No SELinux policy is loaded.
SELINUX=enforcing
# SELINUXTYPE= can take one of three two values:
#     targeted - Targeted processes are protected,
#     minimum - Modification of targeted policy. Only selected processes are protected.
#     mls - Multi Level Security protection.
SELINUXTYPE=targeted


[root@controller ~]# sed -i 's/SELINUX=.*/SELINUX=disabled/g' /etc/selinux/config
[root@controller ~]# cat /etc/selinux/config

# This file controls the state of SELinux on the system.
# SELINUX=disabled
#     enforcing - SELinux security policy is enforced.
#     permissive - SELinux prints warnings instead of enforcing.
#     disabled - No SELinux policy is loaded.
SELINUX=disabled
# SELINUXTYPE= can take one of three two values:
#     targeted - Targeted processes are protected,
#     minimum - Modification of targeted policy. Only selected processes are protected.
#     mls - Multi Level Security protection.
SELINUXTYPE=targeted
(重启后永久生效,关闭selinux)

#关闭NetworkManager 网络管理服务 (controller AND compute)
[root@controller ~]# systemctl stop NetworkManager
[root@controller ~]# systemctl disable NetworkManager
Removed symlink /etc/systemd/system/multi-user.target.wants/NetworkManager.service.
Removed symlink /etc/systemd/system/dbus-org.freedesktop.NetworkManager.service.
Removed symlink /etc/systemd/system/dbus-org.freedesktop.nm-dispatcher.service.

#清除iptables全部的策略(controller AND compute)
[root@controller ~]#
[root@controller ~]# iptables -L
Chain INPUT (policy ACCEPT)
target     prot opt source               destination

Chain FORWARD (policy ACCEPT)
target     prot opt source               destination

Chain OUTPUT (policy ACCEPT)
target     prot opt source               destination
[root@controller ~]# iptables -F
[root@controller ~]# iptables -Z
[root@controller ~]# iptables -X
[root@controller ~]# iptables-save
# Generated by iptables-save v1.4.21 on Sat Jan 29 17:41:16 2022
*filter
:INPUT ACCEPT [28:1880]
:FORWARD ACCEPT [0:0]
:OUTPUT ACCEPT [16:1664]
COMMIT
# Completed on Sat Jan 29 17:41:16 2022

#配置网络(controller AND compute)
[root@controller ~]# vi /etc/sysconfig/network-scripts/ifcfg-ens33
[root@controller ~]# cat /etc/sysconfig/network-scripts/ifcfg-ens33
TYPE=Ethernet
PROXY_METHOD=none
BROWSER_ONLY=no
BOOTPROTO=static			#设置静态IP
DEFROUTE=yes
IPV4_FAILURE_FATAL=no
IPV6INIT=yes
IPV6_AUTOCONF=yes
IPV6_DEFROUTE=yes
IPV6_FAILURE_FATAL=no
IPV6_ADDR_GEN_MODE=stable-privacy
NAME=ens33
UUID=046c4a52-35d6-4b67-8035-7381dc9534e3
DEVICE=ens33
ONBOOT=yes				#开机自启网络服务
IPADDR=192.168.20.10			#IP地址
PREFIX=24				#子网掩码位数
[root@controller ~]# cat /etc/sysconfig/network-scripts/ifcfg-ens34
TYPE=Ethernet
PROXY_METHOD=none
BROWSER_ONLY=no
BOOTPROTO=static
DEFROUTE=yes
IPV4_FAILURE_FATAL=no
IPV6INIT=yes
IPV6_AUTOCONF=yes
IPV6_DEFROUTE=yes
IPV6_FAILURE_FATAL=no
IPV6_ADDR_GEN_MODE=stable-privacy
NAME=ens34
UUID=c54f26a6-6aca-4487-8d22-a69bf472adb5
DEVICE=ens34
ONBOOT=yes
IPADDR=192.168.10.10
PREFIX=24
GATEWAY=192.168.10.2			#网关地址
DNS1=114.114.114.114			#DNS1 地址(223.5.5.5、223.4.4.4、8.8.8.8)

#重启网络服务
[root@controller ~]# systemctl restart network

#查看IP地址
[root@controller ~]# ip a
1: lo: <LOOPBACK,UP,LOWER_UP> mtu 65536 qdisc noqueue state UNKNOWN group default qlen 1000
    link/loopback 00:00:00:00:00:00 brd 00:00:00:00:00:00
    inet 127.0.0.1/8 scope host lo
       valid_lft forever preferred_lft forever
    inet6 ::1/128 scope host
       valid_lft forever preferred_lft forever
2: ens33: <BROADCAST,MULTICAST,UP,LOWER_UP> mtu 1500 qdisc pfifo_fast state UP group default qlen 1000
    link/ether 00:0c:29:58:9d:f3 brd ff:ff:ff:ff:ff:ff
    inet 192.168.20.10/24 brd 192.168.20.255 scope global noprefixroute ens33
       valid_lft forever preferred_lft forever
    inet6 fe80::69a5:d1e2:4fab:9dfb/64 scope link noprefixroute
       valid_lft forever preferred_lft forever
3: ens34: <BROADCAST,MULTICAST,UP,LOWER_UP> mtu 1500 qdisc pfifo_fast state UP group default qlen 1000
    link/ether 00:0c:29:58:9d:fd brd ff:ff:ff:ff:ff:ff
    inet 192.168.10.10/24 brd 192.168.10.255 scope global noprefixroute ens34
       valid_lft forever preferred_lft forever
    inet6 fe80::221:c336:4fad:cb2/64 scope link noprefixroute
       valid_lft forever preferred_lft forever

[root@compute ~]# ip a
1: lo: <LOOPBACK,UP,LOWER_UP> mtu 65536 qdisc noqueue state UNKNOWN group default qlen 1000
    link/loopback 00:00:00:00:00:00 brd 00:00:00:00:00:00
    inet 127.0.0.1/8 scope host lo
       valid_lft forever preferred_lft forever
    inet6 ::1/128 scope host
       valid_lft forever preferred_lft forever
2: ens33: <BROADCAST,MULTICAST,UP,LOWER_UP> mtu 1500 qdisc pfifo_fast state UP group default qlen 1000
    link/ether 00:0c:29:a8:cb:60 brd ff:ff:ff:ff:ff:ff
    inet 192.168.20.20/24 brd 192.168.20.255 scope global noprefixroute ens33
       valid_lft forever preferred_lft forever
    inet6 fe80::c251:7dde:8399:82c4/64 scope link noprefixroute
       valid_lft forever preferred_lft forever
3: ens34: <BROADCAST,MULTICAST,UP,LOWER_UP> mtu 1500 qdisc pfifo_fast state UP group default qlen 1000
    link/ether 00:0c:29:a8:cb:6a brd ff:ff:ff:ff:ff:ff
    inet 192.168.10.20/24 brd 192.168.10.255 scope global noprefixroute ens34
       valid_lft forever preferred_lft forever
    inet6 fe80::7c65:4b27:7f69:e201/64 scope link noprefixroute
       valid_lft forever preferred_lft forever


#测试虚拟机之间的连通性
(controller ---->  compute)
[root@controller ~]# ping 192.168.20.20
PING 192.168.20.20 (192.168.20.20) 56(84) bytes of data.
64 bytes from 192.168.20.20: icmp_seq=1 ttl=64 time=1.62 ms
64 bytes from 192.168.20.20: icmp_seq=2 ttl=64 time=4.13 ms
64 bytes from 192.168.20.20: icmp_seq=3 ttl=64 time=1.42 ms
^C
--- 192.168.20.20 ping statistics ---
3 packets transmitted, 3 received, 0% packet loss, time 2030ms
rtt min/avg/max/mdev = 1.426/2.393/4.133/1.232 ms

(compute ---->  controller)
[root@compute ~]# ping 192.168.20.10
PING 192.168.20.10 (192.168.20.10) 56(84) bytes of data.
64 bytes from 192.168.20.10: icmp_seq=1 ttl=64 time=0.907 ms
64 bytes from 192.168.20.10: icmp_seq=2 ttl=64 time=1.89 ms
64 bytes from 192.168.20.10: icmp_seq=3 ttl=64 time=1.92 ms
^C
--- 192.168.20.10 ping statistics ---
3 packets transmitted, 3 received, 0% packet loss, time 2016ms
rtt min/avg/max/mdev = 0.907/1.572/1.920/0.471 ms

#测试虚拟机和物理机的连通性
(使用物理机ping虚拟机外网卡的IP地址)
C:\Users\willi>ping 192.168.10.10

正在 Ping 192.168.10.10 具有 32 字节的数据:
来自 192.168.10.10 的回复: 字节=32 时间<1ms TTL=64
来自 192.168.10.10 的回复: 字节=32 时间<1ms TTL=64

192.168.10.10 的 Ping 统计信息:
    数据包: 已发送 = 2,已接收 = 2,丢失 = 0 (0% 丢失),
往返行程的估计时间(以毫秒为单位):
    最短 = 0ms,最长 = 0ms,平均 = 0ms
Control-C

C:\Users\willi>ping 192.168.10.20

正在 Ping 192.168.10.20 具有 32 字节的数据:
来自 192.168.10.20 的回复: 字节=32 时间<1ms TTL=64
来自 192.168.10.20 的回复: 字节=32 时间=4ms TTL=64
来自 192.168.10.20 的回复: 字节=32 时间=1ms TTL=64
来自 192.168.10.20 的回复: 字节=32 时间=6ms TTL=64

192.168.10.20 的 Ping 统计信息:
    数据包: 已发送 = 4,已接收 = 4,丢失 = 0 (0% 丢失),
往返行程的估计时间(以毫秒为单位):
    最短 = 0ms,最长 = 6ms,平均 = 2ms
(测试无问题后,可以使用远程连接工具进行连接,方便执行命令或上传文件等)

#配置主机名映射(controller AND compute)
(配置主机名映射,是因为在后面配置openstack中使用到的api接口是以主机名进行连接的,将IP映射到主机名上,使用主机名即可访问)
[root@controller ~]# cat /etc/hosts
127.0.0.1   localhost localhost.localdomain localhost4 localhost4.localdomain4
::1         localhost localhost.localdomain localhost6 localhost6.localdomain6

192.168.20.10 controller			#此处填写自己主机的内网IP地址
192.168.20.20 compute				#此处填写compute主机的内网IP

#测试使用主机名映射的连通性
(controller ----> compute)
[root@controller ~]# ping compute
PING compute (192.168.20.20) 56(84) bytes of data.
64 bytes from compute (192.168.20.20): icmp_seq=1 ttl=64 time=1.50 ms
64 bytes from compute (192.168.20.20): icmp_seq=2 ttl=64 time=3.29 ms
64 bytes from compute (192.168.20.20): icmp_seq=3 ttl=64 time=0.972 ms

(compute ----> controller)
[root@compute ~]# ping controller
PING controller (192.168.20.10) 56(84) bytes of data.
64 bytes from controller (192.168.20.10): icmp_seq=1 ttl=64 time=0.758 ms
64 bytes from controller (192.168.20.10): icmp_seq=2 ttl=64 time=2.31 ms
3.2、yum源配置
# 备份 yum 源文件(controller AND compute)
[root@controller ~]# mkdir /backup
[root@controller ~]# mv /etc/yum.repos.d/* /backup/
[root@controller ~]# ll /backup/
total 32
-rw-r--r--. 1 root root 1664 Apr 29  2018 CentOS-Base.repo
-rw-r--r--. 1 root root 1309 Apr 29  2018 CentOS-CR.repo
-rw-r--r--. 1 root root  649 Apr 29  2018 CentOS-Debuginfo.repo
-rw-r--r--. 1 root root  314 Apr 29  2018 CentOS-fasttrack.repo
-rw-r--r--. 1 root root  630 Apr 29  2018 CentOS-Media.repo
-rw-r--r--. 1 root root 1331 Apr 29  2018 CentOS-Sources.repo
-rw-r--r--. 1 root root 4768 Apr 29  2018 CentOS-Vault.repo

#将 Iaas 的镜像包上传到controller节点上(controller)
#挂载 系统基础 镜像包和 Iaas 镜像包(controller)
[root@controller ~]# mkdir /iso_dir
[root@controller ~]# mkdir /iso_dir/centos
[root@controller ~]# mkdir /iso_dir/iaas
[root@controller ~]# mount /dev/sr0 /iso_dir/centos/
mount: no medium found on /dev/sr0			#这里的错误是找不到sr0的设备,原因是 光盘没连接上(图-3.2.1)
[root@controller ~]# mount /dev/sr0 /iso_dir/centos/
mount: /dev/sr0 is write-protected, mounting read-only
[root@controller ~]# mount /root/chinaskills_cloud_iaas.iso /iso_dir/iaas/
mount: /dev/loop0 is write-protected, mounting read-only #仅读文件挂载
(这里的挂载是临时挂载,后面会告诉大家,永久挂载的方法)

#repo文件编写(controller)
[root@controller ~]# vi /etc/yum.repos.d/local.repo
[root@controller ~]# cat /etc/yum.repos.d/local.repo
[centos]					#源的标识(ID)
name = CentOS-$releasever			#源的名字(rpeo name)
baseurl = file:///iso_dir/centos/		#源地址(本地地址 使用 file:// + 本地源绝对路径)
gpgcheck = 0					#0 代表 否定检测源
enabled = 1					#1 代表开启使用本源

[Iaas]
name = chainskill-Iaas
baseurl = file:///iso_dir/iaas/iaas-repo
gpgcheck = 0
enabled = 1

(测试repo文件和挂载文件是否成功)
[root@controller ~]# yum clean all && yum makecache && yum repolist
......
repo id                      repo name                               status
Iaas                         chainskill-Iaas                         3,232
centos                       CentOS-7                                3,971
repolist: 7,203
(完成)

#安装vsftp服务,让compute节点使用controller的yum源
[root@controller ~]# yum install -y vim net-tools vsftpd tree

#修改vsftp的配置文件
(添加配置)
[root@controller ~]# vim /etc/vsftpd/vsftpd.conf
[root@controller ~]# head -4 /etc/vsftpd/vsftpd.conf
# Example config file /etc/vsftpd/vsftpd.conf
anon_root=/iso_dir			#设置可以访问到的ftp根目录
#

#将repo文件的file://修改为ftp和主机名 并启动ftp
[root@controller ~]# vim /etc/yum.repos.d/local.repo
[root@controller ~]# cat /etc/yum.repos.d/local.repo
[centos]
name = CentOS-$releasever
baseurl = ftp://controller/centos/
gpgcheck = 0
enabled = 1

[Iaas]
name = chainskill-Iaas
baseurl = ftp://controller/iaas/iaas-repo
gpgcheck = 0
enabled = 1

[root@controller ~]# systemctl start vsftpd		#启动vsftp服务守护进程
[root@controller ~]# systemctl enable vsftpd		#设置开机自启
Created symlink from /etc/systemd/system/multi-user.target.wants/vsftpd.service to /usr/lib/systemd/system/vsftpd.service.


(测试ftp源有无问题)
[root@controller ~]# yum clean all && yum makecache && yum repolist
......
repo id                              repo name                                  status
Iaas                                 chainskill-Iaas                            3,232
centos                               CentOS-7					3,971
repolist: 7,203
(无问题)

#将 repo 文件 传输到 compute节点上(controller)
(controller ----> compute)
[root@controller ~]# scp /etc/yum.repos.d/local.repo compute:/etc/yum.repos.d/
The authenticity of host 'compute (192.168.20.20)' can't be established.
ECDSA key fingerprint is SHA256:9RuIaFkz/ujnn9mcGxwPu5uMTxsYfte1hw3EUmVrodg.
ECDSA key fingerprint is MD5:1e:f1:0c:0b:e5:6f:04:dc:e4:9c:cf:7c:9d:cf:21:2d.
Are you sure you want to continue connecting (yes/no)? yes
Warning: Permanently added 'compute,192.168.20.20' (ECDSA) to the list of known hosts.
root@compute's password:
local.repo

#查看源是否有问题(compute)
[root@compute ~]# yum clean all && yum makecache && yum repolist
......
repo id                              repo name                                  status
Iaas                                 chainskill-Iaas                            3,232
centos                               CentOS-7					3,971
repolist: 7,203
(无问题)

>>>>>>> yum 源文件至此就算是配置完成 <<<<<<<<<
#永久挂载
[root@controller ~]# cat /etc/fstab

#
# /etc/fstab
# Created by anaconda on Sat Jan 29 15:37:36 2022
#
# Accessible filesystems, by reference, are maintained under '/dev/disk'
# See man pages fstab(5), findfs(8), mount(8) and/or blkid(8) for more info
#
/dev/mapper/centos-root /                       xfs     defaults        0 0
UUID=c1702ad4-b7ad-4d60-a8f6-889e609850c0 /boot                   xfs     defaults        0 0
/root/chinaskills_cloud_iaas.iso	/iso_dir/iaas	iso9660	defaults 0 0
#被挂载文件的绝对路径			挂载路径		文件类型
/dev/sr0 /iso_dir/centos				iso9660	defaults 0 0
 (图-3.2.1)
4、脚本搭建openstack平台
4.1、分区(swift AND cinder on compute)
(如果安装系统的时候没有预留空间,可以重新添加一块或两块硬盘,格式化成xfs格式就行了)
# 分区(compute)
[root@compute ~]# lsblk
NAME            MAJ:MIN RM  SIZE RO TYPE MOUNTPOINT
sda               8:0    0  200G  0 disk
├─sda1            8:1    0    1G  0 part /boot
└─sda2            8:2    0  199G  0 part
  └─centos-root 253:0    0  199G  0 lvm  /
sdb               8:16   0  100G  0 disk
sr0              11:0    1 1024M  0 rom
[root@compute ~]# fdisk /dev/sdb			#选择分区的硬盘
Welcome to fdisk (util-linux 2.23.2).

Changes will remain in memory only, until you decide to write them.
Be careful before using the write command.

Device does not contain a recognized partition table
Building a new DOS disklabel with disk identifier 0xdb4e4cbf.

Command (m for help): p					#查看分区情况

Disk /dev/sdb: 107.4 GB, 107374182400 bytes, 209715200 sectors
Units = sectors of 1 * 512 = 512 bytes
Sector size (logical/physical): 512 bytes / 512 bytes
I/O size (minimum/optimal): 512 bytes / 512 bytes
Disk label type: dos
Disk identifier: 0xdb4e4cbf

   Device Boot      Start         End      Blocks   Id  System

Command (m for help): n					#新建一个分区
Partition type:
   p   primary (0 primary, 0 extended, 4 free)
   e   extended
Select (default p): p					#选择新建主分区
Partition number (1-4, default 1): 			#默认为1
First sector (2048-209715199, default 2048): 		#起始位置
Using default value 2048
Last sector, +sectors or +size{K,M,G} (2048-209715199, default 209715199): +50G		#输入新建分区的大小
Partition 1 of type Linux and of size 50 GiB is set

Command (m for help): n
Partition type:
   p   primary (1 primary, 0 extended, 3 free)
   e   extended
Select (default p): p
Partition number (2-4, default 2):
First sector (104859648-209715199, default 104859648):
Using default value 104859648
Last sector, +sectors or +size{K,M,G} (104859648-209715199, default 209715199):
Using default value 209715199
Partition 2 of type Linux and of size 50 GiB is set

Command (m for help):
Command (m for help): p

Disk /dev/sdb: 107.4 GB, 107374182400 bytes, 209715200 sectors
Units = sectors of 1 * 512 = 512 bytes
Sector size (logical/physical): 512 bytes / 512 bytes
I/O size (minimum/optimal): 512 bytes / 512 bytes
Disk label type: dos
Disk identifier: 0xdb4e4cbf

   Device Boot      Start         End      Blocks   Id  System
/dev/sdb1            2048   104859647    52428800   83  Linux
/dev/sdb2       104859648   209715199    52427776   83  Linux

Command (m for help): w					#写入分区
The partition table has been altered!

Calling ioctl() to re-read partition table.
Syncing disks.

#格式化分区为 xfs
[root@compute ~]# mkfs.xfs /dev/sdb1
meta-data=/dev/sdb1              isize=512    agcount=4, agsize=3276800 blks
         =                       sectsz=512   attr=2, projid32bit=1
         =                       crc=1        finobt=0, sparse=0
data     =                       bsize=4096   blocks=13107200, imaxpct=25
         =                       sunit=0      swidth=0 blks
naming   =version 2              bsize=4096   ascii-ci=0 ftype=1
log      =internal log           bsize=4096   blocks=6400, version=2
         =                       sectsz=512   sunit=0 blks, lazy-count=1
realtime =none                   extsz=4096   blocks=0, rtextents=0
[root@compute ~]# mkfs.xfs /dev/sdb2
meta-data=/dev/sdb2              isize=512    agcount=4, agsize=3276736 blks
         =                       sectsz=512   attr=2, projid32bit=1
         =                       crc=1        finobt=0, sparse=0
data     =                       bsize=4096   blocks=13106944, imaxpct=25
         =                       sunit=0      swidth=0 blks
naming   =version 2              bsize=4096   ascii-ci=0 ftype=1
log      =internal log           bsize=4096   blocks=6399, version=2
         =                       sectsz=512   sunit=0 blks, lazy-count=1
realtime =none                   extsz=4096   blocks=0, rtextents=0

4.2、iaas-xiandian 配置文件
# 安装配置文件(controller AND compute)
[root@controller ~]# yum install -y iaas-xiandian

# 修改openrc.sh文件
[root@controller ~]# vim /etc/xiandian/openrc.sh
(使用命令模式输入:%s/^#//g将#开头替换为空,也就是 去掉注释、再使用:%s/PASS=/PASS=000000/g 将PASS=替换为PASS=000000 全部的密码都设置为000000)
[root@controller ~]# cat /etc/xiandian/openrc.sh
#--------------------system Config--------------------##
#Controller Server Manager IP. example:x.x.x.x
HOST_IP=192.168.20.10		#控制节点管理IP

#Controller HOST Password. example:000000
HOST_PASS=000000		#控制节点主机的密码这个需要修改为安装系统的时候设置的密码

#Controller Server hostname. example:controller
HOST_NAME=controller		#控制节点主机名

#Compute Node Manager IP. example:x.x.x.x
HOST_IP_NODE=192.168.20.20	#计算节点管理IP

#Compute HOST Password. example:000000
HOST_PASS_NODE=000000		#计算节点的密码和上面一样需要修改

#Compute Node hostname. example:compute
HOST_NAME_NODE=compute		#计算节点主机名

#--------------------Chrony Config-------------------##
#Controller network segment IP.  example:x.x.0.0/16(x.x.x.0/24)
network_segment_IP=192.168.20.0/24	#控制网络的子网

#--------------------Rabbit Config ------------------##
#user for rabbit. example:openstack
RABBIT_USER=openstack			#rabbit 服务的用户(默认即可)

#Password for rabbit user .example:000000
RABBIT_PASS=000000

#--------------------MySQL Config---------------------##
#Password for MySQL root user . exmaple:000000
DB_PASS=000000

#--------------------Keystone Config------------------##
#Password for Keystore admin user. exmaple:000000
DOMAIN_NAME=admin			#平台登录的域的名字
ADMIN_PASS=000000			#管理员登录密码
DEMO_PASS=000000

#Password for Mysql keystore user. exmaple:000000
KEYSTONE_DBPASS=000000

#--------------------Glance Config--------------------##
#Password for Mysql glance user. exmaple:000000
GLANCE_DBPASS=000000

#Password for Keystore glance user. exmaple:000000
GLANCE_PASS=000000

#--------------------Nova Config----------------------##
#Password for Mysql nova user. exmaple:000000
NOVA_DBPASS=000000

#Password for Keystore nova user. exmaple:000000
NOVA_PASS=000000

#--------------------Neturon Config-------------------##
#Password for Mysql neutron user. exmaple:000000
NEUTRON_DBPASS=000000

#Password for Keystore neutron user. exmaple:000000
NEUTRON_PASS=000000

#metadata secret for neutron. exmaple:000000
METADATA_SECRET=000000

#Tunnel Network Interface. example:x.x.x.x
INTERFACE_IP=192.168.20.10		#网络接口(云主机和内网通信,在compute节点配置这里需要填写computeIP)

#External Network Interface. example:eth1
INTERFACE_NAME=ens34			#外网网卡(云主机和外网通信)

#External Network The Physical Adapter. example:provider
Physical_NAME=provider			#物理网络适配器

#First Vlan ID in VLAN RANGE for VLAN Network. exmaple:101
minvlan=101

#Last Vlan ID in VLAN RANGE for VLAN Network. example:200
maxvlan=200

#--------------------Cinder Config--------------------##
#Password for Mysql cinder user. exmaple:000000
CINDER_DBPASS=000000

#Password for Keystore cinder user. exmaple:000000
CINDER_PASS=000000

#Cinder Block Disk. example:md126p3
BLOCK_DISK=sdb1				#块存储使用之前分区好的 sdb1

#--------------------Swift Config---------------------##
#Password for Keystore swift user. exmaple:000000
SWIFT_PASS=000000

#The NODE Object Disk for Swift. example:md126p4.
OBJECT_DISK=sdb2			#对象存储 使用sdb2

#The NODE IP for Swift Storage Network. example:x.x.x.x.
STORAGE_LOCAL_NET_IP=192.168.20.20	#Swift存储网络的node节点IP(使用计算节点)

#--------------------Heat Config----------------------##
#Password for Mysql heat user. exmaple:000000
HEAT_DBPASS=000000

#Password for Keystore heat user. exmaple:000000
HEAT_PASS=000000

#--------------------Zun Config-----------------------##
#Password for Mysql Zun user. exmaple:000000
ZUN_DBPASS=000000

#Password for Keystore Zun user. exmaple:000000
ZUN_PASS=000000

#Password for Mysql Kuryr user. exmaple:000000
KURYR_DBPASS=000000

#Password for Keystore Kuryr user. exmaple:000000
KURYR_PASS=000000

#--------------------Ceilometer Config----------------##
#Password for Gnocchi ceilometer user. exmaple:000000
CEILOMETER_DBPASS=000000

#Password for Keystore ceilometer user. exmaple:000000
CEILOMETER_PASS=000000

#--------------------AODH Config----------------##
#Password for Mysql AODH user. exmaple:000000
AODH_DBPASS=000000

#Password for Keystore AODH user. exmaple:000000
AODH_PASS=000000

#--------------------Barbican Config----------------##
#Password for Mysql Barbican user. exmaple:000000
BARBICAN_DBPASS=000000

#Password for Keystore Barbican user. exmaple:000000
BARBICAN_PASS=000000

(在 openrc.sh 中的配置 compute和controller 基本都一致,只有 INTERFACE_IP 需要填写当前所在主机的IP地址,如图4.2.1)

#将openrc文件传输到compute节点上进行修改
[root@controller ~]# scp /etc/xiandian/openrc.sh compute:/etc/xiandian/openrc.sh
root@compute's password:
openrc.sh
 (图4.2.1)
4.3、脚本安装平台
# 脚本中会再次设置selinux 防火墙 等基础环境配置(controller AND compute)
[root@controller ~]# iaas-pre-host.sh
[root@compute ~]# iaas-pre-host.sh
(执行完成后使用 Ctrl + D 重新退出登录即可不需要重启,或者bash一下也行)

# 安装 mysql 服务(controller)
[root@controller ~]# iaas-install-mysql.sh

# 安装 keystone 服务(controller)
[root@controller ~]# iaas-install-keystone.sh

# 安装 glance 服务(controller)
[root@controller ~]# iaas-install-glance.sh

# 安装 nova 服务(controller AND compute)
[root@controller ~]# iaas-install-nova-controller.sh
[root@compute ~]# iaas-install-nova-compute.sh

(验证nova数据库是否安装成功)
[root@controller ~]# nova-manage cell_v2 list_cells
>>>此处出现报错-----请查看目录 5 中,踩坑怎么爬出来的<<<

(验证系统处理器是否支持硬件加速)
egrep -c '(vmx|svm)' /proc/cpuinfo
(1)如果该命令返回一个1或更大的值,说明你的系统支持硬件加速,通常不需要额外的配置。
(2)如果这个指令返回一个0值,说明你的系统不支持硬件加速,你必须配置libvirt取代KVM来使用QEMU。
crudini --set /etc/nova/nova.conf libvirt virt_type  qemu
(我这边是0,所有需要执行一下这个命令 开启libvirt)
[root@compute ~]# crudini --set /etc/nova/nova.conf libvirt virt_type  qemu
[root@compute ~]# cat /etc/nova/nova.conf | grep virt_type
virt_type = qemu

# 安装 neutron 服务(controller AND compute)
[root@controller ~]# iaas-install-neutron-controller.sh
[root@compute ~]# iaas-install-neutron-compute.sh

#安装 Dashboard 平台(controller)
[root@controller ~]# iaas-install-dashboard.sh

dashboard 安装成功后,就可以打开网址进行登录平台,再设置平台云主机网络即可。

5、踩坑过程
1、在controller 安装nova服务后,进行了 测试 查看nova服务是否安装成功,结果就是出现报错
Pseudo-terminal will not be allocated because stdin is not a terminal.
An unexpected error prevented the server from fulfilling your request. (HTTP 500) (Request-ID: req-6e828d40-3564-42a1-98d6-93de639b0afe)
An error has occurred:
Traceback (most recent call last):
  File "/usr/lib/python2.7/site-packages/nova/cmd/manage.py", line 1654, in main
    ret = fn(*fn_args, **fn_kwargs)
  File "/usr/lib/python2.7/site-packages/nova/cmd/manage.py", line 1323, in discover_hosts
    by_service)
  File "/usr/lib/python2.7/site-packages/nova/objects/host_mapping.py", line 248, in discover_hosts
    cell_mappings = objects.CellMappingList.get_all(ctxt)
  File "/usr/lib/python2.7/site-packages/oslo_versionedobjects/base.py", line 184, in wrapper
    result = fn(cls, context, *args, **kwargs)
  File "/usr/lib/python2.7/site-packages/nova/objects/cell_mapping.py", line 137, in get_all
    db_mappings = cls._get_all_from_db(context)
  File "/usr/lib/python2.7/site-packages/oslo_db/sqlalchemy/enginefacade.py", line 987, in wrapper
    with self._transaction_scope(context):
  File "/usr/lib64/python2.7/contextlib.py", line 17, in __enter__
    return self.gen.next()
  File "/usr/lib/python2.7/site-packages/oslo_db/sqlalchemy/enginefacade.py", line 1037, in _transaction_scope
    context=context) as resource:
  File "/usr/lib64/python2.7/contextlib.py", line 17, in __enter__
    return self.gen.next()
  File "/usr/lib/python2.7/site-packages/oslo_db/sqlalchemy/enginefacade.py", line 640, in _session
    bind=self.connection, mode=self.mode)
  File "/usr/lib/python2.7/site-packages/oslo_db/sqlalchemy/enginefacade.py", line 404, in _create_session
    self._start()
  File "/usr/lib/python2.7/site-packages/oslo_db/sqlalchemy/enginefacade.py", line 491, in _start
    engine_args, maker_args)
  File "/usr/lib/python2.7/site-packages/oslo_db/sqlalchemy/enginefacade.py", line 515, in _setup_for_connection
    sql_connection=sql_connection, **engine_kwargs)
  File "/usr/lib/python2.7/site-packages/debtcollector/renames.py", line 43, in decorator
    return wrapped(*args, **kwargs)
  File "/usr/lib/python2.7/site-packages/oslo_db/sqlalchemy/engines.py", line 184, in create_engine
    test_conn = _test_connection(engine, max_retries, retry_interval)
  File "/usr/lib/python2.7/site-packages/oslo_db/sqlalchemy/engines.py", line 370, in _test_connection
    six.reraise(type(de_ref), de_ref)
  File "<string>", line 2, in reraise
DBConnectionError: (pymysql.err.OperationalError) (2003, "Can't connect to MySQL server on 'controller' ([Errno 111] ECONNREFUSED)") (Background on this error at: http://sqlalche.me/e/e3q8)
看到这报错就懵了,发生了啥???看到最后提示说 无法连接controller节点的MySQL服务,查看一下MySQL的状态
[root@controller ~]# systemctl status mariadb
● mariadb.service - MariaDB 10.1 database server
   Loaded: loaded (/usr/lib/systemd/system/mariadb.service; enabled; vendor preset: disabled)
   Active: failed (Result: exit-code) since Sun 2022-01-30 02:07:27 CST; 3min 41s ago
  Process: 15649 ExecStopPost=/usr/libexec/mysql-wait-stop (code=exited, status=0/SUCCESS)
  Process: 15644 ExecStart=/usr/libexec/mysqld --basedir=/usr $MYSQLD_OPTS $_WSREP_NEW_CLUSTER (code=exited, status=1/FAILURE)
  Process: 15608 ExecStartPre=/usr/libexec/mysql-prepare-db-dir %n (code=exited, status=0/SUCCESS)
  Process: 15585 ExecStartPre=/usr/libexec/mysql-check-socket (code=exited, status=0/SUCCESS)
 Main PID: 15644 (code=exited, status=1/FAILURE)
   Status: "MariaDB server is down"

Jan 30 02:07:26 controller systemd[1]: Starting MariaDB 10.1 database server...
Jan 30 02:07:26 controller mysql-check-socket[15585]: Socket file /var/lib/mysql/mysql.sock exists.
Jan 30 02:07:26 controller mysql-check-socket[15585]: No process is using /var/lib/mysql/mysql.sock, which means it is a garbage, so it will be removed automatically.
Jan 30 02:07:27 controller mysql-prepare-db-dir[15608]: Database MariaDB is probably initialized in /var/lib/mysql already, nothing is done.
Jan 30 02:07:27 controller mysql-prepare-db-dir[15608]: If this is not the case, make sure the /var/lib/mysql is empty before running mysql-prepare-db-dir.
Jan 30 02:07:27 controller mysqld[15644]: 2022-01-30  2:07:27 139963356006592 [Note] /usr/libexec/mysqld (mysqld 10.1.20-MariaDB) starting as process 15644 ...
Jan 30 02:07:27 controller systemd[1]: mariadb.service: main process exited, code=exited, status=1/FAILURE
Jan 30 02:07:27 controller systemd[1]: Failed to start MariaDB 10.1 database server.
Jan 30 02:07:27 controller systemd[1]: Unit mariadb.service entered failed state.
Jan 30 02:07:27 controller systemd[1]: mariadb.service failed.
完全不知道为啥 MySQL 宕了,通过排查mariadb的日志发现了问题所在
[root@controller ~]#  grep 'ERROR' /var/log/mariadb/mariadb.log
2022-01-30  2:04:39 139639024613568 [ERROR] mysqld: Out of memory (Needed 128663552 bytes)
2022-01-30  2:04:39 139639024613568 [ERROR] mysqld: Out of memory (Needed 96485376 bytes)
2022-01-30  2:04:39 139639024613568 [ERROR] InnoDB: Cannot allocate memory for the buffer pool
2022-01-30  2:04:39 139639024613568 [ERROR] Plugin 'InnoDB' init function returned error.
2022-01-30  2:04:39 139639024613568 [ERROR] Plugin 'InnoDB' registration as a STORAGE ENGINE failed.
2022-01-30  2:04:39 139639024613568 [ERROR] Unknown/unsupported storage engine: innodb
2022-01-30  2:04:39 139639024613568 [ERROR] Aborting
2022-01-30  2:05:19 140391508367552 [ERROR] mysqld: Out of memory (Needed 128663552 bytes)
2022-01-30  2:05:20 140391508367552 [ERROR] InnoDB: Cannot allocate memory for the buffer pool
2022-01-30  2:05:20 140391508367552 [ERROR] Plugin 'InnoDB' init function returned error.
2022-01-30  2:05:20 140391508367552 [ERROR] Plugin 'InnoDB' registration as a STORAGE ENGINE failed.
2022-01-30  2:05:20 140391508367552 [ERROR] Unknown/unsupported storage engine: innodb
2022-01-30  2:05:20 140391508367552 [ERROR] Aborting
2022-01-30  2:07:27 139963356006592 [ERROR] mysqld: Out of memory (Needed 128663552 bytes)
2022-01-30  2:07:27 139963356006592 [ERROR] mysqld: Out of memory (Needed 96485376 bytes)
2022-01-30  2:07:27 139963356006592 [ERROR] mysqld: Out of memory (Needed 72351744 bytes)
2022-01-30  2:07:27 139963356006592 [ERROR] InnoDB: Cannot allocate memory for the buffer pool
2022-01-30  2:07:27 139963356006592 [ERROR] Plugin 'InnoDB' init function returned error.
2022-01-30  2:07:27 139963356006592 [ERROR] Plugin 'InnoDB' registration as a STORAGE ENGINE failed.
2022-01-30  2:07:27 139963356006592 [ERROR] Unknown/unsupported storage engine: innodb
2022-01-30  2:07:27 139963356006592 [ERROR] Aborting
居然是因为我的 内存 不够了,查看一下内存,wtf 这是我给的内存????没什么办法 加内存 然后重启mariadb,再 在compute节点中执行一下 nova 服务安装

[root@controller ~]# systemctl restart mariadb
[root@controller ~]# systemctl status mariadb
● mariadb.service - MariaDB 10.1 database server
   Loaded: loaded (/usr/lib/systemd/system/mariadb.service; enabled; vendor preset: disabled)
   Active: active (running) since Sun 2022-01-30 02:25:02 CST; 7s ago
  Process: 15649 ExecStopPost=/usr/libexec/mysql-wait-stop (code=exited, status=0/SUCCESS)
  Process: 16642 ExecStartPost=/usr/libexec/mysql-check-upgrade (code=exited, status=0/SUCCESS)
  Process: 16551 ExecStartPre=/usr/libexec/mysql-prepare-db-dir %n (code=exited, status=0/SUCCESS)
  Process: 16528 ExecStartPre=/usr/libexec/mysql-check-socket (code=exited, status=0/SUCCESS)
 Main PID: 16611 (mysqld)
   Status: "Taking your SQL requests now..."
   CGroup: /system.slice/mariadb.service
           └─16611 /usr/libexec/mysqld --basedir=/usr

Jan 30 02:25:01 controller systemd[1]: Starting MariaDB 10.1 database server...
Jan 30 02:25:01 controller mysql-check-socket[16528]: Socket file /var/lib/mysql/mysql.sock exists.
Jan 30 02:25:01 controller mysql-check-socket[16528]: No process is using /var/lib/mysql/mysql.sock, which means it is a garbage, so it will be removed automatically.
Jan 30 02:25:01 controller mysql-prepare-db-dir[16551]: Database MariaDB is probably initialized in /var/lib/mysql already, nothing is done.
Jan 30 02:25:01 controller mysql-prepare-db-dir[16551]: If this is not the case, make sure the /var/lib/mysql is empty before running mysql-prepare-db-dir.
Jan 30 02:25:01 controller mysqld[16611]: 2022-01-30  2:25:01 139753844246720 [Note] /usr/libexec/mysqld (mysqld 10.1.20-MariaDB) starting as process 16611 ...
Jan 30 02:25:02 controller systemd[1]: Started MariaDB 10.1 database server.

6、总结
国基的openstack平台给了脚本,基本上没什么需要真正要动的东西,但是想要真正理解这里面的各个服务的功能和关系,排错还是需要多花点时间去 一遍一遍的测试。平台的搭建大概就这些内容,后面有空再写一下后面的内容,这个平台是最基础的,只有平台起来了,容器什么的才能做。想要拿个差不多成绩的话 ,就多练练吧。
如果 有什么问题或者有错误的地方麻烦小伙伴们私信或留言哦~~


 406
406


 被折叠的 条评论
为什么被折叠?
被折叠的 条评论
为什么被折叠?
 到【灌水乐园】发言


