


1 什么是Spring?
Spring是一个开源的分层的javaSE/javaEE一站式的容器的轻量级的,解决业务逻辑层【Service】与web层和数据访问层之间的松耦合问题。
(1)开源的
(2)javaSE/javaEE一站式
(3)容器框架
(4)轻量级
(5)解决业务逻辑层【Service】与web层和数据访问层之间的松耦合
2 Spring的结构组成
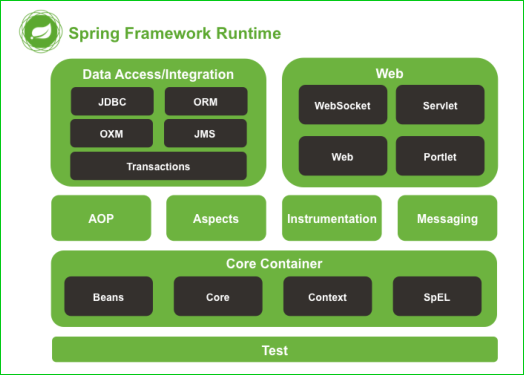
从下往上test,core容器,aop【面向切面编程】,web,data access
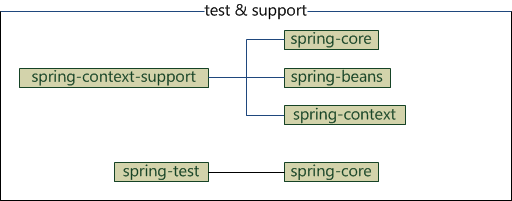
1.test部分只有一个模块:
spring-test:spring测试,提供junit与mock测试功能
spring-context-support:spring额外支持包,比如邮件服务、视图解析等
它们的依赖关系
2.core部分包含4个模块
spring-core:依赖注入IoC与DI的最基本实现
spring-beans:Bean工厂与bean的装配
spring-context:spring的context上下文即IoC容器
spring-expression:spring表达式语言
它们的完整依赖关系

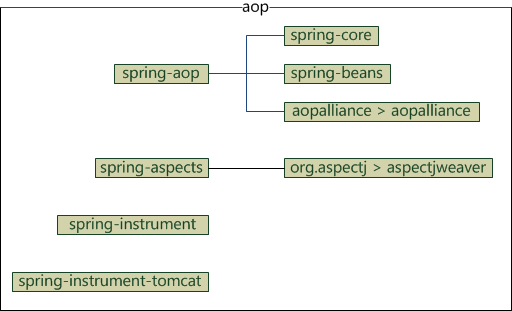
3.aop部分包含4个模块
spring-aop:面向切面编程
spring-aspects:集成AspectJ
spring-instrument:提供一些类级的工具支持和ClassLoader级的实现,用于服务器spring-instrument-tomcat:针对tomcat的instrument实现
它们的依赖关系
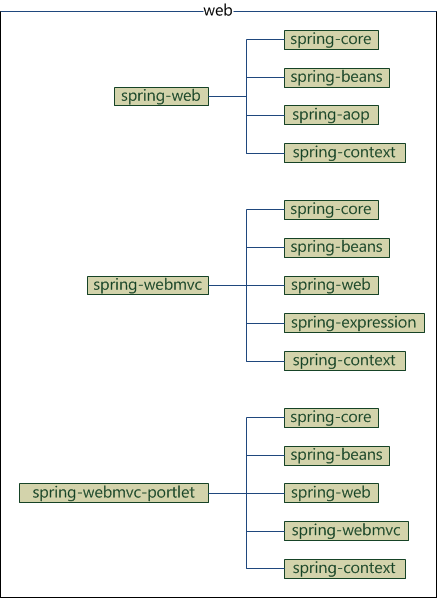
4.web部分包含4个模块
spring-web:基础web功能,如文件上传
spring-webmvc:mvc实现
spring-webmvc-portlet:基于portlet的mvc实现
spring-struts:与struts的集成,不推荐,spring4不再提供
它们的依赖关系
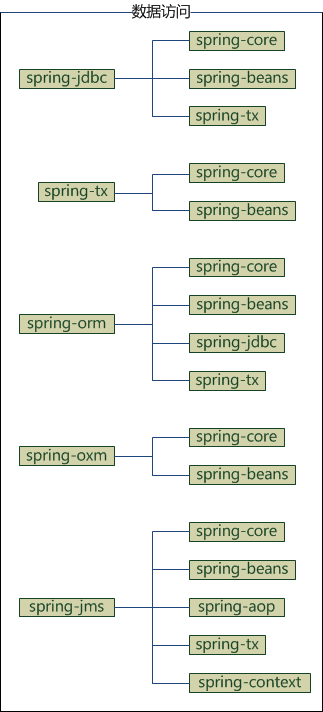
5.data access部分包含5个模块
spring-jdbc:jdbc的支持
spring-tx:事务控制
spring-orm:对象关系映射,集成orm框架
spring-oxm:对象xml映射
spring-jms:java消息服务
它们的依赖关系
3 Spring的优点
Spring的出现解决了JavaEE实际问题:
1.方便解耦,简化开发:Spring是一个超级工厂(超级容器),可以将对象的创建和依赖关系交给Spring工厂去管理
2.AOP编程:Spring提供面向切面编程,可以方便的对程序进行运行监控、权限验证等操作
3.声明事务:只需要通过配置就可以完成对事务的管理,不需要手动编程
4.方便测试:Spring支持junit4,可以通过Spring注解方式测试程序
5.方便集成各种框架:Spring支持各种开源框架的集成。例如(struts、Hibernate、MyBaties等)
6.降低JavaEE API的使用难度: Spring对JavaEE开发中非常难用的API进行封装,使这些开发API应用难度降低。
4 Spring的核心技术
1.IoC(Inverse of Control 反转控制):将java对象创建和维护权利交由Spring工厂进行管理和维护。
2.DI(依赖注入):将某一个java类中的依赖对象快速的添加到另一个java类中。
3.AOP(Aspect Oriented Programming 面向切面编程),基于动态代理的功能增强方式[给自己的程序中添加一些系统需求的处理【日志管理,数据的安全性检查…】]。
4.事务管理的相关操作。
5.Spring整合/管理其他各层的框架【Spring集成web层SpringMVC/Spring整合数据访问层MyBatis】{SSM}
5 Spring的IoC(Inverse of Control 反转控制)
IoC(Inverse of Control 反转控制): 将java对象创建和维护权利交由Spring工厂进行管理和维护。
例如:
package com.click369.javabean;

public class StudentBean {
    private  int stuid;
    private  String  stuname;
    private  int stuage;

    public StudentBean(){}

    public StudentBean(int stuid,String stuname,int stuage){
    	this.stuid=stuid;
    	this.stuname=stuname;
    	this.stuage=stuage;
    }

	public int getStuid() {
		return stuid;
	}
	public void setStuid(int stuid) {
		this.stuid = stuid;
	}
	public String getStuname() {
		return stuname;
	}
	public void setStuname(String stuname) {
		this.stuname = stuname;
	}
	public int getStuage() {
		return stuage;
	}
	public void setStuage(int stuage) {
		this.stuage = stuage;
	}
	@Override
	public String toString() {
		return "stuid=="+stuid+"  stuname=="+stuname+" stuage=="+stuage;
	}
}
/**
	 * 在没有使用Spring的时候,我们要想创建java对象,就得自己new
	 */
	@Test
	public  void test1(){
		//自己new的java对象,java对象的创建是程序开发者自己创建维护
		StudentBean stu=new StudentBean(1001,"zhangsan",23);
		System.out.println(stu.toString());

	}
6 Bean实例化4种方式
1.1无参数构造方法(开发最常用)
package com.click369.javabean;
public class StudentBean {
    private  int stuid;
    private  String  stuname;
    private  int stuage;

public StudentBean(){}
.............
}

编写Spring的配置文件:【applicationContext.xml/自己起名】{src/main/resources}
<!-- 无参数构造方法实例化bean -->
<!-- id:对象名称 -->
<!-- class:被创建对象的java类的包名+类名 -->
<bean id="stu" class="com.click369.javabean.StudentBean"></bean>
1.2静态工厂方法实例化bean
静态工厂方法:在一个类中书写静态的方法,这个方法返回某个Bean的对象(在方法中创建Bean的对象)。
实体类:
package com.click369.javabean;
public class StudentBean {
    private  int stuid;
    private  String  stuname;
    private  int stuage;

public StudentBean(){}
.............
}
创建一个静态工厂方法类,提供一个静态方法,让这个静态方法返回一个实体类的对象
package com.click369.javabean;
/**
 * 静态工厂方法类
 * @author Administrator
 *
 */
public class StaticFactoryMethodClass {
	/**
	 * 静态方法,让这个静态方法返回一个实体类的对象
	 * @return
	 */
	public  static  StudentBean   getStaticStudentBean(){
		return new StudentBean();
	}
}

编写Spring配置
<!-- 静态工厂方法实例化bean的配置 -->
	<!-- id:对象名称 -->
	<!-- factory-method:配置静态工厂方法 -->
	<!-- class:配置静态工厂方法类【包名+类名】 -->
	<bean id="student" factory-method="getStaticStudentBean" class="com.click369.javabean.StaticFactoryMethodClass"></bean>
1.3实例工厂方法实例化bean
实体类:
package com.click369.javabean;
public class StudentBean {
    private  int stuid;
    private  String  stuname;
    private  int stuage;

public StudentBean(){}
.............
}

创建一个工厂类,提供实例方法,这个实例方法返回java实体类的对象
package com.click369.javabean;

/**
 * 工厂类
 * @author Administrator
 *
 */
public class StudentFactory {
    /**
     * 实例方法,返回实体类对象
     * @return
     */
	public  StudentBean getStudentBean(){
		return new StudentBean();
	}
}
Spring配置文件的编写:
<!-- 实例工程方法实例化bean的配置 -->
	<!-- 创建实例工厂类对象 -->
	<bean id="studentFactory" class="com.click369.javabean.StudentFactory"></bean>
	<!-- 配置得到实体类对象 -->
	<!-- id:对象名称 -->
	<!-- factory-bean:实例工厂类对象 -->
	<!-- factory-method:实例工厂类中创建实体类的方法 -->
	<bean id="student" factory-bean="studentFactory" factory-method="getStudentBean"></bean>
1.4FactoryBean接口方式实例化bean
FactoryBean是Spring提供的接口,专门用于对bean进行初始化操作的。
如果bean需要使用这种方式进行初始化,那么需要定义类实现这个FactoryBean接口,在实现类中复写getObject的方法。
实体类:
package com.click369.javabean;
public class StudentBean {
    private  int stuid;
    private  String  stuname;
    private  int stuage;

public StudentBean(){}
.............
}
创建一个类,实现FactoryBean接口,重写getObject的方法,返回实体类对象。
package com.click369.factory;
import org.springframework.beans.factory.FactoryBean;
import com.click369.javabean.StudentBean;
public class CreateObject implements FactoryBean<StudentBean>{
	@Override
	public StudentBean getObject() throws Exception {
		return new StudentBean();
	}
	@Override
	public Class<?> getObjectType() {
		return StudentBean.class;
	}
}
Spring配置文件:
<!-- FactoryBean实例化Bean的配置 -->
	<!-- id:对象名称 -->
	<!-- class:实现FactoryBean接口的java类的包名+类名 -->
	<bean id="student" class="com.click369.factory.CreateObject"></bean>
7 FactoryBean接口与BeanFactory接口的区别
共同点:都是接口。
不同点:FactoryBean是Spring提供的专门用来实例化java类的接口。【创造】
BeanFactory接口表示一个Spring工厂对象【Spring容器对象】,包含了实例化好的java类对象。【管理】
8 bean的作用域
bean的作用域:主要是指Spring创建的Bean对象是单例、多例、request、session级别。
有点像JSP动作元素useBean的page/request/session/application.
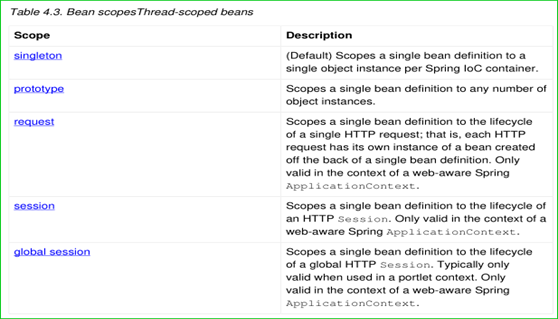
singleton: 单例模式【在一个spring容器中,对象只有一个实例。(默认值)】
prototype:多例模式/原型模式【在一个spring容器中,存在多个实例,每次getBean 返回一个新的实例。】
request:该属性仅对HTTP请求产生作用,使用该属性定义Bean时,每次HTTP请求都会创建一个新的Bean,适用于WebApplicationContext环境。【一次请求一个对象】
session:该属性仅用于HTTP Session,同一个Session共享一个Bean实例。不同Session使用不同的实例。【同一次回话中的对象都是相同的】
global session:该属性仅用于HTTP Session,同session作用域不同的是,所有的Session共享一个Bean实例。【多个session共享一个对象】
下面重点讨论singleton、prototyp作用域,request,session和global-session类作用域放到Spring MVC章节讨论,这里不再做详细讲述。
通过在配置Spring配置文件是设置bean元素的scope属性设置bean的作用域:
bean元素的scope属性:singleton,prototype,request,session,global session。
9 bean的生命周期
Spring工厂对象【Spring容器对象】负责创建对象,初始化对象,销毁对象。
也就是说任何一个交给Spring的Bean,它的生命周期统一由Spring容器维护。
10 Spring的依赖注入是什么?实现方式有几种?每一种如何操作?
DI–依赖注入,建立在IoC[控制反转]基础之上的,没有控制反转就谈不上依赖注入。
依赖注入–在调用者类中将被调用者类的对象,添加到调用者类中这个过程就是依赖注入。 在这个过程中被调用者类的对象就是调用者类的依赖对象。
把Service添加到Servlet中的过程叫依赖注入
1.构造方法注入
创建被调用者类
package com.click369.javabean;
/**
 * 被调用者类
 * @author Administrator
 *
 */
public class PersonBean {

	 public  PersonBean(){
		 System.out.println("PersonBean--被调用者类的构造方法");
	 }

	 public void testPerson(){
		 System.out.println("测试被调用者类");
	 }
}

调用者类
package com.click369.javabean;
/**
 * 调用者类
 * @author Administrator
 *
 */
public class StudentBean {
	//依赖对象
	public  PersonBean   personBean;

    public StudentBean(PersonBean   personBean){
    	System.out.println("StudentBean--调用者类的构造方法");
    	this.personBean=personBean;
}

    public  void  testStudent(){
    	System.out.println("测试StudentBean类");
    	personBean.testPerson();
    }
}
Spring配置文件
<!-- 创建被调用者类PersonBean -->
<bean id="person" class="com.click369.javabean.PersonBean"></bean>
<!-- 创建调用者类StudentBean -->
<bean id="student" class="com.click369.javabean.StudentBean">
	    <!-- 构造方法注入 -->
	    <!-- index:构造方法参数的索引值 -->
	    <!-- ref:引用对象 -->
	    <constructor-arg index="0" ref="person"></constructor-arg>
</bean>

测试
ApplicationContext  applicationContext=new ClassPathXmlApplicationContext("applicationContext.xml");
StudentBean stu1=(StudentBean)applicationContext.getBean("student");
stu1.testStudent();
2.Set方法注入
被调用者类:
package com.click369.javabean;
/**
 * 被调用者类
 * @author Administrator
 *
 */
public class PersonBean {

	 public  PersonBean(){
		 System.out.println("PersonBean--被调用者类的构造方法");
	 }

	 public void testPerson(){
		 System.out.println("测试被调用者类");
	 }
}

调用者类
package com.click369.javabean;
/**
 * 调用者类
 * @author Administrator
 *
 */
public class StudentBean {
	//依赖对象
	public  PersonBean   personBean;

    //为依赖对象提供一个set方法
	public void setPersonBean(PersonBean personBean) {
		this.personBean = personBean;
	}

    public  void  testStudent(){
    	System.out.println("测试StudentBean类");
    	personBean.testPerson();
    }
}
Spring配置文件:
<!-- 创建被调用者类PersonBean -->
	<bean id="person" class="com.click369.javabean.PersonBean"></bean>
	<!-- 创建调用者类StudentBean -->
	<bean id="student" class="com.click369.javabean.StudentBean">
	    <!-- set方法注入被调用者类 -->
	    <!-- name:成员变量名称【依赖对象名称】 -->
	    <!-- ref:引用对象 -->
	    <property name="personBean" ref="person"></property>
	</bean>

测试:
ApplicationContext  applicationContext=new ClassPathXmlApplicationContext("applicationContext.xml");
		StudentBean stu1=(StudentBean)applicationContext.getBean("student");
		stu1.testStudent();
@Autowired 是根据对应的属性的类型找到对应的bean进行自动注入。
@Service 标注类是一个业务访问类
@Service添加在业务实现类上表示该类是一个业务访问类,默认的业务访问类的名称就是类名。
@Service(“自定义的名称”)添加在业务实现类上表示该类是一个业务访问类,使用自动定义的名称
//@Service
//表示该类是一个业务访问类,默认的业务访问类的名称就是类名。
@Service("userService")
//表示该类是一个业务访问类,使用自动定义的名称
public class UserServiceImpl implements UserService{
	//依赖对象的自动注入【无需在UserServiceImpl类中提供依赖对象的set方法,无需在SPring的配置文件中配置注入】
	@Autowired
    private UserMapper  userMapper;

	@Override
	public UserBean queryUserNameAadPass(UserBean user) {
		return userMapper.selectUserNameAndPass(user);
	}

	@Override
	public List<UserBean> queryUser() {
		return userMapper.selectUser();
	}

}

<!-- 开启注解功能 -->
<context:annotation-config/>
<!-- 配置自动扫描service包 -->
<context:component-scan base-package="com.click369.service.impl"></context:component-scan>

ApplicationContext context = new ClassPathXmlApplicationContext("applicationContext.xml");
		UserService service = (UserService) context.getBean("userService");
		List<UserBean> userlist = service.queryUser();
		for(UserBean user:userlist){
			System.out.println(user.getUserid()+"  "+user.getUsername());
		}


@Resource注解注入复杂类型数据
package com.click369.service.impl;

import java.util.List;

import javax.annotation.Resource;

import org.springframework.stereotype.Service;

import com.click369.javabean.UserBean;
import com.click369.mapper.UserMapper;
import com.click369.service.UserService;
@Service("userService")
public class UserServiceImpl implements UserService {
    //定义依赖对象
	@Resource
	private UserMapper  myUserMapper;
    .......................
}

创建LoaderServlet
package com.click369.ssmj.servlet;

import javax.servlet.ServletException;
import javax.servlet.http.HttpServlet;

import org.springframework.context.ApplicationContext;
import org.springframework.web.context.support.WebApplicationContextUtils;

public class LoaderServlet extends HttpServlet{
    private static  ApplicationContext context=null;
	@Override
	public void init() throws ServletException {
		context=WebApplicationContextUtils.getWebApplicationContext(this.getServletContext());
	}
    public static Object getServiceObject(String servicename){
    	Object  serviceObject=null;
    	serviceObject=context.getBean(servicename);
    	return serviceObject;
    }
}

创建用户访问的Servlet
package com.click369.ssmj.servlet;

import java.io.IOException;
import java.util.List;

import javax.servlet.ServletException;
import javax.servlet.http.HttpServlet;
import javax.servlet.http.HttpServletRequest;
import javax.servlet.http.HttpServletResponse;

import com.click369.ssmj.javabean.UserBean;
import com.click369.ssmj.service.UserService;

public class LoginServlet extends HttpServlet{

	@Override
	protected void doGet(HttpServletRequest req, HttpServletResponse resp) throws ServletException, IOException {
		doPost(req, resp);
	}

	@Override
	protected void doPost(HttpServletRequest req, HttpServletResponse resp) throws ServletException, IOException {
		req.setCharacterEncoding("utf-8");
		resp.setCharacterEncoding("utf-8");
		//得到用户名和密码
		String username=req.getParameter("username");
		String userpass=req.getParameter("password");
		//封装UserBean
		UserBean  user=new UserBean();
		user.setUsername(username);
		user.setUserpass(userpass);
		//得到UserServie
		UserService userservice=LoaderServlet.getUserService();
		UserBean userBean=userservice.queryUserNameAndPass(user);
		if(userBean!=null){

			List<UserBean>  userList=userservice.queryUser();
			req.getSession().setAttribute("username", username);
			req.getSession().setAttribute("userList", userList);
			resp.sendRedirect("main.jsp");
		}else{
			req.setAttribute("error","用户名密码错误!");
			req.getRequestDispatcher("login.jsp").forward(req, resp);
		}
	}
}

配置web.xml文件
<?xml version="1.0" encoding="UTF-8"?>
<web-app version="2.5" xmlns="http://java.sun.com/xml/ns/javaee"
	xmlns:xsi="http://www.w3.org/2001/XMLSchema-instance"
	xsi:schemaLocation="http://java.sun.com/xml/ns/javaee
	http://java.sun.com/xml/ns/javaee/web-app_2_5.xsd">
	<!-- 配置加载Spring配置文件 -->
	<context-param>
	     <param-name>contextConfigLocation</param-name>
	     <param-value>classpath:applicationContext.xml</param-value>
	</context-param>
	<listener>
      <listener-class>org.springframework.web.context.ContextLoaderListener</listener-class>
    </listener>
    <!-- 配置LoaderServlet -->
	<servlet>
	    <servlet-name>loaderservlet</servlet-name>
	    <servlet-class>com.click369.ssmj.servlet.LoaderServlet</servlet-class>
	    <load-on-startup>1</load-on-startup>
	</servlet>
	<!-- 配置LoginServlet -->
	<servlet>
	    <servlet-name>login</servlet-name>
	    <servlet-class>com.click369.ssmj.servlet.LoginServlet</servlet-class>
	</servlet>
	<servlet-mapping>
	    <servlet-name>login</servlet-name>
	    <url-pattern>/login</url-pattern>
	</servlet-mapping>
</web-app>
创建jsp页面[login.jsp/main.jsp]
<%@ page language="java" contentType="text/html; charset=utf-8"
    pageEncoding="utf-8"%>
<%@taglib  uri="http://java.sun.com/jsp/jstl/core" prefix="c" %>
<!DOCTYPE html PUBLIC "-//W3C//DTD HTML 4.01 Transitional//EN" "http://www.w3.org/TR/html4/loose.dtd">
<html>
<head>
<meta http-equiv="Content-Type" content="text/html; charset=utf-8">
<title>Insert title here</title>
</head>
<body>
	<center>
	<c:if test="${not empty  error}">
		<font color="red">${error}</font>
	</c:if>
	<form action="login" method="get">
		用户名:<input type="text" name="username" ><br>
		密码:<input type="password" name="password" ><br>
		<input type="submit" value="登陆">
	</form>
	</center>
</body>
</html>


<%@ page language="java" contentType="text/html; charset=utf-8"
    pageEncoding="utf-8"%>
<%@taglib  uri="http://java.sun.com/jsp/jstl/core" prefix="c" %>
<!DOCTYPE html PUBLIC "-//W3C//DTD HTML 4.01 Transitional//EN" "http://www.w3.org/TR/html4/loose.dtd">
<html>
<head>
<meta http-equiv="Content-Type" content="text/html; charset=utf-8">
<title>Insert title here</title>
</head>
<body>
	<c:if test="${empty username}">
		<jsp:forward page="login.jsp"></jsp:forward>
	</c:if>
	<center>
	   <h1>${username},登陆成功!</h1>
	   <hr>
	   <table border="1px" width="500px">
	   		<tr align="center">
	   			<td>编号</td>
	   			<td>用户名</td>
	   			<td>密码</td>
	   			<td>年龄</td>
	   			<td>地址</td>
	   		</tr>
	   		<c:forEach items="${userList}" var="user">
	   		<tr align="center">
	   			<td>${user.userid}</td>
	   			<td>${user.username}</td>
	   			<td>${user.userpass}</td>
	   			<td>${user.userage}</td>
	   			<td>${user.useraddress}</td>
	   		</tr>
	   		</c:forEach>
	   </table>
	</center>
</body>
</html>
11 Spring的自动装配策略
Spring 提供了某些规则,可以对 bean 进行自动装配。 的 autowire 属性可以指定自动装配的策略。
| 策略 | 说明 |
|---|---|
| byName | 根据名称进行匹配。 |
| byType | 根据类型进行匹配。假设 Book 有一个 Author 类型的属性,如果容器中找到 Author 类型的 Bean 时,就会自动把它装配给 Book 的 Author 属性。 |
| constructor | 也是根据类型进行匹配,只不过指的是构造函数的情况。假设 Book 有一个构造函数,它有一个 Author 类型的入参;如果容器中找到 Author 类型的 Bean 时,就会自动装配;如果没有找到,则抛出异常。 |
| autodetect | 如果 Bean 提供了默认的构造函数,则采用 byType 方式;如果没有,则采用 constructor 方式。 |
元素存在 default-autowire 属性,可以设置全局性的自动装配类型;如果为 no,则表示不启用自动装配;还有这些值:byName、byType、constructor 与 autodetect。
12 autowired和resource的区别
相同点:
@Resource的作用相当于@Autowired,均可标注在字段或属性的setter方法上。
不同点:
(1)提供方:@Autowired是由org.springframework.beans.factory.annotation.Autowired提供,换句话说就是由Spring提供;@Resource是由javax.annotation.Resource提供,即J2EE提供,需要JDK1.6及以上。
(2)注入方式:@Autowired只按照byType 注入;@Resource默认按byName自动注入,也提供按照byType 注入;
(3)属性:@Autowired按类型装配依赖对象,默认情况下它要求依赖对象必须存在,如果允许null值,可以设置它required属性为false。如果我们想使用按名称装配,可以结合@Qualifier注解一起使用。@Resource有两个中重要的属性:name和type。name属性指定byName,如果没有指定name属性,当注解标注在字段上,即默认取字段的名称作为bean名称寻找依赖对象,当注解标注在属性的setter方法上,即默认取属性名作为bean名称寻找依赖对象。需要注意的是,@Resource如果没有指定name属性,并且按照默认的名称仍然找不到依赖对象时, @Resource注解会回退到按类型装配。但一旦指定了name属性,就只能按名称装配了。
13 @Component注解
@Component注解:
该注解使用在类上面,表示这个类是一个component
当使用基于注解的配置和类路径扫描时,这种类就是自动检测的候选类
其他类级别的注释也可以视为标识component
通常是一种特殊的组件,比如@Repository和AspectJ的@Aspect注解
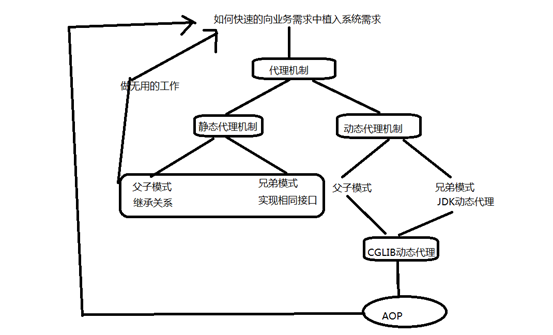
14 什么是AOP?
AOP (Aspect Oriented Programing) 称为:面向切面编程,它是一种编程思想。
AOP采取横向抽取机制,取代了传统纵向继承体系重复性代码的编写方式(性能监视、事务管理、安全检查、缓存,日志记录等)。
AOP 思想: 基于代理思想,对原来目标对象,创建代理对象,在不修改原对象代码情况下,通过代理对象,调用增强功能的代码【系统需求方法】,从而对原有业务方法进行增强。
AOP的底层是动态代理机制【CGLIB动态代理】。
基于两种动态代理机制: JDK动态代理和CGLIB动态代理。
JDK动态代理:基于接口的代理,会生成目标对象的接口的子对象【实现接口的类】
CGLIB动态代理:基于类的代理,会生成目标对象的子对象。【无论是继承父类还是实现接口所产生的类】
15 AOP相关的概念
joinpoint(连接点):指那些被拦截到的点。在spring中指的可以被代理(增强)的方法。【业务类中的业务需求方法】
poingcut(切入点):对哪些连接点进行拦截的定义。在Spring中指的真正需要被代理(增强)的方法。
advice(通知/增强):指拦截到连接点之后要做的事情。真正增强的那些代码(逻辑)。
通知/增强分为:
前置通知,后置通知,异常通知,最终通知,环绕通知。
aspect(切面):是切入点和通知/增强的结合过程。
introduction(引介):一种特殊的通知在不修改类代码的前提下,introduction可以在运行期为类动态地添加一些方法或者字段。
target(目标对象):代码的目标对象。
weaving(织入):把增强应用到目标对象来创建新的代理对象的过程。spring采用动态代理织入。而AspectJ采用编译期织入和类装在期织入。
proxy(代理):一个类被AOP织入增强后,就产生一个结果代理类。
16 基于XML文件的AOP实现
1.添加支持AOP的相关依赖
<project xmlns="http://maven.apache.org/POM/4.0.0" xmlns:xsi="http://www.w3.org/2001/XMLSchema-instance"
	xsi:schemaLocation="http://maven.apache.org/POM/4.0.0 http://maven.apache.org/xsd/maven-4.0.0.xsd">
	<modelVersion>4.0.0</modelVersion>
	<groupId>com.click369.springaop</groupId>
	<artifactId>SpringAOPDemo1</artifactId>
	<version>0.0.1-SNAPSHOT</version>
	<dependencies>
		<!-- https://mvnrepository.com/artifact/org.springframework/spring-context -->
		<dependency>
			<groupId>org.springframework</groupId>
			<artifactId>spring-context</artifactId>
			<version>5.1.5.RELEASE</version>
		</dependency>
		<!-- https://mvnrepository.com/artifact/org.springframework/spring-context-support -->
		<dependency>
			<groupId>org.springframework</groupId>
			<artifactId>spring-context-support</artifactId>
			<version>5.1.5.RELEASE</version>
		</dependency>
		<!-- https://mvnrepository.com/artifact/org.springframework/spring-aspects -->
		<dependency>
			<groupId>org.springframework</groupId>
			<artifactId>spring-aspects</artifactId>
			<version>5.1.5.RELEASE</version>
		</dependency>
		<!-- https://mvnrepository.com/artifact/aopalliance/aopalliance -->
		<dependency>
			<groupId>aopalliance</groupId>
			<artifactId>aopalliance</artifactId>
			<version>1.0</version>
		</dependency>
	</dependencies>
	<!-- 配置插件 -->
	<build>
		<plugins>
			<!-- 配置jdk1.8的编译插件 -->
			<plugin>
				<groupId>org.apache.maven.plugins</groupId>
				<artifactId>maven-compiler-plugin</artifactId>
				<version>3.2</version>
				<configuration>
					<source>1.8</source>
					<target>1.8</target>
					<encoding>UTF-8</encoding>
				</configuration>
			</plugin>
		</plugins>
	</build>
</project>
2.创建业务需求类,提供业务方法
package com.click369.service;
/**
 * 业务访问接口
 * @author Administrator
 *
 */
public interface UserService {
   void  insertService();
   void  updateService();
   void  deleteService();
   void  selectService();
}
package com.click369.service.impl;

import com.click369.service.UserService;
/**
 * 业务接口实现类
 * @author Administrator
 *
 */
public class UserServiceImpl implements UserService {

	/**
	 * 添加的业务方法
	 */
	@Override
	public void insertService() {
		System.out.println("实现具体的添加操作");
	}
	/**
	 * 修改的业务方法
	 */
	@Override
	public void updateService() {
		System.out.println("实现具体的修改操作");
	}
	/**
	 * 删除的业务方法
	 */
	@Override
	public void deleteService() {
		System.out.println("实现具体的删除操作");
	}
	/**
	 * 查询的业务方法
	 */
	@Override
	public void selectService() {
		System.out.println("实现具体的查询操作");
	}
}
3.编写一个系统需求类,统一管理系统需求方法。
package com.click369.avice;

import org.aspectj.lang.ProceedingJoinPoint;

/**
 * 系统需求类[增强类]
 * @author Administrator
 *
 */
public class MyAvice {

	/**
	 * 记录系统运行日志的系统需求方法
	 */
	public  void  savaLog(){
		System.out.println("记录系统运行日志的系统需求方法");
	}

	/**
	 * 执行环绕通知的方法
	 */
	public void around( ProceedingJoinPoint joinPoint ) throws Throwable{
		savaLog();
		joinPoint.proceed(); // 调用真正的逻辑方法
		savaLog();
	}
}
4.配置Spring配置文件实现AOP
xmlns:aop="http://www.springframework.org/schema/aop"

http://www.springframework.org/schema/aop
http://www.springframework.org/schema/aop/spring-aop.xsd

<?xml version="1.0" encoding="UTF-8"?>
<beans xmlns="http://www.springframework.org/schema/beans"
	xmlns:xsi="http://www.w3.org/2001/XMLSchema-instance"
	xmlns:aop="http://www.springframework.org/schema/aop"
	xsi:schemaLocation="http://www.springframework.org/schema/beans
	http://www.springframework.org/schema/beans/spring-beans.xsd
	http://www.springframework.org/schema/aop
	http://www.springframework.org/schema/aop/spring-aop.xsd">
	<!-- 创建业务需求类的对象【UserService接口对象】 -->
	<bean id="userService" class="com.click369.service.impl.UserServiceImpl"></bean>
	<!-- 创建系统需求类对象 [MyAvice类对象]-->
	<bean id="myAvice" class="com.click369.avice.MyAvice"></bean>
	<!-- 配置基于XML的aop实现  -->
	<!-- aop:pointcut切入点配置元素 -->
	<!-- expression:切入点表达式 -->
	<!-- 格式:execution(<访问修饰符>?<返回类型>空格<方法名>(<参数>)<异常>?) -->
	<!-- id:切入点的名称 -->
	<!-- aop:aspect切面元素配置【切入点与通知的结合体】 -->
	<!-- ref:系统需求类对象的引用 -->
	<!-- aop:before前置通知配置元素  method:系统需求功能方法   pointcut-ref:切入点引用-->
	<!-- aop:after-returning后置通知配置元素  method:系统需求功能方法   pointcut-ref:切入点引用-->
	<!-- aop:after最终通知配置元素  method:系统需求功能方法   pointcut-ref:切入点引用-->
	<!-- aop:around环绕通知配置元素  method:系统需求功能方法【系统需求类中单独定义】   pointcut-ref:切入点引用 -->
	<!-- aop:after-throwing异常通知配置元素  method:系统需求功能方法   pointcut-ref:切入点引用 -->
	<aop:config>
		<aop:pointcut expression="execution(* com.click369.service.impl.UserServiceImpl.insertService(..))"
					  id="point1"/>
		<aop:pointcut expression="execution(* com.click369.service.impl.UserServiceImpl.updateService(..))"
					  id="point2"/>
		<aop:pointcut expression="execution(* com.click369.service.impl.UserServiceImpl.deleteService(..))"
					  id="point3"/>
		<aop:aspect ref="myAvice">
			<aop:before method="savaLog" pointcut-ref="point1"/>
			<aop:after-returning method="savaLog" pointcut-ref="point2"/>
			<aop:around method="around" pointcut-ref="point3"/>
		</aop:aspect>
	</aop:config>
</beans>
测试:
ApplicationContext context = new ClassPathXmlApplicationContext("applicationContext.xml");
		// 获取UserDao
		UserService service = (UserService) context.getBean("userService");
		service.insertService();
17 基于注解的Aop实现
1.添加支持AOP的相关依赖
<project xmlns="http://maven.apache.org/POM/4.0.0" xmlns:xsi="http://www.w3.org/2001/XMLSchema-instance"
	xsi:schemaLocation="http://maven.apache.org/POM/4.0.0 http://maven.apache.org/xsd/maven-4.0.0.xsd">
	<modelVersion>4.0.0</modelVersion>
	<groupId>com.click369.springaop</groupId>
	<artifactId>SpringAOPDemo1</artifactId>
	<version>0.0.1-SNAPSHOT</version>
	<dependencies>
		<!-- https://mvnrepository.com/artifact/org.springframework/spring-context -->
		<dependency>
			<groupId>org.springframework</groupId>
			<artifactId>spring-context</artifactId>
			<version>5.1.5.RELEASE</version>
		</dependency>
		<!-- https://mvnrepository.com/artifact/org.springframework/spring-context-support -->
		<dependency>
			<groupId>org.springframework</groupId>
			<artifactId>spring-context-support</artifactId>
			<version>5.1.5.RELEASE</version>
		</dependency>
		<!-- https://mvnrepository.com/artifact/org.springframework/spring-aspects -->
		<dependency>
			<groupId>org.springframework</groupId>
			<artifactId>spring-aspects</artifactId>
			<version>5.1.5.RELEASE</version>
		</dependency>
		<!-- https://mvnrepository.com/artifact/aopalliance/aopalliance -->
		<dependency>
			<groupId>aopalliance</groupId>
			<artifactId>aopalliance</artifactId>
			<version>1.0</version>
		</dependency>
	</dependencies>
	<!-- 配置插件 -->
	<build>
		<plugins>
			<!-- 配置jdk1.8的编译插件 -->
			<plugin>
				<groupId>org.apache.maven.plugins</groupId>
				<artifactId>maven-compiler-plugin</artifactId>
				<version>3.2</version>
				<configuration>
					<source>1.8</source>
					<target>1.8</target>
					<encoding>UTF-8</encoding>
				</configuration>
			</plugin>
		</plugins>
	</build>
</project>
2.创建业务需求类,提供业务方法,在业务需求类上添加@Service,标注这个类是一个业务操作类。
/**
 * 业务接口实现类
 * @author Administrator
 *
 */
@Service("userService")
public class UserServiceImpl implements UserService {
3.编写一个系统需求类,统一管理系统需求方法。
在系统需求类上添加@Component,通知Spring容器实例化系统需求类对象。
在系统需求类上添加@Aspect,表示这个系统需求类是一个切面类。
/**
 * 系统需求类[增强类]
 * @author Administrator
 *
 */
@Component
@Aspect
public class MyAvice {
4.在系统需求类的,系统需求方法上通过注解配置切入点。
/**
	 * 记录系统运行日志的系统需求方法
	 */
	//@Before("execution(* com.click369.service.impl.UserServiceImpl.insertService(..))")
	@AfterReturning("execution(* com.click369.service.impl.UserServiceImpl.updateService(..))")
	public  void  savaLog(){
		System.out.println("记录系统运行日志的系统需求方法");
	}

	/**
	 * 执行环绕通知的方法
	 */
	@Around("execution(* com.click369.service.impl.UserServiceImpl.deleteService(..))")
	public void around( ProceedingJoinPoint joinPoint ) throws Throwable{
		savaLog();
		joinPoint.proceed(); // 调用真正的逻辑方法
		savaLog();
	}
5.在Spring的配置文件中,开启注解功能,和配置自动扫描包
<?xml version="1.0" encoding="UTF-8"?>
<beans xmlns="http://www.springframework.org/schema/beans"
	xmlns:xsi="http://www.w3.org/2001/XMLSchema-instance"
	xmlns:aop="http://www.springframework.org/schema/aop"
	xmlns:context="http://www.springframework.org/schema/context"
	xsi:schemaLocation="http://www.springframework.org/schema/beans
	http://www.springframework.org/schema/beans/spring-beans.xsd
	http://www.springframework.org/schema/context
    http://www.springframework.org/schema/context/spring-context.xsd
    http://www.springframework.org/schema/aop
    http://www.springframework.org/schema/aop/spring-aop-4.3.xsd">
    <!-- 开启注解 -->
	<context:annotation-config />
	<!-- 配置扫描包 -->
	<context:component-scan base-package="com.click369.*" />
	<!-- 开启aop注解  -->
	<aop:aspectj-autoproxy />
</beans>
6.测试
@Test
	public  void test1()throws Exception{
		ApplicationContext context = new ClassPathXmlApplicationContext("applicationContext.xml");
		// 获取UserDao
		UserService service = (UserService) context.getBean("userService");
		//service.insertService();
		//service.updateService();
		service.deleteService();
	}
18 切入点表达式
切入点表达式的写法:
            关键字:execution(表达式)
            表达式:
                访问修饰符 返回值 包名.包名....类名.方法名(参数列表)

             标准表达式写法:
                 public void com.wance.service.impl.AccountServiceImpl.saveCount()
             访问修饰符可以省略
             	void com.wance.service.impl.AccountServiceImpl.saveCount()
             返回值可以使用通配符,表示任意返回值
             	* com.wance.service.impl.AccountServiceImpl.saveCount()
             包名可以使用通配符,表示任意包,但是有几级包,就需要写几个*
             	* *.*.*.*.AccountServiceImpl.saveCount()
             包名可以使用..表示当前包及其子包
             	* *..AccountServiceImpl.saveAccount()
             类名和方法名都可以使用*来实现通配
             	* *..*.*()
             参数列表:
             	可以直接写数据类型
             		基本类型直接写名称 int
             		应用类型写包名.类名方式 java.lang.String
             	可以使用通配符表示仕意奕型,但是必须有参效
             	可以使用..表示有无参数均可,有参数可以是任意类型
             	实际开发中切入点表达式的通常写法:
				切到业务层实现类下的所有方法
				* com.itheima.service.impl.*.*(..)
-->
19 什么事务?
对数据库的一系列操作中,保证同时成功或者同时失败。不能出现成部分成功,失败部分的情况。而这一些列操作称为数据库的事务。
20 数据库的事务有4大特征【ACID】
数据库的事务有4大特征:
原子性:指事务是一个不可分割的工作单位,事务的操作要么都发生,要么都不发生.
一致性:事务前后数据的完整性必须保持一致。
隔离性:指多个用户并发访问数据库时,一个用户的事务不能被其他用户的事务干扰,多个并发之间的数据要相互隔离。
持久性:指一个事务一旦被提交,它对数据库中数据的改变就是永久性的,接下来即使数据库发生故障也不应该对其又任何影响。简称ACID。其中隔离性最重要。
21 事务的隔离性
使用Java操作的时候设置隔离级别由高到低分别为:
Serializable:可避免脏读、不可重复读、虚读情况的发生。
Repeatable read:可避免脏读、不可重复读情况发生。(可重复读)
Read committed:可避免脏读情况的发生。(读已提交)
Read uncommitted:最低级别,以上情况均为无法保证。(读未提交)
22 Spring的声明式事务管理方式
基于xml方式的事物管理操作:
<!-- 配置spring的事务管理 -->
	<!-- 1.创建事务管理器对象-->
	<bean id="transactionManager" class="org.springframework.jdbc.datasource.DataSourceTransactionManager">
		<!-- 需要配置数据源 -->
		<property name="dataSource" ref="dataSource" />
	</bean>
	<!-- 2.创建事务-->
	<!--id:事务名称  -->
	<!--transaction-manager:事务管理器对象-->
	<tx:advice id="txAdvice" transaction-manager="transactionManager">
		<tx:attributes>
			<!--  使用method配置是事务控制的方法,method的其他属性默认即可 -->
			<tx:method name="transfer"/>
		</tx:attributes>
	</tx:advice>
	<!-- 3.通过aop将上面创建好的事物,作用到指定的业务方法中 -->
	<aop:config>
		<aop:pointcut expression="execution(* com.click369.service.impl.TransferServiceImpl.transfer(..))" id="point1"/>
		<!-- aop:advisor专门配置事务对象 -->
		<aop:advisor advice-ref="txAdvice" pointcut-ref="point1"/>
	</aop:config>

	<!-- 开启Spring主解 -->
	<context:annotation-config></context:annotation-config>
	<!-- 配置扫描包 -->
	<context:component-scan base-package="com.click369.service.impl"></context:component-scan>
</beans>
基于注解方式的事物管理操作:
1.在需要管理事务的方法或者类上面 添加@Transactional 注解
package com.click369.service.impl;

import java.util.HashMap;
import java.util.Map;

import org.springframework.beans.factory.annotation.Autowired;
import org.springframework.stereotype.Service;
import org.springframework.transaction.annotation.Transactional;

import com.click369.mapper.TransferMapper;
import com.click369.service.TransferService;
/**
 * 转账业务实现类
 * @author Administrator
 *
 */
@Service("transferService")
//使用@Transactional注解来表示当前的类需要被spring的事务管理
@Transactional
public class TransferServiceImpl implements TransferService {
    //定义依赖对象
    @Autowired
	private  TransferMapper  transferMapper;

	@Override
	public void transfer() throws Exception {
		// 从刘能的账户减少1000元,给赵四的账户增加1000元
		Map param1=new HashMap();
		param1.put("number", 1000);
		param1.put("username", "刘能");
		transferMapper.lessMoney(param1);
		int i=10/0;
		Map param2=new HashMap();
		param2.put("number", 1000);
		param2.put("username", "赵四");
		transferMapper.addMoney(param2);
	}

}
2.配置注解驱动事务管理(事务管理注解生效的作用)(需要配置对特定持久层框架使用的事务管理器)
<?xml version="1.0" encoding="UTF-8"?>
<beans xmlns="http://www.springframework.org/schema/beans"
	xmlns:xsi="http://www.w3.org/2001/XMLSchema-instance"
	xmlns:aop="http://www.springframework.org/schema/aop"
	xmlns:context="http://www.springframework.org/schema/context"
	xmlns:tx="http://www.springframework.org/schema/tx"
	xsi:schemaLocation="http://www.springframework.org/schema/beans
	http://www.springframework.org/schema/beans/spring-beans.xsd
	http://www.springframework.org/schema/aop
	http://www.springframework.org/schema/aop/spring-aop.xsd
	http://www.springframework.org/schema/context
	http://www.springframework.org/schema/context/spring-context.xsd
	http://www.springframework.org/schema/tx
	http://www.springframework.org/schema/tx/spring-tx.xsd">
	<!-- 读取数据库链接字符串的资源文件 -->
	<context:property-placeholder location="classpath:mydatabase.properties"/>
	<!-- 配置数据源 com.alibaba.druid.pool.DruidDataSource -->
	<bean id="dataSource" class="com.alibaba.druid.pool.DruidDataSource">
		<property name="driverClassName" value="${mydriver}"></property>
		<property name="url" value="${myurl}"></property>
		<property name="username" value="${myusername}"></property>
		<property name="password" value="${mypassword}"></property>
	</bean>
	<!-- 配置SqlSessionFactory "org.mybatis.spring.SqlSessionFactoryBean" -->
	<bean id="sqlSessionFactory" class="org.mybatis.spring.SqlSessionFactoryBean">
		<property name="dataSource" ref="dataSource"></property>
		<property name="mapperLocations" value="classpath:mapper/*Mapper.xml"></property>
	</bean>
	<!--扫描所有Mapper接口-->
	<bean class="org.mybatis.spring.mapper.MapperScannerConfigurer">
	     <property name="basePackage" value="com.click369.mapper"/>
	     <property name="sqlSessionFactoryBeanName" value="sqlSessionFactory"></property>
	</bean>
	<!-- 开启Spring主键 -->
	<context:annotation-config></context:annotation-config>
	<!-- 配置扫描包 -->
	<context:component-scan base-package="com.click369.service.impl"></context:component-scan>
	<!-- 配置事务管理器 -->
	<bean id="transactionManager" class="org.springframework.jdbc.datasource.DataSourceTransactionManager">
		<!-- 需要配置数据源 -->
		<property name="dataSource" ref="dataSource" />
	</bean>
	<!-- 开启事务注解 -->
	<!--  <tx:annotation-driven transaction-manager="transactionManager"/>-->
	<!-- 默认会找transactionManager为名称的事务管理类对应的bean,
		因此可以在配置tx:annotation-driven的时候省略transaction-manager属性 -->
	<tx:annotation-driven/>
</beans>
3.测试:
ApplicationContext  ac=new ClassPathXmlApplicationContext("applicationContext.xml");
		TransferService  transferService=(TransferService)ac.getBean("transferService");
		transferService.transfer();


 95
95


 被折叠的 条评论
为什么被折叠?
被折叠的 条评论
为什么被折叠?
 到【灌水乐园】发言


