


loC控制反转
文章目录
一、IoC简介
控制反转(loC,Inversion of Control),是一个概念,是一种思想。指将传统上由程序代码直接操控的对象调用权交给容器,通过容器来实现对象的装配和管理。控制反转就是对对象控制权的转移,从程序代码本身反转到了外部容器。通过容器实现对象的创建,属性赋值,依赖的管理。
loC 是一个概念,是一种思想,其实现方式多种多样。当前比较流行的实现方式是依赖注入。应用广泛。
依赖:classA 类中含有classB 的实例,在classA 中调用classB 的方法完成功能,即classA 对classB 有依赖。
loc的实现:
- 依赖注入:Dl(Dependency Injection),程序代码不做定位查询,这些工作由容器自行完成。只需要在程序中提供要使用的对象名称就可以,至于对象如何在容器中创建、赋值、查找都由容器内部实现。
依赖注入DI 是指程序运行过程中,若需要调用另一个对象协助时,无须在代码中创建被调用者,而是依赖于外部容器,由外部容器创建后传递给程序。
Spring的依赖注入对调用者与被调用者几乎没有任何要求,完全支持对象之间依赖关系的管理。
Spring框架使用依赖注入(DI)实现IoC。使用的 DI 实现了 IoC 的功能,spring底层创建对象,使用的是反射机制。
Spring容器是一个超级大工厂,负责创建、管理所有的 Java对象,这些 Java对象被称为Bean。Spring容器管理着容器中Bean之间的依赖关系,Spring使用 “依赖注入” 的方式来管理Bean之间的依赖关系。使用 loC 实现对象之间的解耦和。
二、Spring的第一个程序
1、创建maven项目
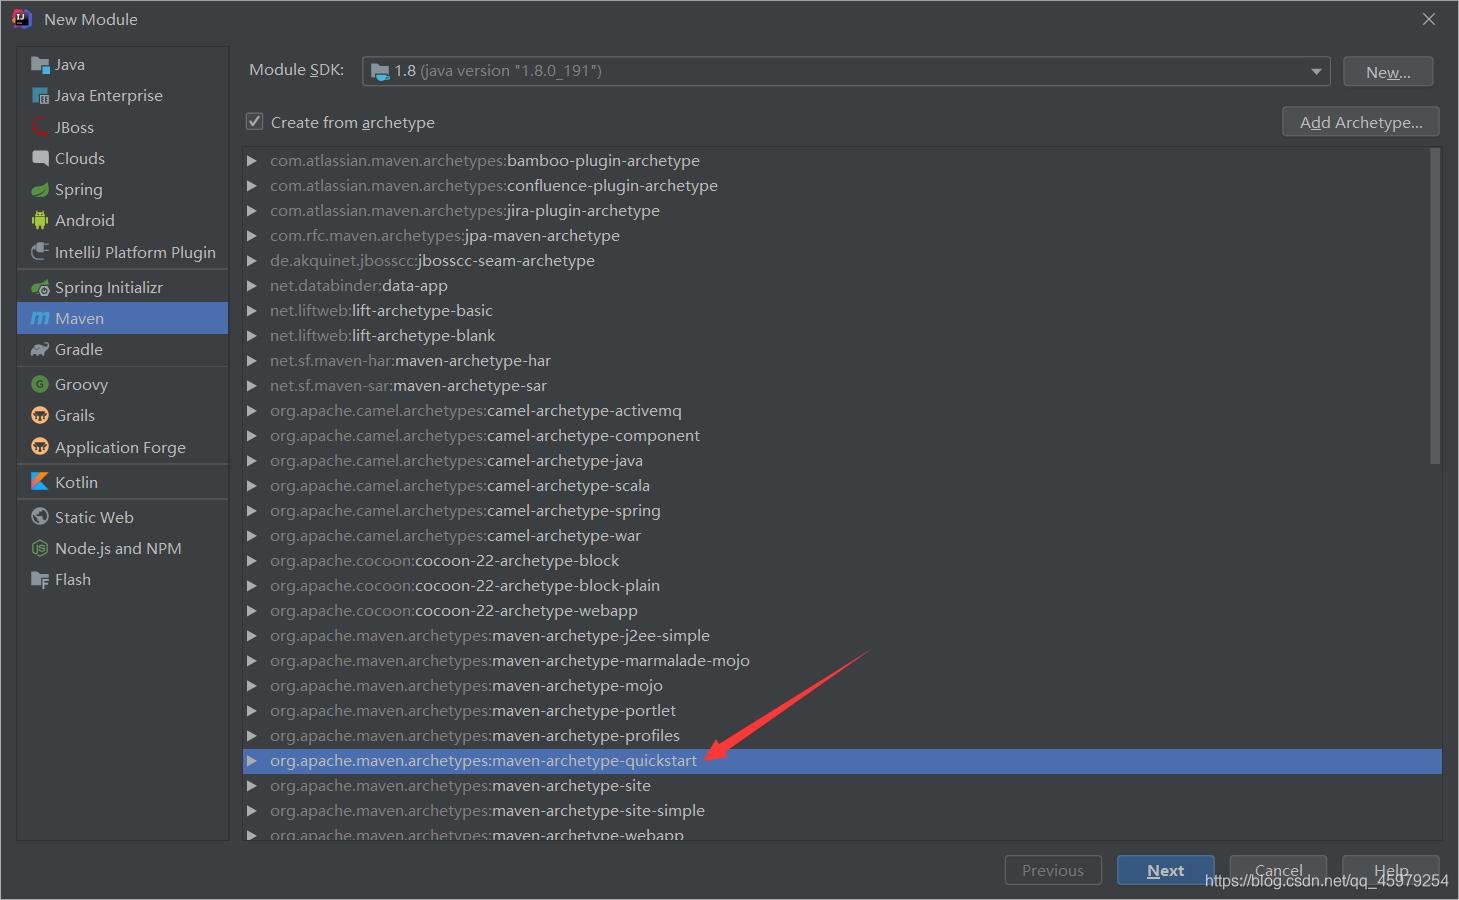
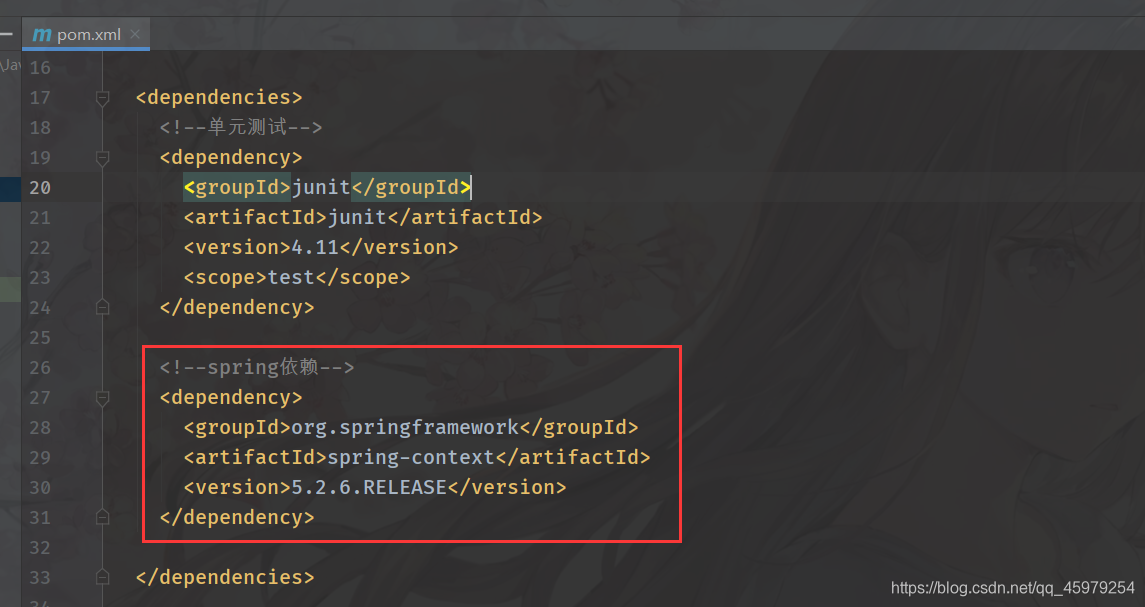
2、引入maven依赖pom
3、定义接口与实体类
SomeService(接口):
package cn.edu.huat.service;

public interface SomeService {
    void doSome();
}
SomeServiceImpl(实现类):
package cn.edu.huat.service.impl;

import cn.edu.huat.service.SomeService;

public class SomeServiceImpl implements SomeService {
    @Override
    public void doSome() {
        System.out.println("执行了SomeServiceImpl的doSome方法");
    }
}
4、创建Spring配置文件
声明bean,就是告诉spring要创建某个类的对象
- id:对象的自定义名称,唯一值。spring通过这个名称找到对象
- class:类的全限定名称(不能是接口,因为spring是反射机制创建对象, 必须使用类)
<?xml version="1.0" encoding="UTF-8"?>
<beans xmlns="http://www.springframework.org/schema/beans"
       xmlns:xsi="http://www.w3.org/2001/XMLSchema-instance"
       xsi:schemaLocation="http://www.springframework.org/schema/beans
       http://www.springframework.org/schema/beans/spring-beans.xsd">

    <bean id="someService" class="cn.edu.huat.service.impl.SomeServiceImpl" />
</beans>
spring配置文件解析:
(1)beans
根标签,spring把 java对象成为bean
(2)spring.beans.xsd
约束文件,和mybatis指定dtd是一样的
(3)bean
spring相当于就完成如下程序:
SomeService someService = new SomeServiceImpl();
spring是把创建好的对象放入到map中,spring框架有一个map存放对象
//springMap.put(id的值,对象);
springMap.put("someService",new SomeServiceImpl());
注意:一个bean标签声明一个对象
5、定义测试类
- spring默认创建对象的时间:在创建spring的容器时,会创建配置文件中的所有的对象。
- spring创建对象:默认调用的是无参数构造方法
package cn.edu.huat;

import org.junit.Test;
import org.springframework.context.ApplicationContext;
import org.springframework.context.support.ClassPathXmlApplicationContext;

public class MyTest {
    @Test
    public void test02(){
        //使用spring容器创建的对象
        //1、指定spring配置文件的名字
        String config = "beans.xml";
        //2、创建表示spring容器的对象,ApplicationContext
        // ApplicationContext:表示Spring容器,通过容器获取对象
        // ClassPathXmlApplicationContext:表示从类路径中加载spring配置文件
        ApplicationContext ac = new ClassPathXmlApplicationContext(config);
        //从容器中获取某个值,你要调用对象的方法
        //getBean("配置文件中的bean的id值")
        SomeService someService = (SomeService) ac.getBean("someService");
        //使用spring创建好的对象
        someService.doSome();
    }
}

注意:类路径如下图所示

6、使用spring创建非自定对象
(1)创建一个存在的某个类的对象
<bean id="myDate" class="java.util.Date" />
(2)测试类
package cn.edu.huat;

import org.junit.Test;
import org.springframework.context.ApplicationContext;
import org.springframework.context.support.ClassPathXmlApplicationContext;

import java.util.Date;

public class MyTest {
    @Test
    public void test03(){
        String config = "beans.xml";
        ApplicationContext ac = new ClassPathXmlApplicationContext(config);
        Date myDate = (Date) ac.getBean("myDate");
        System.out.println("Date:" + myDate);
    }
}

三、基于XML的DI
1、注入分类
bean实例在调用无参构造器创建对象后,就要对bean对象的属性进行初始化。初始化是由容器自动完成的,称为注入(即赋值)。
根据注入方式的不同,常用的有两类
- set注入
- 构造注入
(1)set 注入(掌握)
set注入也叫设值注入。是指,通过setter方法传入被调用者的实例。这种注入方式简单、直观,因而在Spring的依赖注入中大量使用。
applicationContext.xml(Spring配置文件)
<?xml version="1.0" encoding="UTF-8"?>
<beans xmlns="http://www.springframework.org/schema/beans"
       xmlns:xsi="http://www.w3.org/2001/XMLSchema-instance"
       xsi:schemaLocation="http://www.springframework.org/schema/beans http://www.springframework.org/schema/beans/spring-beans.xsd">

    <bean id="myStudent" class="cn.edu.huat.sp01.Student">
        <property name="name" value="张三" />
        <property name="age" value="22" />
    </bean>
</beans>
spring配置文件解析:
简单类型:spring中规定 java的【基本数据类型】和【string】都是简单类型
set注入(设置注入):spring调用类的set方法,你可以在set方法中完成属性赋值
<bean id="xx" class="yyy">
    <property name="属性名字” value="此属性的值" />
    一个property只能给一个属性赋值
    <property. . .>
</bean>
Student(实体类)
package cn.edu.huat.sp01;

public class Student {
    private String name;
    private Integer age;

    public void setName(String name) {
        this.name = name;
    }

    public void setAge(Integer age) {
        this.age = age;
    }

    @Override
    public String toString() {
        return "Student{" + "name='" + name + '\'' + ", age=" + age + '}';
    }
}
MyTest(测试类)
package cn.edu.huat;

import cn.edu.huat.sp01.Student;
import org.junit.Test;
import org.springframework.context.ApplicationContext;
import org.springframework.context.support.ClassPathXmlApplicationContext;

public class MyTest {
    @Test
    public void test01(){
        String config = "sp01/applicationContext.xml";
        ApplicationContext ac = new ClassPathXmlApplicationContext(config);
        Student student = (Student)ac.getBean("myStudent");
        System.out.println("student对象:" + student);
    }
}

applicationContext.xml(Spring配置文件)
<?xml version="1.0" encoding="UTF-8"?>
<beans xmlns="http://www.springframework.org/schema/beans"
       xmlns:xsi="http://www.w3.org/2001/XMLSchema-instance"
       xsi:schemaLocation="http://www.springframework.org/schema/beans http://www.springframework.org/schema/beans/spring-beans.xsd">

    <bean id="myStudent" class="cn.edu.huat.sp02.Student">
        <property name="name" value="张三" />
        <property name="age" value="22" />
        <!--引用类型-->
        <property name="school" ref="mySchool" />
    </bean>

    <!--声明School对象-->
    <bean id="mySchool" class="cn.edu.huat.sp02.School">
        <property name="name" value="某某高校" />
        <property name="address" value="武汉" />
    </bean>
</beans>
spring配置文件解析:
引用类型的set注入:spring调用类的set方法
<bean id="xxx" class="yyy">
	<property name="属性名称" ref="bean的id(对象的名称)” />
</bean>
School(实体类)
package cn.edu.huat.sp02;

public class School {
    private String name;
    private String address;

    public void setName(String name) {
        this.name = name;
    }

    public void setAddress(String address) {
        this.address = address;
    }

    @Override
    public String toString() {
        return "School{" + "name='" + name + '\'' + ", address='" + address + '\'' + '}';
    }
}
Student(实体类)
package cn.edu.huat.sp02;

public class Student {
    private String name;
    private Integer age;
    private School school;

    public void setName(String name) {
        this.name = name;
    }

    public void setAge(Integer age) {
        this.age = age;
    }

    public void setSchool(School school) {
        this.school = school;
    }

    @Override
    public String toString() {
        return "Student{" + "name='" + name + '\'' + ", age=" + age + ", school=" + school + '}';
    }
}
MyTest(测试类)
package cn.edu.huat;

import cn.edu.huat.sp02.Student;
import org.junit.Test;
import org.springframework.context.ApplicationContext;
import org.springframework.context.support.ClassPathXmlApplicationContext;

public class MyTest {
    @Test
    public void test01(){
        String config = "sp02/applicationContext.xml";
        ApplicationContext ac = new ClassPathXmlApplicationContext(config);
        Student student = (Student)ac.getBean("myStudent");
        System.out.println("student对象:" + student);
    }
}

(2)构造注入(理解)
构造注入是指,在构造调用者实例的同时,完成被调用者的实例化。即,使用构造器设置依赖关系。
applicationContext.xml(Spring配置文件)
<?xml version="1.0" encoding="UTF-8"?>
<beans xmlns="http://www.springframework.org/schema/beans"
       xmlns:xsi="http://www.w3.org/2001/XMLSchema-instance"
       xsi:schemaLocation="http://www.springframework.org/schema/beans http://www.springframework.org/schema/beans/spring-beans.xsd">

    <!--使用name属性实现构造注入-->
    <bean id="myStudent" class="cn.edu.huat.sp03.Student">
        <constructor-arg name="name" value="张三" />
        <constructor-arg name="age" value="23" />
        <constructor-arg name="school" ref="mySchool" />
    </bean>

    <bean id="mySchool" class="cn.edu.huat.sp03.School">
        <property name="name" value="某某高校" />
        <property name="address" value="武汉" />
    </bean>
</beans>
spring配置文件解析:
构造注入:spring调用类有参数构造方法,在创建对象的同时,在构造方法中给属性赋值。
构造注入使用 <constructor-arg> 标签
<constructor-arg>标签:一个<constructor-arg>表示构造方法一个参数
<constructor-arg>标签属性:
- name:表示构造方法的形参名
- index:表示构造方法的参数的位置,参数从左往右位置是0,1,2的顺序
- value:构造方法的形参类型是简单类型的,使用value
- ref:构造方法的形参类型是引用类型的,使用ref
School(实体类)
package cn.edu.huat.sp02;

public class School {
    private String name;
    private String address;

    public void setName(String name) {
        this.name = name;
    }

    public void setAddress(String address) {
        this.address = address;
    }

    @Override
    public String toString() {
        return "School{" + "name='" + name + '\'' + ", address='" + address + '\'' + '}';
    }
}
Student(实体类)
package cn.edu.huat.sp03;

public class Student {
    private String name;
    private Integer age;
    private School school;

    public Student() {
    }

    public Student(String name, Integer age, School school) {
        this.name = name;
        this.age = age;
        this.school = school;
    }

    public void setName(String name) {
        this.name = name;
    }

    public void setAge(Integer age) {
        this.age = age;
    }

    public void setSchool(School school) {
        this.school = school;
    }

    @Override
    public String toString() {
        return "Student{" + "name='" + name + '\'' + ", age=" + age + ", school=" + school + '}';
    }
}
MyTest(测试类)
package cn.edu.huat;

import cn.edu.huat.sp03.Student;
import org.junit.Test;
import org.springframework.context.ApplicationContext;
import org.springframework.context.support.ClassPathXmlApplicationContext;

public class MyTest {
    @Test
    public void test01(){
        String config = "sp03/applicationContext.xml";
        ApplicationContext ac = new ClassPathXmlApplicationContext(config);
        Student student = (Student)ac.getBean("myStudent");
        System.out.println("student对象:" + student);
    }
}

2、引用类型属性自动注入
对于引用类型属性的注入,也可不在配置文件中显示的注入。可以通过为<bean/>标签设置autowire属性值,为引用类型属性进行隐式自动注入(默认是不自动注入引用类型属性)。根据自动注入判断标准的不同,可以分为两种:
- byName:根据名称自动注入
- byType:根据类型自动注入
(1)byName方式自动注入
当配置文件中被调用者bean 的【id值】与代码中调用者bean类的属性名相同时,可使用byName方式,让容器自动将被调用者bean注入给调用者bean。容器是通过调用者的bean类的属性名与配置文件的被调用者bean的【id】进行比较而实现自动注入的。
applicationContext.xml(Spring配置文件)
<?xml version="1.0" encoding="UTF-8"?>
<beans xmlns="http://www.springframework.org/schema/beans"
       xmlns:xsi="http://www.w3.org/2001/XMLSchema-instance"
       xsi:schemaLocation="http://www.springframework.org/schema/beans http://www.springframework.org/schema/beans/spring-beans.xsd">

    <bean id="myStudent" class="cn.edu.huat.sp04.Student" autowire="byName">
        <property name="name" value="张三" />
        <property name="age" value="25" />
    </bean>

    <bean id="school" class="cn.edu.huat.sp04.School">
        <property name="name" value="某某高校" />
        <property name="address" value="武汉" />
    </bean>
</beans>
spring配置文件解析:
byName(按名称注入):java类中引用类型的属性名和spring容器中(配置文件) <bean>的 id 名称一样,且数据类型是一致的,这样的容器中的bean,spring能够赋值给引用类型。
<bean id="xx" class="yyy" autowire="byName">
	简单类型属性赋值
</bean>
(2)byType方式自动注入
byType(按类型注入):java类中引用类型的数据类型和spring容器中(配置文件)<bean>的class属性是同源关系的, 这样的bean能够赋值给引用类型
同源就是一类的意思:
- java类中引用类型的数据类型和 bean 的 class 的值是一样的
- java类中引用类型的数据类型和 bean 的 class 的值是父子类关系的
- java类中引用类型的数据类型和 bean 的 class 的值是接口和实现类关系的
<bean id="xx" class="yyy" autowire= "byType"'>
	简单类型属性赋值
</bean>
注意:在byType中,xml配置文件中声明bean只能有一个符合条件的,多余一个是错误的
applicationContext.xml(Spring配置文件)
<?xml version="1.0" encoding="UTF-8"?>
<beans xmlns="http://www.springframework.org/schema/beans"
       xmlns:xsi="http://www.w3.org/2001/XMLSchema-instance"
       xsi:schemaLocation="http://www.springframework.org/schema/beans http://www.springframework.org/schema/beans/spring-beans.xsd">

    <bean id="myStudent" class="cn.edu.huat.sp04.Student" autowire="byType">
        <property name="name" value="李四" />
        <property name="age" value="25" />
    </bean>

    <bean id="mySchool" class="cn.edu.huat.sp04.School">
        <property name="name" value="某某高校" />
        <property name="address" value="武汉" />
    </bean>
</beans>
3、为应用指定多个Spring配置文件
(1)多个配置优势
- 每个文件的大小比一个文件要小很多,效率高
- 避免多人竞争带来的冲突
(2)多文件的分配方式
- 按功能模块,一个模块一个配置文件
- 按类的功能,数据库相关的配置一个文件配置文件,做事务的功能一个配置文件,做 service 功能的一个配置文件等
(3)多文件的实际用法
spring-student.xml
<!--Student模块所有的声明-->
<bean id="myStudent" class="cn.edu.huat.sp05.Student" autowire="byType">
    <property name="name" value="李四" />
    <property name="age" value="25" />
</bean>
spring-school.xml
<!--School模块所有的声明-->
<bean id="mySchool" class="cn.edu.huat.sp05.School">
    <property name="name" value="某某高校" />
    <property name="address" value="武汉" />
</bean>
total.xml
表示主配置文件,包含其他的配置文件的,主配置文件一般是不定义对象的。
<import resource="classpath:其他配置文件的路径" />
//classpath:表示类路径(class文件所在的目录)
在spring的配置文件中要指定其他文件的位置,需要使用classpath,告诉spring到哪去加载读取文件
<!--加载的是文件列表-->
<import resource="classpath:sp05/spring-student.xml" />
<import resource="classpath:sp05/spring-school.xml" />
也可使用通配符。但,此时要求父配置文件名不能满足所能匹配的格式,否则将出现循环递归包含。就本例而言,父配置文件不能匹配spring-.xml 的格式,即不能起名为spring-total.xml。
<!--在包含关系的配置文件中,也可以使用通配符(*:表示任意字符)
	注意:主的配置文件名称不能包含在通配符的范围内(不能叫做spring-total.xml)-->
<import resource="classpath:ba06/spring-*.xml" />
MyTest(测试类)
package cn.edu.huat;

import cn.edu.huat.sp05.Student;
import org.junit.Test;
import org.springframework.context.ApplicationContext;
import org.springframework.context.support.ClassPathXmlApplicationContext;

public class MyTest {
    @Test
    public void test01(){
        String config = "sp05/spring-total.xml";
        ApplicationContext ac = new ClassPathXmlApplicationContext(config);
        Student student = (Student)ac.getBean("myStudent");
        System.out.println("student对象:" + student);
    }
}
四、基于注解的DI(掌握)
对于 DI 使用注解,将不再需要在Spring配置文件中声明bean实例。Spring中使用注解,需要在原有Spring运行环境基础上再做一些改变 。
需要在Spring配置文件中配置组件扫描器,用于在指定的基本包中扫描注解。
1、定义Bean的注解@Component
(1)@Component
创建对象的,等同于<bean>的功能
属性:value就是对象的名称,也就是bean的 id 值,value的值是唯一的,创建的对象在整个spring容器中就个一位置【在类的上面】
package cn.edu.huat.sp01;

import org.springframework.stereotype.Component;

//@Component(value = "myStudent")等同于<bean id="myStudent" class="cn.edu.huat.sp01.Student" />
@Component(value = "myStudent")
public class Student {
    private String name;
    private Integer age;

    public void setName(String name) {
        this.name = name;
    }

    public void setAge(Integer age) {
        this.age = age;
    }
}
声明组件扫描器(component-scan),组件就是java对象
- base-package:指定注解在你的项目中的包名
- component-scan工作方式:spring会扫描遍历 base-package 指定的包,把包中和子包中的所有类,找到类中的注解, 按照注解的功能创建对象,或给属性赋值。
加入了 component -scan 标签,配置文件的变化:
- 加入一个新的约束文件spring-context.xsd
- 给这个新的约束文件起个命名空间的名称
<?xml version="1.0" encoding="UTF-8"?>
<beans xmlns="http://www.springframework.org/schema/beans"
       xmlns:xsi="http://www.w3.org/2001/XMLSchema-instance"
       xmlns:context="http://www.springframework.org/schema/context"
       xsi:schemaLocation="http://www.springframework.org/schema/beans
       http://www.springframework.org/schema/beans/spring-beans.xsd
       <!-给这个新的约束文件起个命名空间的名称--->
       http://www.springframework.org/schema/context
       <!--加入一个新的约束文件spring-context.xsd-->
       https://www.springframework.org/schema/context/spring-context.xsd">

    <context:component-scan base-package="cn.edu.huat.sp01" />
</beans>
@Component的另两种用法:
- 省略value(常用写法):@Component (“myStudent”)
- 不指定对象名称,由spring提供默认名称:类名的首字母小写
(2)@Repository (用在持久层类的上面)
放在 dao 的实现类上面,表示创建dao对象,dao对象是能访问数据库的
(3)@Service(用在业务层类的上面)
放在 service 的实现类上面,创建service对象,service对象是做业务处理,可以有事务等功能的
(4)@Controller(用在控制器的上面)
放在控制器(处理器)类的上面,创建控制器对象的,控制器对象,能够接受用户提交的参数,显示请求的处理结果
注意:以上三个注解的使用语法和@Component是一样的。都能创建对象,但是这三个注解还有额外的功能。是给项目分层的。
(5)指定多个包的三种方式
- 第一种方式:使用多次组件扫描器, 指定不同的包
<context:component-scan base-package="cn.edu.huat.sp01" />
<context:component-scan base-package="cn.edu.huat.sp02" />
- 第二种方式:使用分隔符( ; 或 ,)分隔多个包名
<context:component-scan base-package="cn.edu.huat.sp01;cn.edu.huat.sp02" />
- 第三种方式:指定父包
<context:component-scan base-package="cn.edu.huat" />
2、简单类型属性注入@Value
需要在属性上使用注解@Value,该注解的value属性用于指定要注入的值。
使用该注解完成属性注入时,类中无需setter。当然,若属性有setter, 则也可将其加到setter上 。
- @Value:简单类型的属性赋值
- 属性:value是String类型的,表示简单类型的属性值
(1)在属性定义的上面,无需set方法(推荐使用)
package cn.edu.huat.sp02;

import org.springframework.beans.factory.annotation.Value;
import org.springframework.stereotype.Component;

@Component("myStudent")
public class Student {
    @Value(value = "真三")
    private String name;
    @Value(value = "32")
    private Integer age;

    @Override
    public String toString() {
        return "Student{" + "name='" + name + '\'' + ", age=" + age + '}';
    }
}
(2)在set方法的上面
package cn.edu.huat.sp02;

import org.springframework.beans.factory.annotation.Value;
import org.springframework.stereotype.Component;

@Component("myStudent")
public class Student {
    private String name;
    private Integer age;

    @Value("真三")
    public void setName(String name) {
        this.name = name;
    }

    @Value("25")
    public void setAge(Integer age) {
        this.age = age;
    }

    @Override
    public String toString() {
        return "Student{" + "name='" + name + '\'' + ", age=" + age + '}';
    }
}
3、byType自动注入@Autowired
需要在引用属性上使用注解@Autowired,该注解默认使用按类型自动装配Bean的方式。
使用该注解完成属性注入时,类中无需setter。 当然,若属性有setter, 则也可将其加到setter上。
- @Autowired:spring 框架提供的注解,实现引用类型的赋值。
- spring中通过注解给引用类型赋值,使用的是自动注入原理,支持byName、byType
- @Autowired:默认使用的是byType自动注入
(1)在属性定义的上面,无需set方法(推荐使用)
School
package cn.edu.huat.sp03;

import org.springframework.beans.factory.annotation.Value;
import org.springframework.stereotype.Component;

@Component("mySchool")
public class School {
    @Value(value = "武汉大学")
    private String name;

    @Value(value = "武汉")
    private String address;

    @Override
    public String toString() {
        return "School{" + "name='" + name + '\'' + ", address='" + address + '\'' + '}';
    }
}
Student
package cn.edu.huat.sp03;

import org.springframework.beans.factory.annotation.Autowired;
import org.springframework.beans.factory.annotation.Value;
import org.springframework.stereotype.Component;

@Component("myStudent")
public class Student {
    @Value(value = "zs")
    private String name;

    @Value(value = "29")
    private Integer age;

    @Autowired(required = true)
    private School school;

    @Override
    public String toString() {
        return "Student{" + "name='" + name + '\'' + ", age=" + age + ", school=" + school + '}';
    }
}
(2)@Autowired的required属性
required , 是一个boolean类型的,默认true
- required = true:表示引用类型赋值失败,程序报错,并终止执行(建议使用)
- required = false:引用类型如果赋值失败,程序正常执行,引用类型是null
4、byName自动注入@Autowired与@Qualifier
需要在引用属性上联合使用注解@Autowired与@Qualifier。
@Qualifier 的value属性用于指定要匹配的Bean的id值。类中无需set方法,也可加到set方法上。
- 在属性上面加入@Autowired
- 在属性上面加入@Qualifier(value = “bean的id”):表示使用指定名称的bean完成赋值
package cn.edu.huat.sp03;

import org.springframework.beans.factory.annotation.Autowired;
import org.springframework.beans.factory.annotation.Value;
import org.springframework.stereotype.Component;

@Component("myStudent")
public class Student {
    @Value(value = "zs")
    private String name;

    @Value(value = "29")
    private Integer age;

    @Autowired
    @Qualifier("mySchool")
    private School school;

    @Override
    public String toString() {
        return "Student{" + "name='" + name + '\'' + ", age=" + age + ", school=" + school + '}';
    }
}
5、JDK注解@Resource自动注入
Spring提供了对 jdk 中@Resource注解的支持。
@Resource注解既可以按名称匹配Bean,也可以按类型匹配Bean。默认是按名称注入。
使用该注解,要求 JDK必须是6及以上版本。@Resource可在属性上,也可在set方法上。
(1)byType注入引用类型属性
@Resource注解若不带任何参数,采用默认按byName的方式注入,按byName不能注入bean,则会按照byType进行Bean的匹配注入。
package cn.edu.huat.sp03;

import org.springframework.beans.factory.annotation.Value;
import org.springframework.stereotype.Component;

import javax.annotation.Resource;

@Component("myStudent")
public class Student {
    @Value(value = "zs")
    private String name;

    @Value(value = "29")
    private Integer age;

    @Resource
    private School school;
}
(2)byName注入引用类型属性
@Resource只使用byName方式,需要增加一个属性name。name的值是bean的 id(名称)
@Resource(name = "mySchool")
private School school;
6、注解与XML的对比
- 经常改动则使用xml
- 不经常使用则使用注解形式


 1564
1564


 被折叠的 条评论
为什么被折叠?
被折叠的 条评论
为什么被折叠?
 到【灌水乐园】发言


