


文章目录
1、JDBC是什么?
- Java DataBase Connectivity(Java语言连接数据库)
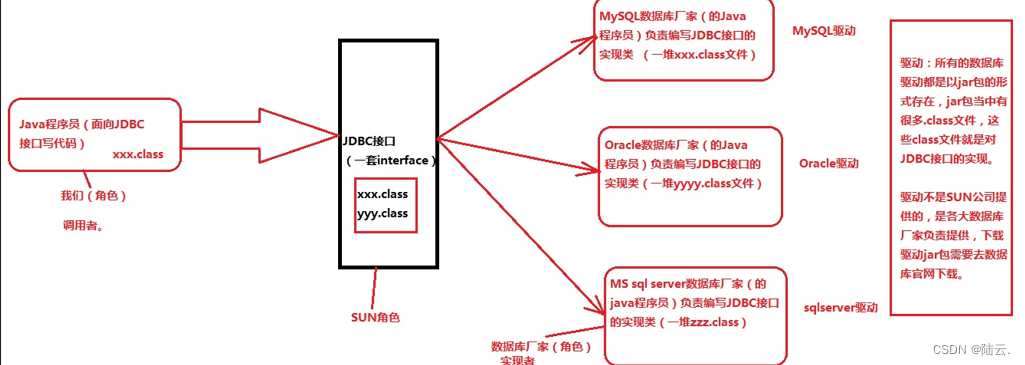
2、JDBC的本质是什么?
- JDBC是SUN公司制定的一套接口(interface)
- java.sql.*; (这个软件包下有很多接口。)
3、JDBC开发前的准备工作
先从官网下载对应的驱动jar包,然后将其配置到环境变量classpath当中。
举例:classpath=.;自己下载的jar包地址
以上的配置是针对于文本编辑器的方式开发,使用IDEA工具的时候,不需要配置以上的环境变量。
IDEA有自己的配置方式。
4、MySQL5.1.23版本和8.0.26版本的jar包地址
链接:https://pan.baidu.com/s/1swXKxYto0OSLjTbww_3SkQ
提取码:1111
5、JDBC编程六步
-
第一步:注册驱动(作用:告诉Java程序,即将要连接的是哪个品牌的数据库)
-
第二步:获取连接(表示JVM的进程和数据库进程之间的通道打开了,这属于进程之间的通信,重量级的,使用完之后一定要关闭通道。)
-
第三步:获取数据库操作对象(专门执行sql语句的对象)
-
第四步:执行SQL语句(DQL DML…)
-
第五步:处理查询结果集(只有当第四步执行的是select语句的时候,才有这第五步处理查询结果集。)
-
第六步:释放资源(使用完资源之后一定要关闭资源。Java和数据库属于进程间的通信,开启之后一定要关闭。)
引自b站(老杜JDBC):
6、第一种注册驱动方式实现增删改:
主要是以返回值的方式
import java.sql.SQLException;
import java.sql.Connection;
import java.sql.Statement;
public class JDBCTest01{
	public static void main(String[] args){
		Connection conn = null;
		Statement stmt = null;
		try{
		Driver driver = new com.mysql.cj.jdbc.Driver();
		//第一步:注册驱动
		DriverManager.registerDriver(driver);
		String url = "jdbc:mysql://localhost:3306/itcast";
		String user = "root";
		String password = "Ma521521";

		//第二步:获取连接
		conn = DriverManager.getConnection(url,user,password);
		System.out.println("数据库连接对象:" + conn);

		//第三部:获取数据库操作对象
		stmt = conn.createStatement();

		String sql = "insert into student(id,name,no) values(5,'张三',2000100105)";
		// String sql = "delete  from student where id = 5";
		//String sql = "update student set name='法外狂徒' where id= 4";
		//第四部:执行SQL语句
		int count = stmt.executeUpdate(sql);

		//第五步:处理查询结果集
		System.out.println(count==1? "保存成功":"保存失败");
		}catch(SQLException e){
		e.printStackTrace();
		}finally{
			//第六步:释放资源
			try{
			if(stmt!=null){
				stmt.close();
			}
			}catch(SQLException e){
				e.printStackTrace();
			}
			try{
			if(conn!=null){
				conn.close();
			}
			}catch(SQLException e){
				e.printStackTrace();
			}
		}
	}
}
注意:以此方式注册驱动,如果数据库版本是8以上,那么需要将数据库驱动jar包粘贴到JDK/jre/lib/ext目录下(就是自己安装的JDK)
7、注册驱动的第二种方式
实用类加载动作注册,不需要接收返回值
import java.sql.*;
public class JDBCTest03{
	public static void main(String[] args){

		//1、注册驱动
		//这是注册驱动的第一种写法
		//DriverManager.registerDriver(new com.mysql.cj.jdbc.driver());
		//注册驱动的第二种方式:常因为参数是一个字符串,字符串可以写到XXX.properties文件中
		//为什么这种方式常用?
		//以下方法不需要接受返回值,因为我们只想用它的类加载动作
		Connection conn = null;
		try{
		Class.forName("com.mysql.cj.jdbc.Driver");
		//2、获取连接
		conn = DriverManager.getConnection("jdbc:mysql://localhost:3306/itcast","root","Ma521521");
		System.out.println(conn);
		}catch(SQLException e){
			e.printStackTrace();
		}catch(ClassNotFoundException e){
			e.printStackTrace();
		}
	}
}
8、使用资源绑定器绑定属性配置文件将连接数据库的所有信息配置到配置文件中
此种方式可以让用户有更好的体验,只需要修改.properties文件里的值即可改变数据库连接
import java.sql.*;
import java.util.*;
public class JDBCTest04{
	public static void main(String[] args){
		//使用资源绑定器绑定属性配置文件
		ResourceBundle bundle = ResourceBundle.getBundle("jdbc");
		String driver = bundle.getString("driver");
		String url = bundle.getString("url");
		String user = bundle.getString("user");
		String password = bundle.getString("password");

		Connection conn = null;
		Statement stmt = null;
		try{
		//1、注册驱动
		Class.forName(driver);
		//2、获取连接
		conn = DriverManager.getConnection(url,user,password);
		//3、获取数据库操作对象
		stmt = conn.createStatement();
		//4、执行sql语句
		String sql = "update student set name='法外狂徒008' where id= 4";
		//5、处理sql查询结果集
		int count = stmt.executeUpdate(sql);
		System.out.println(count == 1?"修改成功":"修改失败");

		}catch(Exception e){
			e.printStackTrace();
		}finally{
		try{
			//6、释放资源
			if(stmt!=null){
				stmt.close();
			}
		}catch(SQLException e){
				e.printStackTrace();
			}
		try{
			if(conn!=null){
				conn.close();
			}
		}catch(SQLException e){
				e.printStackTrace();
			}
		}
	}
}

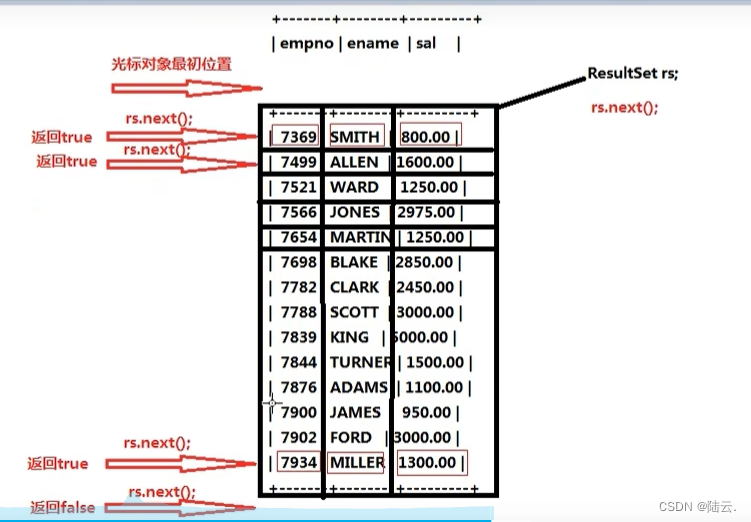
9、处理查询结果集(遍历结果集)
两种方式获取属性值,
第一种是以JDBC的下标获取,JDBC的下标是从1开始
第二种方式是数据库表的列名的方式获取
import java.sql.*;
import java.util.*;
public class JDBCTest05{
	public static void main(String[] args){

		Connection conn = null;
		Statement stmt = null;
		ResultSet rt = null;
		try{
		//1、注册驱动
		Class.forName("com.mysql.cj.jdbc.Driver");
		//2、获取连接
		conn = DriverManager.getConnection("jdbc:mysql://localhost:3306/itcast","root","Ma521521");
		//3、获取数据库操作对象
		stmt = conn.createStatement();
		//4、执行sql语句
		String sql = "select id a,name,no,doubledata from student";
		rt = stmt.executeQuery(sql);
		//5、处理查询结果集
		/* boolean flag1 = rs.next();
		if(flag1){
			//光指向的行有数据
			//取数据
			//getString()方法的特点是:不管数据库中的数据类型是什么,都以String的形式取出
		} */
		while(rt.next()){
			/* String id = rt.getString(1);//jdbc中所有下标从1开始,不是从0开始
			String name = rt.getString(2);
			String no = rt.getString(3);
			String doubledata = rt.getString(4);
			System.out.println(id + " " + name + " " + no + " " + doubledata); */

			/*
			//这个不是以列的下标获取,以列的名字获取
			String id = rt.getString("id");
			String name = rt.getString("name");
			String no = rt.getString("no");
			String doubledata = rt.getString("doubledata");
			System.out.println(id + " " + name + " " + no + " " + doubledata); */

			//除了可以以String类型取出之外,还可以以特定的类型取出
			int id = rt.getInt("a");//重点注意:列名称不是表中的列名称,是查询结果集的列名称
			String name = rt.getString("name");
			String no = rt.getString("no");
			double doubledata = rt.getDouble("doubledata");
			System.out.println(id + " " + name + " " + no + " " + (doubledata + 100.0));
		}
		}catch(Exception e){
			e.printStackTrace();
		}finally{
			try{
				if(rt!=null){
					rt.close();
				}
			}catch(SQLException e){
				e.printStackTrace();
			}
			try{
				if(stmt!=null){
					stmt.close();
				}
			}catch(SQLException e){
				e.printStackTrace();
			}
			try{
				if(conn!=null){
					conn.close();
				}
			}catch(SQLException e){
				e.printStackTrace();
			}
		}
		//6、释放资源
	}
}
10、模拟用户登录功能的实现
实现功能:
(1)需求
模拟用户登录功能的实现。
(2)业务描述
程序运行的时候,提供一个输入的入口,可以让用户输入用户名和密码
用户输入用户名和密码之后,提交信息,java程序收集到用户信息
Java程序连接数据库验证用户名和密码是否合法
合法:显示登录成功
不合法:显示登录失败
(3)数据的准备
在实际开发中,表的设计会使用专业的建模工具,我们这里安装一个建模工具:PowerDesigner
使用PD工具来进行数据库表的设计。(参见user-login.sql脚本)
(4)总结
初始化方法是把用户使用界面加载出来,把用户名输入的用户名和密码放到一个hashmap集合中
只要利用的是hashmap集合的key,value键值对,登录方法是JDBC操作,使用一个标识,逻辑是先把
标识设置为假,如果用户输入的用户名和密码与数据库中的用户名密码相同,那么就把标识字段设置
为真,最后返回标识字段判断用户是否登陆成功!
public class JDBCTest06 {
    public static void main(String[] args) {
        //1、初始化页面
        Map<String,String> userLoginInfo= initUI();

        //2、验证用户名和密码
        boolean loginSuccess = login(userLoginInfo);
        System.out.println(loginSuccess == true ? "登录成功" : "登录失败");
    }

    /**
     * 用户登录
     * @param userLoginInfo 用户登录信息
     * @return true表示成功 false表示失败
     */
    private static boolean login(Map<String,String> userLoginInfo) {
        //jdbc
        //定义一个标识
        boolean flag = false;
        String loginName = userLoginInfo.get("loginName");
        String loginPwd = userLoginInfo.get("loginPwd");
        //4、执行sql语句
        //6、释放资源
        Connection conn = null;
        Statement stmt = null;
        ResultSet rt = null;
        try{
            //1、注册驱动
            Class.forName("com.mysql.cj.jdbc.Driver");
            //2、获取连接
            conn = DriverManager.getConnection("jdbc:mysql://localhost:3306/itcast","root","Ma521521");
            //3、获取数据库操作对象
            stmt = conn.createStatement();
            //4、执行sql语句
            String sql = "select loginName,loginPwd from t_user where loginName = '"+loginName+"' and loginPwd= '"+loginPwd+"'";
            //5、处理查询结果集
            rt = stmt.executeQuery(sql);
            if(rt.next()){
                //登陆成功
                flag=true;
            }
        }catch (Exception e){
            e.printStackTrace();
        }finally{
            //6、释放资源
            if(rt!=null){
                try {
                    rt.close();
                } catch (SQLException throwables) {
                    throwables.printStackTrace();
                }
            }
            if(stmt!=null){
                try {
                    stmt.close();
                } catch (SQLException throwables) {
                    throwables.printStackTrace();
                }
            }
            if(conn!=null){
                try {
                    conn.close();
                } catch (SQLException throwables) {
                    throwables.printStackTrace();
                }
            }
        }
        return flag;
    }

    private static Map<String,String> initUI() {

        Scanner s = new Scanner(System.in);

        System.out.println("用户名:");
        String loginName = s.nextLine();

        System.out.println("密码:");
        String loginPwd = s.nextLine();

        Map<String,String> userLogininfo = new HashMap<>();
        userLogininfo.put("loginName",loginName);
        userLogininfo.put("loginPwd",loginPwd);

        return userLogininfo;
    }
}
11、SQL注入
(1)以上程序存在的问题:
用户名fdsa
密码:fdsa’ or ‘1’='1
登录成功
这种现象被称为SQL注入(安全隐患)。
(2)导致SQL注入的根本原因是什么?
用户输入的信息中含有sql语句的关键字,并且这些关键字参与sql语句的编译过程,
导致sql语句的原意被扭曲,进而达到sql注入。
(3)解决SQL注入问题?
只要用户提供的信息不参与SQL语句的编译过程,问题就解决了
即使用户提供的信息含有sql语句的关键字,但是没有参与编译,不起作用
要想用户信息不参与SQL语句的编译,那么必须使用java.sql.PreparedStatement
PreparedStatement接口继承了java.sql.Statement
PreparedStatement是属于预编译的数据库操作对象
PreparedStatement的原理是:预先对SQL语句的框架进行编译,然后再给SQL语句传值
(4)测试结果:
用户名:fdas
密码:fdsa’ or ‘1’='1
登录失败
(5)解决SQL注入的关键是什么?
用户提供的信息中即使含有sql语句的关键字,但是这些关键字并没有参与编译。不起作用。
public class JDBCTest07 {
    public static void main(String[] args) {
        //1、初始化页面
        Map<String,String> userLoginInfo= initUI();

        //2、验证用户名和密码
        boolean loginSuccess = login(userLoginInfo);
        System.out.println(loginSuccess == true ? "登录成功" : "登录失败");
    }

    /**
     * 用户登录
     * @param userLoginInfo 用户登录信息
     * @return true表示成功 false表示失败
     */
    private static boolean login(Map<String,String> userLoginInfo) {
        //jdbc
        //定义一个标识
        boolean flag = false;
        String loginName = userLoginInfo.get("loginName");
        String loginPwd = userLoginInfo.get("loginPwd");
        //4、执行sql语句
        //6、释放资源
        Connection conn = null;
        PreparedStatement pt = null;
        ResultSet rt = null;
        try{
            //1、注册驱动
            Class.forName("com.mysql.cj.jdbc.Driver");
            //2、获取连接
            conn = DriverManager.getConnection("jdbc:mysql://localhost:3306/itcast","root","Ma521521");
            //3、获取预编译的数据库操作对象
            //SQL语句的框子,其中一个?,表示一个占位符,一个?将来接收一个“值”,注意:占位符不能使用单引号括起来
            String sql = "select loginName,loginPwd from t_user where loginName = ? and loginPwd= ?";
            //程序执行到此处,会发送SQL语句框子给DBMS,然后DBMS进行SQL语句的预先编译。
            pt = conn.prepareStatement(sql);
            //给占位符?传值(第一个问号下标是1,第二个问号下标是2,JDBC中所有下标从1开始)
            pt.setString(1,loginName);
            pt.setString(2,loginPwd);
            //4、执行sql语句
            rt = pt.executeQuery();
            //5、处理查询结果集
            if(rt.next()){
                //登陆成功
                flag=true;
            }
        }catch (Exception e){
            e.printStackTrace();
        }finally{
            //6、释放资源
            if(rt!=null){
                try {
                    rt.close();
                } catch (SQLException throwables) {
                    throwables.printStackTrace();
                }
            }
            if(pt!=null){
                try {
                    pt.close();
                } catch (SQLException throwables) {
                    throwables.printStackTrace();
                }
            }
            if(conn!=null){
                try {
                    conn.close();
                } catch (SQLException throwables) {
                    throwables.printStackTrace();
                }
            }
        }
        return flag;
    }

    private static Map<String,String> initUI() {

        Scanner s = new Scanner(System.in);

        System.out.println("用户名:");
        String loginName = s.nextLine();

        System.out.println("密码:");
        String loginPwd = s.nextLine();

        Map<String,String> userLogininfo = new HashMap<>();
        userLogininfo.put("loginName",loginName);
        userLogininfo.put("loginPwd",loginPwd);

        return userLogininfo;
    }
}
12、Statement和PreparedStatement的区别
(1)对比一下Statement和PreparedStatement?
-
Statement存在sql注入问题,PreparedStatement解决了SQL注入问题
-
Statement是编译一次执行一次。PreparedStatement是编译一次,可执行N次。PreparedStatement效率较高一些
-
PreparedStatement会在编译阶段做类型的安全检查
综上所述:PreparedStatement使用较多。只有极少数的情况下需要使用Statement
(2)什么情况下必须使用Statement呢?
- 业务方面要求必须支持SQL注入的时候。
- Statement支持SQL注入,凡是业务方面要求是需要进行sql语句拼接的,必须使用Statement。
- 比如,字段的排序需要使用字符串拼接操作,此时就需要使用PreparedStatement
public class JDBCTest08 {
    public static void main(String[] args) {
        //用户在控制台输入desc就是降序,输入asc就是升序
        Scanner s = new Scanner(System.in);
        System.out.println("请输入desc或者asc,asc表示升序,desc表示降序");
        System.out.print("请输入:");
        String keyWords = s.nextLine();

        Connection conn = null;
        Statement stmt = null;
        ResultSet rs = null;
        try {
            //注册驱动
            Class.forName("com.mysql.cj.jdbc.Driver");
            //获取连接
            conn = DriverManager.getConnection("jdbc:mysql://localhost:3306/itcast","root","Ma521521");
            //获取预编译的数据库操作对象
            stmt = conn.createStatement();
            //执行sql语句
            String sql = "select name from student order by name " + keyWords;
            rs = stmt.executeQuery(sql);
            //处理查询结果集
            while(rs.next()){
                System.out.println(rs.getString("name"));
            }
        } catch (ClassNotFoundException | SQLException e) {
            e.printStackTrace();
        }finally {
            //释放资源
            if(rs!=null){
                try {
                    rs.close();
                } catch (SQLException throwables) {
                    throwables.printStackTrace();
                }
            }
            if(stmt!=null){
                try {
                    stmt.close();
                } catch (SQLException throwables) {
                    throwables.printStackTrace();
                }
            }
            if(conn!=null){
                try {
                    conn.close();
                } catch (SQLException throwables) {
                    throwables.printStackTrace();
                }
            }
        }
    }
}
13、使用PreparedStatement实现增删改
使用预编译数据库对象时,SQL语句中的关键数值设置为?,为了防止SQL注入
public class JDBCTest09 {
    public static void main(String[] args) {

        Connection conn = null;
        PreparedStatement pt = null;
        try {
            //注册驱动
            Class.forName("com.mysql.cj.jdbc.Driver");
            //获取连接
            conn = DriverManager.getConnection("jdbc:mysql://localhost:3306/itcast","root","Ma521521");
            //获取预编译的数据库对象
            /*String sql = "insert into student(id,name,no,doubledata) values(?,?,?,?) ";
            pt = conn.prepareStatement(sql);
            pt.setInt(1,5);
            pt.setString(2,"法外狂徒");
            pt.setInt(3,2000100101);
            pt.setDouble(4,500.0);*/

            /*String sql = "update student set name=? where id=?";
            pt = conn.prepareStatement(sql);
            pt.setString(1,"张三之祖");
            pt.setInt(2,5);*/

            String sql = "delete from student where id=?";
            pt = conn.prepareStatement(sql);
            pt.setInt(1,5);
            //执行sql语句
            int count = pt.executeUpdate();
        } catch (Exception e) {
            e.printStackTrace();
        }finally {
            //释放资源
            if(pt!=null){
                try {
                    pt.close();
                } catch (SQLException throwables) {
                    throwables.printStackTrace();
                }
            }
            if(conn!=null){
                try {
                    conn.close();
                } catch (SQLException throwables) {
                    throwables.printStackTrace();
                }
            }
        }
    }
}
14、JDBC事务机制
(1)JDBC中的事务是自动提交的,什么是自动提交?
- 只要执行任意一条DML语句,则自动提交一次。这是JDBC默认的事务行为。但是在实际的业务当中,通常都是N条DML语句共同联合才能完成的,必须保证他们这些DML语句在同一个事务中同时成功或者同时失败。
(2)以下程序先来验证一下JDBC的事务是否是自动提交机制
测试结果:JDBC中只要执行任意一条DML语句,就提交一次。
public class JDBCTest10 {
    public static void main(String[] args) {
        Connection conn = null;
        PreparedStatement pt = null;
        try {
            //注册驱动
            Class.forName("com.mysql.cj.jdbc.Driver");
            //获取连接
            conn = DriverManager.getConnection("jdbc:mysql://localhost:3306/itcast","root","Ma521521");
            //获取预编译的数据库对象
            String sql = "update student set name=? where id=?";
            pt = conn.prepareStatement(sql);

            // 第一次给占位符传值
            pt.setString(1,"超人");//第一次修改
            pt.setInt(2,4);
            //执行sql语句
            int count = pt.executeUpdate();
            System.out.println(count);

            // 重新给占位符传值
            pt.setString(1,"雷神");//第二次修改
            pt.setInt(2,4);
            //执行sql语句
            count = pt.executeUpdate();
            System.out.println(count);
        } catch (Exception e) {
            e.printStackTrace();
        }finally {
            //释放资源
            if(pt!=null){
                try {
                    pt.close();
                } catch (SQLException throwables) {
                    throwables.printStackTrace();
                }
            }
            if(conn!=null){
                try {
                    conn.close();
                } catch (SQLException throwables) {
                    throwables.printStackTrace();
                }
            }
        }
    }
}
15、银行转账案例
public class JDBCTest11 {
    public static void main(String[] args) {

        Connection conn = null;
        PreparedStatement pt = null;
        try {
            //注册驱动
            Class.forName("com.mysql.cj.jdbc.Driver");
            //获取连接
            conn = DriverManager.getConnection("jdbc:mysql://localhost:3306/itcast","root","Ma521521");
            //将自动提交机制改为手动提交
            conn.setAutoCommit(false);
            //获取预编译的数据库对象
            String sql = "update t_act set balance=? where actno=?";
            pt = conn.prepareStatement(sql);

            pt.setInt(1,10000);
            pt.setDouble(2,111);
            int count = pt.executeUpdate();

            //String s = null;
            //s.toString();

            pt.setInt(1,10000);
            pt.setDouble(2,222);
            count += pt.executeUpdate();
            System.out.println(count ==2 ? "转账成功":"转账失败");
            //程序能够走到这里说明以上程序没有异常,事务结束,手动提交事务
            conn.commit();
        } catch (Exception e) {
            if(conn!=null){
                try {
                    conn.rollback();
                } catch (SQLException throwables) {
                    throwables.printStackTrace();
                }
            }
            e.printStackTrace();
        }finally {
            //释放资源
            if(pt!=null){
                try {
                    pt.close();
                } catch (SQLException throwables) {
                    throwables.printStackTrace();
                }
            }
            if(conn!=null){
                try {
                    conn.close();
                } catch (SQLException throwables) {
                    throwables.printStackTrace();
                }
            }
        }
    }
}
16、自定义JDBC工具类
public class DBUtil {

    /**
     * 工具类中的构造方法都是私有的
     * 因为工具类当中的方法都是静态的,不需要new对象,直接采用类名调用
     */
    private DBUtil(){}

    //静态代码块在类加载时执行,并且只执行一次
    static{
        try {
            Class.forName("com.mysql.cj.jdbc.Driver");
        } catch (ClassNotFoundException e) {
            e.printStackTrace();
        }
    }

    /**
     * 获取数据库连接对象
     * @return 连接对象
     * @throws SQLException
     */
    public static Connection getConnection() throws SQLException {
        return DriverManager.getConnection("jdbc:mysql://localhost:3306/itcast","root","Ma521521");
    }

    /**
     * 关闭资源
     * @param conn 连接对象
     * @param ps 数据库操作对象
     * @param rt 结果集
     */
    public static void close(Connection conn, Statement ps, ResultSet rt){
        if(rt!=null){
            try {
                rt.close();
            } catch (SQLException throwables) {
                throwables.printStackTrace();
            }
        }
        if(ps!=null){
            try {
                ps.close();
            } catch (SQLException throwables) {
                throwables.printStackTrace();
            }
        }
        if(conn!=null){
            try {
                conn.close();
            } catch (SQLException throwables) {
                throwables.printStackTrace();
            }
        }
    }
}
用模糊查询测试工具类
/*
*   用模糊查询测试JDBC工具类
* */
public class JDBCTest12 {
    public static void main(String[] args) {

        Connection conn = null;
        PreparedStatement ps = null;
        ResultSet rt = null;

        try {
            //获取连接
            conn = DBUtil.getConnection();
            String sql = "select name from student where name like ?";
            ps = conn.prepareStatement(sql);
            ps.setString(1,"_A%");
            rt = ps.executeQuery();
            while(rt.next()){
                System.out.println(rt.getString("name"));//出错点,忘记输出格式
            }
        } catch (SQLException throwables) {
            throwables.printStackTrace();
        }finally{
            //释放资源
            DBUtil.close(conn,ps,rt);
        }
    }
}
17、JDBC的行级锁
在执行一段查询SQL语句时,在其后面加上for update,表示给查询的行加上行级锁,它是一种悲观锁,除非事务提交之后不允许其他事务再操作这些行的信息
-
悲观锁:加上悲观锁之后,不允许并发,事务必须排队执行
-
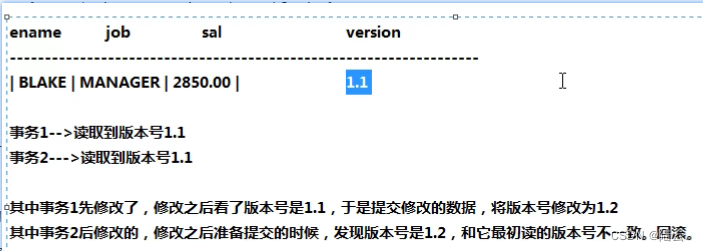
乐观锁:加上锁之后支持并发,事务不需要排队,只不过需要使用到一个版本号
public class JDBCTest13 {
    public static void main(String[] args) {

        Connection conn = null;
        PreparedStatement ps = null;
        ResultSet rt = null;
        try {
            //获取连接
            conn = DBUtil.getConnection();
            conn.setAutoCommit(false);
            String sql = "select name,no from student where name=? for update";
            ps = conn.prepareStatement(sql);
            ps.setString(1,"吕全胜");
            rt = ps.executeQuery();
            while(rt.next()){
                System.out.println(rt.getString("name") + rt.getInt("no"));//出错点,忘记输出格式
            }
            conn.commit();
        } catch (SQLException throwables) {
            if(conn!=null){
                try {
                    conn.rollback();
                } catch (SQLException e) {
                    e.printStackTrace();
                }
            }
            throwables.printStackTrace();
        }finally{
            //释放资源
            DBUtil.close(conn,ps,rt);
        }
    }
}
public class JDBCTest14 {
    public static void main(String[] args) {
        Connection conn = null;
        PreparedStatement ps = null;
        try {
            //获取连接
            conn = DBUtil.getConnection();
            String sql = "update student set name=? where id=?";
            ps = conn.prepareStatement(sql);
            ps.setString(1,"吕全胜");
            ps.setInt(2,2);
            int count = ps.executeUpdate();
            System.out.println(count);
        } catch (SQLException throwables) {
            throwables.printStackTrace();
        }finally{
           if(ps!=null){
               try {
                   ps.close();
               } catch (SQLException throwables) {
                   throwables.printStackTrace();
               }
           }
           if(conn!=null){
               try {
                   conn.close();
               } catch (SQLException throwables) {
                   throwables.printStackTrace();
               }
           }
        }
    }
}


 5395
5395

 被折叠的 条评论
为什么被折叠?
被折叠的 条评论
为什么被折叠?
 到【灌水乐园】发言


