


目录
1、下载nginx1.16.1tar包 官网下载地址:nginx: download
6、给nginx配置一个systemctl管理(配置的路径要与nginx安装的路径一致)
1、下载nginx-1.24.0,解压并进入nginx-1.24.0目录
5、将nginx-1.24.0目录下的nginx放到/usr/local/nginx/sbin/目录下
要求:
不停止业务运行,不能影响用户体验,将nginx1.16.1升级为nginx1.24.0。
一、安装编译环境
yum install epel-release         //安装epel扩展源
yum install gcc gcc-c++ make zlib-devel pcre pcre-devel openssl-devel perl-devel perl-ExtUtils-Embed gd-devel geoip-devel -y    //安装编译基础环境
二、编译安装nginx1.16.1
1、下载nginx1.16.1tar包 官网下载地址:nginx: download
2、解压nginx1.16.1包
tar xf nginx-1.16.1.tar.gz
3、进入nginx-1.16.1/目录
cd nginx-1.16.1/4、进行编译配置
 ./configure --prefix=/usr/local/nginx \
--user=nginx \
--group=nginx \
--with-pcre \
--with-http_ssl_module \
--with-http_v2_module \
--with-http_realip_module \
--with-http_addition_module \
--with-http_sub_module \
--with-http_dav_module \
--with-http_flv_module \
--with-http_mp4_module \
--with-http_gunzip_module \
--with-http_gzip_static_module \
--with-http_random_index_module \
--with-http_secure_link_module \
--with-http_stub_status_module \
--with-http_auth_request_module \
--with-http_image_filter_module \
--with-http_slice_module \
--with-mail \
--with-threads \
--with-file-aio \
--with-stream \
--with-mail_ssl_module \
--with-stream_ssl_module \
--with-http_geoip_module          \
--with-http_geoip_module=dynamic  \
--with-http_sub_module            \
--with-http_dav_module            \
--with-http_flv_module            \
--with-http_mp4_module            \
--with-http_gunzip_module         \
--with-http_gzip_static_module    \
--with-http_auth_request_module   \
--with-http_random_index_module   \
--with-http_secure_link_module    \
--with-http_degradation_module    \
--with-http_slice_module          \
--with-http_stub_status_module
5、编译安装
make && make install6、给nginx配置一个systemctl管理(配置的路径要与nginx安装的路径一致)
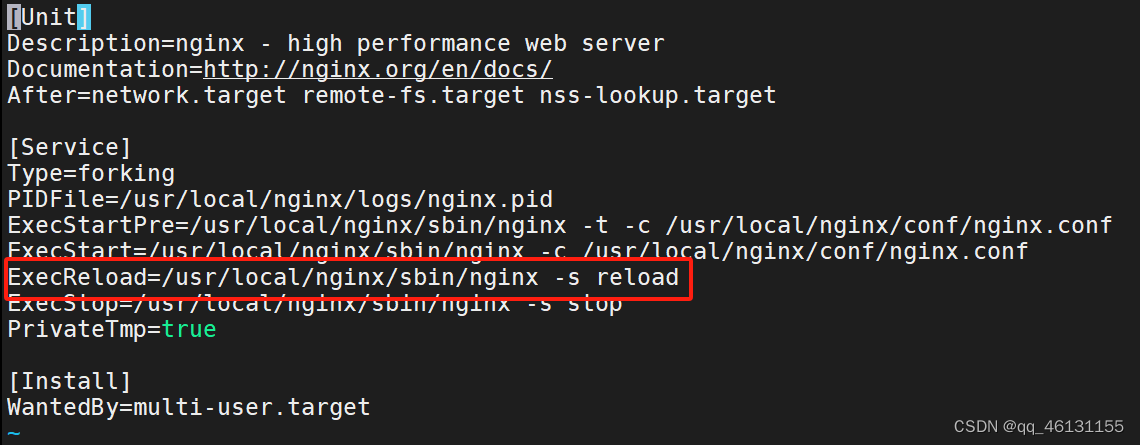
vim /usr/lib/systemd/system/nginx.service

[Unit]
Description=nginx - high performance web server
Documentation=http://nginx.org/en/docs/
After=network.target remote-fs.target nss-lookup.target

[Service]
Type=forking
PIDFile=/usr/local/nginx/logs/nginx.pid
ExecStartPre=/usr/local/nginx/sbin/nginx -t -c /usr/local/nginx/conf/nginx.conf
ExecStart=/usr/local/nginx/sbin/nginx -c /usr/local/nginx/conf/nginx.conf
ExecReload=/usr/local/nginx/sbin/nginx -S reload
ExecStop=/usr/local/nginx/sbin/nginx -s stop
PrivateTmp=true

[Install]
WantedBy=multi-user.target
7、启动nginx
systemctl start nginxps:如果启动失败,大概率是因为没有创建nginx用户
创建用户nginx,然后就可以正常启动nginx了
useradd -s /sbin/nologin nginx二、安装nginx1.24.0
1、下载nginx-1.24.0,解压并进入nginx-1.24.0目录
tar xf nginx-1.24.0.tar.gz
cd nginx-1.24.0/
2、将nginx-1.16.1配置的编译文件复制
[root@web03 nginx-1.24.0]# ./configure --prefix=/usr/local/nginx \
> --user=nginx \
> --group=nginx \
> --with-pcre \
> --with-http_ssl_module \
> --with-http_v2_module \
> --with-http_realip_module \
> --with-http_addition_module \
> --with-http_sub_module \
> --with-http_dav_module \
> --with-http_flv_module \
> --with-http_mp4_module \
> --with-http_gunzip_module \
> --with-http_gzip_static_module \
> --with-http_random_index_module \
> --with-http_secure_link_module \
> --with-http_stub_status_module \
> --with-http_auth_request_module \
> --with-http_image_filter_module \
> --with-http_slice_module \
> --with-mail \
> --with-threads \
> --with-file-aio \
> --with-stream \
> --with-mail_ssl_module \
> --with-stream_ssl_module \
> --with-http_geoip_module          \
> --with-http_geoip_module=dynamic  \
> --with-http_sub_module            \
> --with-http_dav_module            \
> --with-http_flv_module            \
> --with-http_mp4_module            \
> --with-http_gunzip_module         \
> --with-http_gzip_static_module    \
> --with-http_auth_request_module   \
> --with-http_random_index_module   \
> --with-http_secure_link_module    \
> --with-http_degradation_module    \
> --with-http_slice_module          \
> --with-http_stub_status_module
3、执行make,不要make install
[root@web03 nginx-1.24.0]# make
4、移动当前版本的nginx文件
[root@web03 ~]# cd /usr/local/nginx/sbin/
[root@web03 sbin]# ls
nginx
[root@web03 sbin]# mv nginx /root/
5、将nginx-1.24.0目录下的nginx放到/usr/local/nginx/sbin/目录下
[root@web03 sbin]# mv /root/nginx-1.24.0/objs/nginx /usr/local/nginx/sbin/
[root@web03 sbin]# ls
nginx
[root@web03 sbin]#
6、生成新的nginx master进程
[root@web03 ~]# cd /usr/local/nginx/logs/
[root@web03 logs]# cat nginx.pid
15210
[root@web03 logs]# kill -USR2 15210
[root@web03 logs]# ls
access.log  error.log  nginx.pid  nginx.pid.oldbin
[root@web03 logs]#
可以看到,当前的nginx进程文件自动命名为nginx.pid.oldbin,又生成了一个新的nginx.pid文件
7、平滑停止旧版本的nginx进程
[root@web03 logs]# cat nginx.pid.oldbin
15210
[root@web03 logs]# kill -WINCH 15210
[root@web03 logs]# kill -QUIT 15210
[root@web03 logs]# ls
access.log  error.log  nginx.pid
[root@web03 logs]#
旧版本的nginx进程已经被新版本的nginx进程替代
8、可以看到当前版本已经升级到了1.24.0
[root@web03 logs]# /usr/local/nginx/sbin/nginx -V
nginx version: nginx/1.24.0
built by gcc 4.8.5 20150623 (Red Hat 4.8.5-44) (GCC)
built with OpenSSL 1.0.2k-fips  26 Jan 2017
TLS SNI support enabled
configure arguments: --prefix=/usr/local/nginx --user=nginx --group=nginx --with-pcre --with-http_ssl_module --with-http_v2_module --with-http_realip_module --with-http_addition_module --with-http_sub_module --with-http_dav_module --with-http_flv_module --with-http_mp4_module --with-http_gunzip_module --with-http_gzip_static_module --with-http_random_index_module --with-http_secure_link_module --with-http_stub_status_module --with-http_auth_request_module --with-http_image_filter_module --with-http_slice_module --with-mail --with-threads --with-file-aio --with-stream --with-mail_ssl_module --with-stream_ssl_module --with-http_geoip_module --with-http_geoip_module=dynamic --with-http_sub_module --with-http_dav_module --with-http_flv_module --with-http_mp4_module --with-http_gunzip_module --with-http_gzip_static_module --with-http_auth_request_module --with-http_random_index_module --with-http_secure_link_module --with-http_degradation_module --with-http_slice_module --with-http_stub_status_module
[root@web03 logs]#
9、访问页面测试:输入本机IP
三、升级后出现的问题
1、如果升级之后执行systemctl restart nginx 重启失败,可能是因为配置systemctl启动nginx文件有问题
vim /usr/lib/systemd/system/nginx.service修改配置文件中ExecReload=/usr/local/nginx/sbin/nginx -S reload 将-S改为-s
再次systemctl restart nginx重启就没问题了,搞定!!!!


 7485
7485


 被折叠的 条评论
为什么被折叠?
被折叠的 条评论
为什么被折叠?
 到【灌水乐园】发言


