


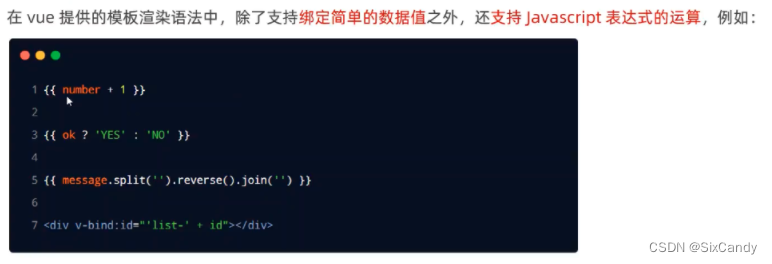
1 内容渲染指令
作用:用来辅助开发者渲染DOM元素的文本内容
- v-text
- {{}}
- v-html
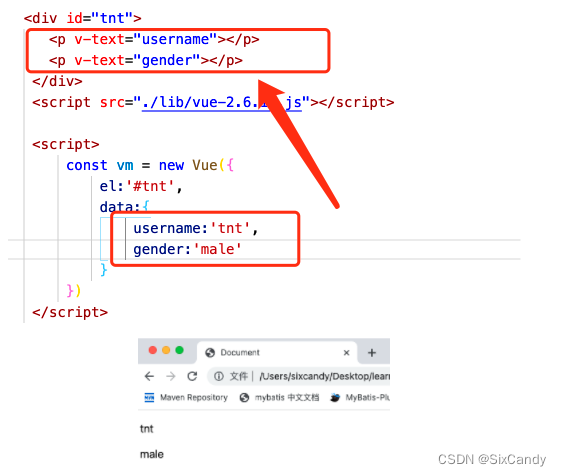
v-text:会覆盖标签内原有的内容(不常用)
 <p v-text="username"></p>
 <p v-text="gender"></p>
{{}}:差值表达式 实际开发中用的最多,不会覆盖原来的值
只可以用在内容节点,不可以用在属性节点
<p>姓名:{{username}}</p>
<p>性别:{{gender}}</p>
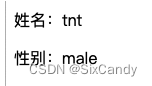
v-html:

<div v-html="info"></div>
2 属性绑定指令
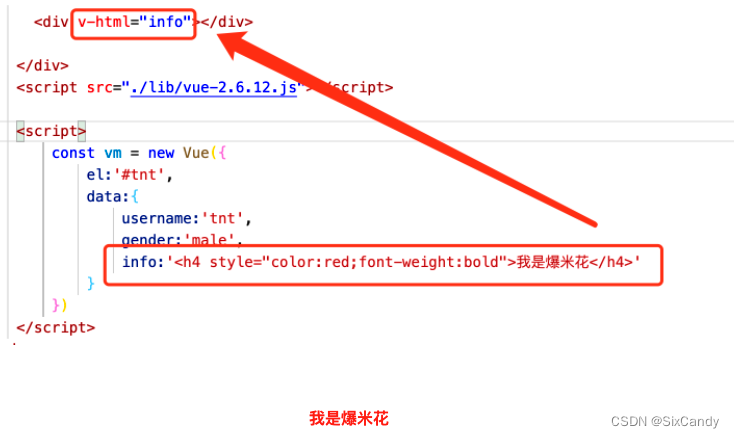
- v-bind:给元素的属性动态绑定属性值
v-bind: 简写 :
<input type="text" v-bind:placeholder="tips">
<!--简写 -->
<input type="text" :placeholder="tips">
拓展:
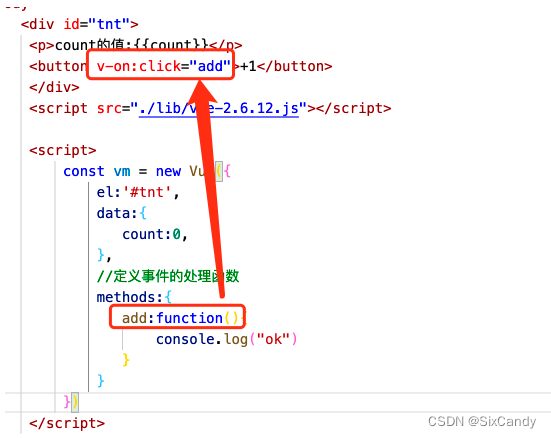
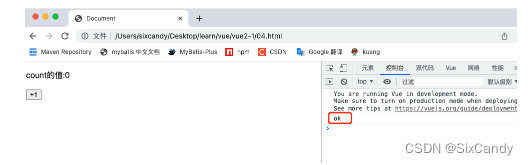
3 事件绑定指令
需求:
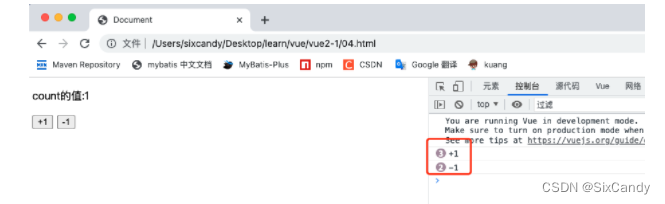
点击+1按钮上面的值增加

v-on:事件绑定
v-on: 简写 @
<button v-on:click="add">+1</button>
测试是否绑定成功:
事件处理函数简写:
add(){
  console.log("+1")
},
  derc(){
    console.log("-1")
  }
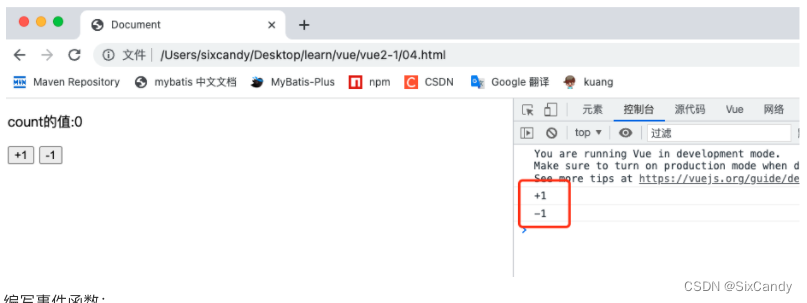
编写事件函数:
add(){
  this.count +=1;
  console.log("+1")
},
derc(){
    this.count -=1;
    console.log("-1")
  }
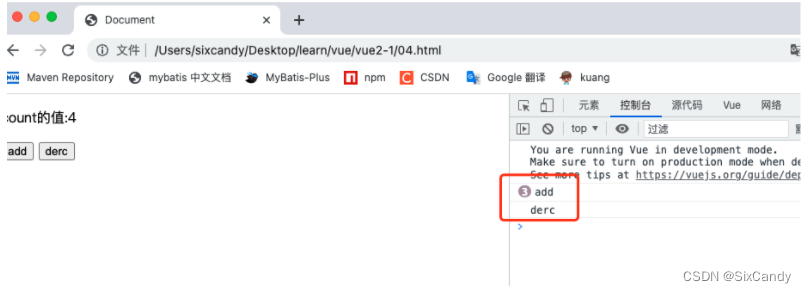
需求:绑定事件传参
<div id="tnt">
  <p>count的值:{{count}}</p>
  <button v-on:click="add(2)">add</button>
  <button v-on:click="derc(2)">derc</button>
</div>
<script src="./lib/vue-2.6.12.js"></script>

<script>
  const vm = new Vue({
    el:'#tnt',
    data:{
      count:0,
    },
    //定义事件的处理函数
    methods:{
      add(n){
        this.count +=n;
        console.log("add")
      },
      derc(n){
        this.count -=n;
        console.log("derc")
      }
    }
  })
</script>
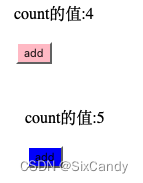
需求:如果count是偶数,则按钮颜色变成粉色;奇数,变成蓝色。
vue提供了内置变量,名字叫**$event**,它就是原生的DOM的事件对象
<div id="tnt">
  <p>count的值:{{count}}</p>
  <button @click="add(1,$event)">add</button>
</div>
<script src="./lib/vue-2.6.12.js"></script>

<script>
  const vm = new Vue({
    el:'#tnt',
    data:{
      count:0,
    },
    //定义事件的处理函数
    methods:{
      add(n,e){//e是形参叫什么都可以,但是上面必须是$event
        this.count +=1;
        console.log("add");
        //判断this.count的值是否为偶数
        if(this.count%2 === 0){
          //偶数
          e.target.style.backgroundColor = 'pink'
        }else{
          //奇数
          e.target.style.backgroundColor = 'blue'
        }
      },
    }
  })
</script>
事件修饰符

实例:
<div>
  <a href="http://www.baidu.com" @click.prevent="show">跳转到百度</a>
</div>
<script src="./lib/vue-2.6.12.js"></script>

<script>
  const vm = new Vue({
    el:'#tnt',
    data:{
      count:0,
    },
    //定义事件的处理函数
    methods:{
      show(e){
        // e.preventDefault() 原来的的方法
        console.log('点击了链接')
      }
    }
  })
</script>

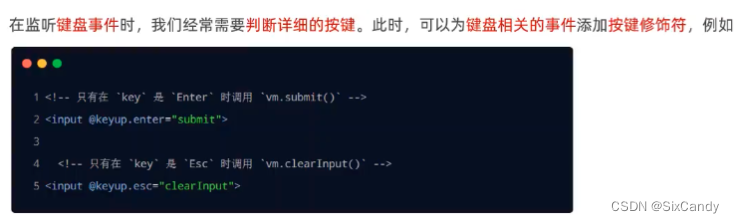
按键修饰符
<div id="tnt">
  <input type="text" @keyup.esc="clearInput">
</div>
<script src="./lib/vue-2.6.12.js"></script>

<script>
  const vm = new Vue({
    el:'#tnt',
    data:{
      count:0,
    },
    //定义事件的处理函数
    methods:{
      add(n,e){
        this.count +=1;
        console.log("add");
        //判断this.count的值是否为偶数
        if(this.count%2 === 0){
          //偶数
          e.target.style.backgroundColor = 'pink'
        }else{
          //奇数
          e.target.style.backgroundColor = 'blue'
        }
      },
      show(e){
        // e.preventDefault()
        console.log('点击了链接')
      },
      clearInput(e){
        console.log('点击')
        e.target.value =''
      }
    }
  })
</script>
4 双向绑定指令
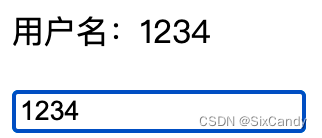
- v-model双向数据绑定指令,用于辅助开发者在不操作DOM的前提下,快速获取表单的数据
<div id="tnt">
  <p>用户名:{{username}}</p>
  <input type="text" v-model="username">
</div>

<script src="./lib/vue-2.6.12.js"></script>
<script>
  const vm = new Vue({
    el:'#tnt',
    data:{
      username:'时代少年团'
    }
  })
</script>
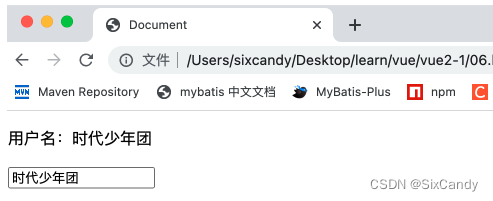
当在input修改值当时候上面的p标签内容也会被修改
v-model指令运用场景:
input、textarea、select
v-model的修饰符:

<div id="tnt">
  <input type="text" v-model.number="n1"> +<input type="text" v-model.number="n2"> =<span>{{ n1+n2 }}</span>
</div>

<script src="./lib/vue-2.6.12.js"></script>
<script>
  const vm = new Vue({
    el:'#tnt',
    data:{
      n1:1,
      n2:2,
    }
  })
</script>

如果不加.number的话,改变input的值变化为变成字符串,结果是字符串拼接的结果
<div id="tnt">
  <input type="text" v-model.trim="username">
  <button @click="got">获取用户名</button>
</div>
 <script src="./lib/vue-2.6.12.js"></script>
<script>
  const vm = new Vue({
    el:'#tnt',
    data:{
      username:'时代少年团',
    },
    methods:{
      got(){
        console.log(`用户名:“${this.username}”`)
      }
    }
  })
</script>
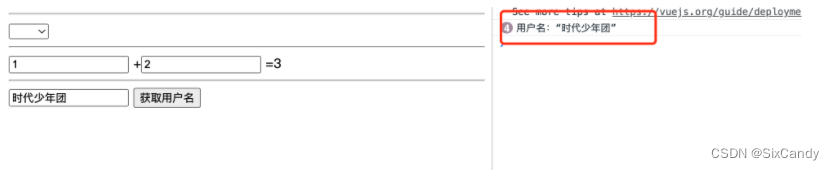
用了.trim修饰符之后,当input里面输入的值有空格的时候,输出会自动去掉空格
<div id="tnt">
  <input type="text" v-model.lazy="username">
</div>
 <script src="./lib/vue-2.6.12.js"></script>
<script>
  const vm = new Vue({
    el:'#tnt',
    data:{
      username:'时代少年团',
    },
  })
</script>

用了.lazy修饰符之后,当用户确认输入之后才会双向绑定修改的数据
5 条件渲染指令
用来辅助开发真按需控制DOM的显示与隐藏
- v-if
- v-show
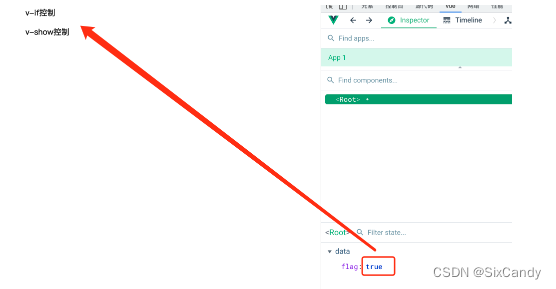
v-if 隐藏元素是动态删除元素,v-show隐藏是改变元素的样式display:none
<div id="tnt">
  <p v-if="flag">v-if控制</p>
  <p v-show="flag">v-show控制</p>
</div>
<script src="./lib/vue-2.6.12.js"></script>
<script>
  const vm = new Vue({
    el:'#tnt',
    data:{
      flag:true
    }
  })
</script>
v-if的拓展:
<div id="tnt">
  <div v-if="type === 'A'">优秀</div>
  <div v-else-if="type === 'B'">良好</div>
  <div v-else-if="type === 'C'">一般</div>
  <div v-else="type === 'D'">合格</div>
</div>
<script src="./lib/vue-2.6.12.js"></script>
<script>
  const vm = new Vue({
    el:'#tnt',
    data:{
      type:'A'
    }
  })
</script>
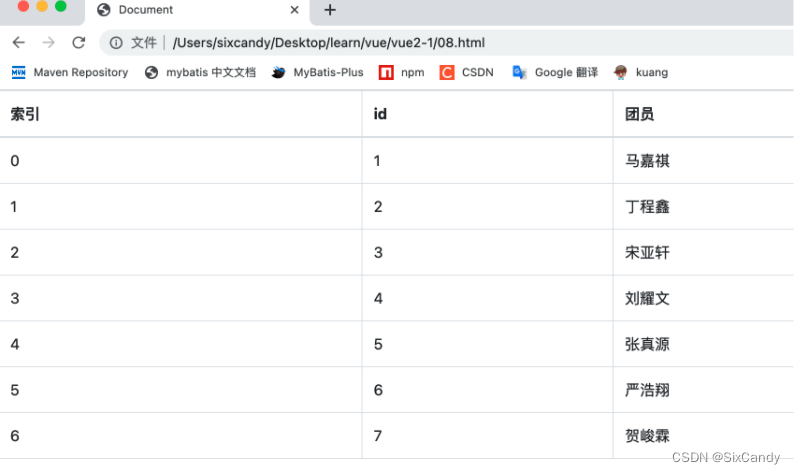
6 列表渲染指令

<div id="tnt">
  <table class="table table-bordered table-hover">
    <head>
      <th>索引</th>
      <th>id</th>
      <th>团员</th>
    </head>
    <tbody>
      <tr v-for="(item,index) in list">
        <td>{{index}}</td>
        <td>{{item.id}}</td>
        <td>{{item.name}}</td>
      </tr>
    </tbody>
  </table>
</div>
<script src="./lib/vue-2.6.12.js"></script>
<script>
  const vm = new Vue({
    el:'#tnt',
    data:{
      list:[
        {id:1,name:'马嘉祺'},
        {id:2,name:'丁程鑫'},
        {id:3,name:'宋亚轩'},
        {id:4,name:'刘耀文'},
        {id:5,name:'张真源'},
        {id:6,name:'严浩翔'},
        {id:7,name:'贺峻霖'},
      ]
    }
  })
</script>
官方建议:用v-for指令,那么一定要用:key属性,并且把ID用做key的值
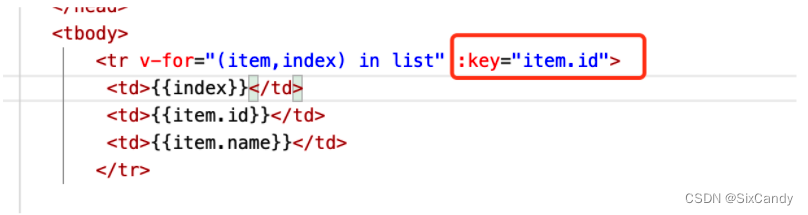
key的值类型:数字或者字符串,key的值不可以重复
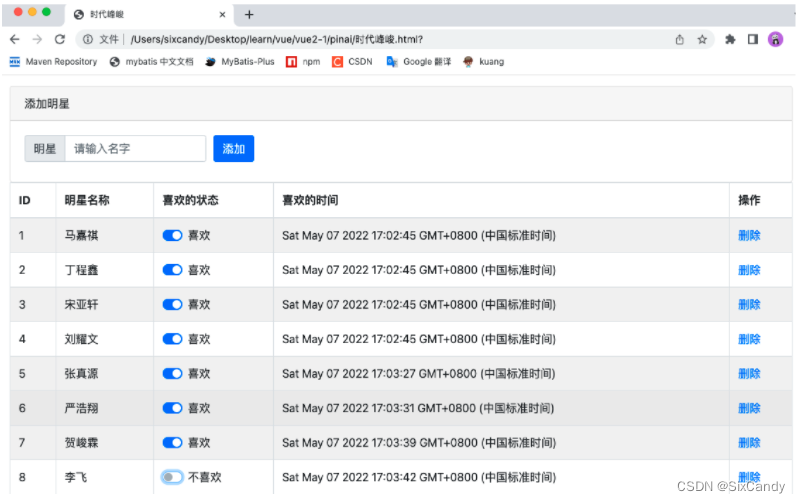
7 自制sdfj网站案例总结
<!DOCTYPE html>
<html lang="en">

<head>
  <meta charset="UTF-8">
  <meta http-equiv="X-UA-Compatible" content="IE=edge">
  <meta name="viewport" content="width=device-width, initial-scale=1.0">
  <title>时代峰峻</title>
  <link rel="stylesheet" href="./lib/bootstrap.css">
  <link rel="stylesheet" href="./css/brandlist.css">
</head>

<body>

  <div id="app">
    <!-- 卡片区域 -->
    <div class="card">
      <div class="card-header">
        添加明星
      </div>
      <div class="card-body">
        <!-- 添加明星的表单区域  当提交为空时不进行提交刷新页面-->
        <form @submit.prevent="add">
          <div class="form-row align-items-center">
            <div class="col-auto">
              <div class="input-group mb-2">
                <div class="input-group-prepend">
                  <div class="input-group-text">明星</div>
                </div>
                <input type="text" class="form-control" placeholder="请输入名字" v-model.trim="mingzi">
              </div>
            </div>
            <div class="col-auto">
              <button type="submit" class="btn btn-primary mb-2">添加</button>
            </div>
          </div>
        </form>
      </div>
    </div>

    <!-- 表格区域 -->
    <table class="table table-bordered table-hover table-striped">
      <thead>
        <tr>
          <th scope="col">ID</th>
          <th scope="col">明星名称</th>
          <th scope="col">喜欢的状态</th>
          <th scope="col">喜欢的时间</th>
          <th scope="col">操作</th>
        </tr>
      </thead>
      <tbody>
        <tr v-for="item in pinpai" :key="item.id">
          <td>{{item.id}}</td>
          <td>{{item.name}}</td>
          <td>
            <div class="custom-control custom-switch">
              <input v-model="item.status" type="checkbox" class="custom-control-input" :id="'cd'+item.id">
              <label v-if="item.status" class="custom-control-label" :for="'cd'+item.id">喜欢</label>
              <label v-else class="custom-control-label" :for="'cd'+item.id">不喜欢</label>
            </div>
          </td>
          <td>{{item.time}}</td>
          <td>
            <a href="javascript:;" @click="remove(item.id)">删除</a>
          </td>
        </tr>
      </tbody>
    </table>
  </div>

  <script src="./lib//vue-2.6.12.js"></script>
  <script>
    const vm = new Vue({
      el:'#app',
      data:{
        mingzi:'',
        //下一个可用的id
        nextId:5,
        pinpai:[
          {id:1,name:'马嘉祺',status:true,time:new Date()},
          {id:2,name:'丁程鑫',status:true,time:new Date()},
          {id:3,name:'宋亚轩',status:true,time:new Date()},
          {id:4,name:'刘耀文',status:true,time:new Date()},
        ]
      },
      methods:{
        remove(id){
          //  console.log('remove')
           this.pinpai = this.pinpai.filter(item => item.id !== id)
        },
        add(){
          //若输入空时 不打印
          if(this.mingzi ===''){
            alert('请输入名字')
            return
          }
          //执行添加
          //1.先把要添加的明星,整理出来
          const obj ={
            id:this.nextId,
            name:this.mingzi,
            status:true,
            time:new Date()
          }
          //2.往this.list数组中push上一步的对象
          this.pinpai.push(obj)
          //3.清空this.mingzi,让nextId自增
          this.mingzi=''
          this.nextId++
          // console.log(this.mingzi)
        }
      }
    })
  </script>
</body>
</html>


 946
946


 被折叠的 条评论
为什么被折叠?
被折叠的 条评论
为什么被折叠?
 到【灌水乐园】发言


