


 本文介绍了如何在SpringBoot项目中集成MyBatisPlus和Druid数据源,配置核心配置文件,定义数据表,以及实现分页显示。还涉及了使用Postman测试接口,以及如何通过Redis进行缓存优化,包括使用编程方式和注解方式实现缓存管理。此外,讨论了RESTfulAPI的设计和使用,以及分页查询的实现。
一、添加依赖
代码如下:
<?xml version="1.0" encoding="UTF-8"?>
<project xmlns="http://maven.apache.org/POM/4.0.0"
xmlns:xsi="http://www.w3.org/2001/XMLSchema-instance"
xsi:schemaLocation="http://maven.apache.org/POM/4.0.0
https://maven.apache.org/xsd/maven-4.0.0.xsd">
<modelVersion>4.0.0</modelVersion>
<groupId>com.yan</groupId>
<artifactId>product</artifactId>
<version>0.0.1-SNAPSHOT</version>
<name>product</name>
<description>Demo project for Spring Boot</description>
<properties>
<java.version>1.8</java.version>
<project.build.sourceEncoding>UTF-8</project.build.sourceEncoding>
<project.reporting.outputEncoding>UTF-
8</project.reporting.outputEncoding>
<spring-boot.version>2.6.13</spring-boot.version>
</properties>
<dependencies>
<!-- 表现层 -->
<dependency>
<groupId>org.springframework.boot</groupId>
<artifactId>spring-boot-starter-web</artifactId>
</dependency>
<!--持久层 -->
<dependency>
<groupId>com.baomidou</groupId>
<artifactId>mybatis-plus-boot-starter</artifactId>
<version>3.5.3.1</version>
</dependency>
<dependency>
<groupId>com.alibaba</groupId>
<artifactId>druid-spring-boot-starter</artifactId>
<version>1.2.18</version>
</dependency>
<dependency>
<groupId>com.mysql</groupId>
<artifactId>mysql-connector-j</artifactId>
<scope>runtime</scope>
</dependency>
<!--- 其它工具类 -->
<dependency> <!-- 支持热启动 -->
<groupId>org.springframework.boot</groupId>
<artifactId>spring-boot-devtools</artifactId>
<scope>runtime</scope>
<optional>true</optional>
</dependency>
<dependency><!-- 简化值bean的编码 -->
<groupId>org.projectlombok</groupId>
<artifactId>lombok</artifactId>
<optional>true</optional>
</dependency>
<!-- 单元测试 -->
<dependency>
<groupId>org.springframework.boot</groupId>
<artifactId>spring-boot-starter-test</artifactId>
<scope>test</scope>
</dependency>
</dependencies>
<dependencyManagement>
<dependencies>
<dependency>
<groupId>org.springframework.boot</groupId>
<artifactId>spring-boot-dependencies</artifactId>
<version>${spring-boot.version}</version>
<type>pom</type>
<scope>import</scope>
</dependency>
</dependencies>
</dependencyManagement>
<build>
<plugins>
<plugin>
<groupId>org.apache.maven.plugins</groupId>
<artifactId>maven-compiler-plugin</artifactId>
<version>3.10.1</version>
<configuration>
<source>1.8</source>
<target>1.8</target>
<encoding>UTF-8</encoding>
</configuration>
</plugin>
<plugin>
<groupId>org.springframework.boot</groupId>
<artifactId>spring-boot-maven-plugin</artifactId>
<version>${spring-boot.version}</version>
<configuration>
<mainClass>com.yan.ProductApplication</mainClass>
<skip>true</skip>
</configuration>
<executions>
<execution>
<id>repackage</id>
<goals>
<goal>repackage</goal>
</goals>
</execution>
</executions>
</plugin>
</plugins>
</build>
</project>
二、添加核心配置
我查了一下资料一般使用的是yaml格式,而且它对应的核心配置文件是resources/application.yml
# 默认使用服务器为tomcat
server:
port: 8080
# 数据库连接池的配置
spring:
datasource:
type: com.alibaba.druid.pool.DruidDataSource
driver-class-name: com.mysql.cj.jdbc.Driver
url: jdbc:mysql:///test?serverTimezone=UTC
username: root
password: 123456
# 和连接池产品紧密相关的配置信息,一般参照旧有项目进行配置,如果没有则使用默认即可
druid:
max-active: 10
min-idle: 3
# MP相关配置
mybatis-plus:
mapper-locations: classpath:mapper/*.xml
configuration:
log-impl: org.apache.ibatis.logging.stdout.StdOutImpl
三、定义数据表
从下到上或者从上到下都行,但是一般采用一个方法是最好的,不可以同时采用两个方法!!!!
create table if not exists tbl_catalog(
id bigint primary key auto_increment,
name varchar(32) not null unique,
memo varchar(100)
) engine=innodb default charset utf8;
create table if not exists tbl_produce(
id bigint primary key auto_increment,
name varchar(32) not null,
catalog_id bigint,
price numeric(8,2),
store_num int
)engine=innodb default charset utf8;
下面是我总结的一些问题:
- 最近看到许多面试问题都有是auto_increment的处理,例如auto_increment到达上限继续插入数据 MySQL如何处理... ...
- 针对类目的处理的方法我查到了有两种解决方法:
如果可以确定三级分类,就可以创建类目大表、类目小表和产品表;
如果类目等级无法提前确定或者分类层数大于3
,考虑使用自关联的方式定义类目表。
四、反向映射
4.1 创建数据源

4.2 执行MyBatisX
4.3 检查生成内容
如果其中有不对的地方,要进行修改!!
4.3.1 主键生成策略
- AUTO:id自增
- NONE: 不设置id生成策略
- INPUT:用户手工输入id
- ASSIGN_ID:雪花算法生成id
- ASSIGN_UUID:以UUID生成算法作为id生成策略
4.3.2 雪花算法生成
雪花算法生成的是一个64bit大小的整数,用于分布式应用中,如果对数据库进行 了横 切
,如何保
证
id
值的唯一性。
- 41bit的时间戳:用来记录时间戳,毫秒级
- 10bit的工作机器id:用来记录工作机器id12bit的序列号:占用12bit,每个节点每毫秒0开始不 断累加,最多可以累加到4095,一共可以产 生4096个ID
- ASSIGN_UUID :ASSIGN_UUID是自动生成一个不重复的、长度为32字符长的字符串,也能在分布式系统中使用。
4.4 编写控制器
我采用的是编程的方式进行开发,下一步应该编写控制器,由控制类的定义过程中总结出业
务类需要的方法。
RESTful
是一种网络应用程序的设计风格和开发方式,基于
HTTP
,可以使用
XML
格式定义或
JSON
格式定 义。RESTFUL
适用于移动互联网厂商作为业务接口的场景,实现第三方
OTT
调用移动网络资源的功能,动作类型为新增、变更、删除所调用资源。
4.4.1 RESTful的实现等级
- 0级:是传统的RPC,基于SOAP的WS,调用的服务名,参数放在HTTP协议的body里面,同时必须以 POST方式提交,我必须清楚知道所有服务,子服务,及其参数的信息,并且需要知道各种服务的不同点。
- 1级:利用resource概念,把所有服务都抽取成resource概念,从body中提取到header里,这样 做的好处就是如果知道一个服务地址,不需知道具体服务是什么,依照资源的惯例就访问 到服务,比如查询id=1的书籍信息时使用路径/books/1。
- 2级:利用HTTP动词,HTTP定义了4种动词,GET获取服务器资源,POST在服务器上创建新资 源,PUT更改服务器上资源,DELETE删除服务器上资源,任何操作都可以看成增删改查,所以利 用标准的http verb加上resource(/book/1)就能准确地操作资源,当你不知道服务具体是什么的 时候也可以轻易按照惯例访问到服务,然而服务供应商更改服务也需要遵循惯例,不会像RPC那样 轻易更改服务接口。
- 3级:最高级别,HATEOS超媒体既应用状态引擎。对于任何服务都存在很多子服务,只需要知道第一个服务的入口,便可以依据服务返回结构的自描述性得到下一个服务的入口,这样在服务供应商修改服务的时候,不会影响到客户端的调用。
在
RESTful
应用中需要和前端充分沟通,建议通信的数据规范代码如下:
@Data
public class JsonResult implements Serializable {
private int code;//自定义的响应状态码,不是http规范中的响应码,一般用于给前端更详细的信
息
private Boolean success; //可有可无,给前端一个简单的响应状态提示
private String message; //服务器端生成的响应提示信息
private Object data;//响应数据
}
4.4.2 控制器类的定义
@RestController // @Controller+@ResponseBody
@RequestMapping("/catalogs")
public class CatalogController {
@Autowired //@Resource
private CatalogService catalogService;
@GetMapping
public JsonResult getAllCatalogs(){
List<Catalog> catalogList= catalogService.list();
return JsonResult.success("所有类目列表",catalogList);
}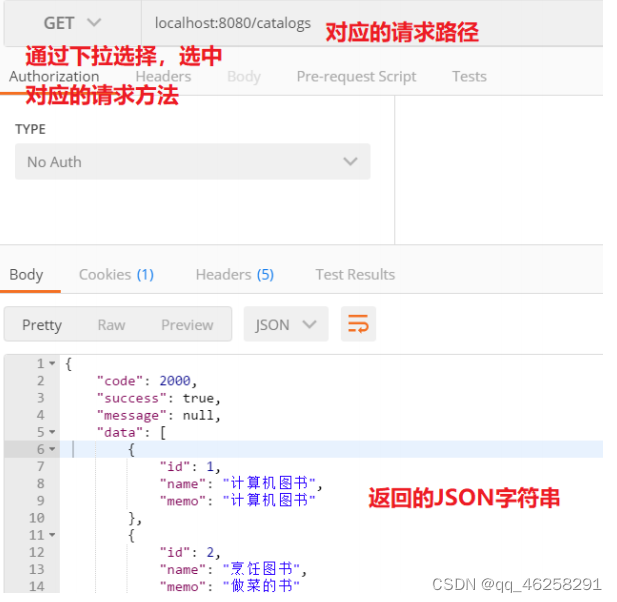
}五、使用Postman测试
插入测试数据 :
insert into tbl_catalog values(1,'计算机图书','计算机图书'),(2,'烹饪图书','做菜的书'),
(3,'音乐图书','教你音乐入门');
5.1 postman的用法
六、分页显示
分页操作可以利用MP中提供的分页插件实现,修改MP的配置类则引入分页插件
@MapperScan(basePackages = "com.xu.mapper") //注册自动扫描mapper接口,完成mapper接
口的注册
@SpringBootConfiguration //用于声明当前类时一个配置类
public class MybatisPlusConfig {
@Bean
public MybatisPlusInterceptor mybatisPlusInterceptor(){
MybatisPlusInterceptor interceptor=new MybatisPlusInterceptor();
interceptor.addInnerInterceptor(new
PaginationInnerInterceptor(DbType.MYSQL));
return interceptor;
}
}
控制器类定义需要传递分页参数。传递分页参数的值
bean
有多种写法。
@Data //主要用于供前端实现分页导航
public class PageBean implements Serializable {
private long pageNum;//当前页面值
private long maxPage;//最大页面值
private long rowsNum;//总行数
private long rowsPerPage=15;//每页行数
//另外写法有:添加属性Object data存储查询结果集
}
控制器类
注意:这里新增业务方法
listByPage
目的在于前后可以使用
redis
缓存!!!
@RestController // @Controller+@ResponseBody
@RequestMapping("/catalogs")
public class CatalogController {
@Autowired //@Resource
private CatalogService catalogService;
@GetMapping("/show")
public JsonResult getByPage(@RequestParam(defaultValue = "1") Integer
page,@RequestParam(defaultValue = "3") Integer size){
PageBean pages=new PageBean();
pages.setPageNum(page);
pages.setRowsPerPage(size);
List<Catalog> catalogList= catalogService.listByPage(pages);
Map<String,Object> map=new HashMap<>();
map.put("pages",pages);
map.put("data",catalogList);
return JsonResult.success("加载成功",map);
}
}
修改业务方法的实现
实际上具体的分页实现很简单,就是在调用查询之前构建
IPage
类型的对象,然后调用
Mapper
接口中所提供的支持Page
参数的方法即可
@Service
public class CatalogServiceImpl extends ServiceImpl<CatalogMapper, Catalog>
implements CatalogService{
@Override
public List<Catalog> listByPage(PageBean pages) {
List<Catalog> res=new ArrayList<>();
if(pages==null|| pages.getRowsPerPage()<1){
//查询所有
res=this.getBaseMapper().selectList(null);
}else {
//分页查询
if(pages.getPageNum()<1)
pages.setPageNum(1);
Page<Catalog> pageInfo=new Page<>
(pages.getPageNum(),pages.getRowsPerPage());
pageInfo=this.getBaseMapper().selectPage(pageInfo,null);
res=pageInfo.getRecords();
pages.setPageNum(pageInfo.getCurrent());
pages.setRowsNum(pageInfo.getTotal());
pages.setMaxPage(pageInfo.getPages());
}
return res;
}
}
使用
postman
测试验证
生成的响应数据为
JSON
格式的字符串
{
"code": 2000,
"success": true,
"message": null,
"data": {
"pages": {
"pageNum": 1,
"maxPage": 2,
"rowsNum": 3,
"rowsPerPage": 2
},
"data": [
{
"id": 1,
"name": "计算机图书",
"memo": "计算机图书"
},
{
"id": 2,
"name": "烹饪图书",
"memo": "做菜的书"
}
]
}
}七、redis缓存开发
我发现针对类目信息发现一般很少修改,但是经常需要执行查询,例如添加商品等操作。比较适合使用redis缓存数据,通过浪费内存以减少数据库的查询此时,从而提供执行性能,应对更高的并发性需求。
redis
缓存开发一般有
2
种方式,使用注解【推荐】和使用自定义编程实现。缓存可以添加在不同的层面上,一般针对controller
缓存,多使用本地缓存
Ehcache
;如果针对业务层缓存,一般使用支持分布式的Redis;也可以在持久层添加缓存,例如开启的
MyBatis
的缓存。
7.1、首先添加依赖
<!-- 业务层缓存 -->
<dependency>
<groupId>org.springframework.boot</groupId>
<artifactId>spring-boot-starter-data-redis</artifactId>
</dependency>
<dependency>
<groupId>org.apache.commons</groupId>
<artifactId>commons-pool2</artifactId>
</dependency>7.2、添加配置
@SpringBootConfiguration
public class MyRedisConfig {
@Bean
public RedisTemplate<String, Object> redisTemplate(RedisConnectionFactory
factory) {
RedisTemplate<String, Object> template = new RedisTemplate<>(); //创建模板
类对象
RedisSerializer<String> redisSerializer = new StringRedisSerializer();//
创建String序列化类
Jackson2JsonRedisSerializer jackson2JsonRedisSerializer = new
Jackson2JsonRedisSerializer(Object.class); //指定使用jackson工具负责具体的序列化操作
ObjectMapper om = new ObjectMapper(); //创建jackson的核心api的 ObjectMapper
,将bean,list,map,数组等等转成字符串
om.setVisibility(PropertyAccessor.ALL, JsonAutoDetect.Visibility.ANY);
// 使用objectmapper设置bean的属性,修饰符
om.enableDefaultTyping(ObjectMapper.DefaultTyping.NON_FINAL); //设置默认
类型
om.disable(SerializationFeature.WRITE_DATES_AS_TIMESTAMPS); //设置将本地时
间转成字符串
jackson2JsonRedisSerializer.setObjectMapper(om); //将核心api objectmapper
设置给jackson
template.setConnectionFactory(factory); // 通过工厂得到连接对象
template.setKeySerializer(redisSerializer); //设置key序列化方式: 转成字符串
template.setValueSerializer(jackson2JsonRedisSerializer); // 设置value序列
化: 字符串
template.setHashValueSerializer(jackson2JsonRedisSerializer); // value
hashmap序列化
return template;
}
}
添加相关配置:
spring:
redis:
host: localhost
port: 6379
lettuce:
pool:
max-active: 8
min-idle: 37.3、操作Redis数据库
通过
spring
框架提供的模板类
RedisTemplate
调用
API
操作
Redis
数据库;
在使用
redis
缓存之前应该充分沟通,定义一个
key
的标准,不能随便起名字!!!!
@Service
public class CatalogServiceImpl extends ServiceImpl<CatalogMapper, Catalog>
implements CatalogService {
@Autowired
private RedisTemplate redisTemplate;
private ThreadLocalRandom random = ThreadLocalRandom.current();
@Override
public List<Catalog> listByPage(PageBean pages) {
List<Catalog> res = new ArrayList<>();
if (pages == null || pages.getRowsPerPage() < 1) {
//查询所有,避免缓存穿透,索引允许存储数据为空集
if (redisTemplate.hasKey("catalog::all")) {
//如果在具体开发种比较倾向于使用常量的方式
Object obj = redisTemplate.opsForValue().get("catalog::all");
if (obj != null && obj instanceof List)
res = (List<Catalog>) obj;
} else {
res = this.getBaseMapper().selectList(null);
//为了避免雪崩问题,所以生存周期引入随机数
int kk = 100 + random.nextInt(100);
redisTemplate.opsForValue().set("catalog::all", res,
Duration.ofSeconds(kk));
}
} else {
//分页查询。实际上具体应用中不一定针对分页数据进行缓存 catalog::page::size
if (pages.getPageNum() < 1)
pages.setPageNum(1);
String key = "catalog::" + pages.getPageNum() + "::" +
pages.getRowsPerPage();
if (this.redisTemplate.hasKey(key)) {
Object obj = redisTemplate.opsForValue().get(key);
if (obj != null && obj instanceof List)
res = (List<Catalog>) obj;
if(this.redisTemplate.hasKey(key+"::page")){
obj = redisTemplate.opsForValue().get(key+"::page");
if (obj != null && obj instanceof PageBean) {
PageBean tmp = (PageBean) obj;
BeanUtils.copyProperties(tmp,pages);
}
}
}
if (res == null || res.size() < 1) {
Page<Catalog> pageInfo = new Page<>(pages.getPageNum(),
pages.getRowsPerPage());
pageInfo = this.getBaseMapper().selectPage(pageInfo, null);
res = pageInfo.getRecords();
pages.setPageNum(pageInfo.getCurrent());
pages.setRowsNum(pageInfo.getTotal());
pages.setMaxPage(pageInfo.getPages());
int kk = 100 + random.nextInt(100); //随机数时长用于避免雪崩
redisTemplate.opsForValue().set(key, res,
Duration.ofSeconds(kk));
redisTemplate.opsForValue().set(key+"::page", pages,
Duration.ofSeconds(kk));
}
}
return res;
}
}
最后使用
postman
测试,可以在控制台上查看是否有对应的
SQL
语句输出来 判断缓存是否生效
八、注解开发
通过查询,注解提供了更声明式和方便的方式,而编码方式允许更精准的控制和定制
在
Java
中,当
Redis
充当缓存时,使用注解的方式是很常见的,同时也非常方便。
Spring Framework
提供了一种基于注解的缓存机制,称为Spring Cache
。通过在方法上添加注解,我可以指定缓存的行为,例如缓存的名称、缓存的过期时间等。使用注解的方式,可以在代码中更直接一点的定义缓存逻辑,就不用手写来编写代码了!
Spring Cache
提供了多个注解,最常用的是
@Cacheable
、
@CachePut
和
@CacheEvict
。
- @Cacheable 用于标记方法应该被缓存
- @CachePut 用于将方法的结果存储到缓存中
- @CacheEvict 用于从缓存中删除数据
8.1、添加依赖
<dependency>
<groupId>org.springframework.boot</groupId>
<artifactId>spring-boot-starter-cache</artifactId>
</dependency>
<dependency>
<groupId>org.springframework.boot</groupId>
<artifactId>spring-boot-starter-data-redis</artifactId>
</dependency>
8.2、添加配置
spring.redis.host=localhost
spring.redis.port=6379
spring.cache.type=redis
8.3、定义配置类
@EnableCaching
@SpringBootConfiguration
public class MyRedisConfig {
@Bean
public RedisCacheManager redisCacheManager(RedisConnectionFactory factory) {
GenericJackson2JsonRedisSerializer genericJackson2JsonRedisSerializer =
new GenericJackson2JsonRedisSerializer();
StringRedisSerializer stringRedisSerializer = new
StringRedisSerializer();
RedisCacheConfiguration config =
RedisCacheConfiguration.defaultCacheConfig().entryTtl(Duration.ofSeconds(100))
.serializeKeysWith(RedisSerializationContext.SerializationPair.fromSerializer(st
ringRedisSerializer))
.serializeValuesWith(RedisSerializationContext.SerializationPair.fromSerializer(
genericJackson2JsonRedisSerializer));
return RedisCacheManager.builder(factory)
.cacheDefaults(config).build();
}
}
8.4、添加注解
在方法上添加对应的注解,就可以达到缓存的目的
@Service
public class UserServImpl implements IUserServ{
@Cacheable(value = "users",key = "#id") 设置所使用的key值为users::传入的参数id值
public User load(Long id) {
System.out.println("执行业务逻辑");
User user=new User();
user.setId(99L);
user.setUsername("zhangsan");
user.setPassword("123456");
return user;
}
}8.5、注解Cacheable
@Cacheable
注解主要针对方法配置的,能够根据方法的请求参数和运行结果进行缓存,比如如果缓存中存在该值,则使用缓存数据, 如果不在缓存中,则执行业务逻辑处理,并将执行结果存入缓存。
- value/cacheNames:指定缓存空间的名称,比配属性。可二选一使用。
- key:指定缓存中数据的key,默认使用方法参数值,也可使用SpEL表达式
- keyGenerator:指定缓存数据的key的生成器,与key属性二选一使用
- cacheManager:指定缓存的管理器
- cacheResolver:指定缓存的解析器,与cacheManager属性二选一使用
- condition:指定在符合某种条件下,进行数据缓存,不符合条件则不执行存储
- unless:指定在符合某种条件下不进行数据缓存
- sync:指定是否使用异步缓存,默认为false。
@CacheAable(value="dep",key="#department.id") //缓存所使用的key值由value和key共同组
成,值为dept::再加上参数department对象中的id参数值
public Department listDepartment(Department department){
System.out.println("加载信息:"+department);
departmentDao.loadDepartment(department);
return department;
}8.6、注解EnableCaching
@EnableCaching主要用于开启基于注解的缓存支持,用在应用主类或者配置类上
@EnableCaching
@SpringBootConfiguration
public class MyRedisConfig {8.7注解CacheConfig
@CacheConfig
注解是加在类上,用于抽取缓存的公共配置。
在类头上加了
@CacheConfig
注解等同于每个方法上的缓存注解都加了
cacheName
或者
value
指定的组 件,并且这个组件来自@CacheConfig
,也就是用于统筹管理类中所有使用
@Cacheable
、
@CachePut… 和@CacheEvict
注解标注方法中的公共属性,这些公共属性包括有
cacheNames
、
keyGenerator
、cacheManager和
cacheResolver
@CacheConfig(cacheNames = "users") 等价于在每个缓存注解上添加了value="users"
@Service
public class UserServImpl implements IUserServ{
@Cacheable(value="bbb",key = "#id",unless="#result == null") 在类上有定义,同时
在方法上也有定义,则局部优先
public User load(Long id) {
8.8 注解CachePut
@CachePut
该注解用于设置缓存。表示在调用方法的同时又更新缓存,它是默认先调用目标方法,然后 将目标方法的运行结果存入缓存,不过需要注意的是如果要保持缓存同步更新,这个注解使用的key
需要和缓存的key必须是一样的
。
和@cacheable不同的是:
@Cacheable在运行在目标方法之前,而它是目标方法之后,因为它需要先拿到目标方法运
行的结果
@Cacheable不可以使用#result,因为使用@Cacheable标注的方法不一定会被调用,可能
获取不到result。
8.9 注解Caching
@Caching
该注解可以对缓存清理、设置 操作打包。用于针对复杂规则的数据缓存管理,可以作用于类 或方法,在@Caching
注解内部包含有
Cacheable
、
put
和
evict
三个属性,分别对
@Cacheable,
@CachePut和
@CacheEvict
三个注解
@Caching(
cacheable={@Cacheable(cacheNames ="comment",key = "#id")},
put = {@CachePut(cacheNames = "comment",key.= "#result.author")}
)
public Comment getcoiment(int id){
return commentRepository.findByld(id).get();
}


 382
382

 被折叠的 条评论
为什么被折叠?
被折叠的 条评论
为什么被折叠?
 到【灌水乐园】发言


