


1.项目介绍
1.项目技术
SpringBoot : 简化新 Spring 应用的初始搭建以及开发过程
SpringCloud : 基于 Springboot 实现的云原生的开发工具,SpringCloud 使用的技术:(Spring Cloud Gateway , Spring Cloud Alibaba Nacos, Spring Cloud Alibaba Sentinel, Spring Cloud Task , Spring Cloud Feign等)
MyBatis-Plus : 持久层框架
Redis : 内存缓存
RabbitMQ : 消息中间件
HTTPClient : http 协议客户端
Swgger2 : Api 接口文档
Nginx :负载均衡
Lombok
Mysql : 关系型数据库
MongoDB : 面向文档的 NoSQL 数据库
Vue.js : web 界面的渐进式框架
Node.js JavaScript 运行环境
Axios : Axios 是一个基于 promise 的 HTTP 库
NPM : 包管理器
Babel : 转码器
Wepack : 打包工具
Docker : 容器技术
Git : 代码管理工具
DockerFile : 管理 Docker 镜像命令文本
Jenkins : 持续集成工具
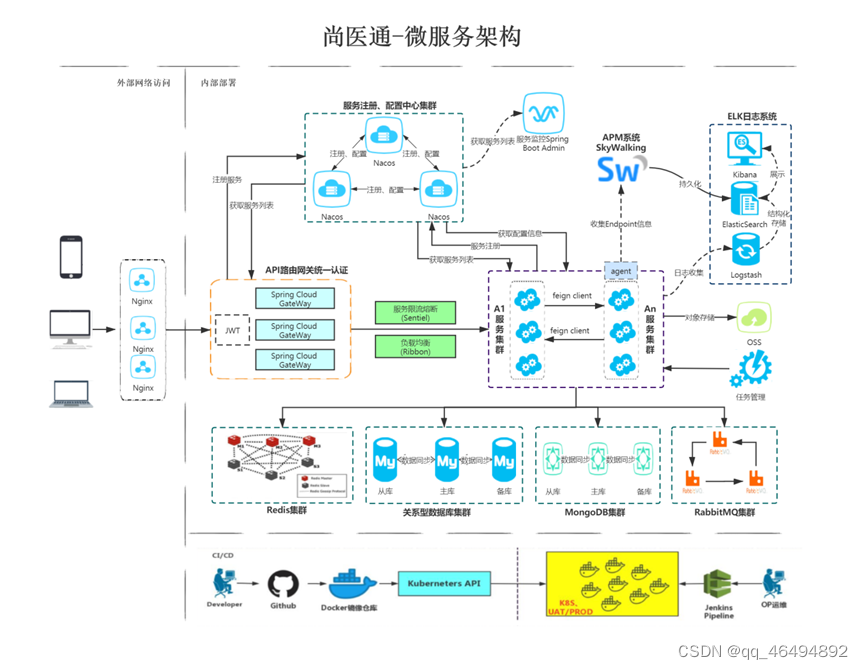
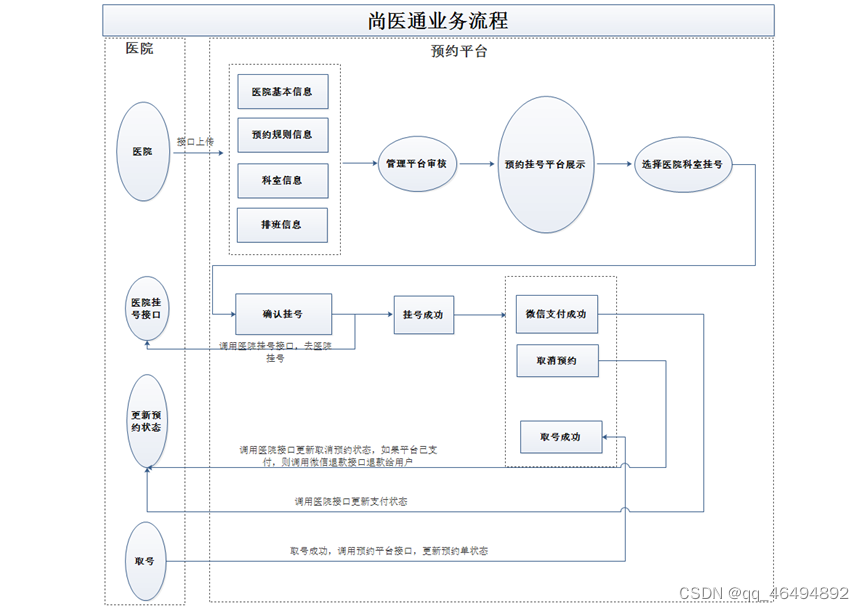
2.项目架构和流程图
3.项目模块构建
hospital-manage:医院接口模拟端(已开发,直接使用)
yygh-parent:根目录,管理子模块:
common:公共模块父节点
common-util:工具类模块,所有模块都可以依赖于它
rabbit-util:rabbitmq业务封装
service-util:service服务的工具包,包含service服务的公共配置类,所有service模块依赖于它
server-gateway:服务网关
model:实体类模块
service:api接口服务父节点
service-hosp:医院api接口服务
service-cmn:公共api接口服务
service-user:用户api接口服务
service-order:订单api接口服务
service-oss:文件api接口服务
service-sms:短信 api接口服务
service-task:定时任务服务
service-statistics:统计api接口服务
service-client:feign服务调用父节点
service-cmn-client:公共api接口
service-hosp-client:医院api接口
service-order-client:订单api接口

2.项目公共配置
1.配置swagger
api路径下是webApi ,admin路径下的是adminApi
/**
 * Swagger2配置信息
 */
@Configuration
@EnableSwagger2
public class Swagger2Config {

    @Bean
    public Docket webApiConfig(){

        return new Docket(DocumentationType.SWAGGER_2)
                .groupName("webApi")
                .apiInfo(webApiInfo())
                .select()
                //只显示api路径下的页面
                .paths(Predicates.and(PathSelectors.regex("/api/.*")))
                .build();

    }

    @Bean
    public Docket adminApiConfig(){

        return new Docket(DocumentationType.SWAGGER_2)
                .groupName("adminApi")
                .apiInfo(adminApiInfo())
                .select()
                //只显示admin路径下的页面
                .paths(Predicates.and(PathSelectors.regex("/admin/.*")))
                .build();

    }

    private ApiInfo webApiInfo(){

        return new ApiInfoBuilder()
                .title("网站-API文档")
                .description("本文档描述了网站微服务接口定义")
                .version("1.0")
                .contact(new Contact("atguigu", "http://atguigu.com", "493211102@qq.com"))
                .build();
    }

    private ApiInfo adminApiInfo(){

        return new ApiInfoBuilder()
                .title("后台管理系统-API文档")
                .description("本文档描述了后台管理系统微服务接口定义")
                .version("1.0")
                .contact(new Contact("atguigu", "http://atguigu.com", "49321112@qq.com"))
                .build();
    }


}
swagger常用Api
@Api:修饰整个类,描述Controller的作用
@ApiOperation:描述一个类的一个方法,或者说一个接口
@ApiParam:单个参数描述
@ApiModel:用对象来接收参数
@ApiModelProperty:用对象接收参数时,描述对象的一个字段
@ApiImplicitParam:一个请求参数
@ApiImplicitParams:多个请求参数
2.gitee 仓库
1.创建gitee仓库并复制ssh

2.打开项目并点击菜单栏上的【CVS】--》【Import into version control】--》【Create Git Repository】创建本地仓库
3.配置远程仓库地址
右击项目点击【Git】--》【Repository】--》【Remotes...】。在打开的【Git Remotes】窗口中添加码云的远程仓库。

4.提交

3.通用结果类
/**
 * 全局统一返回结果类
 */
@Data
@ApiModel(value = "全局统一返回结果")
public class Result<T> {

    @ApiModelProperty(value = "返回码")
    private Integer code;

    @ApiModelProperty(value = "返回消息")
    private String message;

    @ApiModelProperty(value = "返回数据")
    private T data;

    public Result(){}

    protected static <T> Result<T> build(T data) {
        Result<T> result = new Result<T>();
        if (data != null)
            result.setData(data);
        return result;
    }

    public static <T> Result<T> build(T body, ResultCodeEnum resultCodeEnum) {
        Result<T> result = build(body);
        result.setCode(resultCodeEnum.getCode());
        result.setMessage(resultCodeEnum.getMessage());
        return result;
    }

    public static <T> Result<T> build(Integer code, String message) {
        Result<T> result = build(null);
        result.setCode(code);
        result.setMessage(message);
        return result;
    }

    public static<T> Result<T> ok(){
        return Result.ok(null);
    }

    /**
     * 操作成功
     * @param data
     * @param <T>
     * @return
     */
    public static<T> Result<T> ok(T data){
        Result<T> result = build(data);
        return build(data, ResultCodeEnum.SUCCESS);
    }

    public static<T> Result<T> fail(){
        return Result.fail(null);
    }

    /**
     * 操作失败
     * @param data
     * @param <T>
     * @return
     */
    public static<T> Result<T> fail(T data){
        Result<T> result = build(data);
        return build(data, ResultCodeEnum.FAIL);
    }

    public Result<T> message(String msg){
        this.setMessage(msg);
        return this;
    }

    public Result<T> code(Integer code){
        this.setCode(code);
        return this;
    }

    public boolean isOk() {
        if(this.getCode().intValue() == ResultCodeEnum.SUCCESS.getCode().intValue()) {
            return true;
        }
        return false;
    }
}
4.全局异常类和自定义异常类
全局异常类(使用controllerAdvice注解)对controller中的异常处理 (当使用RestControllerAdvice注解之后就可以不用ResponseBody注解了)
@ControllerAdvice
public class GlobalExceptionHandler {


//对该类Exception异常的处理
     @ExceptionHandler(Exception.class)
     @ResponseBody
    public Result error(Exception e){
        e.printStackTrace();
        return Result.fail();

    }
    /**
     * 自定义异常处理方法
     * @param e
     * @return
     */
    @ExceptionHandler(YyghException.class)
    @ResponseBody
    public Result error(YyghException e){
        e.printStackTrace();
        return Result.fail();
    }

}
自定义异常类
/**
 * 自定义全局异常类
 *
 * @author qy
 */
@Data
@ApiModel(value = "自定义全局异常类")
public class YyghException extends RuntimeException {

    @ApiModelProperty(value = "异常状态码")
    private Integer code;

    /**
     * 通过状态码和错误消息创建异常对象
     * @param message
     * @param code
     */
    public YyghException(String message, Integer code) {
        super(message);
        this.code = code;
    }

    /**
     * 接收枚举类型对象
     * @param resultCodeEnum
     */
    public YyghException(ResultCodeEnum resultCodeEnum) {
        super(resultCodeEnum.getMessage());
        this.code = resultCodeEnum.getCode();
    }

    @Override
    public String toString() {
        return "YyghException{" +
                "code=" + code +
                ", message=" + this.getMessage() +
                '}';
    }
}
5.配置日志级别
日志记录器(Logger)的行为是分等级的。如下表所示:
分为:OFF、FATAL、ERROR、WARN、INFO、DEBUG、ALL(默认是info)
默认情况下,spring boot从控制台打印出来的日志级别只有INFO及以上级别,可以配置日志级别
# 设置日志级别
logging.level.root=WARN
这种方式只能将日志打印在控制台上


 781
781


 被折叠的 条评论
为什么被折叠?
被折叠的 条评论
为什么被折叠?
 到【灌水乐园】发言


