


 本文介绍了如何在SpringBoot项目中整合SSM(Spring、Struts、MyBatis)框架,并详细阐述了Shiro的安全管理配置,包括ShiroFilter的配置、 Realm的实现以及授权信息的获取。文中提到了数据库表的设计,用户登录验证以及角色权限的分配。此外,还展示了登录页面的表单处理和登录操作的实现,以及RememberMe功能的配置。
SpringBoot
创建一个普通SpringBoot的Web工程01-Shiro添加依赖包
<dependency>
   <groupId>org.apache.shiro</groupId>
   <artifactId>shiro-spring</artifactId>
   <version>1.3.2</version>
</dependency>
定义类shoro.config.ShiroConfig
//标记当前类是一个Spring的配置类,用于模拟Spring的配置文件
//在这里我们将要配置Shiro
@Configuration
public class ShiroConfig {
    //配置Shiro的安全管理器
    @Bean
    public SecurityManager securityManager(Realm myRealm){
        DefaultWebSecurityManager securityManager=new DefaultWebSecurityManager();
        //设置一个Realm,这个Realm是最终用于完成我们的认证号和授权操作的具体对象
        securityManager.setRealm(myRealm);
        return securityManager;
    }
    //配置一个自定义的Realm的bean,最终将使用这个bean返回的对象来完成我们的认证和授权
    @Bean
    public Realm myRealm(){
        MyRealm realm=new MyRealm();
        return realm;
    }

    //配置一个Shiro的过滤器bean,这个bean将配置Shiro相关的一个规则的拦截
    //例如什么样的请求可以访问什么样的请求不可以访问等等
    @Bean
    public ShiroFilterFactoryBean shiroFilter(SecurityManager securityManager){
        //创建Shiro的拦截的拦截器 ,用于拦截我们的用户请求
        ShiroFilterFactoryBean shiroFilter=new ShiroFilterFactoryBean();
        //设置Shiro的安全管理,设置管理的同时也会指定某个Realm 用来完成我们权限分配
        shiroFilter.setSecurityManager(securityManager);
        //用于设置一个登录的请求地址,这个地址可以是一个html或jsp的访问路径,也可以是一个控制器的路径
        //作用是用于通知Shiro我们可以使用这里路径转向到登录页面,但Shiro判断到我们当前的用户没有登录时就会自动转换到这个路径
        //要求用户完成成功
        shiroFilter.setLoginUrl("/");
        //登录成功后转向页面,由于用户的登录后期需要交给Shiro完成,因此就需要通知Shiro登录成功之后返回到那个位置
        shiroFilter.setSuccessUrl("/success");
        //用于指定没有权限的页面,当用户访问某个功能是如果Shiro判断这个用户没有对应的操作权限,那么Shiro就会将请求
        //转向到这个位置,用于提示用户没有操作权限
        shiroFilter.setUnauthorizedUrl("/noPermission");
        //定义一个Map集合,这个Map集合中存放的数据全部都是规则,用于设置通知Shiro什么样的请求可以访问什么样的请求不可以访问
        Map<String,String> map=new LinkedHashMap<String,String>();
        //  /login 表示某个请求的名字    anon 表示可以使用游客什么进行登录(这个请求不需要登录)
        map.put("/login","anon");

        map.put("/admin/**","authc");
        map.put("/user/**","authc");
        //表示所有的请求路径全部都需要被拦截登录,这个必须必须写在Map集合的最后面,这个选项是可选的
        //如果没有指定/** 那么如果某个请求不符合上面的拦截规则Shiro将方行这个请求
        map.put("/**","authc");

		//或者也可这样
		//注意:admin:add仅仅是一个普通的字符串用于标记某个权限功能
        map.put("/admin/test","authc,perms[admin:add]");
        map.put("/admin/**","authc,roles[admin]");
        map.put("/user/**","authc,roles[user]");


        shiroFilter.setFilterChainDefinitionMap(map);
        return shiroFilter;
    }
}
reaml.MyReaml ( 这里主要的配置看下面的myReaml)
他的具体方法看下面的ssm配置
	当用户认证通过后,每次访问需要授权的请求,都会调用这个方法。
//Shiro用户授权的回调方法
    protected AuthorizationInfo doGetAuthorizationInfo(PrincipalCollection principalCollection) {
        //从Shiro中获取用户名
        Object username=principalCollection.getPrimaryPrincipal();
        //创建一个SimpleAuthorizationInfo类的对象,利用这个对象需要设置当前用户的权限信息
        SimpleAuthorizationInfo simpleAuthorizationInfo=new SimpleAuthorizationInfo();
        //创建角色信息的集合
        Set<String> roles=new HashSet<String>();
        //这里应该根据账号到数据库中获取用户的所对应的所有角色信息并初始化到roles集合中
        if("admin".equals(username)){
            roles.add("admin");
            roles.add("user");
        }else if ("zhangsan".equals(username)){
            roles.add("user");
        }
        Set<String>psermission=new HashSet<String>();
        if("admin".equals(username)){
            psermission.add("admin:add");
        }
        //设置角色信息
        simpleAuthorizationInfo.setRoles(roles);
        simpleAuthorizationInfo.setStringPermissions(psermission);		// 注意这里。
        return simpleAuthorizationInfo;
    }
他们的配置几乎都差不多。逻辑相同。
注意:只需要进行登录认证的话,myreaml 继承 AuthenticationReaml 即可。 两种都需要,跟下面的内容一样即可.
SSM
注意:使用ssm是一定要打包为war , 错误了及时的clean,package 。会有很大帮助的
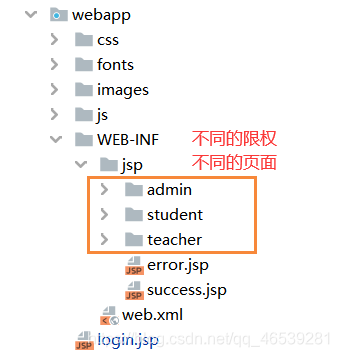
1. 所实现的方法,未登录之前,除了登录页面,访问其他的页面都会跳转到登录页面。
2. 根据用户的权限,只能进行访问部门页面。每个用户的权限不同。
数据库表:
权限表

CREATE TABLE `role` (
  `roleID` int(11) NOT NULL,
  `roleName` varchar(20) NOT NULL,
  `permissions` varchar(255) DEFAULT NULL COMMENT '权限',
  PRIMARY KEY (`roleID`)
) ENGINE=InnoDB DEFAULT CHARSET=utf8;

INSERT INTO `role` VALUES ('0', 'admin', null);
INSERT INTO `role` VALUES ('1', 'teacher', null);
INSERT INTO `role` VALUES ('2', 'student', null);

有几个分类,写几个

--------------------------------------------------------------------------------------------------------

登录的账户,密码表

CREATE TABLE `userlogin` (
  `userID` int(11) NOT NULL AUTO_INCREMENT,
  `userName` varchar(200) NOT NULL,
  `password` varchar(200) NOT NULL,
  `role` int(11) NOT NULL  COMMENT '角色权限',
  PRIMARY KEY (`userID`),
) ENGINE=InnoDB   DEFAULT CHARSET=utf8;

-- ----------------------------
-- Records of userlogin
-- ----------------------------
INSERT INTO `userlogin` VALUES ('1', 'admin', '123', '0');
INSERT INTO `userlogin` VALUES ('8', '10001', '123', '2');
INSERT INTO `userlogin` VALUES ('9', '10002', '123', '2');
根据以上两个表,创建对应的pojo , 对应的属性一定要注意
pom.xml
<!--shiro依赖-->
    <dependency>
      <groupId>org.apache.shiro</groupId>
      <artifactId>shiro-core</artifactId>
      <version>1.2.3</version>
    </dependency>
    <dependency>
      <groupId>org.apache.shiro</groupId>
      <artifactId>shiro-web</artifactId>
      <version>1.2.3</version>
    </dependency>
    <dependency>
      <groupId>org.apache.shiro</groupId>
      <artifactId>shiro-spring</artifactId>
      <version>1.2.3</version>
    </dependency>
web.xml
<!-- name要和 applicationContext.xml中的对应的bean的id一致 -->
  <!--Shiro拦截器 shiro入口-->
  <filter>
    <filter-name>shiroFilter</filter-name>    <!-- 注意这里name的值 -->
    <filter-class>org.springframework.web.filter.DelegatingFilterProxy</filter-class>
    <init-param>
      <param-name>targetFilterLifecycle</param-name>
      <param-value>true</param-value>
    </init-param>
  </filter>

  <filter-mapping>
    <filter-name>shiroFilter</filter-name>
    <url-pattern>/*</url-pattern>
  </filter-mapping>
applicationContext-shiro.xml
<?xml version="1.0" encoding="UTF-8"?>
<beans xmlns="http://www.springframework.org/schema/beans"
       xmlns:xsi="http://www.w3.org/2001/XMLSchema-instance"
       xmlns:context="http://www.springframework.org/schema/context"
       xmlns:aop="http://www.springframework.org/schema/aop"
       xmlns:tx="http://www.springframework.org/schema/tx"
       xsi:schemaLocation="http://www.springframework.org/schema/beans
	http://www.springframework.org/schema/beans/spring-beans.xsd
	http://www.springframework.org/schema/context
	http://www.springframework.org/schema/context/spring-context.xsd
	http://www.springframework.org/schema/aop
	http://www.springframework.org/schema/aop/spring-aop.xsd
	http://www.springframework.org/schema/tx
	http://www.springframework.org/schema/tx/spring-tx.xsd">

    <!--组件扫描器 realm所在的包-->
    <context:component-scan base-package="com.system.realm" />

    <!-- shiro过滤器bean,id要和web.xml中filter-name一致 -->
    <bean id="shiroFilter" class="org.apache.shiro.spring.web.ShiroFilterFactoryBean">
        <property name="securityManager" ref="securityManager" />

        <!-- 要求登录时的链接(登录页面地址), -->
        <!-- 这些属性进行设置以下 loginUrl,登录成功跳转的地址,必须设置,登录的就是这个页面,访问其他的没有限权的页面,就会跳转到该页面-->
        <property name="loginUrl" value="/admin/show"></property>
        <!-- 登录成功后,进入的页面。可以不设置,在controller中进行跳转 -->
        <!-- <property name="successUrl" value=""></property> -->
        <!-- 设置没有权限跳转的页面 -->

		<!-- 注意这里的配置 -->
        <property name="filterChainDefinitions">
            <value>
                #这里相当于ini配置文件中的[urls]
                #url=拦截器[参数],拦截器
                # /techer/** = authc, perms[document:read]
                # 如果用户没有该角色,然后访问该 路径 会报 401错误

                /admin/** = authc, roles[admin]
                /techer/** = authc, roles[teacher]
                /student/** = authc, roles[student]

                # 当访问login时,不用进行认证(anon表示匿名)
                /login = anon

                /logout = logout

                # 配置静态资源可以匿名访问
                /css/** = anon
                /js/** = anon
                /images/** = anon
                /fonts/** = anon

                # 除了上面额 /login 可以匿名访问,其他路径都需要登录访问
                # 如果没登录,就访问其他路径会跳转到 /login 登录

                /** = authc
            </value>
        </property>
    </bean>


    <!-- 配置securityManager -->
    <bean id="securityManager" class="org.apache.shiro.web.mgt.DefaultWebSecurityManager">
        <!--配置自定义Realm-->
        <!--loginRealm 使用扫描器扫描注册成功了-->
        <property name="realm" ref="loginRealm" />
    </bean>

</beans>
登录:跳转到/login post方法
			<form  action="/login" id="from1" method="post">

				    <label for="firstname" class="col-sm-3 control-label">用户id</label>
				    <input type="text" class="form-control" id="userID" placeholder="请输入名字" name="userName">

				    <label for="lastname" class="col-sm-3 control-label">密码</label>
				    <input type="password" class="form-control" id="password" placeholder="请输入密码" name="password">

				 <!-- 根据所在的用户的种类进行分类: -->
			        <label class="checkbox-inline">
						<input type="radio" name="role" value="1" checked>管理员
					</label>
					<label class="checkbox-inline">
						<input type="radio" name="role" value="2">老师
					</label>
					<label class="checkbox-inline">
						<input type="radio" name="role" value="3">学生
					</label>

				  <input type ="submit" value="提交">
				</form>
登录操作:
//登录表单处理
    @RequestMapping(value = "/login", method = {RequestMethod.POST})
    public String login(String username , String password , int role) throws Exception {

        //Shiro实现登录
        UsernamePasswordToken token = new UsernamePasswordToken(username ,
                password );
        Subject subject = SecurityUtils.getSubject();

        //如果获取不到用户名就是登录失败,但登录失败的话,会直接抛出异常
        //这里需要进行处理, try-catch{ 出问题了就进行抛异常,返回数据,显示到前台的页面}
        subject.login(token);

        //设置当前对象 是否有role
        // 根据不同的限权跳转到不同的页面。自己进行修改
        if (subject.hasRole("admin")) {
            return "redirect:/admin/showStudent";
        } else if (subject.hasRole("teacher")) {
            return "redirect:/teacher/showCourse";
        } else if (subject.hasRole("student")) {
            return "redirect:/student/showCourse";
        }

        return "/login";
    }
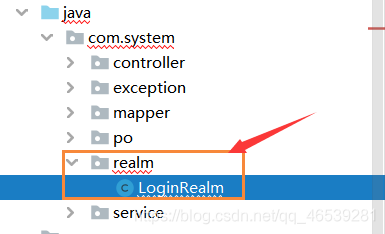
LoginRealm:
@Component
public class LoginRealm extends AuthorizingRealm{

    @Resource(name = "userloginServiceImpl")	//  进行访问数据库  角色的限权  自己写
    private UserloginService userloginService;

    @Resource(name = "roleServiceImpl")		//  进行访问数据库的是 username, password 自己写
    private RoleService roleService;

    /**
     * 获取身份信息,我们可以在这个方法中,从数据库获取该用户的权限和角色信息
     *     当调用权限验证时,就会调用此方法
     * 	   这个方法才进行判断用户的权限
     */
    protected AuthorizationInfo doGetAuthorizationInfo(PrincipalCollection principalCollection) {

        //得到 username,登录的username
        String username = (String) getAvailablePrincipal(principalCollection);

        Role role = null;

        try {
            Userlogin userlogin = userloginService.findByName(username);
            //获取角色对象
            role = roleService.findByid(userlogin.getRole());
        } catch (Exception e) {
            e.printStackTrace();
        }
        //通过用户名从数据库获取权限/角色信息
        SimpleAuthorizationInfo info = new SimpleAuthorizationInfo();
        Set<String> r = new HashSet<String>();
        if (role != null) {
            r.add(role.getRolename());
            info.setRoles(r);
        }

        return info;
    }

    /**
     * 在这个方法中,进行身份验证 , 如果前端进行md5对密码进行加密,那么可以在这里对数据库中拿出来的密码进行md5加密,后进行对比
     *         login时调用, 只进行判断用的username,password是否正确。不进行判断响应的权限
     */
    protected AuthenticationInfo doGetAuthenticationInfo(AuthenticationToken token) throws AuthenticationException {
        //用户名
        String username = (String) token.getPrincipal();
        //密码
        String password = new String((char[])token.getCredentials());

        Userlogin userlogin = null;
        try {
            userlogin = userloginService.findByName(username);
        } catch (Exception e) {
            e.printStackTrace();
        }

        if (userlogin == null) {
            //没有该用户名
            throw new UnknownAccountException();
        } else if (!password.equals(userlogin.getPassword())) {
            //密码错误
            throw new IncorrectCredentialsException();
        }

        //身份验证通过,返回一个身份信息
        AuthenticationInfo aInfo = new SimpleAuthenticationInfo(username,password,getName());

        return aInfo;
    }
}
以上成功了。
记住我:
		//记住用户名,密码,下次可以直接进行登录了,不用进行登录了
        usernamePasswordToken.setRememberMe(true);
设置以上配置,后进行登录后,将浏览器关闭后,再次访问该网页,就不用登录了。
但是有些路径是访问不了的,需要进行重新登录,才能进行访问。
/某路径 = user
但是我还未实现成功(不知道为什么)
设置能免密码登录的时间,时间过了后,就需要再次登录了。
<bean id="securityManager" class="org.apache.shiro.web.mgt.DefaultWebSecurityManager">
        <!--配置自定义Realm-->
        <!--loginRealm 使用扫描器扫描注册成功了-->
        <property name="realm" ref="myRealm" />

        <!-- 配置这里 10秒 -->
		<property name="rememberMeManager.cookie.maxAge" value="10"></property>

    </bean>
成功了的。
再次登录后,好像是会有默认的拦截,如果是访问了不存在的页面,会跳转到登录页面。


 1009
1009

 被折叠的 条评论
为什么被折叠?
被折叠的 条评论
为什么被折叠?
 到【灌水乐园】发言


