


目录
不积跬步,无以至千里;不积小流,无以成江海。要沉下心来,诗和远方的路费真的很贵!
BaseQuickAdapter——简化RecyclerView的使用
例子:用RecyclerView实现招聘信息列表
1.引入依赖
- 在build.gradle的allprojects中加入镜像
//jcenter镜像
        maven { url 'http://maven.aliyun.com/nexus/content/repositories/jcenter' }
        maven { url 'http://maven.aliyun.com/nexus/content/groups/public/' }
        maven { url 'https://maven.aliyun.com/repository/google' }
        maven { url "https://jitpack.io" }
- 引入依赖
implementation 'com.github.CymChad:BaseRecyclerViewAdapterHelper:3.0.4'//BaseQuickAdapter
2.根据item布局建立item数据类
- 布局
- item布局
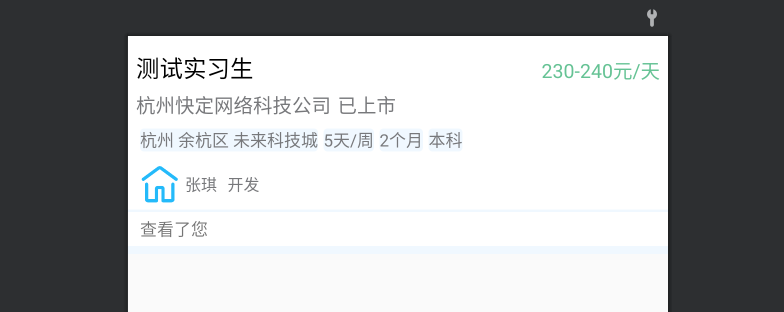
- item_looked_list
<?xml version="1.0" encoding="utf-8"?>
<androidx.constraintlayout.widget.ConstraintLayout xmlns:android="http://schemas.android.com/apk/res/android"
    xmlns:app="http://schemas.android.com/apk/res-auto"
    xmlns:tools="http://schemas.android.com/tools"
    android:layout_width="match_parent"
    android:layout_height="wrap_content"
    android:background="@color/white">

    <TextView
        android:id="@+id/tv_work_name"
        android:layout_width="wrap_content"
        android:layout_height="wrap_content"
        android:layout_marginLeft="6dp"
        android:layout_marginTop="12dp"
        tools:text="测试实习生"
        android:textColor="@color/black"
        android:textSize="18dp"
        app:layout_constraintStart_toStartOf="parent"
        app:layout_constraintTop_toTopOf="parent" />

    <TextView
        android:id="@+id/tvSalary"
        android:layout_width="wrap_content"
        android:layout_height="wrap_content"
        android:layout_marginEnd="6dp"
        android:layout_marginRight="6dp"
        tools:text="230-240元/天"
        android:textColor="@color/salary_color"
        android:textSize="15dp"
        app:layout_constraintBottom_toBottomOf="@+id/tv_work_name"
        app:layout_constraintEnd_toEndOf="parent" />

    <TextView
        android:id="@+id/tv_company_name"
        android:layout_width="wrap_content"
        android:layout_height="wrap_content"
        android:layout_marginTop="6dp"
        tools:text="杭州快定网络科技公司"
        android:textColor="@color/tv_gray"
        android:textSize="15dp"
        app:layout_constraintStart_toStartOf="@+id/tv_work_name"
        app:layout_constraintTop_toBottomOf="@+id/tv_work_name" />

    <TextView
        android:id="@+id/tv_company_state"
        android:layout_width="wrap_content"
        android:layout_height="wrap_content"
        tools:text="已上市"
        android:layout_marginLeft="5dp"
        android:textColor="@color/tv_gray"
        android:textSize="15dp"
        app:layout_constraintBottom_toBottomOf="@+id/tv_company_name"
        app:layout_constraintStart_toEndOf="@+id/tv_company_name"
        app:layout_constraintTop_toTopOf="@+id/tv_company_name" />

    <TextView
        android:id="@+id/tvLocation"
        android:layout_width="wrap_content"
        android:layout_height="wrap_content"
        android:background="@drawable/tv_background"
        tools:text="杭州 余杭区 未来科技城"
        android:textSize="13dp"
        android:textColor="@color/tv_gray"
        android:gravity="center"
        android:layout_marginLeft="3dp"
        android:layout_marginTop="8dp"
        app:layout_constraintStart_toStartOf="@+id/tv_company_name"
        app:layout_constraintTop_toBottomOf="@+id/tv_company_name" />

    <TextView
        android:id="@+id/tv_work_day"
        android:layout_width="wrap_content"
        android:layout_height="wrap_content"
        android:background="@drawable/tv_background"
        android:gravity="center"
        tools:text="5天/周"
        android:textColor="@color/tv_gray"
        android:textSize="13dp"
        android:layout_marginLeft="4dp"
        app:layout_constraintBottom_toBottomOf="@+id/tvLocation"
        app:layout_constraintStart_toEndOf="@+id/tvLocation"
        app:layout_constraintTop_toTopOf="@+id/tvLocation" />

    <TextView
        android:id="@+id/tv_work_time"
        android:layout_width="wrap_content"
        android:layout_height="wrap_content"
        android:background="@drawable/tv_background"
        android:gravity="center"
        tools:text="2个月"
        android:textColor="@color/tv_gray"
        android:textSize="13dp"
        android:layout_marginLeft="4dp"
        app:layout_constraintBottom_toBottomOf="@+id/tv_work_day"
        app:layout_constraintStart_toEndOf="@+id/tv_work_day"
        app:layout_constraintTop_toTopOf="@+id/tv_work_day" />

    <TextView
        android:id="@+id/tvEducation"
        android:layout_width="wrap_content"
        android:layout_height="wrap_content"
        android:background="@drawable/tv_background"
        android:gravity="center"
        tools:text="本科"
        android:textColor="@color/tv_gray"
        android:textSize="13dp"
        android:layout_marginLeft="4dp"
        app:layout_constraintBottom_toBottomOf="@+id/tv_work_time"
        app:layout_constraintStart_toEndOf="@+id/tv_work_time"
        app:layout_constraintTop_toTopOf="@+id/tv_work_time" />

    <de.hdodenhof.circleimageview.CircleImageView
        android:id="@+id/ivAvatar"
        android:layout_width="30dp"
        android:layout_height="30dp"
        android:layout_marginTop="10dp"
        tools:background="@mipmap/home_selected"
        app:layout_constraintStart_toStartOf="@+id/tvLocation"
        app:layout_constraintTop_toBottomOf="@+id/tvLocation" />

    <TextView
        android:id="@+id/tv_username"
        android:layout_width="wrap_content"
        android:layout_height="wrap_content"
        android:gravity="center"
        tools:text="张琪"
        android:textColor="@color/tv_gray"
        android:textSize="12dp"
        android:layout_marginLeft="4dp"
        app:layout_constraintBottom_toBottomOf="@+id/ivAvatar"
        app:layout_constraintStart_toEndOf="@+id/ivAvatar"
        app:layout_constraintTop_toTopOf="@+id/ivAvatar" />

    <TextView
        android:id="@+id/tv_job"
        android:layout_width="wrap_content"
        android:layout_height="wrap_content"
        android:layout_marginLeft="8dp"
        android:gravity="center"
        android:textColor="@color/tv_gray"
        android:textSize="12dp"
        app:layout_constraintBottom_toBottomOf="@+id/tv_username"
        app:layout_constraintStart_toEndOf="@+id/tv_username"
        app:layout_constraintTop_toTopOf="@+id/tv_username"
        app:layout_constraintVertical_bias="1.0"
        tools:text="开发" />

    <View
        android:id="@+id/view2"
        android:layout_width="match_parent"
        android:layout_height="2dp"
        android:layout_marginTop="4dp"
        android:background="@color/bg_gray"
        app:layout_constraintTop_toBottomOf="@+id/ivAvatar" />


    <TextView
        android:id="@+id/textView"
        android:layout_width="wrap_content"
        android:layout_height="wrap_content"
        android:layout_marginTop="4dp"
        android:text="查看了您"
        android:textSize="13dp"
        app:layout_constraintStart_toStartOf="@+id/ivAvatar"
        app:layout_constraintTop_toBottomOf="@+id/view2" />

    <View
        android:layout_width="match_parent"
        android:layout_height="6dp"
        android:layout_marginTop="4dp"
        android:background="@color/bg_gray"
        app:layout_constraintTop_toBottomOf="@+id/textView" />
</androidx.constraintlayout.widget.ConstraintLayout>
-
根据布局建立数据类
- Works
package com.example.app_smallsystem.bean;

/**
 * @author created by lvjunkai
 * @date 2021/7/29
 * @description: 招聘信息类
 */
public class Works {
    String workName;
    String workSalary;
    String companyName;
    String companyState;
    String workLocation;
    String workDay;
    String workTime;
    String education;
    String avatar;
    String username;
    String job;

    public Works() {
    }

    public String getWorkName() {
        return workName;
    }

    public void setWorkName(String workName) {
        this.workName = workName;
    }

    public String getWorkSalary() {
        return workSalary;
    }

    public void setWorkSalary(String workSalary) {
        this.workSalary = workSalary;
    }

    public String getCompanyName() {
        return companyName;
    }

    public void setCompanyName(String companyName) {
        this.companyName = companyName;
    }

    public String getCompanyState() {
        return companyState;
    }

    public void setCompanyState(String companyState) {
        this.companyState = companyState;
    }

    public String getWorkLocation() {
        return workLocation;
    }

    public void setWorkLocation(String workLocation) {
        this.workLocation = workLocation;
    }

    public String getWorkDay() {
        return workDay;
    }

    public void setWorkDay(String workDay) {
        this.workDay = workDay;
    }

    public String getWorkTime() {
        return workTime;
    }

    public void setWorkTime(String workTime) {
        this.workTime = workTime;
    }

    public String getEducation() {
        return education;
    }

    public void setEducation(String education) {
        this.education = education;
    }

    public String getAvatar() {
        return avatar;
    }

    public void setAvatar(String avatar) {
        this.avatar = avatar;
    }

    public String getUsername() {
        return username;
    }

    public void setUsername(String username) {
        this.username = username;
    }

    public String getJob() {
        return job;
    }

    public void setJob(String job) {
        this.job = job;
    }
}
3. 建立适配器
- LookedAdapter
package com.example.app_smallsystem.adapter;

import android.widget.ImageView;
import com.bumptech.glide.Glide;
import com.chad.library.adapter.base.BaseQuickAdapter;
import com.chad.library.adapter.base.viewholder.BaseViewHolder;
import com.example.app_smallsystem.R;
import com.example.app_smallsystem.bean.Works;
import com.example.app_smallsystem.fragment.LookedVpFragment;
import org.jetbrains.annotations.NotNull;
import org.jetbrains.annotations.Nullable;
import java.util.ArrayList;
import java.util.List;

/**
 * @author created by lvjunkai
 * @date 2021/7/29
 * @description: 谁看过我的适配器
 */

//继承BaseQuickAdapter,里面有数据类和ViewHolder
public class LookedAdapter extends BaseQuickAdapter<Works, BaseViewHolder> {

    //构造函数,用于适配器初始化
    public LookedAdapter(int layoutResId, @Nullable List<Works> data) {
        super(layoutResId, data);
    }

    @Override
    //重写convert方法
    //进行控件操作
    protected void convert(@NotNull BaseViewHolder holder, Works item) {
        Glide.with(getContext())
                .load(item.getAvatar())
                .into((ImageView) holder.getView(R.id.ivAvatar));
        holder.setText(R.id.tv_work_name, item.getWorkName())
                .setText(R.id.tvSalary, item.getWorkSalary())
                .setText(R.id.tv_company_name, item.getCompanyName())
                .setText(R.id.tv_company_state, item.getCompanyState())
                .setText(R.id.tvLocation, item.getWorkLocation())
                .setText(R.id.tv_work_day, item.getWorkDay())
                .setText(R.id.tv_work_time, item.getWorkTime())
                .setText(R.id.tvEducation, item.getEducation())
                .setText(R.id.tv_username, item.getUsername())
                .setText(R.id.tv_job, item.getJob());
    }
}
4.使用适配器
- LookedVpFragment
package com.example.app_smallsystem.fragment;

import android.os.Bundle;
import androidx.fragment.app.Fragment;
import androidx.recyclerview.widget.LinearLayoutManager;
import androidx.recyclerview.widget.RecyclerView;
import android.view.LayoutInflater;
import android.view.View;
import android.view.ViewGroup;
import com.example.app_smallsystem.R;
import com.example.app_smallsystem.adapter.LookedAdapter;
import com.example.app_smallsystem.bean.Works;
import java.util.ArrayList;
import java.util.List;

public class LookedVpFragment extends Fragment {
    RecyclerView rcvLookedList;
    List<Works> lookedList = new ArrayList<>();
    LookedAdapter lookedAdapter;

    @Override
    public View onCreateView(LayoutInflater inflater, ViewGroup container,
                             Bundle savedInstanceState) {
        //主布局
        View root = LayoutInflater.from(getActivity()).inflate(R.layout.fragment_looked_vp,container,false);
        //初始化
        rcvLookedList = root.findViewById(R.id.rcvLookedList);
        //设置适配器
        //new的时候,把它的子布局和数据传入
        lookedAdapter = new LookedAdapter(R.layout.item_looked_list,lookedList);
        rcvLookedList.setAdapter(lookedAdapter);
        //设置recyclerView的布局
        LinearLayoutManager lm = new LinearLayoutManager(getActivity());
        rcvLookedList.setLayoutManager(lm);

        //构造测试数据
        for(int i=0;i<20;i++){
            Works works = new Works();
            works.setAvatar("https://img-blog.csdnimg.cn/2020061412003655.JPG");
            works.setWorkName("工作名" + i);
            works.setCompanyName("公司名" + i);
            works.setWorkSalary("薪水" + i);
            works.setCompanyState("公司状态" + i);
            works.setEducation("学历" + i);
            works.setJob("职位" + i);
            works.setUsername("账号使用者" + i);
            works.setWorkTime("工作时长" + i);
            works.setWorkDay("工作日" + i);
            works.setWorkLocation("工作地点" + i);
            lookedList.add(works);
        }

        return root;
    }
}
总结
使用BaseQuickAdapter后,不需要我们自己再写ViewHolder类去缓存控件了,也不需要重写Adapter的三个方法了。大大便利了我们对RecyclerView的使用。
使用步骤
- 建立bean类,实现item的数据结构对象。
- 实现适配器类,通过构造方法初始化时确定子布局和数据。
- 重写
convert方法,所有对控件的操作,都在这个方法中实现。 - 在Activity或者Fragment中使用Adapter类。


 731
731


 被折叠的 条评论
为什么被折叠?
被折叠的 条评论
为什么被折叠?
 到【灌水乐园】发言


