


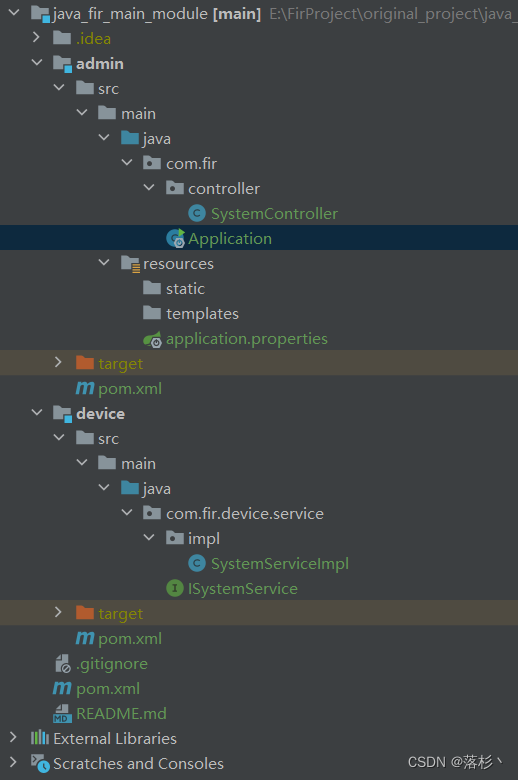
总体结构
项目源码地址:https://gitee.com/dong-puen/mainModule
打包之后得到结果,此时admin下的为部署jar包

运行之后,调用测试的接口:http://localhost:8080/auth/login
可以得到device下的结果:device 测试模块
pom配置
父级目录
<?xml version="1.0" encoding="UTF-8"?>
<project xmlns="http://maven.apache.org/POM/4.0.0" xmlns:xsi="http://www.w3.org/2001/XMLSchema-instance"
         xsi:schemaLocation="http://maven.apache.org/POM/4.0.0 https://maven.apache.org/xsd/maven-4.0.0.xsd">
    <modelVersion>4.0.0</modelVersion>
    <parent>
        <groupId>org.springframework.boot</groupId>
        <artifactId>spring-boot-starter-parent</artifactId>
        <version>2.6.13</version>
        <relativePath/>
    </parent>
    <groupId>com.fir</groupId>
    <artifactId>main</artifactId>
    <version>0.0.1</version>
    <name>main</name>
    <description>main</description>

    <modules>
        <module>admin</module>
        <module>device</module>
    </modules>
    <packaging>pom</packaging>

    <properties>
        <java.version>1.8</java.version>
    </properties>
    <dependencies>


        <dependency>
            <groupId>org.springframework.boot</groupId>
            <artifactId>spring-boot-starter-web</artifactId>
        </dependency>

        <dependency>
            <groupId>org.projectlombok</groupId>
            <artifactId>lombok</artifactId>
            <optional>true</optional>
        </dependency>
        <dependency>
            <groupId>org.springframework.boot</groupId>
            <artifactId>spring-boot-starter-test</artifactId>
            <scope>test</scope>
        </dependency>
    </dependencies>

    <!-- 依赖声明 -->
    <dependencyManagement>
        <dependencies>
<!--            指定子模块版本-->
            <dependency>
                <groupId>com.fir</groupId>
                <artifactId>admin</artifactId>
                <version>0.0.1</version>
            </dependency>
            <dependency>
                <groupId>com.fir</groupId>
                <artifactId>device</artifactId>
                <version>0.0.1</version>
            </dependency>
        </dependencies>
    </dependencyManagement>
    <build>
        <plugins>
            <plugin>
                <groupId>org.springframework.boot</groupId>
                <artifactId>spring-boot-maven-plugin</artifactId>
                <configuration>
<!--                    多模块下,指定统一入口文件,否则会导致打包失败-->
                    <mainClass>com.fir.Application</mainClass>
                    <excludes>
                        <exclude>
                            <groupId>org.projectlombok</groupId>
                            <artifactId>lombok</artifactId>
                        </exclude>
                    </excludes>
                </configuration>
            </plugin>
        </plugins>
    </build>

</project>
接口层主模块
<?xml version="1.0" encoding="UTF-8"?>
<project xmlns="http://maven.apache.org/POM/4.0.0"
         xmlns:xsi="http://www.w3.org/2001/XMLSchema-instance"
         xsi:schemaLocation="http://maven.apache.org/POM/4.0.0 http://maven.apache.org/xsd/maven-4.0.0.xsd">
    <parent>
        <groupId>com.fir</groupId>
        <artifactId>main</artifactId>
        <version>0.0.1</version>
    </parent>
    <modelVersion>4.0.0</modelVersion>
    <packaging>jar</packaging>
    <artifactId>admin</artifactId>

    <description>
        主服务
    </description>

    <dependencies>
<!--        引入业务子模块,打包时将引入子模块-->
        <!--    子服务模块    -->
        <dependency>
            <groupId>com.fir</groupId>
            <artifactId>device</artifactId>
        </dependency>
    </dependencies>

<!--        现在打包默认为admin,如下,可更改主题包名称-->
    <build>
        <finalName>fir</finalName>
    </build>
</project>
子模块
<?xml version="1.0" encoding="UTF-8"?>
<project xmlns="http://maven.apache.org/POM/4.0.0"
         xmlns:xsi="http://www.w3.org/2001/XMLSchema-instance"
         xsi:schemaLocation="http://maven.apache.org/POM/4.0.0 http://maven.apache.org/xsd/maven-4.0.0.xsd">
    <parent>
        <groupId>com.fir</groupId>
        <artifactId>main</artifactId>
        <version>0.0.1</version>
    </parent>
    <modelVersion>4.0.0</modelVersion>
    <artifactId>device</artifactId>

    <description>
        设备子服务
    </description>
    <build>
        <plugins>
            <plugin>
                <groupId>org.springframework.boot</groupId>
                <artifactId>spring-boot-maven-plugin</artifactId>
                <configuration>
                    <classifier>exec</classifier>
                </configuration>
            </plugin>
        </plugins>
    </build>

</project>
业务模块子接口
    <build>
        <plugins>
            <plugin>
                <groupId>org.springframework.boot</groupId>
                <artifactId>spring-boot-maven-plugin</artifactId>
                <configuration>
                    <classifier>exec</classifier>
                </configuration>
            </plugin>
        </plugins>
    </build>
MyBatis-Plus 扫描配置
扫描配置方式应如下
import org.mybatis.spring.annotation.MapperScan;
import org.springframework.boot.SpringApplication;
import org.springframework.boot.autoconfigure.SpringBootApplication;
import org.springframework.context.annotation.Configuration;
import org.springframework.web.servlet.config.annotation.EnableWebMvc;
import springfox.documentation.swagger2.annotations.EnableSwagger2;


@SpringBootApplication
@MapperScan(basePackages = "com.fir.**.mapper")
@Configuration
@EnableWebMvc
@EnableSwagger2
public class Application {

    public static void main(String[] args) {
        SpringApplication.run(Application.class, args);
    }
}
#mybatis-plus配置
mybatis-plus: # mybatis-plus配置
  # 配置mapper的扫描,找到所有的mapper.xml映射文件
  mapper-locations: classpath*:mapper/**/*Mapper.xml # mapper映射包扫描
  type-aliases-package: com.fir.**.entity # entity别名
功能描述
exec
<classifier>exec</classifier> 是在 Spring Boot 项目的 Maven 构建中,配置 Spring Boot 插件的一个特定选项。这个选项的作用是为生成的 JAR 文件添加一个分类(classifier),以便在构建中区分不同的构建产物。
在 Maven 构建中,一个项目可以生成多个 JAR 文件,每个 JAR 文件可能包含不同类型的内容或用途。例如,在 Spring Boot 项目中,通常会生成两种类型的 JAR 文件:一个是普通的可执行 JAR 文件,另一个是不包含依赖的 JAR 文件(也称为"uber JAR")。这些不同类型的 JAR 文件可以通过添加分类来区分。
具体来说,<classifier>exec</classifier> 配置了一个分类为 “exec”,这个分类通常用于表示可执行的 JAR 文件。这样,当你构建项目时,会生成两个 JAR 文件:一个是普通的 JAR 文件,另一个带有 “exec” 分类,用于可执行的 JAR。你可以通过运行 java -jar 命令来执行这个带有 “exec” 分类的 JAR 文件。
这个分类的使用方式可以根据具体项目的需要而定,但通常用于标识不同类型的构建产物,以便在项目中使用时能够区分它们。
Uber JAR
“Uber JAR” 是一种特殊类型的 JAR(Java Archive) 文件,也被称为"Fat JAR" 或"可执行 JAR"。它在 Java 开发中常常用于将一个应用程序的所有依赖库和资源打包在一个单独的 JAR 文件中,从而使应用程序更易于分发和执行。
通常情况下,Java 项目的依赖会被打包成多个 JAR 文件,而应用程序的代码则位于一个或多个主要的 JAR 文件中。但是,当你要将一个应用程序部署到其他环境时,管理这些不同的 JAR 文件可能会变得复杂。
Uber JAR 解决了这个问题,它将应用程序的所有依赖库(包括第三方库)和资源文件打包到一个单独的 JAR 文件中。这意味着你只需要一个 JAR 文件就可以运行整个应用程序,而不必担心缺少依赖库或文件路径问题。
Uber JAR 的优点包括:
易于分发和部署:只需要一个 JAR 文件,简化了应用程序的分发和部署过程。
避免依赖冲突:所有的依赖库都被包含在一个 JAR 文件中,避免了潜在的依赖冲突问题。
独立运行:应用程序可以独立运行,不需要额外的配置或设置。
减少路径问题:不需要考虑依赖库的路径设置,简化了应用程序的配置。
然而,Uber JAR 也可能带来一些缺点,比如 JAR 文件的大小会增加,可能会造成启动时间稍微延长。在选择是否使用 Uber JAR 时,需要根据具体项目的需求和约束进行权衡。


 9万+
9万+


 被折叠的 条评论
为什么被折叠?
被折叠的 条评论
为什么被折叠?
 到【灌水乐园】发言


