


前言
因为前段时间有购买阿里云的轻量服务器同时个人对于服务器的使用也很有兴趣,原先是自己搭建博客项目通过nginx部署,但只能是静态而且也没太多时间去优化升级,浏览网页发现了博客框架hexo的官网,于是…
下载hexo脚手架
hexo官网
进入hexo官网,里面也有相关文档介绍,在下载之前最重要的就是需要node.js以及GIT的安装了,安装这些东西就不需要过多介绍了,直接快进下一步
(ps:node版本的选择可以选长期维护的,git的话就找到git官网去下就好了git下载,选“64-bit Git for Windows Setup.”这个下载就好了)
安装hexo脚手架
以下命令在hexo官网上是使用git命令行去安装的,但也可以使用自带的cmd去安装的
npm install -g hexo-cli
有可能会下载的很慢,可以先去下载淘宝镜像再执行上面一行命令应该会快很多
npm install -g cnpm --registry=https://registry.npm.taobao.org
安装完成后,使用 hexo -v 命令行就可以显示出相关版本号

显示以上内容的话就说明,已经成功安装啦,进入正题
找一个磁盘D、E新建文件夹名称自定义就好了,因为是要部署在服务器上,以上操作是同步的,至于服务器安装的地方么,看个人配置吧,我是最基础的放C盘了。
hexo init
初始化hexo
安装完成会出现:INFO Start blogging with Hexo!
到此,就完成了安装hexo,在命令行运行hexo s/hexo server

因为hexo启动默认端口就是4000当然也可以更改端口号
hexo server -p 4001

因为我是使用了主题zhaoo,默认显示的会是hexo官方提供的默认模板
如果以上安装有不懂的可以点击这里,文章内容介绍的很清楚
安装nginx
nginx启动/停止
nginx -s stop //停止服务
nginx 		  //启动服务
因为需要部署在服务器,用的最多的就是nginx啦,
nginx下载

下载完成就会有以下的东西,
conf文件夹最重要的文件是nginx.conf
html文件夹里存放的就是项目包了
Nginx详解
完成以上步骤就是进入到最后阶段
生成hexo静态文件
hexo官网也有讲到部署,但实际上是部署在github代码库里,通过github的链接就能访问到你部署的博客
当然,个人还是觉得生成静态文件部署在nginx上就舒服很多
 hexo generate
 执行此命令会生成项目静态文件夹,跟vue使用webpack打包一样


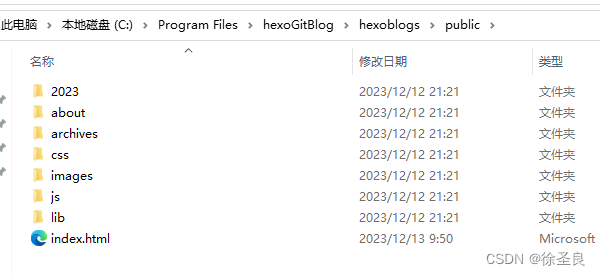
就像以上这样,弄好这些,复制剪切都行,放到nginx的html目录下就ok了
当然了,到这里,nginx都还没配置呢,运行nginx是肯定不行滴
#user  root;
worker_processes  1;

#error_log  logs/error.log;
#error_log  logs/error.log  notice;
#error_log  logs/error.log  info;

#pid        logs/nginx.pid;


events {
    worker_connections  1024;
}


http {
    include       mime.types;
    default_type  application/octet-stream;

    #log_format  main  '$remote_addr - $remote_user [$time_local] "$request" '
    #                  '$status $body_bytes_sent "$http_referer" '
    #                  '"$http_user_agent" "$http_x_forwarded_for"';

    #access_log  logs/access.log  main;

    sendfile        on;
    #tcp_nopush     on;

    #keepalive_timeout  0;
    keepalive_timeout  65;

    #gzip  on;

    server {
        listen       81;
        server_name  localhost;

        #charset koi8-r;

        #access_log  logs/host.access.log  main;

        location / {
            root  html;
            index  index.html index.htm;
        }

        #error_page  404              /404.html;

        # redirect server error pages to the static page /50x.html
        #
        error_page   500 502 503 504  /50x.html;
        location = /50x.html {
            root   html;
        }

        # proxy the PHP scripts to Apache listening on 127.0.0.1:80
        #
        #location ~ \.php$ {
        #    proxy_pass   http://127.0.0.1;
        #}

        # pass the PHP scripts to FastCGI server listening on 127.0.0.1:9000
        #
        #location ~ \.php$ {
        #    root           html;
        #    fastcgi_pass   127.0.0.1:9000;
        #    fastcgi_index  index.php;
        #    fastcgi_param  SCRIPT_FILENAME  /scripts$fastcgi_script_name;
        #    include        fastcgi_params;
        #}

        # deny access to .htaccess files, if Apache's document root
        # concurs with nginx's one
        #
        #location ~ /\.ht {
        #    deny  all;
        #}
    }


    # another virtual host using mix of IP-, name-, and port-based configuration
    #
    #server {
    #    listen       8000;
    #    listen       somename:8080;
    #    server_name  somename  alias  another.alias;

    #    location / {
    #        root   html;
    #        index  index.html index.htm;
    #    }
    #}


    # HTTPS server
    #
    #server {
    #    listen       443 ssl;
    #    server_name  localhost;

    #    ssl_certificate      cert.pem;
    #    ssl_certificate_key  cert.key;

    #    ssl_session_cache    shared:SSL:1m;
    #    ssl_session_timeout  5m;

    #    ssl_ciphers  HIGH:!aNULL:!MD5;
    #    ssl_prefer_server_ciphers  on;

    #    location / {
    #        root   html;
    #        index  index.html index.htm;
    #    }
    #}
server {
        listen       80;  # 定义端口号;
        server_name  127.0.0.1;# 定义服务名

        location / {
        add_header 'Access-Control-Allow-Origin' '*';
        add_header 'Access-Control-Allow-Credentials' true;
        add_header 'Access-Control-Allow-Headers' *;
        add_header 'Access-Control-Allow-Methods' *;
        add_header 'Access-Control-Expose-Headers' *;
            root   html/public; # 打包后的文件目录,这里是相对路径,也可以写带磁盘的绝对路径
            index  index.html index.htm;
            try_files $uri $uri/ /index.html;	 # 防止刷新出现404
        }

        error_page   500 502 503 504  /50x.html;
        location = /50x.html {
            root   html;
        }
}


}
以上的这个是我个人的相关配置,来自conf文件夹的文件nginx.conf
完成了这些再去运行nginx命令就可以了,通过服务器的公网ip就可以访问到你刚刚部署的博客了
就像这样
补充
如果需要使用hexo的主题的话就例如我使用的主题,zhaoo主题作者的博客,里面详细介绍了主题的安装和使用
刚开始的时候我遇到的问题就是生成静态文件部署发现jq是未定义的,其实去到主题的配置文件cdn里修改一下jq的cdn链接再生成就好了

切换主题
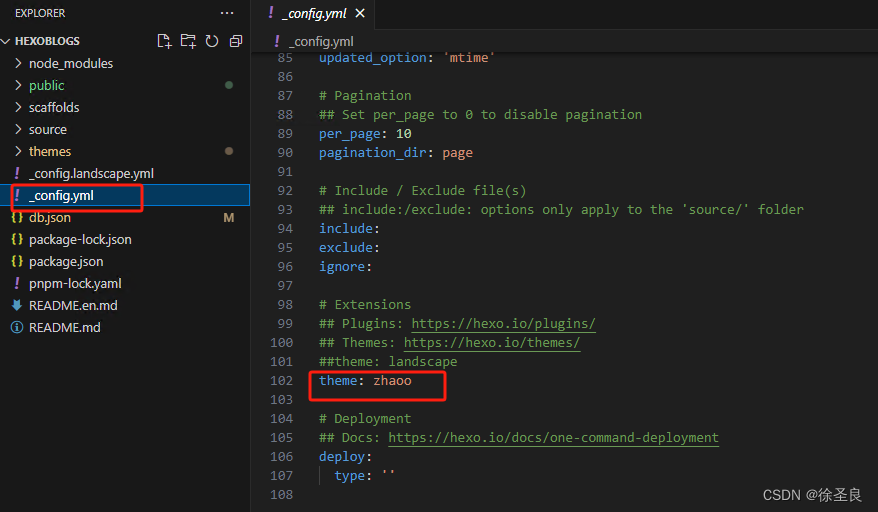
刚刚修改cdn的文件在themes文件夹里的zhaoo文件夹的config.yml里
注意,写字段的时候写完字段和英文冒号记得空一个格噢!
以上内容是在本地计算机和服务器同步进行,我个人是将hexo项目放在码云平台上,在服务器通过git的方式获取新的修改,再次生成静态文件放入nginx的html文件夹当中,后续会尝试本地计算机通过内网穿透的形式达到启用本地计算机使公网能够访问博客内容,(先让我试试,然后分享实践内容)
以上就是使用nginx部署hexo博客框架搭建实践的分享,如果有不理解的地方欢迎私信。


 1853
1853


 被折叠的 条评论
为什么被折叠?
被折叠的 条评论
为什么被折叠?
 到【灌水乐园】发言


