springboot整合mybatis接口文件与映射文件的放置

一、接口文件与xml文件同包放置

操作:pom文件下加入

<resources>
    <resource>
        <directory>src/main/java</directory>
        <includes>
            <include>**/*.xml</include>
        </includes>
    </resource>
</resources>

并且接口文件与xml文件命名必须一致
在这里插入图片描述
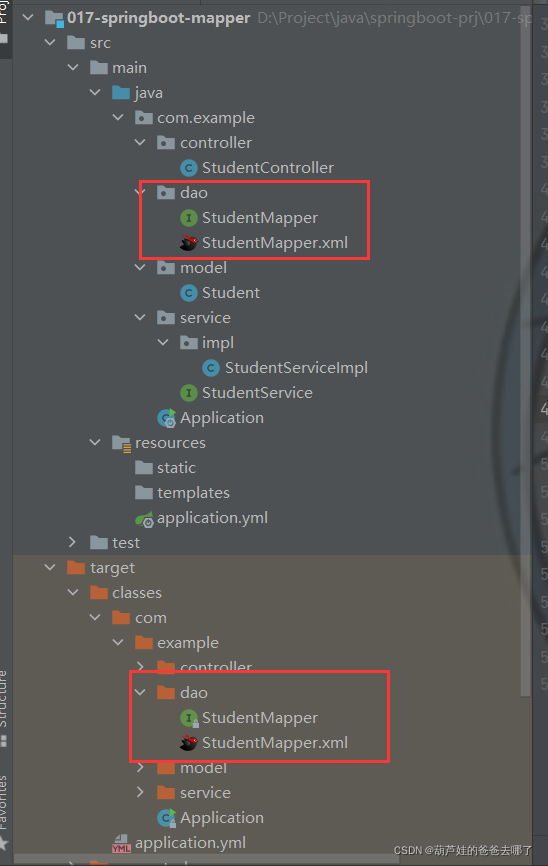
从生成的target文件结构和命名必须一致的推测来看,底层注册映射文件的方式应该是使用映射器接口实现类的完全限定类名

<!--
使用映射器接口实现类的完全限定类名
需要配置文件名称和接口名称一致,并且位于同一目录下
-->
<mappers>
 <mapper class="org.mybatis.builder.AuthorMapper"/>
</mappers>

二、接口文件与xml文件分开放置

1 在resources中创建与src/main/Java下同层级的包

操作:此方法比起另外两种方法来说不用进行额外的配置,接口文件与xml文件命名必须一致

踩坑点:resources下创建包时建议一层一层创建,直接一次性创建com.example.dao容易报错,应该是idea原因
在这里插入图片描述
在这里插入图片描述
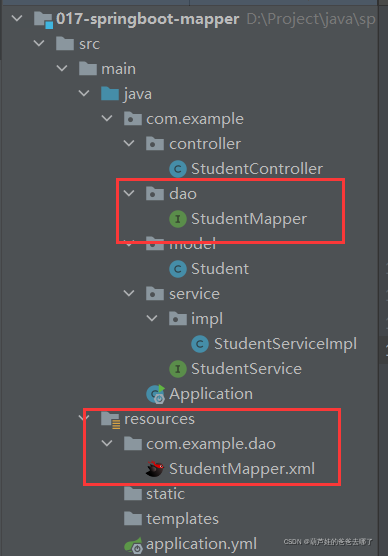
接口文件与xml文件命名必须一致,因为生成的target结构与同包放置时相同,所以底层原理与第一种相同

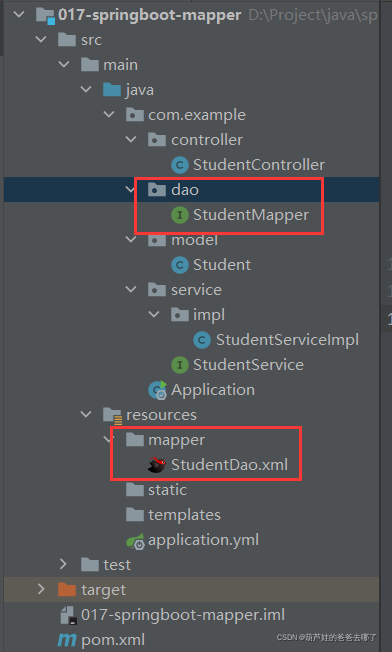
2 将xml文件放置在resources文件夹下自定义的mapper文件夹下

操作:此时xml文件与接口文件的命名可以不一致,需要在aplication.yml文件中进行配置:

mybatis:
  mapper-locations: classpath:mapper/*.xml
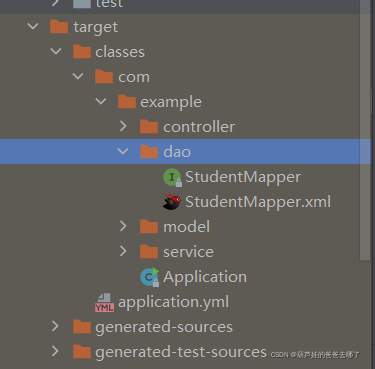
在这里插入图片描述

生成的target的结构是
在这里插入图片描述

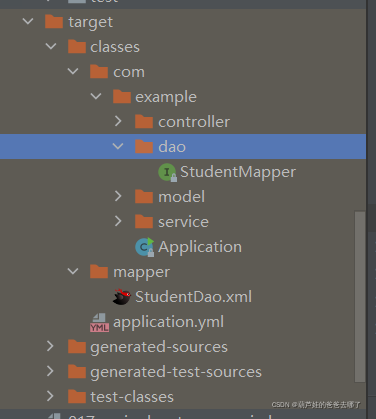
因为不需要同名同目录所以猜测底层mapper文件注册使用的方式是使用相对于类路径的资源引用

<!-- 使用相对于类路径的资源引用 -->
<mappers>
 <mapper resource="org/mybatis/builder/PostMapper.xml"/>
</mappers>
  • 5
    点赞
  • 17
    收藏
    觉得还不错? 一键收藏
  • 1
    评论
### 回答1: Spring Boot整合MyBatis的配置文件主要包括以下几个方面: 1. 数据库连接配置 在application.properties或application.yml中配置数据库连接信息,包括数据库URL、用户名、密码等。 2. MyBatis配置 在application.properties或application.yml中配置MyBatis的相关配置,包括Mapper扫描路径、MyBatis配置文件路径等。 3. 数据源配置 在Spring Boot中,可以使用自带的数据源或者第三方数据源,如Druid、HikariCP等。需要在配置文件中配置数据源相关信息。 4. Mapper配置 在MyBatis中,需要配置Mapper接口和Mapper.xml文件的对应关系。可以使用@MapperScan注解或者在MyBatis配置文件中配置。 以上是Spring Boot整合MyBatis的主要配置文件内容,具体实现可以参考Spring Boot官方文档或者相关教程。 ### 回答2: Spring Boot是一个基于Spring框架的快速开发Java Web应用的工具。而Mybatis是一个优秀的持久层框架。在实际开发中,很多项目会将Spring BootMybatis集成起来使用,这样可以使开发更加高效,代码更加简洁。下面我将介绍Spring Boot整合Mybatis的配置步骤。 1.添加依赖 在pom.xml中加入Spring BootMybatis的依赖。 ``` <dependency> <groupId>org.springframework.boot</groupId> <artifactId>spring-boot-starter-web</artifactId> </dependency> <dependency> <groupId>org.mybatis.spring.boot</groupId> <artifactId>mybatis-spring-boot-starter</artifactId> </dependency> <dependency> <groupId>com.alibaba</groupId> <artifactId>druid-spring-boot-starter</artifactId> <version>1.1.6</version> </dependency> ``` 2.设置数据源 在application.properties中设置数据源参数,包括数据库名称、用户名、密码等等。 ``` spring.datasource.url=jdbc:mysql://localhost:3306/test?useUnicode=true&characterEncoding=utf-8&autoReconnect=true spring.datasource.username=root spring.datasource.password=root spring.datasource.driver-class-name=com.mysql.jdbc.Driver ``` 3.配置Mybatis 在resources目录下新建mybatis文件夹,在其中创建一些必要的配置文件,如SqlMapper.xmlmybatis-config.xml、Application.yml等。 a、SqlMapper.xml 配置连接mysql并定义Mapper操作的SQL语句,可以通过namespace来设置映射接口。在这里我们可以看到它是里面是调用的映射接口 ID。 ``` <?xml version="1.0" encoding="UTF-8"?> <!DOCTYPE mapper PUBLIC "-//mybatis.org//DTD Mapper 3.0//EN" "http://mybatis.org/dtd/mybatis-3-mapper.dtd"> <mapper namespace="com.nian.springboot.mapper.StudentMapper"> <select id="selectByPrimaryKey" resultType="com.nian.springboot.pojo.Student"> select * from student where id = #{id,jdbcType=INTEGER} </select> </mapper> ``` b、mybatis-config.xml mybatis-config.xml用于配置Mybatis相关信息。 ``` <?xml version="1.0" encoding="UTF-8"?> <!DOCTYPE configuration PUBLIC "-//mybatis.org//DTD Config 3.0//EN" "http://mybatis.org/dtd/mybatis-3-config.dtd"> <configuration> <settings> <setting name="logImpl" value="LOG4J"/> </settings> <typeAliases> <typeAlias type="com.nian.springboot.pojo.Student" alias="Student"/> </typeAliases> <mappers> <mapper resource="mapper/StudentMapper.xml"/> </mappers> </configuration> ``` c、Application.yml 在resources目录下新建application.yml文件,用于设置Spring Boot应用程序的配置,包括服务器端口、运行环境等。 ``` spring: servlet: multipart: max-file-size: 10MB max-request-size: 100MB async: request-timeout: 60000 datasource: url: jdbc:mysql://127.0.0.1:3306/mybatis?useUnicode=true&characterEncoding=utf-8&useSSL=false username: root password: root driver-class-name: com.mysql.jdbc.Driver mybatis: config-location: classpath:mybatis/mybatis-config.xml mapper-locations: classpath*:mapper/**/*.xml type-aliases-package: com.nian.springboot.pojo ``` 4.创建mapper 创建mapper文件夹,并创建映射接口,如StudentMapper.java。 ``` public interface StudentMapper { Student selectByPrimaryKey(Integer id); } ``` 5.创建entity 创建实体类,映射数据库中的表,如Student.java。 ``` public class Student { private Integer id; private String name; private Integer age; private String sex; //getter setter } ``` 6.创建service 创建service,实现业务逻辑,如StudentService.java。 ``` @Service public class StudentService { @Autowired private StudentMapper studentMapper; public Student selectByPrimaryKey(Integer id) { return studentMapper.selectByPrimaryKey(id); } } ``` 7.创建Controller 创建Controller接口,处理请求,如StudentController.java。 ``` @RestController @RequestMapping("/student") public class StudentController { @Autowired private StudentService studentService; @RequestMapping(value = "/selectByPrimaryKey", method = RequestMethod.GET) public Student selectByPrimaryKey(@RequestParam("id") Integer id) { return studentService.selectByPrimaryKey(id); } } ``` 以上就是Spring Boot整合Mybatis的大致步骤,当然,具体实现跟业务有关。可以先按照这个框架搭建结构,再根据具体业务逻辑进行扩展和修改。整合后,我们就可以用Spring BootMybatis在数据库中进行数据的 CRUD(增删改查) 操作了。 ### 回答3: Spring Boot 是一个基于 Spring 框架的快速开发框架,它具有简单、快速、灵活等优点,可用于快速搭建 Web 应用程序。MyBatis 是一款优秀的持久化框架,可以帮助开发者简化 DAO 层的开发。在实际的项目中,常常需要将 Spring BootMyBatis 结合起来使用,以帮助实现数据的持久化操作。本文将向读者介绍 Spring Boot 如何整合 MyBatis 的配置文件。 1. 添加依赖 首先,需要在 pom.xml 文件中添加 MyBatis 和数据库驱动程序的依赖。常用的数据库驱动程序有 MySQL、Oracle 等,具体的依赖信息可以在 Maven 仓库中查找。在 pom.xml 中添加如下代码: ``` <dependencies> <!-- MyBatis --> <dependency> <groupId>org.mybatis.spring.boot</groupId> <artifactId>mybatis-spring-boot-starter</artifactId> <version>2.1.0</version> </dependency> <!-- MySQL 驱动 --> <dependency> <groupId>mysql</groupId> <artifactId>mysql-connector-java</artifactId> <version>5.1.48</version> </dependency> </dependencies> ``` 2. 配置数据源 在 Spring Boot 中,可以使用 application.properties 或 application.yml 的配置文件来配置数据源。需要注意的是,数据源的配置需要放在 Spring Boot 的自动配置类上方,以便在 MyBatis 配置文件中使用。这里以 MySQL 数据库为例,配置如下: ``` spring.datasource.url=jdbc:mysql://localhost:3306/test spring.datasource.username=root spring.datasource.password=root spring.datasource.driver-class-name=com.mysql.jdbc.Driver ``` 3. 配置 MyBatisSpring Boot 集成 MyBatis 的过程中,还需要配置 MyBatis 的相关参数,例如 MyBatis 的 mapper、configuration 等。Spring Boot 通过扫描指定的包来自动装配 mapper,并且 MyBatis 的配置文件 mybatis-config.xml 可以省略。在 application.properties 或 application.yml 中添加 MyBatis 相关配置: ``` mybatis.mapper-locations=classpath*:mapper/*.xml mybatis.configuration.map-underscore-to-camel-case=true mybatis.configuration.cache-enabled=true ``` 4. 创建 mapper 接口和实体类 在 Spring Boot 中,可以使用注解方式来声明 mapper 接口和实体类。在 mapper 接口上加上`@Mapper` 注解,在实体类上加上`@TableName` 注解即可: ``` @Mapper public interface UserMapper { @Select("select * from user where id=#{userId}") User findUserById(int userId); } @Data @TableName(value = "user") public class User { @TableId(value = "id",type = IdType.AUTO) private Integer id; private String userName; private String password; } ``` 5. 测试 最后,在 controller 中引入 mapper 接口,即可调用其方法进行数据的操作: ``` @RestController public class UserController { @Autowired private UserMapper userMapper; @RequestMapping("/user/{userId}") public User getUserById(@PathVariable int userId){ User user=userMapper.findUserById(userId); return user; } } ``` 以上是 Spring Boot 整合 MyBatis 的配置方法,通过这种方式可以快速地实现对数据库的操作。同时,Spring Boot 还集成了其他的数据库操作框架,如 JPA、Hibernate 等,读者可以根据需要选择使用。

“相关推荐”对你有帮助么?

  • 非常没帮助
  • 没帮助
  • 一般
  • 有帮助
  • 非常有帮助
提交
评论 1
添加红包

请填写红包祝福语或标题

红包个数最小为10个

红包金额最低5元

当前余额3.43前往充值 >
需支付:10.00
成就一亿技术人!
领取后你会自动成为博主和红包主的粉丝 规则
hope_wisdom
发出的红包
实付
使用余额支付
点击重新获取
扫码支付
钱包余额 0

抵扣说明:

1.余额是钱包充值的虚拟货币,按照1:1的比例进行支付金额的抵扣。
2.余额无法直接购买下载,可以购买VIP、付费专栏及课程。

余额充值