


基于nginx和consul构建自动发现的docker服务架构
#基于上方环境搭建 点击跳转
一:Consul概述
Consul是一套开源的分布式服务发现和配置管理系统,支持多数据中心分布式高可用。Consul是HashiCorp(Vagrant的创建者)开发的一个服务发现与配置项目,用Go语言开发,基于
Mozilla Public License 2.0 的协议开源。
另外,架构里的另一个重要的角色则是Docker。Docker技术的不断成熟,孵化出了大量优秀的相关技术,比如docker监控,开源技术有cAdvisor、Cloud
Insight或Telegraf等,自定义开发方式,Docker stats、Python
API或伪文件系统;Docker管理,Forman、Kubernetes与CoreOS(都已整合各类组件),各类技术覆盖网络、监控、维护、部署、开发等方面,帮助开发、运维人员快速构建、运营Docker服务环境。
面对如此优秀和快速发展的一个生态圈技术,在企业当中,我们该如何选择并发挥Docker的强大之处?
而现实中,我们一直渴望着追求提供高质量、高可用的服务架构体系,同时减少不必要的部署和维护代价,减少容错率。
解决方法:
面对如此高的要求,我们提供了一下一种方案
Docker+Consul+Nginx
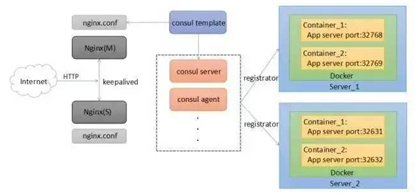
今天我将对比以上方案,给大家提供一种更加高效、快捷,并且维护代价和容错率更低,分布式支持力度更强的架构方案Docker+Consul+Nginx(如图)
(1)Consul:
1、Consul 是 HashCorp 公司推出的开源工具,用于实现分布式系统的服务发现与配置;
2、Consul 特点:
consul 支持健康检查,允许存储键值对;
一致性协议采用 Raft 算法,用来保证服务的高可用;
成员管理和消息广播采用 GOSSIP
协议,支持 ACL 访问控制;
3、方便部署,与 Docker 等轻量级容器可无缝配合。
(2)建立 Consul 服务:
1、每个提高服务的节点上都需要部署和运行 consul 的 agent
2、Consul agent 两种运行模式:
server;
client;
3、server 与 client 只是 consul 群集层面的区分,与搭建在 cluster 之上的应用服务无关。
二:搭建consul群集
环境准备
这里,我们选用Nginx(Consul Template官方同时提供了Nginx和HAProxy的配置demo)。Nginx不仅是个强大的Web代理服务器,同时在负载均衡方面表现也不俗。更关键的,新版本的Nginx对在线升级支持做到了极致。实时配置更新更是不在话下,可以保证服务的连续性。
Nginx将会根据转发策略把请求转发给其中一个健康的服务实体;
前端服务,将会通过负载策略去访问某个后端服务。这一点也是通过Nginx的自身组件实现。
基础架构
Ip地址:主机名 需要安装的软件
192.168.10.101:centos-01	Docker-ce、Compose3、Consul、Consul-template
192.168.10.102:centos-02	Docker-ce、registrator
架构图:
案例实施:
Centos-01配置 consul 服务器(注册中心的安装)
[root@centos-01 ~]# mkdir consul
[root@centos-01 ~]# cd consul/
[root@centos-01 consul]# rz -E
rz waiting to receive.
[root@centos-01 consul]# ls
consul_1.5.2_linux_amd64.zip consul-template_0.19.3_linux_amd64.zip
[root@centos-01 consul]# yum -y install unzip
[root@centos-01 consul]# unzip consul_1.5.2_linux_amd64.zip
[root@centos-01 consul]# unzip consul_1.5.2_linux_amd64.zip
Archive: consul_1.5.2_linux_amd64.zip
inflating: consul
[root@centos-01 consul]# ls
consul
[root@centos-01 consul]# cp consul /usr/bin/
[root@centos-01 consul]#nohup consul agent -server -bootstrap -ui --data-dir=/var/lib/consul-data -bind=192.168.10.101 -client=0.0.0.0 -node=consul-server01 &>>/var/log/sonsul.log &
参数解释
nohup:挂起不中断,不向tty发送信息,即使中断终端。也会继续执行
-bootstrap:用来控制一个Server节点是否处于bootstrap模式,在一个数据中心中,只能有一个节点处于bootstrap模式,当一个节点处于bootstrap模式时,可以自己选取为raft leader(主)
--data-dir:指定数据存储目录
-bind:该地址用于集群内部的通信,集群内的所有的节点,到达这个地址都必须是可达的,默认是0.0.0.0
-ui:指定开启UI界面,可以通过http://localhost:8500/ui访问consul自带的UI界面,可以查看发现的节点
-client:指定consul绑定在那个Client节点上,默认是127.0.0.1
-node:指定集群中的名称,这个名称在集群中是唯一的,默认是节点的主机名
&>>/var/log/sonsul.log &:是将日志输入到var/log/sonsul.log下,并且在后台运行
[root@centos-01 consul]# consul members
Node Address Status Type Build Protocol DC Segment
consul-server01 192.168.10.101:8301 alive server 1.5.2 2 dc1 <all>
[root@centos-01 ~]# curl 127.0.0.1:8500/v1/status/peers
["192.168.10.101:8300"]
[root@centos-01 ~]# curl 127.0.0.1:8500/v1/status/leader
["192.168.10.101:8300"]
Centos-02配置自动注册服务
[root@centos-02 ~]# docker run -d --name=registrator --net=host -v /var/run/docker.sock:/tmp/docker.sock --restart=always gliderlabs/registrator:latest -ip=192.168.10.102 consul://192.168.10.101:8500
3584ee779512c61e5b2ed7c38488a5995d1668c08a82e3e925f7e5c4202e4f04
[root@centos-02 ~]# docker ps -a
CONTAINER ID IMAGE COMMAND CREATED STATUS PORTS NAMES
3584ee779512 gliderlabs/registrator:latest "/bin/registrator -i…" 16 minutes ago Up 16 minutes
可以通过http://localhost:8500/ui访问consul自带的UI界面
注册服务已经安装完毕
验证自动注册服务
在centos-2上创建服务
启动一个容器nginx服务
[root@centos-02 ~]# docker run -d -p 80 -v /web1:/usr/share/nginx/html --name web1 -h web1 nginx
[root@centos-02 ~]# echo web1 >> /web1/index.html
[root@centos-02 ~]# docker run -d -p 80 -v /web2:/usr/share/nginx/html --name web2 -h web2 nginx
[root@centos-02 ~]# echo web2 >> /web2/index.html
[root@centos-02 ~]# docker run -d -P -v /web3:/usr/local/apache2/htdocs --name=web3 -h web3 httpd
[root@centos-02 ~]# echo web3 >> /web3/index.html
[root@centos-02 ~]# docker run -d -P -v /web4:/usr/local/apache2/htdocs --name=web4 -h web4 httpd
[root@centos-02 ~]# echo web4 >> /web4/index.html
[root@centos-02 ~]# docker ps -a
CONTAINER ID IMAGE COMMAND CREATED STATUS PORTS NAMES
9eacf6e9e61f httpd "httpd-foreground" 2 minutes ago Up 2 minutes 0.0.0.0:32772->80/tcp web4
807d1842bb2a httpd "httpd-foreground" 2 minutes ago Up 2 minutes 0.0.0.0:32771->80/tcp web3
25184129e1d2 nginx "/docker-entrypoint.…" 4 minutes ago Up 4 minutes 0.0.0.0:32770->80/tcp web2
5343785e3094 nginx "/docker-entrypoint.…" 6 minutes ago Up 6 minutes 0.0.0.0:32769->80/tcp web1
3584ee779512 gliderlabs/registrator:latest "/bin/registrator -i…" 36 minutes ago Up 36 minutes registrator
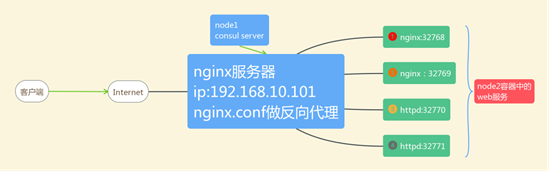
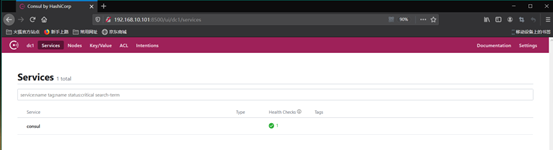
通过Centos-01的UI界面进行查看是否注册成功
http://192.168.10.101:8500/ui
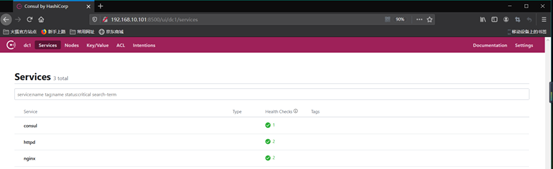
可以通过UI界面查看已经自动注册成功
也可以通过curl查看有那些服务
[root@centos-01 ~]# curl 127.0.0.1:8500/v1/catalog/services
{“consul”:[],“httpd”:[],“nginx”:[]}
到此服务搭建完成
使用nginx搭建负载均衡(基于上方环境)
文件链接:https://pan.baidu.com/s/10NZ6t4dNW7xi359YE4qMFg
提取码:fajs
复制这段内容后打开百度网盘手机App,操作更方便哦
文件下载后拖入centos-01的/root目录下:
nginx-1.16.1-1.el7.ngx.x86_64.rpm
openssl-1.0.2k-16.el7_6.1.x86_64.rpm
openssl-libs-1.0.2k-16.el7_6.1.x86_64.rpm
安装nginx:
[root@centos-01 ~]# yum -y install ./*.rpm
拖入
consul-template_0.19.3_linux_amd64.zip
nginx.ctmpl为nginx模板文件
[root@centos-01 consul]# cat nginx.ctmpl
upstream web_backend {
        {{ range service "nginx" }}
        server {{ .Address }}:{{ .Port }};
        {{ end }}
        {{ range service "httpd" }}
        server {{ .Address }}:{{ .Port }};
        {{ end }}
}

server {
        listen 83;
        server_name localhost 192.168.10.101;
        access_log /var/log/nginx/kgc.cn-access.log;
        index index.html index.php;
        location / {
                proxy_set_header HOST $host;
                proxy_set_header X-Real-IP $remote_addr;
                proxy_set_header Client-IP $remote_addr;
                proxy_set_header X-Forwarded-For $proxy_add_x_forwarded_for;
                proxy_pass http://web_backend;
        }
}
consul-template_0.19.3_linux_amd64.zip的作用:基于consul的自动更新配置文件
使用模板配置文件生成服务发现的配置文件
备份nginx的子配置文件
[root@centos-01 ~]# mv /etc/nginx/conf.d/default.conf {,.bak}
启动nginx
[root@centos-01 ~]# systemctl enable --now nginx
解压 consul-template_0.19.3_linux_amd64.zip
[root@centos-01 ~]# cd consul/
[root@centos-01 consul]# unzip consul-template_0.19.3_linux_amd64.zip
[root@centos-01 consul]# mv consul-template /usr/bin/
[root@centos-01 consul]# consul-template --consul-addr 192.168.10.101:8500 -template "/root/consul/nginx.ctmpl:/etc/nginx/conf.d/kgc.conf:systemctl reload nginx" --log-level=info
启动成功后验证服务
访问nginx监听的83端口
http://192.168.10.101:80/
按F5进行刷新,验证负载均衡服务

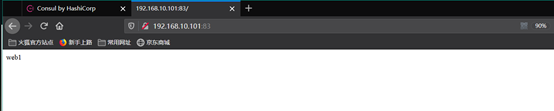
此时负载均衡服务已经搭建完成
查看生成的动态配置文件,四台服务都已经加入到服务器池中


 663
663


 被折叠的 条评论
为什么被折叠?
被折叠的 条评论
为什么被折叠?
 到【灌水乐园】发言


