


😀如果对你有帮助的话😊
🌺为博主点个赞吧 👍
👍点赞是对博主最大的鼓励😋
💓爱心发射~💓
SpringBoot
前情提要
微服务阶段
- javase:AOP
- mysql:持久化
- html+css+js+jquery-+框架:视图,框架不熟练,css不好;
- javaweb:独立开发MVC三层架构的网站了:原始
- ssm:框架:简化了我们的开发流程
- war:tomcati运行
- spring再简化:SpringBoot;微服务架构!
- 服务越来越多:springcloud;
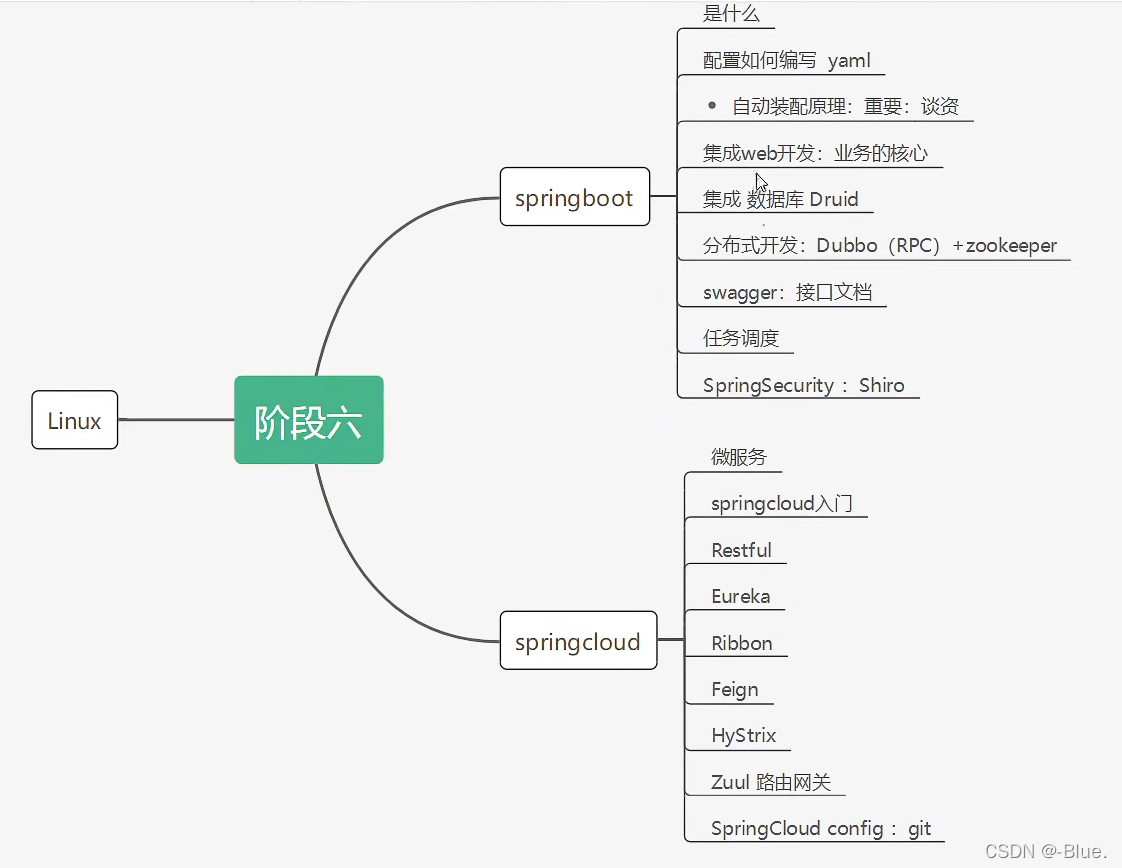
一、什么是SpringBoot?什么是微服务?
环境准备
- jdk1.8
- maven 3.6.1
- springboot:最新
- IDEA
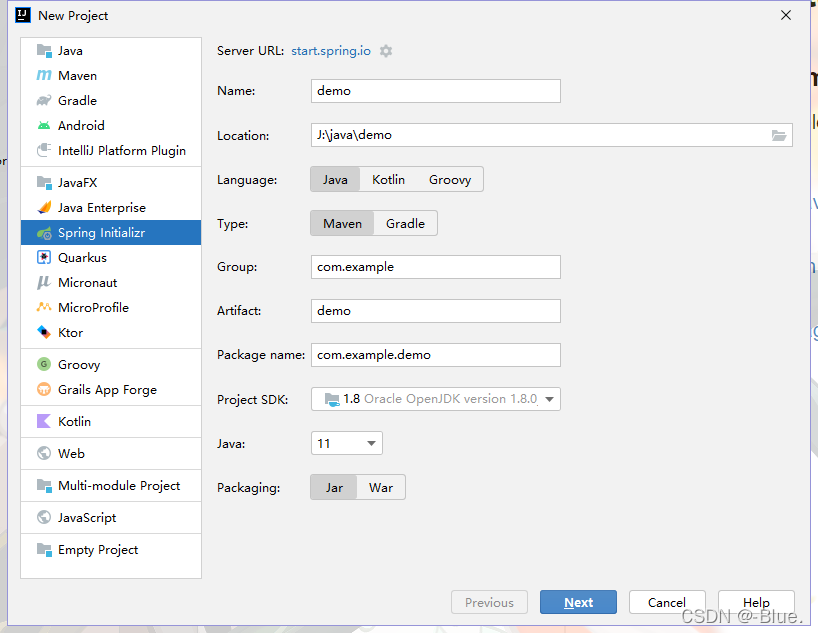
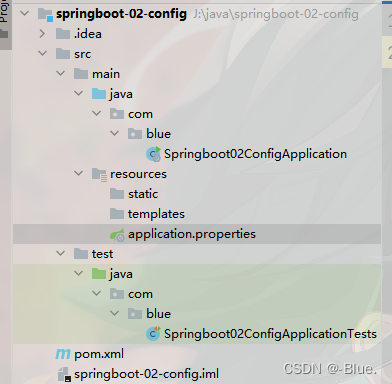
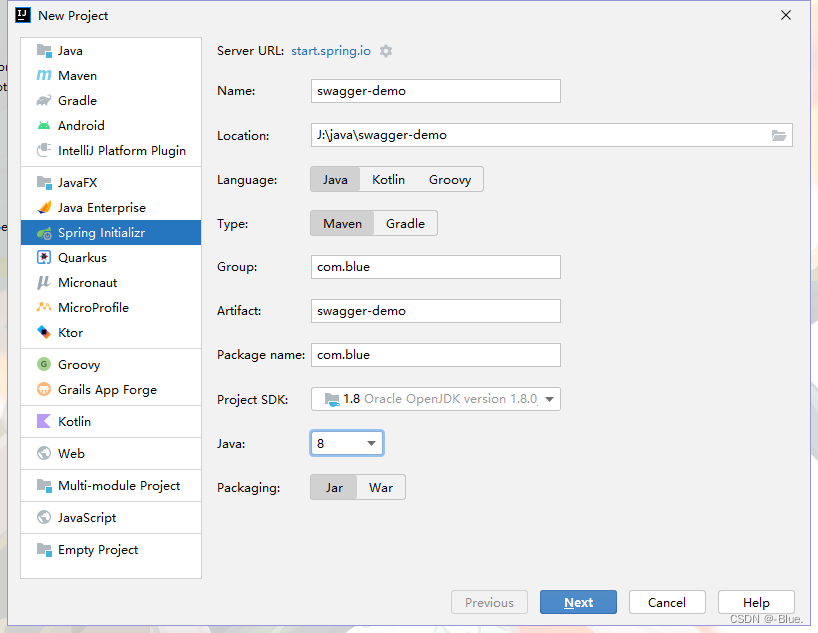
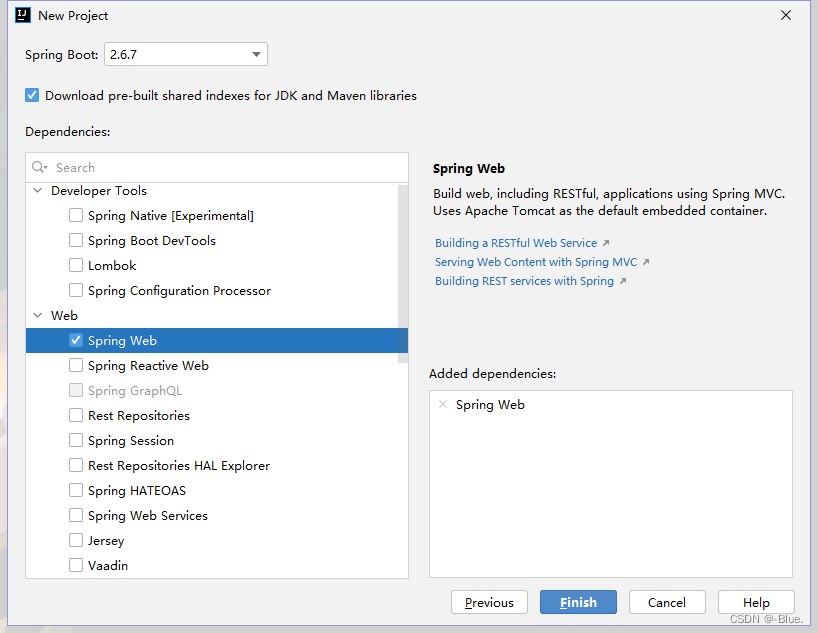
创建项目
官方:提供了一个快速生成的网站!IDEA集成了这个网站!
两种方法:
- 可以在官网直接下载后,导入idea开发(官网在哪)
- 直接使用idea创建一个springbootI项目(一般开发直接在IDEA中创建)
SpringBoot官网
SpringBoot官网下载项目jar包
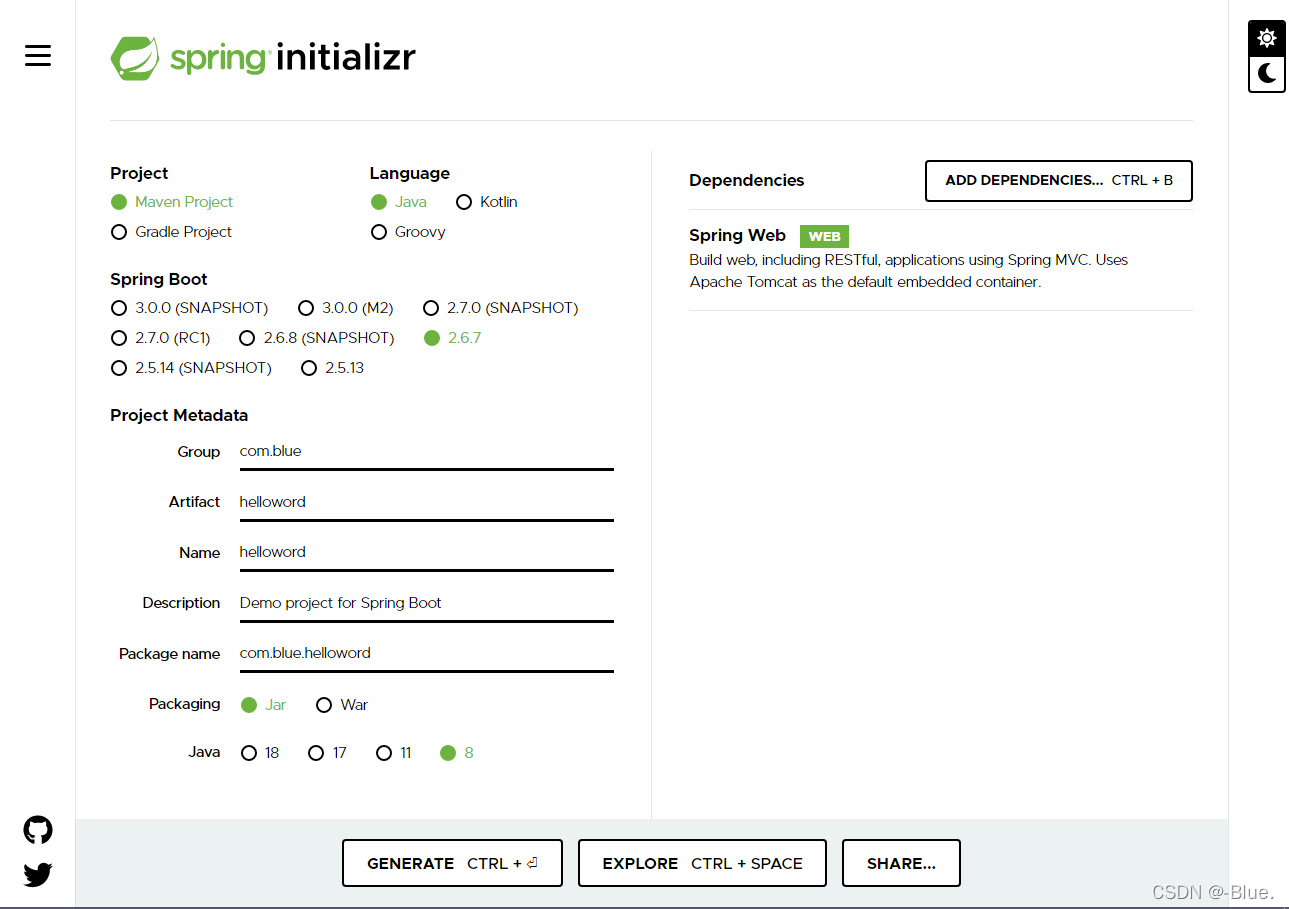
默认模块(多余的删除)
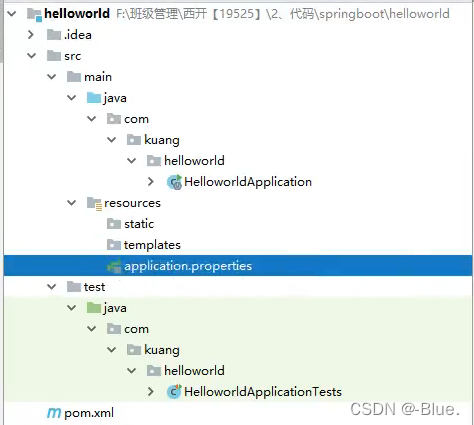

IDEA创建步骤

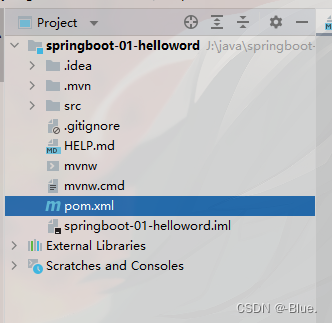
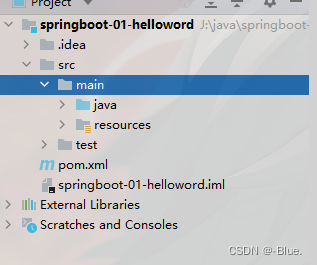
把不用的文件删除
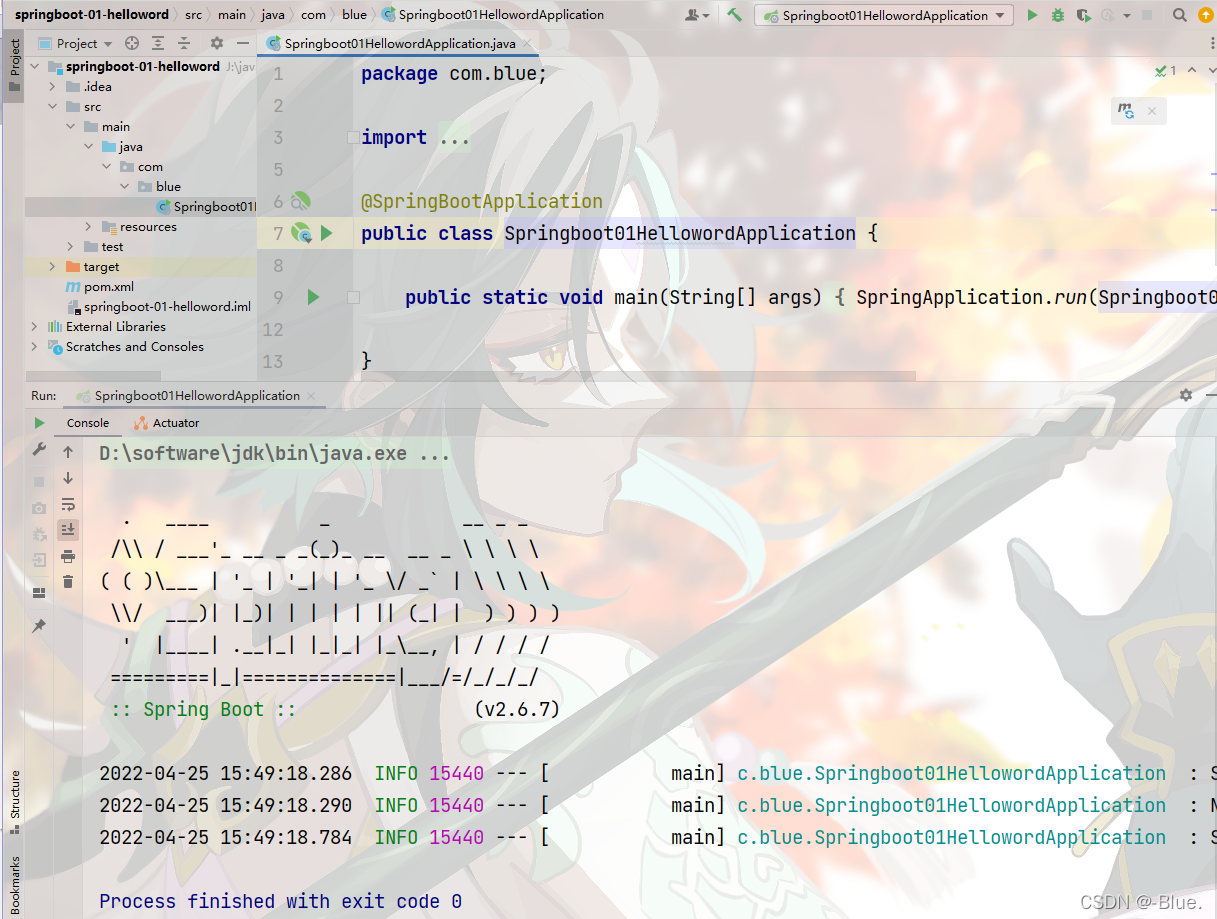
启动程序
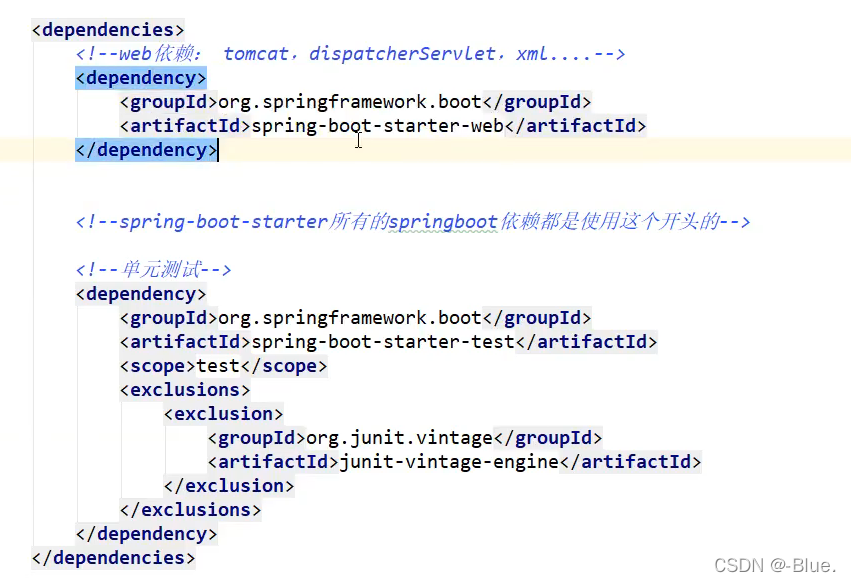
加上依赖
        <dependency>
            <groupId>org.springframework.boot</groupId>
            <artifactId>spring-boot-starter-web</artifactId>
        </dependency>
运行
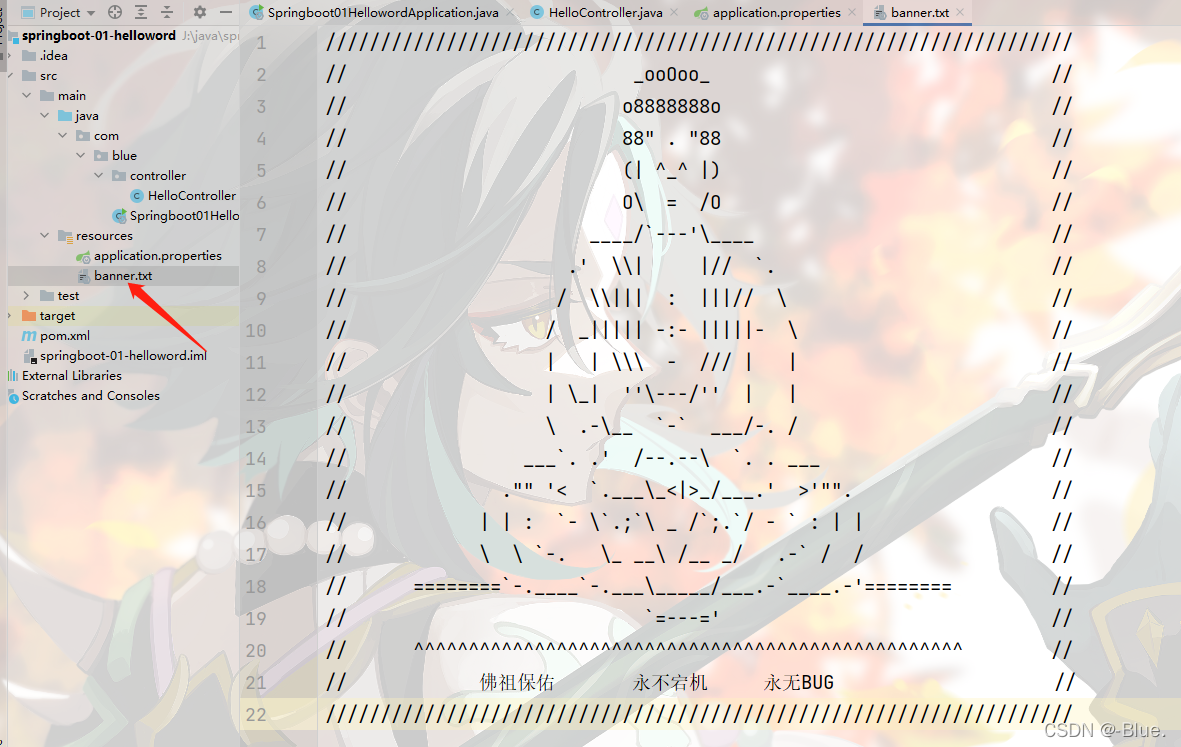
小玩意
- 改端口号

- 更改banner艺术字
二、原理初探
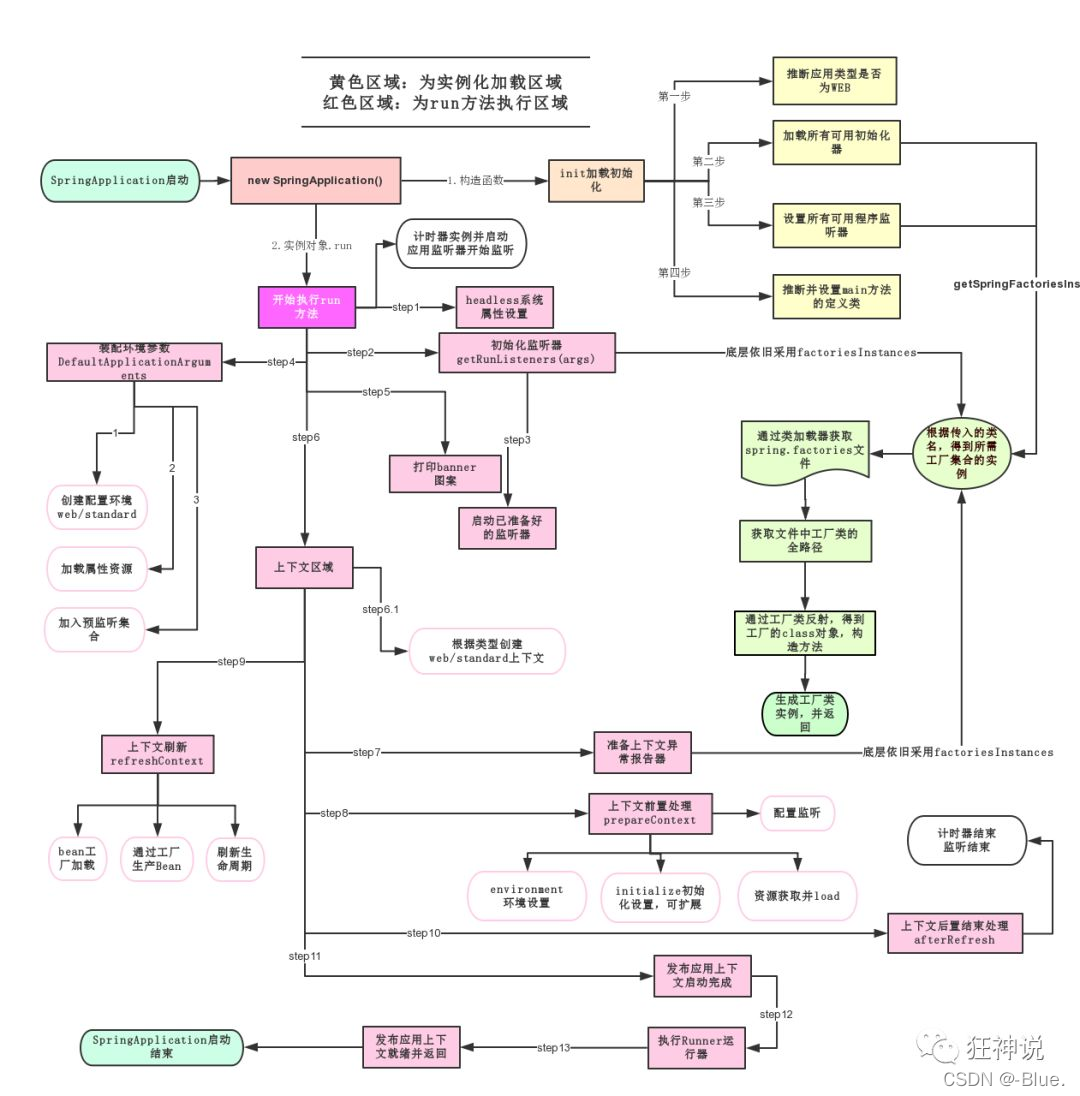
运行原理
SpringBoot02:运行原理初探
自动配置:
pom.xml
spring-boot-dependencies:核心依赖在父工程中!- 我们在写或者引入一些
Springboot依赖的时候,不需要指定版本,就因为有这些版本仓库
启动器
<dependency>
            <groupId>org.springframework.boot</groupId>
            <artifactId>spring-boot-starter</artifactId>
        </dependency>
- 启动器:说白了就是
Springboot的启动场景; - 比如
spring-boot-starter-web,他就会帮我们自动导入web环境所有的依赖! springboot会将所有的功能场景,都变成一个个的启动器- 我们要使用什么功能,就只需要找到对应的启动器就可以了
starter
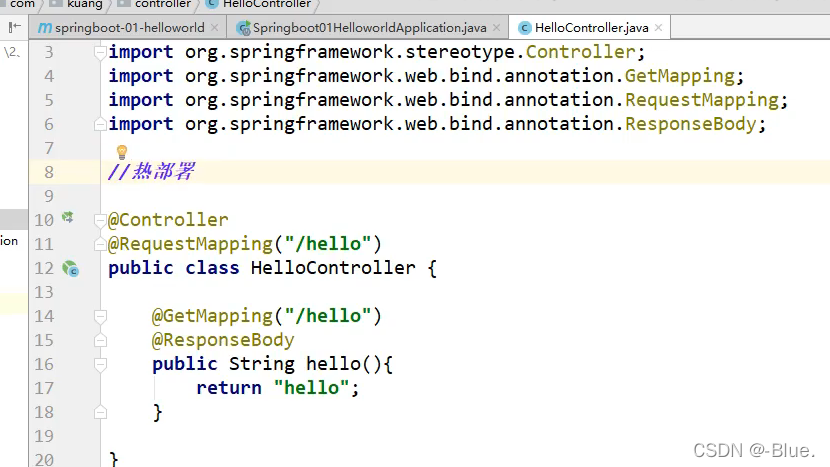
package com.blue;

import org.springframework.boot.SpringApplication;
import org.springframework.boot.autoconfigure.SpringBootApplication;

// @SpringBootAppLication:标注这个类是一个springboot的应用
@SpringBootApplication
public class Springboot01HellowordApplication {
    //将springboot.应用启动
    public static void main(String[] args) {
        SpringApplication.run(Springboot01HellowordApplication.class, args);
    }

}
注解
@SpringBootConfiguration:	springboot的配置
	@Configuration:	spring配置类
	@Component:	说明这也是一个spring的组件

@Enab1 eAutoConfiguration:	自动配置
	@AutoConfigurationPackage:	自动配置包
		@Import(AutoConfigurationPackages.Registrar.class):	自动配置`包注册
	@Import(AutoConfigurationImportselector.class): 自动配置导入选择
META-lNF/spring.factories:自动配置的核心文件
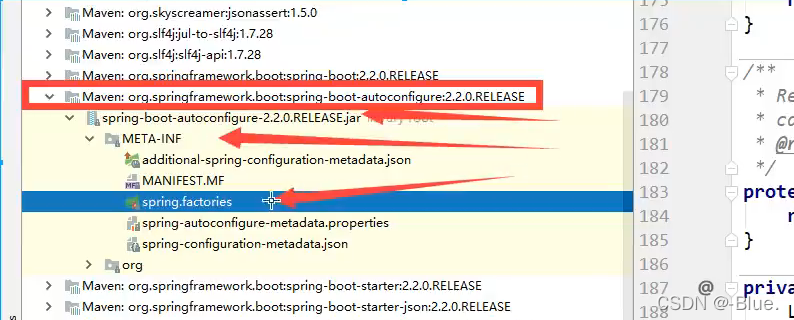
Properties properties PropertiesLoaderutils.loadProperties(resource);
所有资源加载到配置类中!
结论:
springboot所有自动配置都是在启动的时候扫描并加载:spring.factories所有的自动配置类都在这里面,但是不一定生效,要判断条件是否成立,只要导入了对应的start,就有对应的启动器了,有了启动器,我们自动装配就会生效,然后就配置成功!
springboot在启动的时候,从类路径下/META-INF/spring.factories获取指定的值;- 将这些自动配置的类导入容器,自动配置就会生效,帮我进行自动配置!
- 以前我们需要自动配置的东西,现在
springboot帮我们做了! - 整合javaEE,解决方案和自动配置的东西都在
spring-boot-autoconfigure-.2.2.0.RELEASE.jar这个包下 - 它会把所有需要导入的组件,以类名的方式返回,这些组件就会被添加到容器;
- 容器中也会存在非常多的
xxxAutoConfiguration的文件(@Bean),就是这些类给容器中导入了这个场景需要的所有组件;并自动配置,@Configuration,JavaConfig! - 有了自动配置类,免去了我们手动编写配置文件的工作!
关于SpringBoot,谈谈你的理解:
- 自动装配
- run()
三、yaml语法
新建模块
# springboot这个配置文件中到底可以配置哪些东西呢?
# 官方的配置太多了
# 了解原理:一通百通

3.1、给属性赋值的几种方式
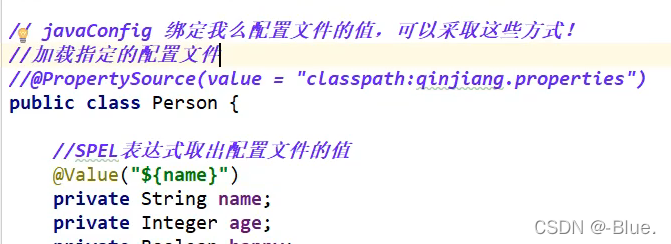
1、@Value
Dog
package com.blue.pojo;

import org.springframework.stereotype.Component;

@Component
public class Dog {
    private String name;
    private Integer age;

    public Dog() {
    }

    public Dog(String name, Integer age) {
        this.name = name;
        this.age = age;
    }

    public String getName() {
        return name;
    }

    public void setName(String name) {
        this.name = name;
    }

    public Integer getAge() {
        return age;
    }

    public void setAge(Integer age) {
        this.age = age;
    }

    @Override
    public String toString() {
        return "Dog{" +
                "name='" + name + '\'' +
                ", age=" + age +
                '}';
    }
}
Person
package com.blue.pojo;

import java.util.Date;
import java.util.List;
import java.util.Map;

public class Person {
    private String name;
    private Integer age;
    private Boolean happy;
    private Date birth;
    private Map<String,Object> maps;
    private List<Object> lists;
    private Dog dog;

    public Person(String name, Integer age, Boolean happy, Date birth, Map<String, Object> maps, List<Object> lists, Dog dog) {
        this.name = name;
        this.age = age;
        this.happy = happy;
        this.birth = birth;
        this.maps = maps;
        this.lists = lists;
        this.dog = dog;
    }

    public Person() {
    }

    public String getName() {
        return name;
    }

    public void setName(String name) {
        this.name = name;
    }

    public Integer getAge() {
        return age;
    }

    public void setAge(Integer age) {
        this.age = age;
    }

    public Boolean getHappy() {
        return happy;
    }

    public void setHappy(Boolean happy) {
        this.happy = happy;
    }

    public Date getBirth() {
        return birth;
    }

    public void setBirth(Date birth) {
        this.birth = birth;
    }

    public Map<String, Object> getMaps() {
        return maps;
    }

    public void setMaps(Map<String, Object> maps) {
        this.maps = maps;
    }

    public List<Object> getLists() {
        return lists;
    }

    public void setLists(List<Object> lists) {
        this.lists = lists;
    }

    public Dog getDog() {
        return dog;
    }

    public void setDog(Dog dog) {
        this.dog = dog;
    }

    @Override
    public String toString() {
        return "Person{" +
                "name='" + name + '\'' +
                ", age=" + age +
                ", happy=" + happy +
                ", birth=" + birth +
                ", maps=" + maps +
                ", lists=" + lists +
                ", dog=" + dog +
                '}';
    }
}
注入Dog
@Component
public class Dog {
    @Value("旺财")
    private String name;
    @Value("3")
    private Integer age;
测试
package com.blue;

import com.blue.pojo.Dog;
import org.junit.jupiter.api.Test;
import org.springframework.beans.factory.annotation.Autowired;
import org.springframework.boot.test.context.SpringBootTest;

@SpringBootTest
class Springboot02ConfigApplicationTests {
    @Autowired
    private Dog dog;

    @Test
    void contextLoads() {
        System.out.println(dog);
    }

}
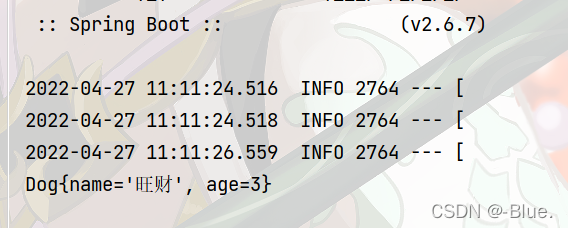
结果:
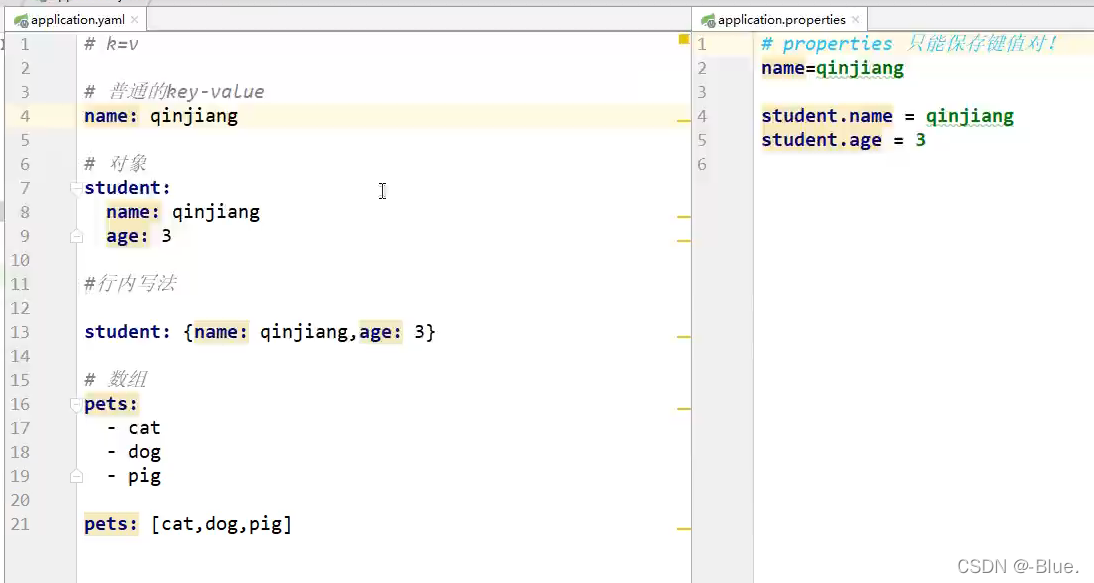
2、yaml赋值
application.yaml
person:
  name: blue
  age: 23
  happy: false
  birth: 2022/04/27
  maps: {k1: v1,k2: v2}
  lists:
    - code
    - music
    - girl
  dog:
    name: 旺财
    age: 3
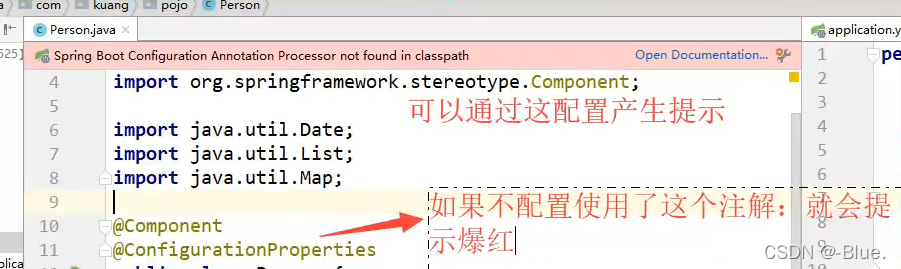
使用注释处理器生成您自己的元数据
加上依赖
<dependency>
    <groupId>org.springframework.boot</groupId>
    <artifactId>spring-boot-configuration-processor</artifactId>
    <optional>true</optional>
</dependency>
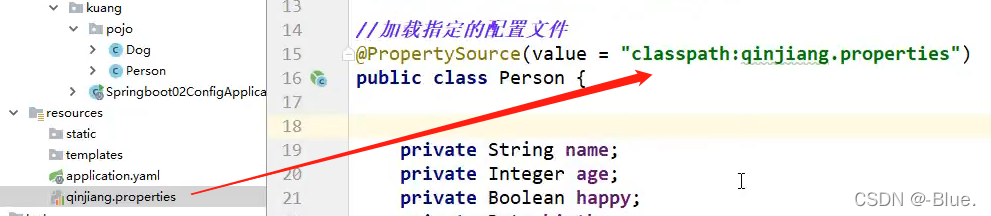
3、第三种——加载指定的配置文件
3.2、配置文件占位符:
person:
  name: blue${random.uuid}
  age: ${random.int}
  happy: false
  birth: 2022/04/27
  maps: {k1: v1,k2: v2}
  lists:
    - code
    - music
    - girl
  dog:
    name: ${person.hello:hello}_旺财
    age: 3
输出
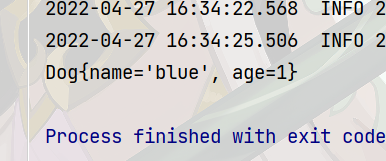
Person{name='blue7d31f176-1c34-4109-a66b-61edc3560202', age=-1360868911, happy=false, birth=Wed Apr 27 00:00:00 CST 2022, maps={k1=v1, k2=v2}, lists=[code, music, girl], dog=Dog{name='hello_旺财', age=3}}
松散绑定:
application.yaml
dog:
  first-name: blue
  age: 1
Dog
@Component
@ConfigurationProperties(prefix = "dog")
public class Dog {

    private String firstName;

    private Integer age;

    public Dog() {
    }

    public Dog(String firstName, Integer age) {
        this.firstName = firstName;
        this.age = age;
    }

    public String getFirstName() {
        return firstName;
    }

    public void setFirstName(String firstName) {
        this.firstName = firstName;
    }

    public Integer getAge() {
        return age;
    }

    public void setAge(Integer age) {
        this.age = age;
    }

    @Override
    public String toString() {
        return "Dog{" +
                "firstName='" + firstName + '\'' +
                ", age=" + age +
                '}';
    }
}
测试
@SpringBootTest
class Springboot02ConfigApplicationTests {

    @Autowired
    private Dog dog;

    @Test
    void contextLoads() {
        System.out.println(dog);
    }
}
结果
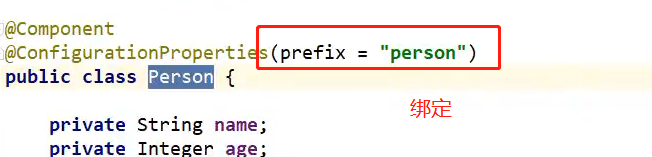
3.3、结论:
- 配置
yml和配置properties都可以获取到值 , 强烈推荐 yml; - 如果我们在某个业务中,只需要获取配置文件中的某个值,可以使用一下
@value; - 如果说,我们专门编写了一个
JavaBean来和配置文件进行一一映射,就直接@configurationProperties,不要犹豫!
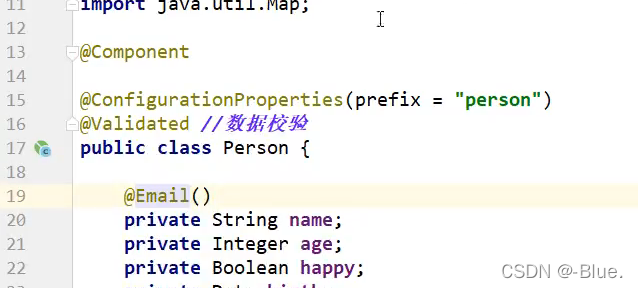
3.4、JSR303数据校验
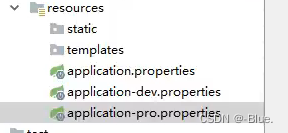
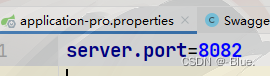
3.5、多环境配置

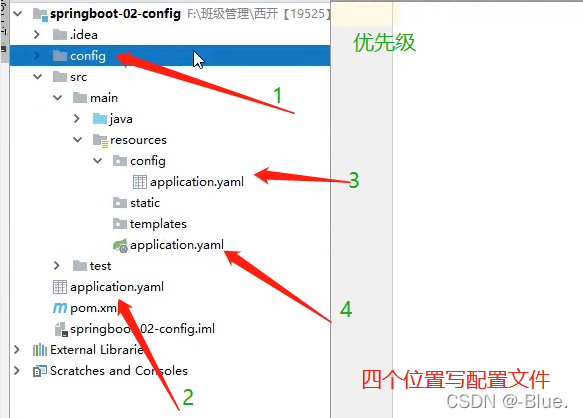
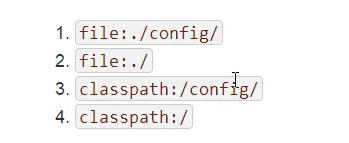
采用.properties文件

采用yml文件
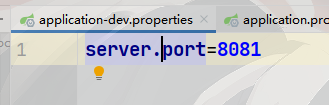
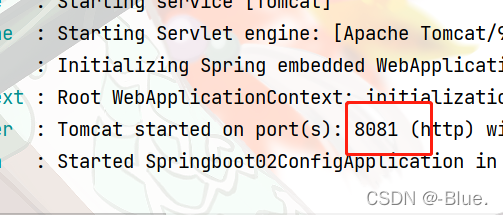
application.yaml
server:
port: 8081
spring:
profiles:
active: dev
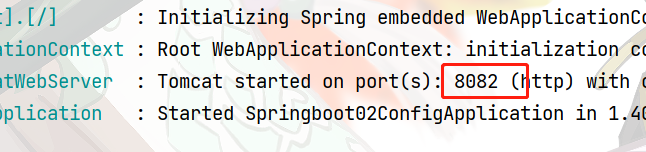
---
server:
port: 8082
spring:
profiles: dev
---
server:
port: 8083
spring:
profiles: test
四、自动配置原理
精髓
1、SpringBoot启动会加载大量的自动配置类
2、我们看我们需要的功能有没有在SpringBoot默认写好的自动配置类当中;
3、我们再来看这个自动配置类中到底配置了哪些组件;(只要我们要用的组件存在在其中,我们就不需要再手动配置了)
4、给容器中自动配置类添加组件的时候,会从properties类中获取某些属性。我们只需要在配置文件中指定这些属性的值即可;
xxxxAutoConfigurartion:自动配置类;给容器中添加组件
xxxxProperties:封装配置文件中相关属性;
我们可以通过启用 debug=true属性;来让控制台打印自动配置报告,这样我们就可以很方便的知道哪些自动配置类生效;
#开启springboot的调试类
debug=true
五、静态资源处理
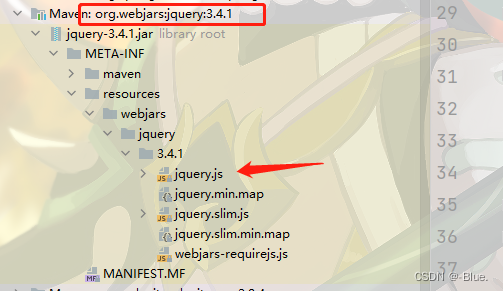
5.1、webjars
第一种:
<dependency>
    <groupId>org.webjars</groupId>
    <artifactId>jquery</artifactId>
    <version>3.4.1</version>
</dependency>
导入完毕,查看webjars目录结构,并访问Jquery.js文件!
第二种:
"classpath:/META-INF/resources/"
"classpath:/resources/"
"classpath:/static/"
"classpath:/public/"
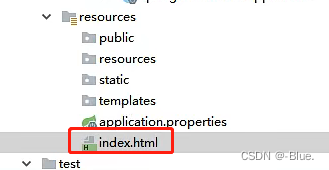
5.2、首页定制
源码:

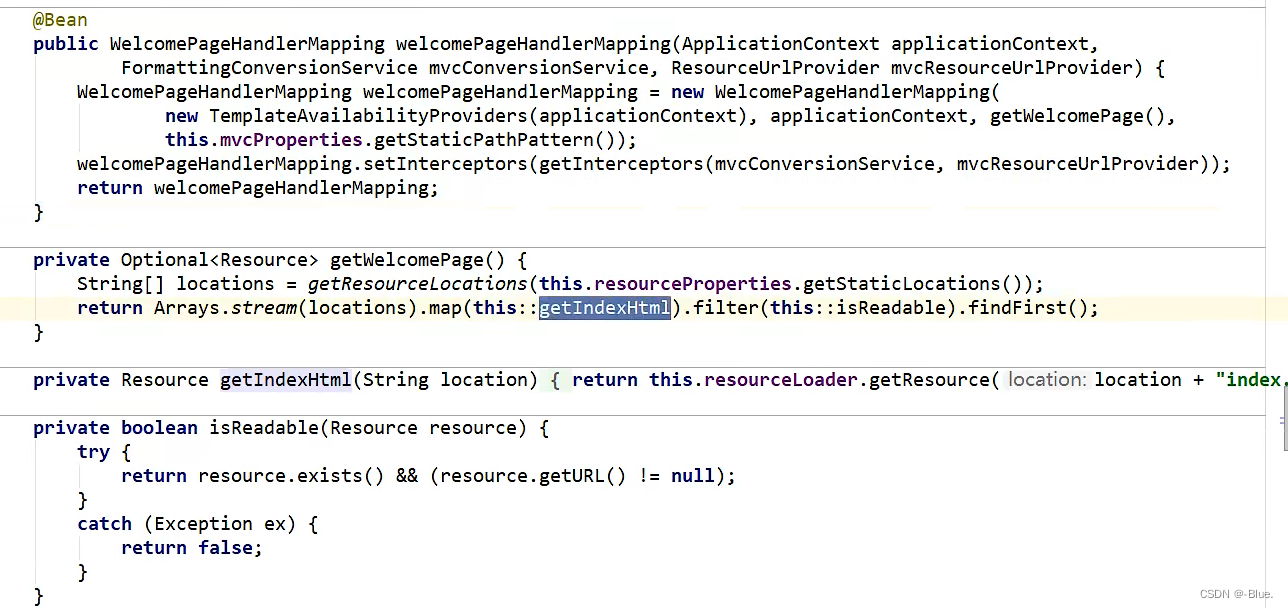
添加index
5.3、图标
老版本有,新版不一定
六、Thymeleaf模板引擎
6.1、引入Thymeleaf
Thymeleaf官网:https://www.thymeleaf.org/Thymeleaf在Github的主页:https://github.com/thymeleaf/thymeleafSpring官方文档:找到我们对应的版本- 找到对应的
pom依赖:可以适当点进源码看下本来的包!
<!--thymeleaf-->
<dependency>
    <groupId>org.springframework.boot</groupId>
    <artifactId>spring-boot-starter-thymeleaf</artifactId>
</dependency>

6.2、模板引擎的作用
就是我们来写一个页面模板,比如有些值呢,是动态的,我们写一些表达式。而这些值,从哪来呢,就是我们在后台封装一些数据。然后把这个模板和这个数据交给我们模板引擎,模板引擎按照我们这个数据帮你把这表达式解析、填充到我们指定的位置,然后把这个数据最终生成一个我们想要的内容给我们写出去,这就是我们这个模板引擎,不管是jsp还是其他模板引擎,都是这个思想。只不过呢,就是说不同模板引擎之间,他们可能这个语法有点不一样。其他的我就不介绍了,我主要来介绍一下SpringBoot给我们推荐的Thymeleaf模板引擎,这模板引擎呢,是一个高级语言的模板引擎,他的这个语法更简单。而且呢,功能更强大。
6.3、测试
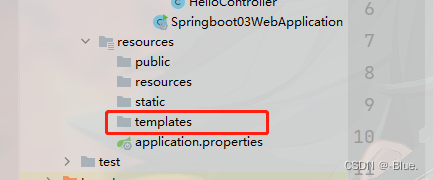
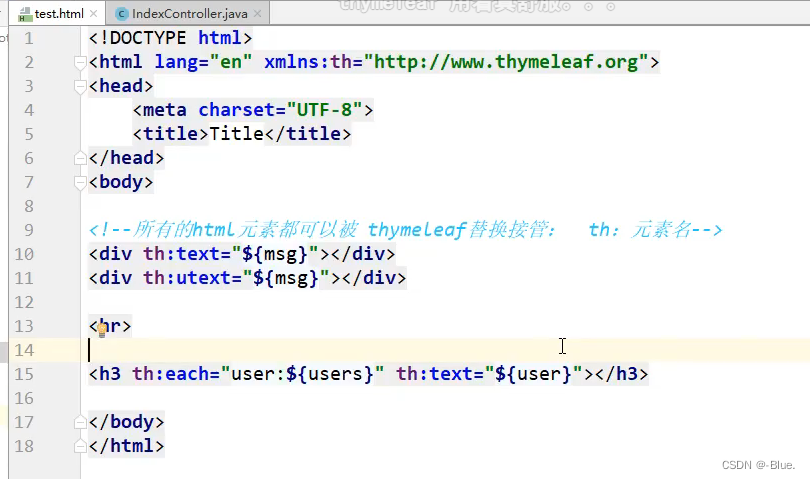
Thymeleaf的所有模板引擎都写在这个包下—templates
源码——ThymeleafProperties

写一个test.html
<!DOCTYPE html>
<html lang="en">
<head>
    <meta charset="UTF-8">
    <title>Title</title>
</head>
<body>
<h1>test</h1>
</body>
</html>
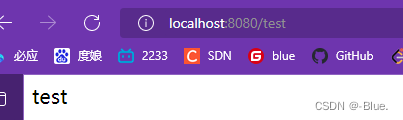
测试HelloController
@RestController
public class HelloController {
    @RequestMapping("/test")
    public String test(){
        return "test";
    }
}
结果:
结论:
只要需要使用thymeleaf,只需要导入对应的依赖就可以了!我们将html放在我们的templates目录下即可!
导入约束
<!DOCTYPE html>

<html xmlns:th="http://www.thymeleaf.org">

  <head>
    <title>Good Thymes Virtual Grocery</title>
    <meta http-equiv="Content-Type" content="text/html; charset=UTF-8" />
    <link rel="stylesheet" type="text/css" media="all"
          href="../../css/gtvg.css" th:href="@{/css/gtvg.css}" />
  </head>

  <body>

    <p th:text="#{home.welcome}">Welcome to our grocery store!</p>

  </body>

</html>
HelloController
@RestController
public class HelloController {
@RequestMapping("/test")
public String test(Model model){
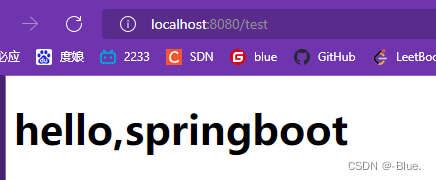
model.addAttribute("msg","hello,springboot");
return "test";
}
}
test.html
<!DOCTYPE html>
<html lang="en" xmlns:th="http://www.thymeleaf.org">
<head>
<meta charset="UTF-8">
<title>Title</title>
</head>
<body>
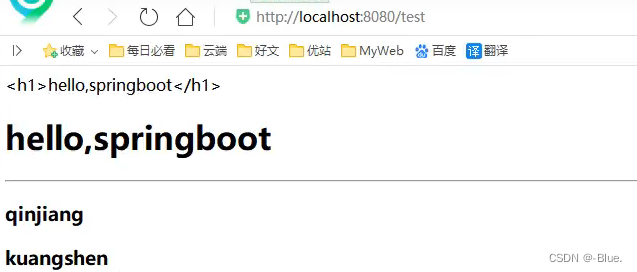
<h1 th:text="${msg}"></h1>
</body>
</html>
运行
MVC自动配置原理
Spring MVC Auto-configuration
// Spring Boot为Spring MVC提供了自动配置,它可以很好地与大多数应用程序一起工作。
Spring Boot provides auto-configuration for Spring MVC that works well with most applications.
// 自动配置在Spring默认设置的基础上添加了以下功能:
The auto-configuration adds the following features on top of Spring’s defaults:
// 包含视图解析器
Inclusion of ContentNegotiatingViewResolver and BeanNameViewResolver beans.
// 支持静态资源文件夹的路径,以及webjars
Support for serving static resources, including support for WebJars
// 自动注册了Converter:
// 转换器,这就是我们网页提交数据到后台自动封装成为对象的东西,比如把"1"字符串自动转换为int类型
// Formatter:【格式化器,比如页面给我们了一个2019-8-10,它会给我们自动格式化为Date对象】
Automatic registration of Converter, GenericConverter, and Formatter beans.
// HttpMessageConverters
// SpringMVC用来转换Http请求和响应的的,比如我们要把一个User对象转换为JSON字符串,可以去看官网文档解释;
Support for HttpMessageConverters (covered later in this document).
// 定义错误代码生成规则的
Automatic registration of MessageCodesResolver (covered later in this document).
// 首页定制
Static index.html support.
// 图标定制
Custom Favicon support (covered later in this document).
// 初始化数据绑定器:帮我们把请求数据绑定到JavaBean中!
Automatic use of a ConfigurableWebBindingInitializer bean (covered later in this document).
七、Swagger
学习目标:
- 了解Swaggerl的作用和概念
- 了解前后端分离
- 在SpringBoot中集成Swagger
7.1、Swagger简介
前后端分离
- Vue SpringBoot
后端时代:
- 前端只用管理静态页面;html==>后端。模板引擎JSP=>后端是主力
前后端分离式时代:
- 后端:后端控制层,服务层,数据访问层【后端团队】。
- 前端:前端控制层,视图层【前端团队】
伪造后端数据,json。已经存在了,不需要后端,前端工程依旧能够跑起来 - 前端后如何交互?===>API前后端相对独立,松耦合;前后端甚至可以部署在不同的服务器上;
产生一个问题:
- 前后端集成联调,前端人员和后端人员无法做到“即使协商,尽早解决”,最终导致问题集中爆发;
解决方案:
- 首先指定schema[计划的提纲],实时更新最新API,降低集成的风险;·早些年:指定word计划文档;
- 早些年:指定word计划文档;前后端分离:前端测试后端接口:postman0后端提供接口,需要实时更新最新的消息及改动!
7.2、Swagger优点
- 号称世界上最流行的Ap框架
- RestFul Api文档在线自动生成工具=>Api文档与API定义同步更新
- 直接运行,可以在线测试AP接口;
- 支持多种语言:(Java,PHP)
官网:官网
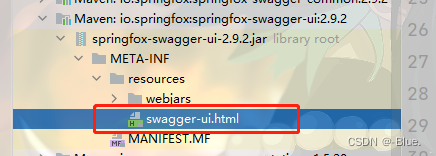
在项目使用Swagger需要springbox;
- swagger2
- Ui
7.3、SpringBoot集成Swagger
1.新建一个SpringBoot——Web项目

2、导入相关依赖
<!-- https://mvnrepository.com/artifact/io.springfox/springfox-swagger2 -->
<dependency>
   <groupId>io.springfox</groupId>
   <artifactId>springfox-swagger2</artifactId>
   <version>2.9.2</version>
</dependency>
<!-- https://mvnrepository.com/artifact/io.springfox/springfox-swagger-ui -->
<dependency>
   <groupId>io.springfox</groupId>
   <artifactId>springfox-swagger-ui</artifactId>
   <version>2.9.2</version>
</dependency>
3、编写一个Hello工程
@RestController
public class HelloController {

    @RequestMapping(value = "/hello")
    public String hello(){
        return "hello";
    }

}
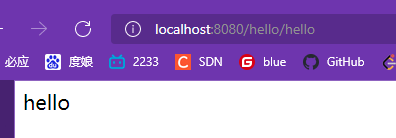
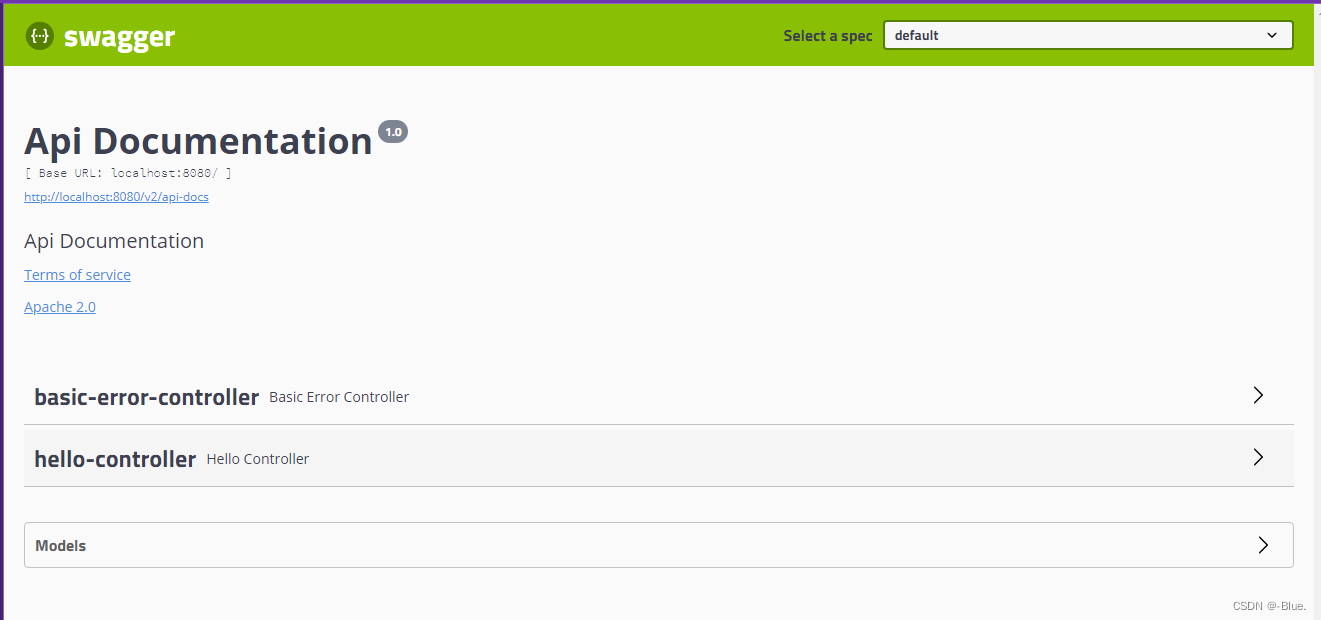
运行,访问http://localhost:8080如下图:

4、配置Swagger=>Config
@Configuration
@EnableSwagger2    //开Swagger.2
public class SwaggerConfig {
}
5、测试运行
运行出现问题的可以将springboot替换为下面
<parent>
        <groupId>org.springframework.boot</groupId>
        <artifactId>spring-boot-starter-parent</artifactId>
        <version>2.5.5</version>
        <relativePath/> <!-- lookup parent from repository -->
    </parent>
结果
7.4、配置Swagger
Swagger的bean实例Docket;
package com.blue.config;
import org.springframework.context.annotation.Bean;
import org.springframework.context.annotation.Configuration;
import springfox.documentation.service.ApiInfo;
import springfox.documentation.service.Contact;
import springfox.documentation.spi.DocumentationType;
import springfox.documentation.spring.web.plugins.Docket;
import springfox.documentation.swagger2.annotations.EnableSwagger2;
import java.util.ArrayList;
@Configuration
@EnableSwagger2 //开Swagger.2
public class SwaggerConfig {
// 置了Swagger /Docket /bean实例
@Bean
public Docket docket(){
return new Docket(DocumentationType.SWAGGER_2).apiInfo(apiInfo());
}
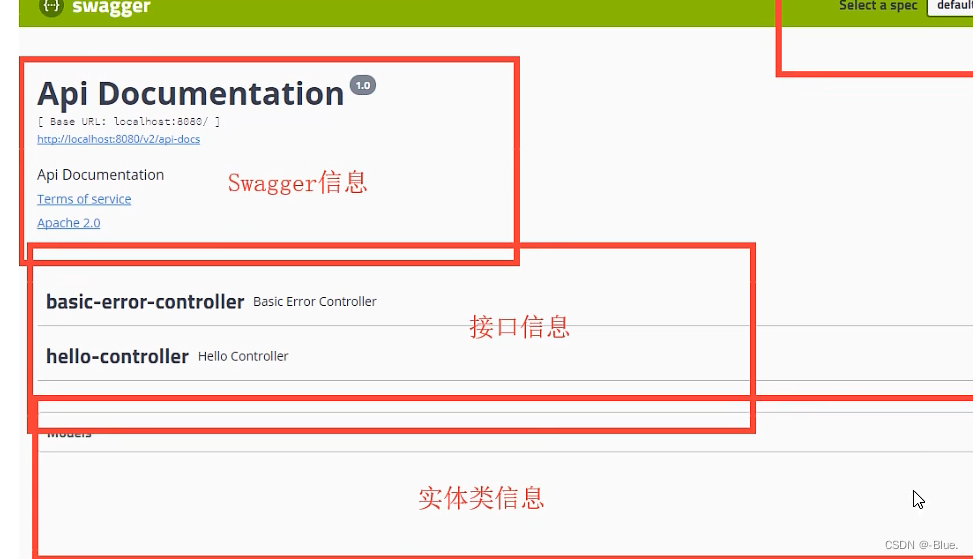
///Swagger信息=apiInfo
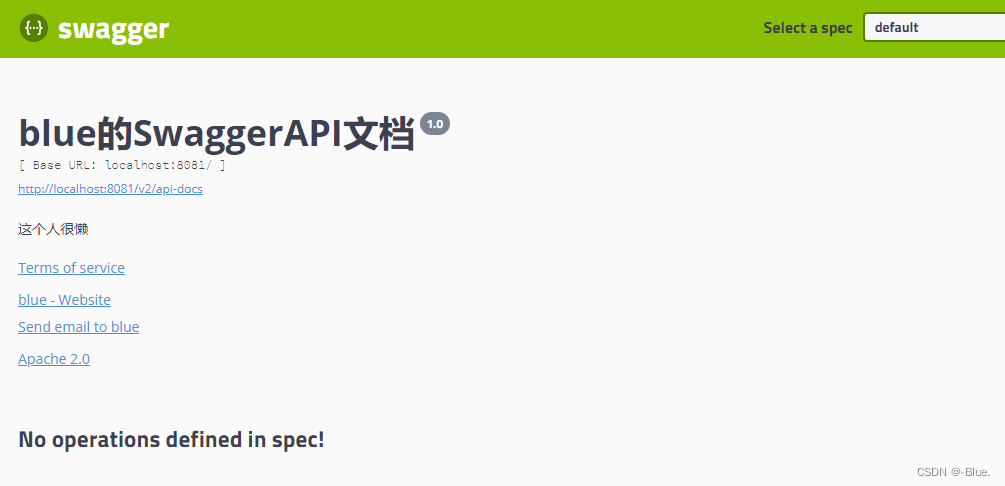
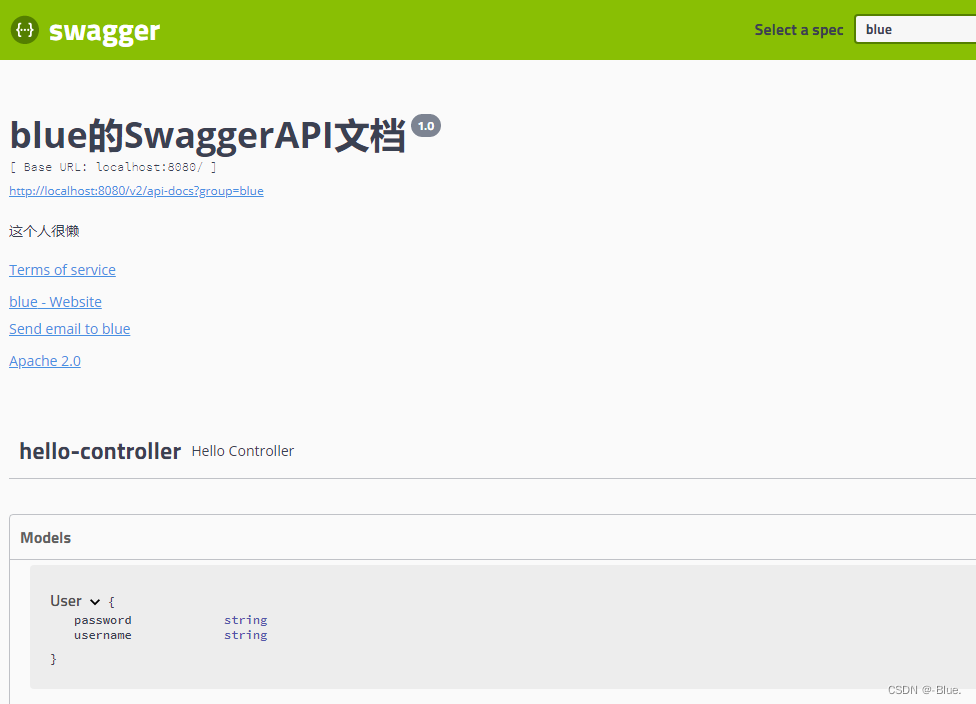
private ApiInfo apiInfo(){
Contact contact = new Contact("blue", "https://blog.csdn.net/qq_47540091?type=lately", "123456");
return new ApiInfo(
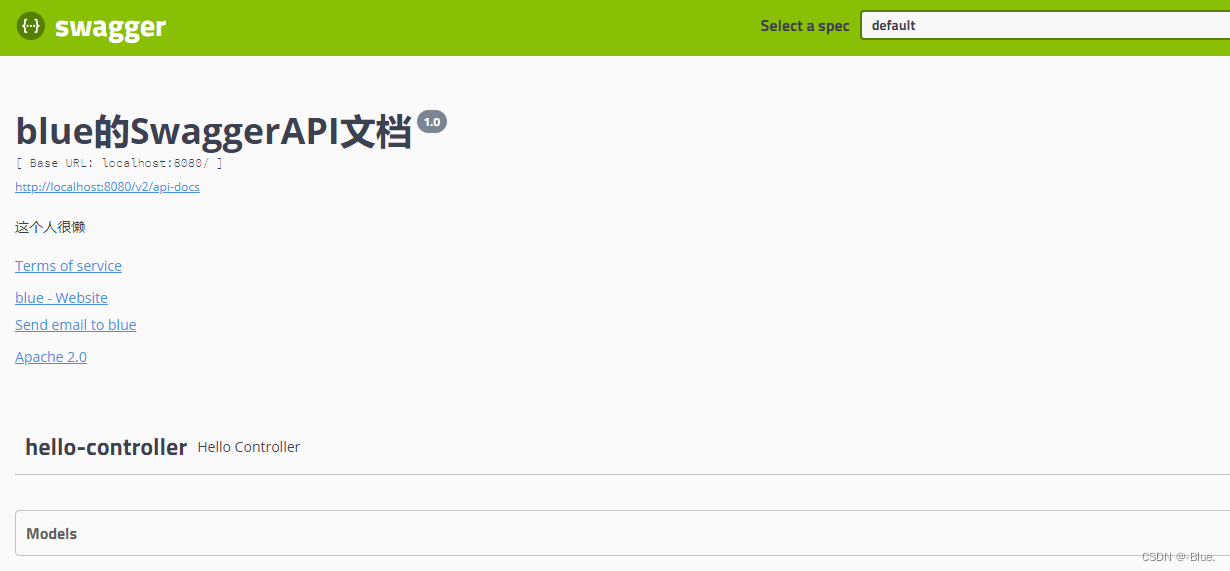
"blue的SwaggerAPI文档",
"这个人很懒",
"1.0",
"https://blog.csdn.net/qq_47540091?type=lately",
contact,
"Apache 2.0",
"http://www.apache.org/licenses/LICENSE-2.0",
new ArrayList());
}
}
运行结果
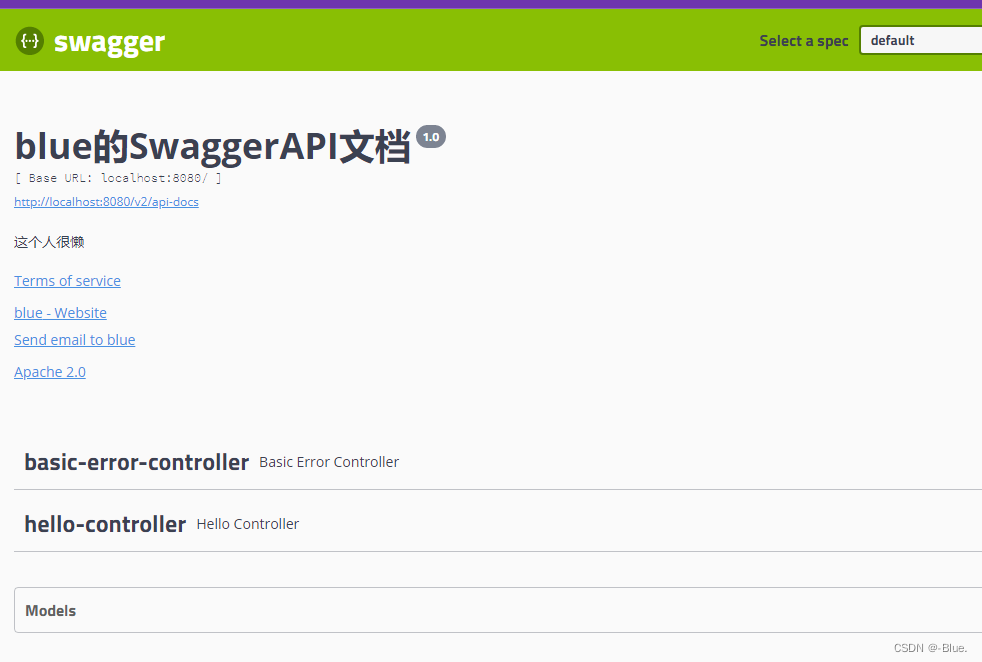
页面在这里:
7.5、Swangger配置扫描接口
Docket.select ()
public class SwaggerConfig {
    // 配置了Swagger 的 Docket 的 bean实例
    // 通过.select()方法,去配置扫描接口
    @Bean
    public Docket docket(){
        return new Docket(DocumentationType.SWAGGER_2)
                .apiInfo(apiInfo())
                .select()
                // RequestHandlerSelectors配置如何扫描接口
                // basePackage:指定要扫描接口的方式  RequestHandlerSelectors.basePackage("com.blue.controller")
                // any() // 扫描所有,项目中的所有接口都会被扫描到
                // none() // 不扫描接口
                // 通过方法上的注解扫描,如withMethodAnnotation(GetMapping.class)只扫描get请求
                // 通过类上的注解扫描,如.withClassAnnotation(Controller.class)只扫描有controller注解的类中的接口

                .apis(RequestHandlerSelectors.basePackage("com.blue.controller"))
                // paths()  过滤什么路径
                .paths(PathSelectors.ant("/blue/**"))
                .build();
    }
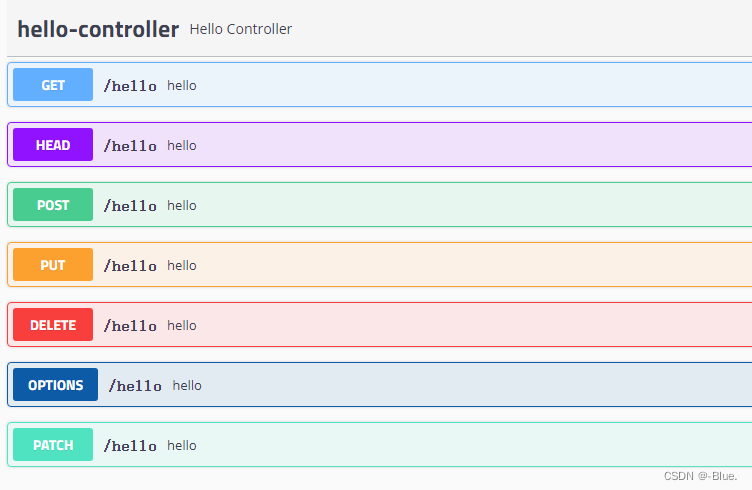
运行结果:
7.6、配置Swagger开关
enable
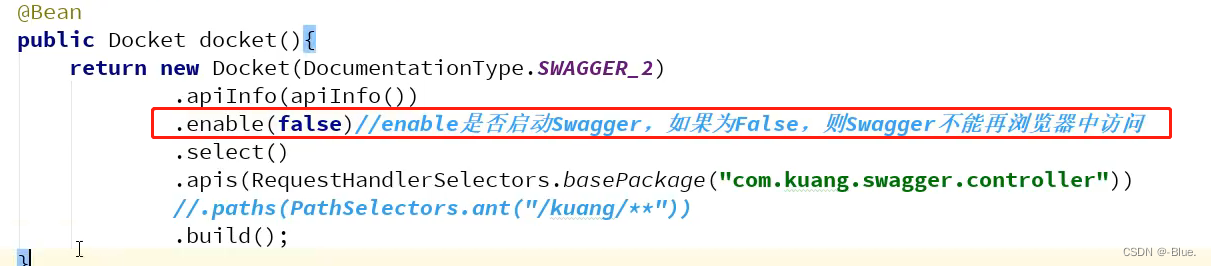
我只希望我的Swagger在生产环境中使用,在发布的时候不使用?
- 判断是不是生产环境flag=false
- 注入enable(flag)


package com.blue.config;

import org.springframework.context.annotation.Bean;
import org.springframework.context.annotation.Configuration;
import org.springframework.core.env.Environment;
import org.springframework.core.env.Profiles;
import springfox.documentation.builders.PathSelectors;
import springfox.documentation.builders.RequestHandlerSelectors;
import springfox.documentation.service.ApiInfo;
import springfox.documentation.service.Contact;
import springfox.documentation.spi.DocumentationType;
import springfox.documentation.spring.web.plugins.Docket;
import springfox.documentation.swagger2.annotations.EnableSwagger2;

import java.util.ArrayList;

@Configuration
@EnableSwagger2    //开Swagger.2
public class SwaggerConfig {
    // 配置了Swagger 的 Docket 的 bean实例
    // 通过.select()方法,去配置扫描接口
    @Bean
    public Docket docket(Environment environment){

        // 设置要是示的Swagger环境
        Profiles profiles = Profiles.of("dev","test");
        // 获取项目的环境
        // 通过environment.acceptsProfiles 判断是否处于自己设定的环境当中
        boolean flag = environment.acceptsProfiles(profiles);

        return new Docket(DocumentationType.SWAGGER_2)
                .apiInfo(apiInfo())
                .enable(flag)
                .select()
                // RequestHandlerSelectors配置如何扫描接口
                // basePackage:指定要扫描接口的方式  RequestHandlerSelectors.basePackage("com.blue.controller")
                // any() // 扫描所有,项目中的所有接口都会被扫描到
                // none() // 不扫描接口
                // 通过方法上的注解扫描,如withMethodAnnotation(GetMapping.class)只扫描get请求
                // 通过类上的注解扫描,如.withClassAnnotation(Controller.class)只扫描有controller注解的类中的接口

                .apis(RequestHandlerSelectors.basePackage("com.blue.controller"))
                // paths()  过滤什么路径
                .paths(PathSelectors.ant("/blue/**"))
                .build();
    }

    ///Swagger信息=apiInfo
    private ApiInfo apiInfo(){
        Contact contact = new Contact("blue", "https://blog.csdn.net/qq_47540091?type=lately", "123456");
        return new ApiInfo(
                "blue的SwaggerAPI文档",
                "这个人很懒",
                "1.0",
                "https://blog.csdn.net/qq_47540091?type=lately",
                contact,
                "Apache 2.0",
                "http://www.apache.org/licenses/LICENSE-2.0",
                new ArrayList());
    }
}
运行结果
没有扫描到包
7.7、配置API文档的分组
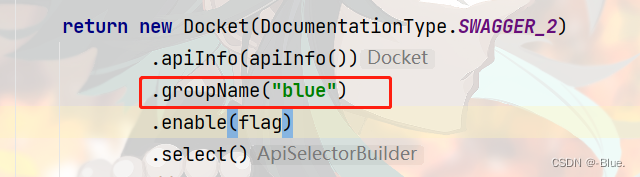
1、groupName(“blue”)
如果没有配置分组,默认是default。通过groupName()方法即可配置分组:
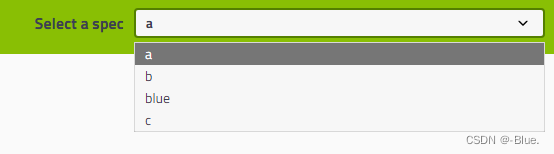
2、多个Docket实例
如何配置多个分组:多个Docket实例即可
   @Bean
    public Docket docket1(){
        return new Docket(DocumentationType.SWAGGER_2).groupName("a");
    }
    @Bean
    public Docket docket2(){
        return new Docket(DocumentationType.SWAGGER_2).groupName("b");
    }
    @Bean
    public Docket docket3(){
        return new Docket(DocumentationType.SWAGGER_2).groupName("c");
    }
运行查看结果
7.8、实体类配置;
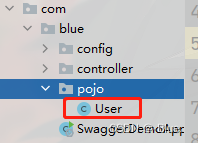
1、新建一个实体类
User
package com.blue.pojo;

public class User {
    public String username;
    public String password;
}
只要这个实体在请求接口的返回值上(即使是泛型),都能映射到实体项中:
    只要我们的接口中,返回值中存在实体类,他就会被扫描的 Swagger中
    @PostMapping(value = "/user")
    public User user(){
        return new User();
    }
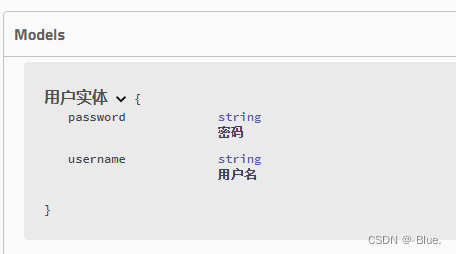
2、加注释
package com.blue.swagger.pojo;

import io.swagger.annotations.ApiModel;
import io.swagger.annotations.ApiModelProperty;
import org.springframework.web.bind.annotation.PostMapping;

@ApiModel("用户实体")
public class User {
    @ApiModelProperty("用户名")
    public String username;
    @ApiModelProperty("密码")
    public String password;
}
运行可以看到注释
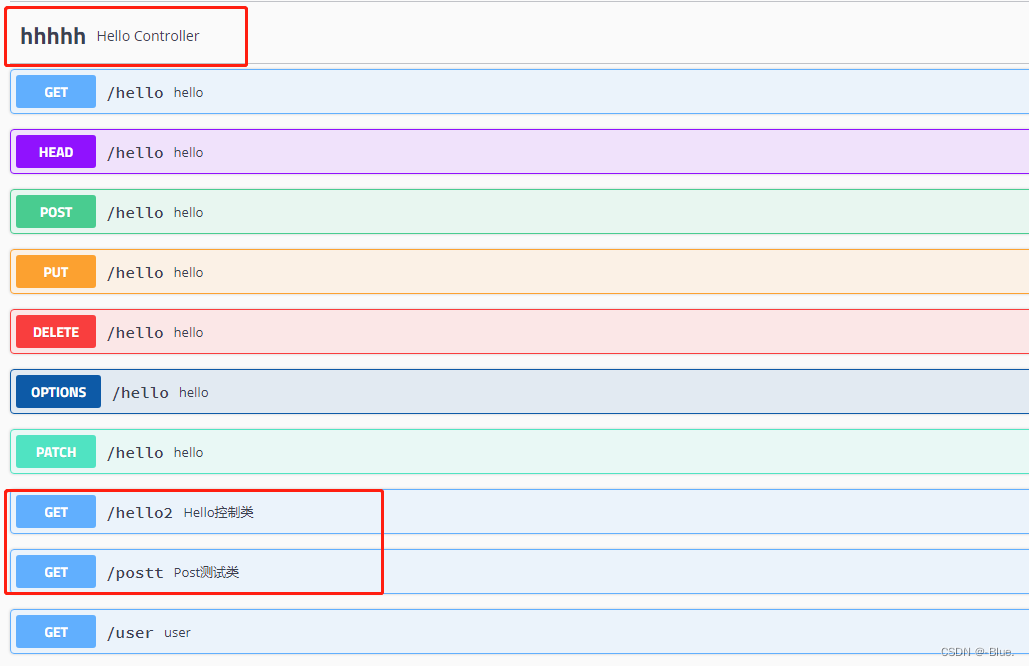
@Api(tag="xxx")作用于模块上,@ApiOpration("xxx")作用于方法上@Api(value = "hello控制器", tags = "哈哈哈")
    //Operation.接口,不是放在类上的,是方法
    @ApiOperation("Hello控制类")
    @GetMapping(value = "/hello2")
    public String hello2(@ApiParam("用户名") String username){
        return "hello"+username;
    }
运行结果:

HelloController
package com.blue.swagger.controller;

import com.blue.swagger.pojo.User;
import io.swagger.annotations.Api;
import io.swagger.annotations.ApiOperation;
import io.swagger.annotations.ApiParam;
import org.springframework.web.bind.annotation.GetMapping;
import org.springframework.web.bind.annotation.RequestMapping;
import org.springframework.web.bind.annotation.RestController;

@Api(value = "blue",tags = "hhhhh")
@RestController
public class HelloController {

    @RequestMapping(value = "/hello")
    public String hello(){
        return "hello";
    }

    只要我们的接口中,返回值中存在实体类,他就会被扫描的 Swagger中
    @RequestMapping (value = "/user")
    public User user(){
        return new User();
    }

    //Operation.接口,不是放在类上的,是方法
    @ApiOperation("Hello控制类")
    @GetMapping(value = "/hello2")
    public String hello2(@ApiParam("用户名") String username){
        return "hello"+username;
    }
    @ApiOperation("Post测试类")
    @GetMapping(value = "/postt")
    public User postt(@ApiParam("用户名") User user){
        return user;
    }


}
总结:
- 我们可以通过Swaggera给一些比较难理解的属性或者接口,增加注释信息
- 接口文档实时更新
- 可以在线测试
Swagger是一个优秀的工具,几乎所有大公司都有使用它【注意点】在正式发布的时候,关闭Swagger。出于安全考虑。而且节省运行的内存;
八、异步、定时、邮件任务
任务
异步任务~
定时任务~
邮件发送~
8.1、异步任务
springboot-09-test模块
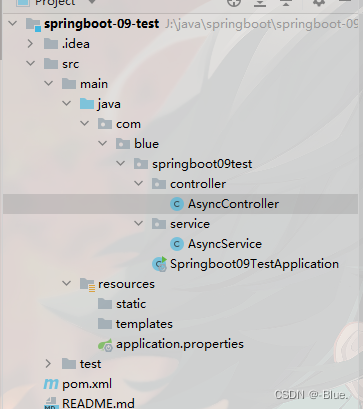
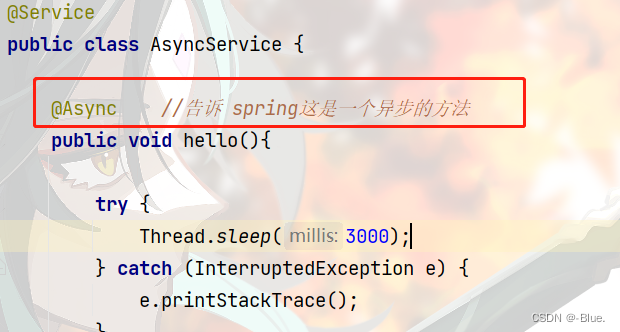
AsyncService
package com.blue.springboot09test.service;

public class AsyncService {
    public void hello(){

        try {
            Thread.sleep(3000);
        } catch (InterruptedException e) {
            e.printStackTrace();
        }

        System.out.println("数据正在处理……");

    }
}
AsyncController
package com.blue.springboot09test.controller;
import com.blue.springboot09test.service.AsyncService;
import org.springframework.beans.factory.annotation.Autowired;
import org.springframework.boot.autoconfigure.SpringBootApplication;
import org.springframework.scheduling.annotation.EnableAsync;
import org.springframework.web.bind.annotation.RequestMapping;
import org.springframework.web.bind.annotation.RestController;
@RestController
public class AsyncController {
@Autowired
AsyncService asyncService;
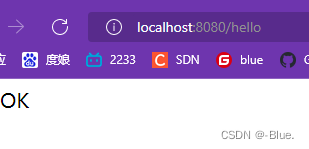
@RequestMapping("/hello")
public String hello(){
asyncService.hello(); //停止三秒
return "OK";
}
}
运行结果:有延迟
修改这里
然后加上
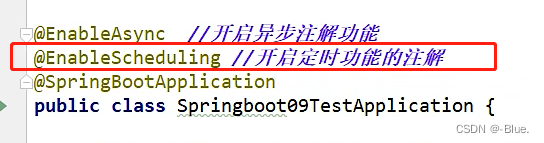
package com.blue.springboot09test;

import org.springframework.boot.SpringApplication;
import org.springframework.boot.autoconfigure.SpringBootApplication;
import org.springframework.scheduling.annotation.EnableAsync;

@EnableAsync //开启异步注解功能
@SpringBootApplication
public class Springboot09TestApplication {

    public static void main(String[] args) {
        SpringApplication.run(Springboot09TestApplication.class, args);
    }

}
运行结果无延迟
8.2、邮件任务
添加依赖
<dependency>
    <groupId>org.springframework.boot</groupId>
    <artifactId>spring-boot-starter-mail</artifactId>
</dependency>
application.properties
spring.mail.username=172420605@qq.com
spring.mail.password=
spring.mail.host=smtp.qq.com
#开启加密验证
spring.mail.properties.mail.smtp.ssl.enable=true
Springboot09TestApplicationTests
- 一个简单的邮件
package com.blue.springboot09test;

import org.junit.jupiter.api.Test;
import org.springframework.beans.factory.annotation.Autowired;
import org.springframework.boot.test.context.SpringBootTest;
import org.springframework.mail.SimpleMailMessage;
import org.springframework.mail.javamail.JavaMailSenderImpl;

@SpringBootTest
class Springboot09TestApplicationTests {

    @Autowired
    JavaMailSenderImpl mailSender;

    @Test
    void contextLoads(){
        // 一个简单的邮件~
        SimpleMailMessage mailMessage = new SimpleMailMessage();
        mailMessage.setSubject("blue hello!");
        mailMessage.setText("hello,hello,hello.");
        mailMessage.setTo("172420405@qq.com");
        mailMessage.setFrom("172420405@qq.com");

        mailSender.send(mailMessage);
    }
}
- 一个复杂的邮件
    @Test
    void contextLoads2() throws MessagingException {
        // 一个复杂的邮件~
        MimeMessage mimeMessage = mailSender.createMimeMessage();
        MimeMessageHelper helper = new MimeMessageHelper(mimeMessage, true);
        // 正文
        helper.setSubject("fighting");
        helper.setText("<p style='color:red'>thank you</p>",true);

        // 附件
        helper.addAttachment("1.jpg",new File(""));
        helper.addAttachment("2.jpg",new File(""));

        helper.setTo("172420405@qq.com");
        helper.setFrom("172420405@qq.com");

        mailSender.send(mimeMessage);
    }
8.3、定时任务
ScheduledService
package com.blue.springboot09test.service;
import org.springframework.scheduling.annotation.Scheduled;
import org.springframework.stereotype.Service;
@Service
public class ScheduledService {
// 在一个特定的时间执行这个方法 Timer
// cron 表达式~
// 秒 分 时 日 月 周几
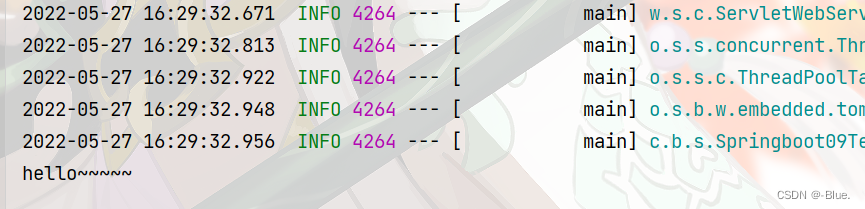
@Scheduled(cron = "0 * * * * 0-7")
public void hello(){
System.out.println("hello~~~~~");
}
}
package com.blue.springboot09test.service;

import org.springframework.scheduling.annotation.Scheduled;
import org.springframework.stereotype.Service;

@Service
public class ScheduledService {

    // 在一个特定的时间执行这个方法 Timer
    // cron 表达式~
    // 秒  分 时  日  月  周几

    /*
        30 15 10 * * ?   每天10,点15分30执行一次
     */
    @Scheduled(cron = "0 30 16 * * 0-7")
    public  void hello(){
        System.out.println("hello~~~~~");
    }
}
结果
九、Dubbo和Zookeeper集成
SpringBoot17:Dubbo和Zookeeper集成
因为博主只学了这几部分,就更新到这里


 3万+
3万+

 被折叠的 条评论
为什么被折叠?
被折叠的 条评论
为什么被折叠?
 到【灌水乐园】发言


