


- nginx特点
- nginx优势、缺点
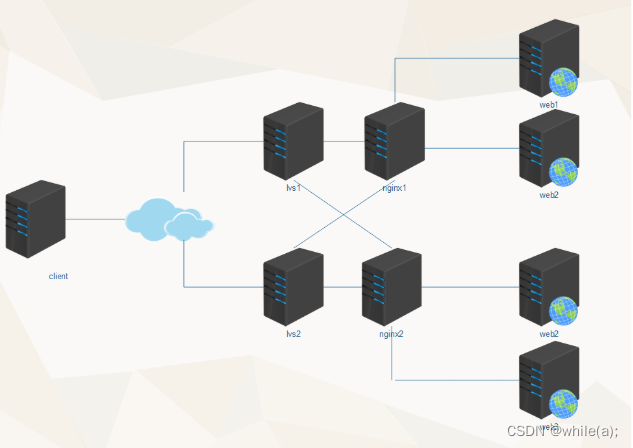
- 生产架构
- nginx 7层负载均衡语法示例
- nginx负载均衡算法
- 测试案例
- 生产案例
1.nginx特点
1. 功能强大,性能卓越,运行稳定。
2. 配置简单灵活。
3. 能够自动剔除工作不正常的后端服务器。
4. 上传文件使用异步模式。client---nginx---web1 web2 web3 lvs同步请求 DR client -->dr---web1
5. 支持多种分配策略,可以分配权重,分配方式灵活。
2.nginx优势、缺点
nginx复制用户请求,在后端服务器出现问题时。nginx会再复制一份请求发给另一台后端服务器。
lvs则在这种情况,只能用户重新发请求流量会经过nginx,nginx成为瓶颈
3.生产架构
4.nginx 7层负载均衡语法示例
通过location对不同的请求进行进行负载均衡,因为通过http协议,所以称作7层
location / {
}
location ~ \.html${
proxy_pass ...
}
location ~ \.php${
proxy_pass ...
}
location ~ \.(jpg|png|css|js)${
proxy_pass ...
}
5.nginx负载均衡算法
1.round robin(默认)
轮询方式,依次将请求分配到各个后台服务器中,默认的负载均衡方式。
适用于后台机器性能一致的情况。 挂掉的机器可以自动从服务列表中剔除。2.weight
根据权重来分发请求到不同的机器中,指定轮询几率,weight和访问比率成正比,用于后端服务器性能不均的情况。
例如:
upstream bakend {
server 192.168.0.14 weight=10;
server 192.168.0.15 weight=10;
}3. IP_hash
根据请求者ip的hash值将请求发送到后台服务器中,可以保证来自同一ip的请求被打到固定的机器上,可以解决session问题。
例如:
upstream bakend {
ip_hash;
server 192.168.0.14:88;
server 192.168.0.15:80;
}
4.url_hash(第三方)
根据请求的url的hash值将请求分到不同的机器中,当后台服务器为缓存的时候效率高。
需要额外安装 nginx的upstream_hash模块:
wget http://wiki.nginx.org/images/7/78/Nginx_upstream_hash-0.3.tar.gz
在upstream中加入hash语句,server语句中不能写入weight等其他的参数,hash_method是使用的hash算法 复制代码
upstream backend {
server squid1:3128;
server squid2:3128;
hash $request_uri;
hash_method crc32;
}5. fair(第三方)
根据后台响应时间来分发请求,响应时间短的分发的请求多。
例如:
upstream backend {
server server1;
server server2;
fair;
}每个设备的状态设置为:
1.down 表示单前的server暂时不参与负载
2.weight 默认为1.weight越大,负载的权重就越大。
3.max_fails :允许请求失败的次数默认为1.当超过最大次数时,返回proxy_next_upstream 模块定义的错误
4.fail_timeout:max_fails次失败后,暂停的时间。
5.backup: 其它所有的非backup机器down或者忙的时候,请求backup机器。所以这台机器压力会最轻。
nginx支持同时设置多组的负载均衡,用来给不用的server来使用。
client_body_in_file_only 设置为On 可以讲client post过来的数据记录到文件中用来做debug
client_body_temp_path 设置记录文件的目录 可以设置最多3层目录
location 对URL进行匹配.可以进行重定向或者进行新的代理 负载均衡
6.测试案例
6.1环境
client:client
nginx:nginx
apache:web1
apache:web2
6.2步骤
(一)准备工作
1.关闭防火墙和selinux
2.域名解析
3.同步时间
计划任务执行如下命令
ntpdate 时间服务器地址4.准备web1、、web2页面
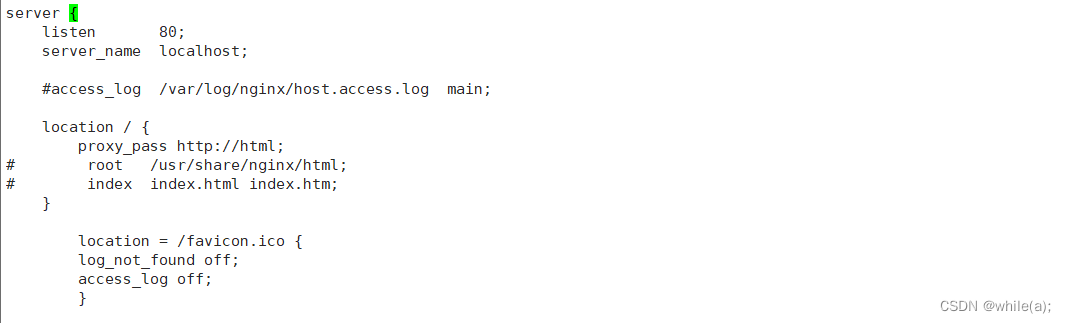
(二)配置nginx
yum install -y epel-release
yum install -y nginx
vim /etc/nginx/ngxin.conf
upstream html {
server web1:80;
server web2:80;
}
server {location / {
proxy_pass http://html;
}
}
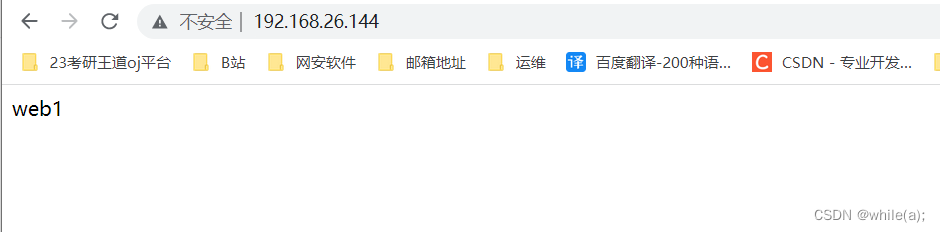
(三)测试负载均衡
访问nginx服务器。能交替的看到web1和web2
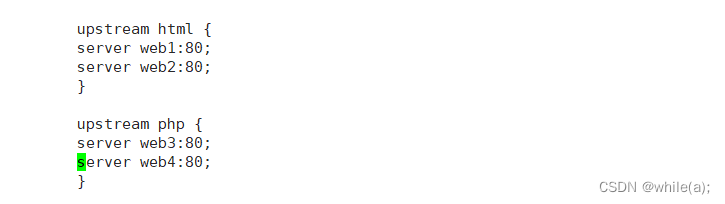
6.3 动静分离
1 增加一个upstream php server web3
2.增加一个location ~ \.php {}
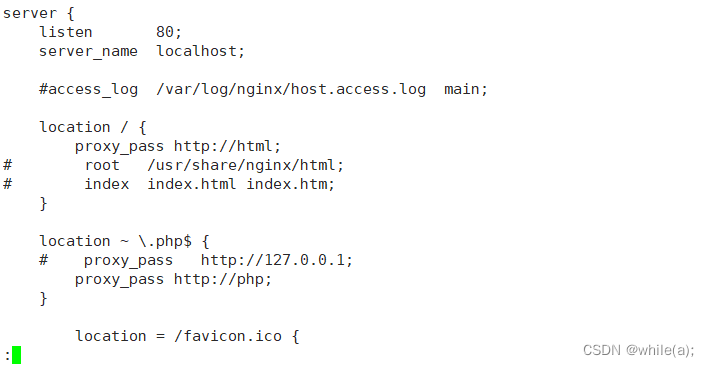
3.配置文件代码示例:
upstream html {
server web1:80;
server web2:80;
}
upstream php {
server web3:80;
server web4:80;
}
server {
location / {
proxy_pass http://html;
}
location ~ \.php$ {
proxy_pass http://php;
}
}
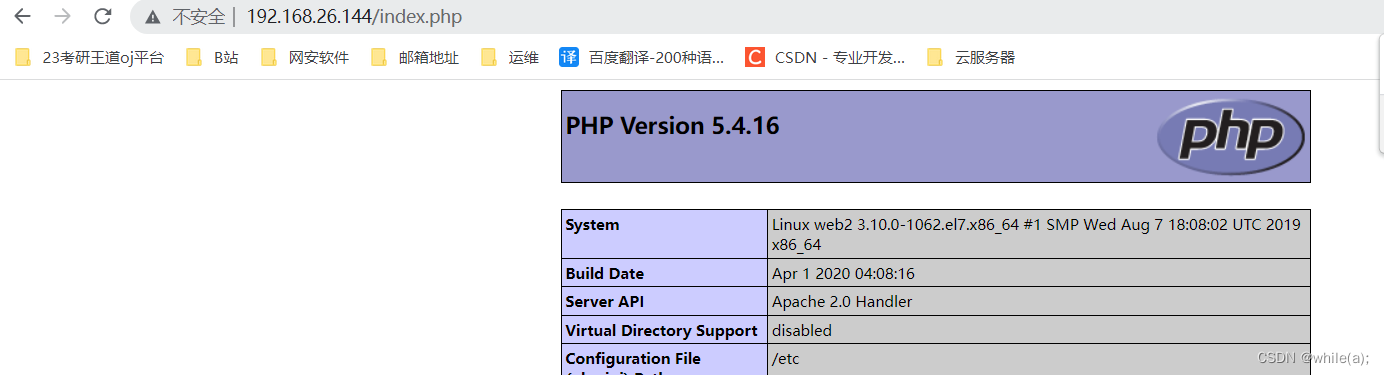
4.客户端测试:
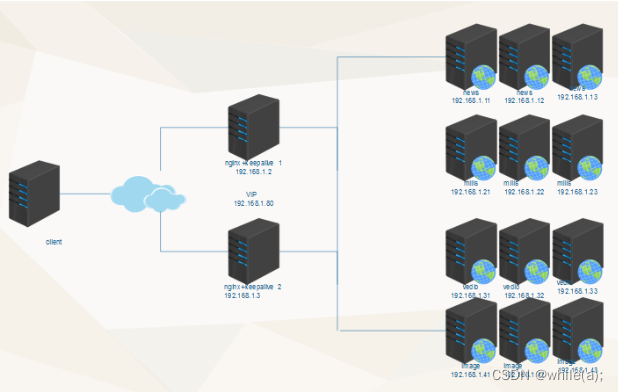
7.生产案例
7.1
需求:
Nginx实现七层的负载均衡
调度到不同组上游服务器
1. 动静分离
2. 网站进行分区
案例:
一、实施过程
1. 根据站点分区进行调度
http {
upstream news {
server 192.168.1.11:80 weight=1 max_fails=2 fail_timeout=2;
server 192.168.1.12:80 weight=2 max_fails=2 fail_timeout=2;
server 192.168.1.13:80 weight=2 max_fails=2 fail_timeout=2;
}
upstream milis {
server 192.168.1.21:80 weight=1 max_fails=2 fail_timeout=2;
server 192.168.1.22:80 weight=2 max_fails=2 fail_timeout=2;
server 192.168.1.23:80 weight=2 max_fails=2 fail_timeout=2;
}
upstream videos {
server 192.168.1.31:80 weight=1 max_fails=2 fail_timeout=2;
server 192.168.1.32:80 weight=2 max_fails=2 fail_timeout=2;
server 192.168.1.33:80 weight=2 max_fails=2 fail_timeout=2;
}
upstream images {
server 192.168.1.41:80 weight=1 max_fails=2 fail_timeout=2;
server 192.168.1.42:80 weight=2 max_fails=2 fail_timeout=2;
server 192.168.1.43:80 weight=2 max_fails=2 fail_timeout=2;
}
upstream others {
server 192.168.1.51:80 weight=1 max_fails=2 fail_timeout=2;
server 192.168.1.52:80 weight=2 max_fails=2 fail_timeout=2;
server 192.168.1.53:80 weight=2 max_fails=2 fail_timeout=2;
}
server {
location / {
proxy_pass http://others;
}
location /news {
proxy_pass http://news;
}
location /mili {
proxy_pass http://milis;
}
location ~* \.(wmv|mp4|rmvb)$ {
proxy_pass http://videos;
}
location ~* \.(png|gif|jpg)$ {
proxy_pass http://images;
}
}
2. 根据动静分离进行调度
http {
upstream htmlservers {
server 192.168.1.3:80 weight=1 max_fails=2 fail_timeout=2;
server 192.168.1.4:80 weight=2 max_fails=2 fail_timeout=2;
}
upstream phpservers {
server 192.168.1.3:80 weight=1 max_fails=2 fail_timeout=2;
server 192.168.1.4:80 weight=2 max_fails=2 fail_timeout=2;
}
server {
location ~* \.html$ {
proxy_pass http://htmlservers;
}
location ~* \.php$ {
proxy_pass http://phpservers;
}
}
}
二、Keepalived实现调度器HA
注:主/备调度器均能够实现正常调度
1. 主/备调度器安装软件
[root@master ~]# yum -y install ipvsadm keepalived
[root@backup ~]# yum -y install ipvsadm keepalived2. Keepalived
Master
# vim /etc/keepalived/keepalived.conf
! Configuration File for keepalivedglobal_defs {
router_id director1 //辅助改为director2
}vrrp_instance VI_1 {
state BACKUP
nopreempt
interface eth0 //心跳接口,尽量单独连接心跳
virtual_router_id 80 //MASTER,BACKUP一致
priority 100 //辅助改为50
advert_int 1
authentication {
auth_type PASS
auth_pass 1111
}
virtual_ipaddress {
192.168.1.80
}
}BACKUP
3. 启动KeepAlived(主备均启动)
# chkconfig keepalived on
# service keepalived start
# ip addr
4. 扩展对调度器Nginx健康检查(可选)
思路:
让Keepalived以一定时间间隔执行一个外部脚本,脚本的功能是当Nginx失败,则关闭本机的Keepalived
a. script
[root@master ~]# cat /etc/keepalived/check_nginx_status.sh
#!/bin/bash
/usr/bin/curl -I http://localhost &>/dev/null
if [ $? -ne 0 ];then
/etc/init.d/keepalived stop
fi
[root@master ~]# chmod a+x /etc/keepalived/check_nginx_status.shb. keepalived使用script
! Configuration File for keepalivedglobal_defs {
router_id director1
}vrrp_script check_nginx {
script "/etc/keepalived/check_nginx_status.sh"
interval 5
}vrrp_instance VI_1 {
state BACKUP
interface eth0
nopreempt
virtual_router_id 90
priority 100
advert_int 1
authentication {
auth_type PASS
auth_pass tianyun
}
virtual_ipaddress {
192.168.1.80
}track_script {
check_nginx
}
}
7.2关于php和php-fpm的一点点区别
--------------------
proxy_pass
后端服务器用的非php独立进程
apache+php模块
fastcgi_pass
后端服务器用的是php-fpm
php-fpm(fastcgi形式的php)后端服务器部署详细过程:
安装软件:
# yum install nginx php php-fpm -y
# vim /etc/nginx/nginx.conf //添加php配置
在server里面添加如下配置:
location ~ \.php$ {
root html;
fastcgi_pass 127.0.0.1:9000;
fastcgi_index index.php;
fastcgi_param SCRIPT_FILENAME $document_root$fastcgi_script_name;
include fastcgi_params;
}
修改php-fpm进程账户并开启php-fpm的进程: 端口是9000
#vim /etc/php-fpm.d/www.conf //修改如下参数,默认值是apache
user = nginx
group = nginx
为什么设置成nginx:
因为nginx.conf配置的账户为nginx
# systemctl start php-fpm
前端nginx反向代理服务器:
upstream web {
server 10.0.0.21;
server 10.0.0.22;
}
upstream phpserver {
server 10.0.0.23;
server 10.0.0.24;
} #上面的配置写到http里面server外面
server {
listen 80;
server_name www.baidu.com;
location / { #html的配置
proxy_pass http://web;
}location ~* \.php$ { #php的配置
proxy_pass http://phpserver;
}


 694
694


 被折叠的 条评论
为什么被折叠?
被折叠的 条评论
为什么被折叠?
 到【灌水乐园】发言


