


目录
2、编写配置文件application.properties
2.2、易错:qw.list、foreach执行sql、limit
一、了解并部署前端工程
1、需下载相关客户端,因注重点在后端,所以我采用轻量级的HBuilder X来实现前端
2、下载安装之后,导入项目,运行以下命令
npm install
npm run build
npm run dev

二、部署后端工程,配置环境
1、使用原生方式创建springboot工程
1.1、创建maven,在pom中导入所需的基本依赖----》虽是单体项目,但为培养微服务思想,我在这里采用父子工程。主要通过<dependencyManagement>来实现
1.2、在父工程中将依赖用<dependencyManagement>包裹
1.3、在子过程中用可直接引用父工程包裹的内容
blog-parent父工程pom文件
    <groupId>com.study</groupId>
    <artifactId>blog-parent</artifactId>
    <packaging>pom</packaging>
    <version>1.0-SNAPSHOT</version>
    <modules>
        <module>blog-api</module>
    </modules>

    <parent>
        <groupId>org.springframework.boot</groupId>
        <artifactId>spring-boot-starter-parent</artifactId>
        <version>2.5.0</version>
        <relativePath/>
    </parent>

    <properties>
        <project.build.sourceEncoding>UTF-8</project.build.sourceEncoding>
        <project.reporting.outputEncoding>UTF-8</project.reporting.outputEncoding>
        <java.version>1.8</java.version>
    </properties>

    <dependencyManagement>
        <dependencies>

            <dependency>
                <groupId>com.alibaba</groupId>
                <artifactId>fastjson</artifactId>
                <version>1.2.76</version>
            </dependency>

            <dependency>
                <groupId>commons-collections</groupId>
                <artifactId>commons-collections</artifactId>
                <version>3.2.2</version>
            </dependency>

            <dependency>
                <groupId>com.baomidou</groupId>
                <artifactId>mybatis-plus-boot-starter</artifactId>
                <version>3.4.3</version>
            </dependency>

            <!-- https://mvnrepository.com/artifact/joda-time/joda-time -->
            <dependency>
                <groupId>joda-time</groupId>
                <artifactId>joda-time</artifactId>
                <version>2.10.10</version>
            </dependency>
        </dependencies>
    </dependencyManagement>

    <build>
        <plugins>
            <plugin>
                <groupId>org.springframework.boot</groupId>
                <artifactId>spring-boot-maven-plugin</artifactId>
            </plugin>
        </plugins>
    </build>

</project>
blog-api子工程pom文件不展示了
2、编写配置文件application.properties
server.port=8888
spring.application.name=liu_blog


# datasource
spring.datasource.url=jdbc:mysql://localhost:13306/blog?useUnicode=true&characterEncoding=UTF-8&serverTimeZone=UTC
spring.datasource.username=root
spring.datasource.password=123456789
spring.datasource.driver-class-name=com.mysql.cj.jdbc.Driver

#mybatis-plus
#打印日志
mybatis-plus.configuration.log-impl=org.apache.ibatis.logging.stdout.StdOutImpl
#数据库表名前有前缀ms_,在此设置与数据库相匹配
mybatis-plus.global-config.db-config.table-prefix=ms_
3、配置 WebMvcConfig
在客户端和服务端交互时,因前后端分离,前端请求端口号等可能不一致,设计跨域处理
所以在配置web时,进行相关操作
@Configuration
public class WebMvcConfig implements WebMvcConfigurer {
    @Override
    public void addCorsMappings(CorsRegistry registry) {
        //跨域配置,不可设置为*,不安全, 前后端分离项目,可能域名不一致
        //本地测试 端口不一致 也算跨域
        registry.addMapping("/**").allowedOrigins("http://localhost:8080");
    }
}
4、配置mybatis配置文件,添加分页拦截器
@Configuration
@MapperScan("com.study.blog.dao.mapper")
public class MybatisPlusConfig {

    //添加分页拦截器
    @Bean
    public MybatisPlusInterceptor mybatisPlusInterceptor(){
        MybatisPlusInterceptor mpInterceptor = new MybatisPlusInterceptor();
        mpInterceptor.addInnerInterceptor(new PaginationInnerInterceptor());
        return mpInterceptor;
    }
}
5、编写启动类
@SpringBootApplication
public class BlogApp {
    public static void main(String[] args) {
        SpringApplication.run(BlogApp.class,args);
    }
}
三、实现首页面相关功能API
1、首页-文章列表(分页查询)
##此处一系列繁琐操作不在此阐述,只记录大致思路和易错点
1.1 、思路:
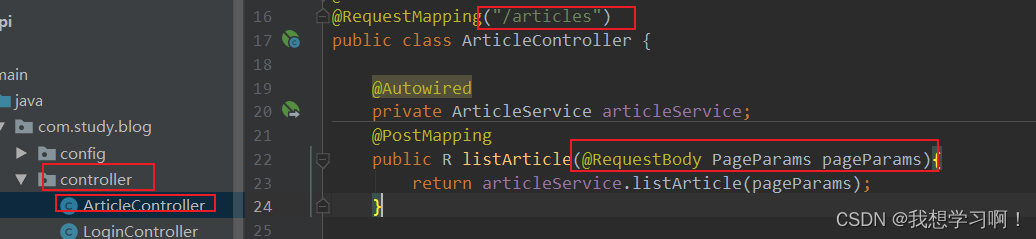
根据前端请求,准确对应请求路径,编写controller方法。此处控制层只写方法不写逻辑。
统一返回值类型R
前端传有参数且根据快速有效的编程思维,可在vo-params中专门编写数据类型来封装请求参数。
前端需要返回呈现在页面的值数据库中无对应表,需要在后端进行自定义,在vo中编写ArticleVo
在service接口中编写方法来实现控制层的需求,具体逻辑在service实现类中编写。分页查询出基本数据,由于数据中缺少部分内容,需要手动添加。
涉及多表查询,可使用Java代码实现或者在mapper.xml中编写sql(mapper接口中编写方法,在xml中具体实现)
    public R listArticle(PageParams pageParams) {
        //基本的分页查询
        Page<Article> page = new Page<>(pageParams.getPage(), pageParams.getPageSize());
        LambdaQueryWrapper<Article> qw = new LambdaQueryWrapper<>();
        qw.orderByDesc(Article::getWeight, Article::getCreateDate);
        Page<Article> articlePage = articleMapper.selectPage(page, qw);
        List<Article> records = articlePage.getRecords();
        //页面展示的类型为ArticleVo,其中CreateDate类型不一致,缺少tag和auther名称
        //我们需要将原records中的数据进行更改
        List<ArticleVo> articleVoList = copyList(records,true,true);
        return R.success(articleVoList);
    }

    private List<ArticleVo> copyList(List<Article> records,boolean isTag,boolean isAuther) {
        //页面展示为list集合
            ArrayList<ArticleVo> articleVoList = new ArrayList<>();
            for (Article record : records) {
                //在集合中增加需要更改的属性-------之前的基本属性也需要copy拷贝
                articleVoList.add(copy(record,isTag,isAuther));
            }
            return articleVoList;
        }

        private ArticleVo copy(Article article,boolean isTag,boolean isAuther) {
        //编写集合中的数据
            ArticleVo articleVo = new ArticleVo();
            //拷贝原有属性
            BeanUtils.copyProperties(article,articleVo);
            //更改类型
            articleVo.setCreateDate(new DateTime(article.getCreateDate()).toString("yyyy-MM-dd HH:mm"));
            //添加tag
            if (isTag){
                Long articleId = article.getId();
                //设计多表查询,在mapper.xml中编写sql语句
                articleVo.setTags(tagService.findTagsByArticleId(articleId));
            }
            //添加auther名称
            if (isAuther){
                Long authorId = article.getAuthorId();
                //防止空指针,需判断是否为空,为空值赋默认值
                articleVo.setAuthor(sysUserService.findUserById(authorId).getNickname());
            }
            return articleVo;
        }
1.2、易错点:
思维很重要,复杂的sql语句可在mysql可视化工具中提前测试 防止空指针,代码要严谨
2、首页-最热标签
2.1、思路:
最热标签,顾名思义需要展示前n条数据,需要考虑根据xx的排序来展示;需要在页面展现什么内容,然后是否需要自定义返回值数据
TagsController----》TagVo----》TagsServiceImpl----》TagMapper
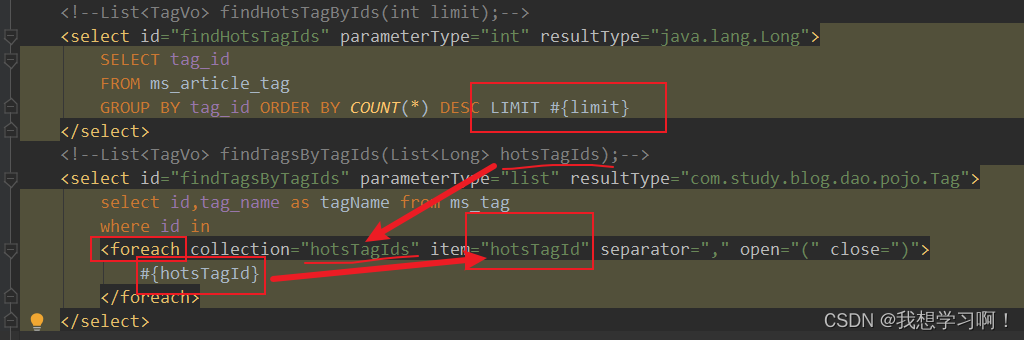
查询n条数据:将此limit传到sql或者qw.list中来限制查询多少数据
        int limit = 6;
        List<TagVo> tagVoList = tagsService.hot(limit);
2.2、易错:qw.list、foreach执行sql
qw.list中来限制查询多少数据中需要注意空格qw.list("limit "+limit)
sql中循环查询注意:前端传来的为集合,需要foreach执行sql
3、 统一异常处理
不管是controller层还是service,dao层,都有可能报异常,如果是预料中的异常,可以直接捕获处理,如果是意料之外的异常,需要统一进行处理,进行记录,并给用户提示相对比较友好的信息。
@RestControllerAdvice
@ResponseBody
@Slf4j
public class AllExceptionHandler {
    @ExceptionHandler(Exception.class) //此处先不具体到某种异常,直接全部捕获
    public R exceptionHandler(Exception ex){
        log.info("捕获到异常............");
        ex.printStackTrace();
        return R.fail(-999,"系统出现异常,请排查");
    }
}
4、首页-最热文章
4.1、思路
类似最热标签,不多赘述
controller:serviceImpl
    /**
     * 此处无需自定义sql语句,因其所需属性在article中都包含
     * @return
     */
    @PostMapping("/hot")
    public R hotArticle(){
        int limit = 6;
        return articleService.findHotsArticles(limit);
    }
@Override
public R findHotsArticles(int limit) {
LambdaQueryWrapper<Article> qw = new LambdaQueryWrapper<>();
qw.orderByDesc(Article::getViewCounts);
qw.select(Article::getId,Article::getTitle);
qw.last("limit "+limit);
List<Article> articleList = articleMapper.selectList(qw);
return R.success(copyList(articleList,false,false));
}此处无需自定义sql语句,因其所需属性在article中都包含
4.2、易错
注意空格qw.list("limit "+limit)
5、首页-文章归档
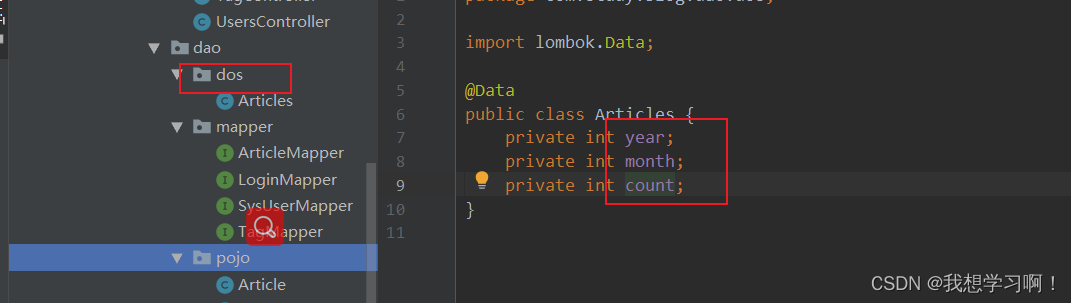
5.1、注意事项“dos”:
此处需要返回时间,属于全新data,不能再原数据库基础上进行改写vo,需要自定义dos进行返回给前端
5.2、易错:复杂sql
select year(create_date) as year,month(create_date) as month,count(*) as count from ms_article group by year,month此处,使用year,month等函数获取时间,上述方法是根据规范时间yyyy MM dd获取
    <select id="findListArchives" resultType="com.study.blog.dao.dos.Articles">
            select year(FROM_UNIXTIME(create_date/1000,'%Y-%m-%d %h:%i:%s')) as year,
            MONTH(FROM_UNIXTIME(create_date/10000,'%Y-%m-%d %h:%i:%s')) as month,
            count(*) as count
            from ms_article group by year,month
    </select>
上述为根据时间戳获取


 9万+
9万+


 被折叠的 条评论
为什么被折叠?
被折叠的 条评论
为什么被折叠?
 到【灌水乐园】发言


