Spring核心概念
提出疑问
- 企业级系统:
- 大规模:用户数量多、数据规模大、功能众多
- 性能和安全要求高
- 业务复杂
- 灵活多变
- 那么Java技术如何应对呢??

一、引入Spring
Spring框架是一个开放源代码的J2EE应用程序框架,由Rod Johnson发起,是针对bean的生命周期进行管理的轻量级容器(lightweight container)。
Spring解决了开发者在J2EE(后改名为javaEE)开发中遇到的许多常见的问题,提供了功能强大IOC(控制反转Inversion of Control)、AOP(面向切面Aspect Oriented Programming)及Web MVC等功能。
Spring可以单独应用于构筑应用程序,也可以和Struts、Webwork、Tapestry等众多Web框架组合使用,并且可以与 Swing等桌面应用程序AP组合。
因此, Spring不仅仅能应用于J2EE应用程序之中,也可以应用于桌面应用程序以及小应用程序之中。Spring框架主要由七部分组成,分别是 Spring Core、 Spring AOP、 Spring ORM、 Spring DAO、Spring Context、 Spring Web和 Spring Web MVC。
spring简介
- spring
- 轻量级框架,Java EE的春天,当前的主流框架
- 目标
- 使现有技术更加易用,推进编码最佳实践
- 内容
- IOC容器
- AOP实现
- 数据访问支持
- 简化JDBC/ORM框架
- 声明式事务
- Web集成
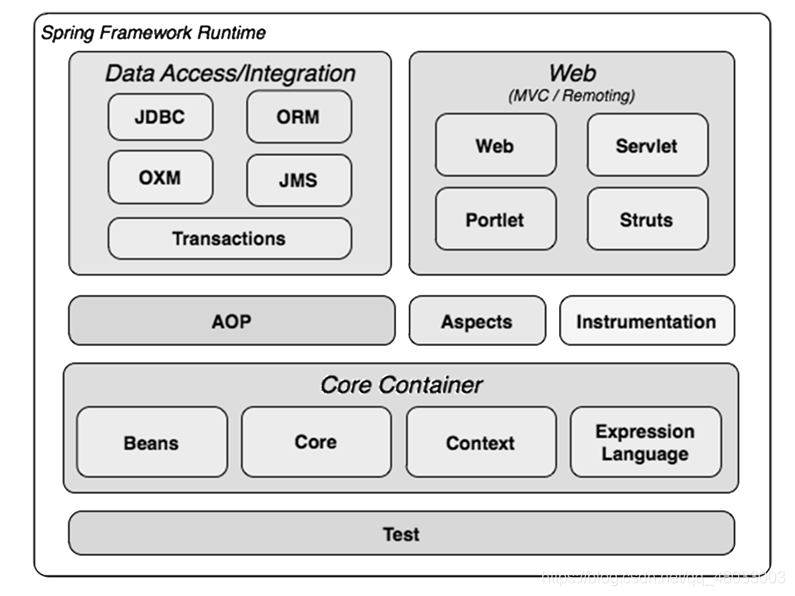
Spring体系结构

spring设计理念
- spring是面向Bean的编程
- Spring 两大核心技术
- 控制反转(IOC:Inversion Of Control)/依赖注入(DI:Dependency Injection)
- 面向切面编程(AOP:Aspect Oriented Programming)

Spring的优点
- 低侵入式设计
非入侵式设计,基于Spring开发的应用一般不依赖于Spring的类 - 独立于各种应用服务器
真正实现:一次编写,到处运行。 - 依赖注入特性将组件关系透明化,降低耦合度
Spring的依赖注入特性使Bean与Bean之间的依赖关系变的完全透明,降低了耦合度:使用SpringIOC容器,将对象之间的依赖关系交给Spring,降低组件之间的耦合性,让我们更专注于应用逻辑
- 面向切面编程特性允许将通用任务进行集中式处理
它的面向切面编程特性允许将一些通用任务如安全、事务、日志等进行集中式处理 - 与第三方框架的良好整合
并且它还提供了与第三方持久层框架的良好整合,并简化了底层数据库访问 - 高度的开放性(可以和Struts2、Hibernate、MyBatis、CXF等很多主流第三方框架无缝整合)
二、控制反转/依赖注入(IOC/DI)
控制反转(IOC)
控制反转(Inversion of Control,缩写为IoC),是面向对象编程中的一种设计原则,可以用来减低计算机代码之间的耦合度。
其中最常见的方式叫做依赖注入(Dependency Injection,简称DI),还有一种方式叫“依赖查找”(Dependency Lookup)。
通过控制反转,对象在被创建的时候,由一个调控系统内所有对象的外界实体将其所依赖的对象的引用传递给它。也可以说,依赖被注入到对象中。
将组件对象的控制权从代码本身转移到外部容器组件化的思想:分离关注点,使用接口,不再关注实现。
依赖注入:将组建的构建和使用分开。
- 目的:
解耦合,实现每个组件时只关注组件内部的事情

解读:
当某个角色(比如一个java示例,调用者)需要另一个角色(另一个java示例,被调用者)的协助时,在传统的程序设计过程中,通常由调用者来创建被调用者的示例。
但是在spring里,创建被调用者的工作不再由调用者来完成。因此被称为控制反转;
创建被调用者实例的工作通常由spring容器来完成,然后注入调用者,因此也称为依赖注入。这样给程序带来很大的灵活性,这样也实现了我们的接口和实现的分离。
简而言之也就是说我们要获得一个对象,不由我们开发者自己创建,而是由我们的容器来注入给我们的程序来使用.
依赖注入(DI)
概念
依赖注入是Spring协调不同Bean实例之间的合作而提供的一种工作机制,在确保Bean实例之间合作的同时,并能保持每个Bean的相对独立性
- 常用的依赖注入的三种方式
- 构造方法注入(Construct注入)
- setter注入
- 基于注解的注入(接口注入)
小实例

- 答案

bean类:
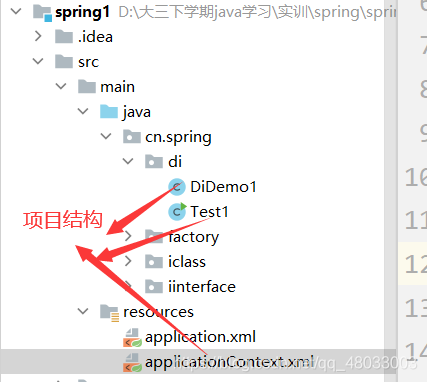
package cn.spring.di;

public class DiDemo1 {
    String name;
    String content;

    public void setName(String name) {
        this.name = name;
    }

    public void setContent(String content) {
        this.content = content;
    }
    public void say(){
        System.out.println(name+":"+content);
    }
}
- applicationContext.xml配置文件
<?xml version="1.0" encoding="UTF-8"?>
<beans xmlns="http://www.springframework.org/schema/beans"
       xmlns:xsi="http://www.w3.org/2001/XMLSchema-instance"
       xsi:schemaLocation="http://www.springframework.org/schema/beans http://www.springframework.org/schema/beans/spring-beans.xsd">

    <bean class="cn.spring.di.DiDemo1" id="di1">
        <property name="name" value="小兵张嘎"/>
        <property name="content" value="三天不打鬼子,手都痒痒!"/>
    </bean>
    <bean class="cn.spring.di.DiDemo1" id="di2">
        <property name="name" value="Rod"/>
        <property name="content" value="世界上只有10中人,认识二进制的和不认识二进制的"/>
    </bean>
</beans>
- Test类:
package cn.spring.di;

import org.springframework.context.ApplicationContext;
import org.springframework.context.support.ClassPathXmlApplicationContext;
import org.springframework.context.support.FileSystemXmlApplicationContext;

public class Test1 {
    public static void main(String[] args) {
        ApplicationContext applicationContext= new  ClassPathXmlApplicationContext("applicationContext.xml");
        DiDemo1 di1= (DiDemo1) applicationContext.getBean("di1");
        di1.say();
        ApplicationContext applicationContext1=new FileSystemXmlApplicationContext("src/main/resources/applicationContext.xml");
        DiDemo1 di2= (DiDemo1) applicationContext1.getBean("di2");
        di2.say();
    }
}
心得
Spring IOC步骤
- 使用
<bean>元素定义一个组件- id属性:指定一个用来访问的唯一名称,一般用于getBean(id)或者ref
- name属性:指定多个别名,名字之间使用逗号、分号或者空格进行分隔
- 设值注入
- 构造器
- setting方法
- 注解
小测试(经典题打印机)

代理(Proxy)
为什么要使用代理呢

当我们为了输出一句“说了句古诗”时,为了加上输出日志的功能,还要额外写一些与我们要实现目的不相关的事情,所以为了解决这,并且提高代码复用性和专心,我们提出代理模式,使得我们专心干我们要实现的事情,将额外的功能进行拆分出来
代理介绍
代理是一种常用的设计模式,其目的就是为其他对象提供一个代理以控制对某个对象的访问。代理类负责为委托类预处理消息,过滤消息并转发消息,以及进行消息被委托类执行后的后续处理。
静态代理
代码解释
实现以下功能:
- 定义一个human接口,创建一个say的方法
- 分别创建两个human的实现类Chinese,American
- 创建代理类,实现调用say方法之前和之后输出日志
创建Human接口
package cn.proxy.staticProxy;

public interface Human {
    public void say(String content);
}
创建实现类
Chinese:
package cn.proxy.staticProxy;

public class Chinese implements Human {
    @Override
    public void say(String content) {
        System.out.println("方法执行:你好"+content);
    }
}
American:
package cn.proxy.staticProxy;

public class American implements Human {
    @Override
    public void say(String content) {

        System.out.println("方法执行:hello"+content);
    }
}
创建代理类
package cn.proxy.staticProxy;

import java.util.logging.Level;
import java.util.logging.Logger;

public class HumanProxy  {
    Logger logger=Logger.getLogger(this.getClass().getName());
    private Human human;

    public void setHuman(Human human) {
        this.human = human;
    }

    public void say(String content){
        logger.log(Level.INFO,"say执行前");
        human.say(content);
        try {
            Thread.sleep(100);
        } catch (InterruptedException e) {
            e.printStackTrace();
        }

        logger.log(Level.INFO,"say执行后");
    }

    public static void main(String[] args) {
        HumanProxy humanProxy=new HumanProxy();
        Chinese chinese=new Chinese();
        humanProxy.setHuman(chinese);
        humanProxy.say("中国人");

        American american=new American();
        humanProxy.setHuman(american);
        humanProxy.say("美国人");
    }
}
发现
HumanProxy 代理类只能为实现了Human接口的类进行增强,而对于其他类则无法进行增强,这无疑是代码的复用性的大打折扣!!!
每个静态代理类只能为一个接口服务,这样程序开发中必然会产生许多的代理类。
每个静态代理只能代理一种类型,而且是在编译器就已经确定被代理的对象。
动态代理
代码解读:
在上述代码不变的情况下(使用Human接口、Chinese和American实现类)
创建Animal接口
package cn.proxy.dynamic;

public interface Animal {
    public void shout();
}
创建Rabbit实现类
package cn.proxy.dynamic;

public class Rabbit implements Animal {
    @Override
    public void shout() {
        System.out.println("小兔子叫");
    }
}
创建日志代理对象
LogHandle:
package cn.proxy.dynamic;

import java.lang.reflect.InvocationHandler;
import java.lang.reflect.Method;

public class LogHandle implements InvocationHandler {
    //代理对象
    private Object obj;

    public void setObj(Object obj) {
        this.obj = obj;
    }

    @Override
    public Object invoke(Object proxy, Method method, Object[] args) throws Throwable {
        System.out.println("动态代理--方法执行前");
        Object returnObj= method.invoke(obj,args);
        System.out.println("动态代理--方法执行后");
        return returnObj;
    }
}
测试执行
import cn.proxy.dynamic.*;

import java.lang.reflect.Proxy;

public class TestDynamic {
    public static void main(String[] args) {
        Chinese chinese=new Chinese();
        LogHandle logHandle=new LogHandle();
        logHandle.setObj(chinese);
        Human human=(Human) Proxy.newProxyInstance(chinese.getClass().getClassLoader(), chinese.getClass().getInterfaces(),logHandle);
        String re= human.say("吃油条 喝豆浆");
        System.out.println(re);

        System.out.println("--------------");
        American american=new American();
        LogHandle logHandle1=new LogHandle();
        logHandle.setObj(american);
        Human human1=(Human) Proxy.newProxyInstance(american.getClass().getClassLoader(), american.getClass().getInterfaces(),logHandle);
        String re1= human.say("吃汉堡");
        System.out.println(re1);

        System.out.println("--------------");
        Rabbit rabbit=new Rabbit();
        LogHandle logHandle2=new LogHandle();
        logHandle.setObj(rabbit);
        Animal animal=(Animal) Proxy.newProxyInstance(rabbit.getClass().getClassLoader(), rabbit.getClass().getInterfaces(),logHandle);
        animal.shout();


    }
}
动态代理是在运行时,通过反射机制实现动态代理,并且能够代理各种类型的对象,所以动态代理可以为任何类的进行增强,极大的提高了代码的复用性!!!
解读方法
注:
InvocationHandler的method参数解读(出现在InvocationHandler的实现类的方法中)
public Object invoke(Object proxy, Method method, Object[] args)
第一个参数proxy:
- 可以使用反射获取代理对象的信息(也就是proxy.getClass().getName())。
- 可以将代理对象返回以进行连续调用,这就是proxy存在的目的,因为this并不是代理对象。
第二个参数 method
- 方法执行激活
Object returnObj= method.invoke(obj,args);执行方法 里面的参数分别是被代理对象和参数列表
第三个参数
方法的参数集合
Proxy.newProxyInstance解读(出现在测试类中):
public static Object newProxyInstance(ClassLoader loader,
                                          Class<?>[] interfaces,
                                          InvocationHandler h)
参数分别是被代理类对象的类加载器、被代理对象实现的接口集合和InvocationHandler 对象
三、面向切面
- 如何集中精力做我们要做的事呢??

引入AOP
在软件业,AOP为Aspect Oriented Programming的缩写,意为:面向切面编程,
通过预编译方式和运行期间动态代理实现程序功能的统一维护的一种技术。AOP是OOP的延续,是软件开发中的一个热点,也是Spring框架中的一个重要内容,是函数式编程的一种衍生范型。
利用AOP可以对业务逻辑的各个部分进行隔离,从而使得业务逻辑各部分之间的耦合度降低,提高程序的可重用性,同时提高了开发的效率。
- AOP的目标:让我们可以“专心做事”
AOP的原理
- 将复杂的需求分解出不同方面,将散布在系统中的公共问题集中解决
- 采用代理机制组装起来运行,在不改变原程序的基础上对代码进行增强处理,增加新的功能。

AOP核心思想
核心知识点:
AOP是一种思想,它与具体的实现技术无关,任何一种符合AOP的思想的技术实现,都可以看做是AOP的实现。
通过java的动态代理机制,就可以很容易实现AOP的思想,实际上Spring的AOP也是建立在Java的代理机制上。
我们发现AOP实际上是由目标类的代理类实现的。AOP代理其实是由AOP框架动态生成的一个对象,该对象可作为目标对象使用。AOP代理包含了目标对象的全部方法,但是AOP代理中的方法与目标对象的方法存在差异,AOP方法在特定切入点添加了增强处理,并回调了目标对象的方法。
AOP解读
AOP相关术语
- 增强处理(Advice)
- 前置增强
- 后置增强
- 环绕增强、异常抛出增强、最终增强等类型。
- 切入点(Pointcut)
- 连接点(Join Point)
- 切面(Aspect)
- 目标对象(target Object)
- AOP代理(AOP Proxy)
增强(Adivce):又翻译成通知(直译并不太合适),定义了切面是什么以及何时使用,描述了切面要完成的工作和何时需要执行这个工作。是织入到目标类连接点上的一段程序代码。增强包含了用于添加到目标连接点上的一段执行逻辑,又包含了用于定位连接点的方位信息。(所以spring提供的增强接口都是带方位名:BeforeAdvice、(表示方法调用前的位置)AfterReturninAdvice、(表示访问返回后的位置)ThrowAdvice等等,所以只有结合切点和增强两者一起才能确定特定的连接点并实施增强逻辑)
切入点(Pointcut):Advice定义了切面要发生“故事”和时间,那么切入点就定义了**“故事”发生的地点**。例如某个类或者方法名,Spring中允许我们使用正则来指定。
连接点(Joinpoint):切入点匹配的执行点称作连接点。如果说切入点是查询条件,那连接点就是被选中的具体的查询结果。程序执行的某个特定位置,程序能够应用增强代码的一个“时机”,比如方法调用或者特定异常抛出
切面(Aspect):切点和增强组成切面。它包括了横切逻辑的定义,也包括了连接点的定义。Spring AOP就是负责实施切面的框架,它将切面所定义的横切逻辑织入到切面所指定的连接点中
代理(Proxy):AOP框架创建的对象。一个类被AOP织入增强之后,就产生了一个结果类,它是融合了原类和增强逻辑的代理类。
目标对象(Target):增强逻辑的织入的目标类
织入(Weaving):将增强添加到目标类具体连接点上的过程。AOP有三种织入的方式:编译期织入、类装载期织入、动态代理织入(spring采用动态代理织入)在一个多或多个连接点上,可以将切面的功能(advice)织入到程序的执行过程中
图理解

AOP实现方式一般有三种:
- 通过实现AfterReturningAdvice等方法进行增强
- 通过
<aop:config>配置 - 通过注解
第一种方式:工厂代理实现
Human接口:
package cn.aop3;

public interface Human {
    public String say(String content);
    public void sleep();
}
Human实现类 Chinese:
package cn.aop3;

public class Chinese implements Human {
    @Override
    public String say(String content) {
        System.out.println("说:"+content);
        return "返回值"+content;
    }

    @Override
    public void sleep() {
        System.out.println("睡觉");
    }
}
后置返回增强实现类
package cn.aop3;

import org.springframework.aop.AfterReturningAdvice;

import java.lang.reflect.Method;

public class LogAfter implements AfterReturningAdvice {
    @Override
    public void afterReturning(Object o, Method method, Object[] objects, Object o1) throws Throwable {
        System.out.println("后置正常返回通知");
    }
}
前置增强实现类
package cn.aop3;

import org.springframework.aop.MethodBeforeAdvice;

import java.lang.reflect.Method;

public class LogBefore implements MethodBeforeAdvice {
    @Override
    public void before(Method method, Object[] objects, Object o) throws Throwable {
        System.out.println("前置通知");
    }
}
application.xml文件配置(核心):
<?xml version="1.0" encoding="UTF-8"?>
<beans xmlns="http://www.springframework.org/schema/beans"
       xmlns:aop="http://www.springframework.org/schema/aop"
       xmlns:xsi="http://www.w3.org/2001/XMLSchema-instance"
       xsi:schemaLocation="http://www.springframework.org/schema/beans http://www.springframework.org/schema/beans/spring-beans.xsd
        http://www.springframework.org/schema/aop http://www.springframework.org/schema/aop/spring-aop.xsd
">
    <bean class="cn.aop3.Chinese" name="chinese"/>
    <bean class="cn.aop3.LogAfter" id="logAfter"/>
    <bean class="cn.aop3.LogBefore" id="logBefore"/>

    <bean id="humanProxy" class="org.springframework.aop.framework.ProxyFactoryBean">
        <property name="target" ref="chinese"/>
        <property name="interfaces">
            <list>
                <value>cn.aop3.Human</value>
            </list>
        </property>
        <property name="interceptorNames">
            <list>
                <value>logAfter</value>
                <value>logBefore</value>
            </list>
        </property>
    </bean>


</beans>
图片解读:

被增强的方法的实现类解读为增强处理
升级:
配置切入点和增强

实现了对于say方法进行前置通知和后置正常返回
而对于sleep方法只进行前置通知
第二种方式:< aop:advisor>实现
- 首先创建一个目标对象类UserAction:
package cn.aop3;

public class UserAction {
    public String  say(String content){
        System.out.println("UserAction的say方法执行了");
        return content;
    }
}
- 创建MyAdvisor通知增强类
package cn.aop4;

import org.aspectj.lang.ProceedingJoinPoint;
import org.aspectj.lang.annotation.AfterReturning;
import org.springframework.aop.AfterReturningAdvice;
import org.springframework.aop.MethodBeforeAdvice;

import java.lang.reflect.Method;

public class MyAdvisor implements MethodBeforeAdvice, AfterReturningAdvice {

    @Override
    public void before(Method method, Object[] objects, Object o) throws Throwable {
        System.out.println("前置通知");
    }

    @Override
    public void afterReturning(Object o, Method method, Object[] objects, Object o1) throws Throwable {
        System.out.println("后置通知");
    }
}
注:这里必须实现Advice接口或者实现其子接口,不然没法配置接下来的xml文件
- 配置application.xml文件
    <bean class="cn.aop4.UserAction" id="userAction"/>
    <bean class="cn.aop4.MyAdvisor" id="myAdvisor"/>
    <aop:config proxy-target-class="true">
        <aop:pointcut id="myPointcut" expression="execution(* cn.aop4.*.*(..))"/>
        <aop:advisor advice-ref="myAdvisor" pointcut-ref="myPointcut"/>
    </aop:config>
第三种方式< aop:config>配置:
- 配置application.xml文件
<bean class="cn.aop3.UserAction" id="userAction"/>
    <bean class="cn.aop3.MyAdvisor" id="myAdvisor"/>

    <aop:config>
        <aop:pointcut id="myPointcut1" expression="execution(* cn.aop3.*.*(..))"/>
        <aop:aspect ref="myAdvisor">
            <aop:before method="before" pointcut-ref="myPointcut1"/>
            <aop:after method="after" pointcut-ref="myPointcut1"/>
            <aop:around method="around" pointcut-ref="myPointcut1"/>
            <aop:after-returning method="afterReturn" pointcut-ref="myPointcut1" returning="obj"/>
            <aop:after-throwing method="afterThrow" pointcut="execution(* cn.aop3.*.*(..))"/>

        </aop:aspect>
    </aop:config>
如图解析:

此图极其重要!!!
第四种方式:注解实现
- 创建切面类:
package cn.aop3;

import org.aspectj.lang.ProceedingJoinPoint;
import org.aspectj.lang.annotation.*;
import org.springframework.stereotype.Component;

@Component
@Aspect
public class MyAspect {
    @Pointcut("execution(* cn.aop3.*.*(..))")
    public void myPointcut(){}
    @Before("myPointcut()")
    public void before(){
        System.out.println("前置通知2");
    }
    @After("myPointcut()")
    public void after(){
        System.out.println("后置通知2");
    }
    @Around("myPointcut()")
    public Object around(ProceedingJoinPoint pjp) throws Throwable {
        Object obj=pjp.proceed();
        System.out.println("环绕通知");
        return obj;
    }
    @AfterThrowing("myPointcut()")
    public void afterThrow(){
        System.out.println("后置抛出通知");
    }
    @AfterReturning(value = "myPointcut()",returning = "obj")
    public Object afterReturn(Object obj){
        System.out.println("后置返回通知");
        System.out.println("后置返回结果为"+obj);
        return obj;
    }
}
注:一定不要忘记类名之前的两个注解(@Component和@Aspect)
关于ProceedingJoinPoint(实现JoinPoint接口)
getTarget( )方法可以得到被代理的目标对象,
getSignature( )方法返回被代理的目标方法,
getArgs( )方法返回传递给目标方法的参数数组。
有关环绕通知ProceedingJoinPoint的参数的详细介绍
- application.xml文件配置
<?xml version="1.0" encoding="UTF-8"?>
<beans xmlns="http://www.springframework.org/schema/beans"
       xmlns:aop="http://www.springframework.org/schema/aop"
       xmlns:context="http://www.springframework.org/schema/context"
       xmlns:xsi="http://www.w3.org/2001/XMLSchema-instance"
       xsi:schemaLocation="http://www.springframework.org/schema/beans http://www.springframework.org/schema/beans/spring-beans.xsd
       http://www.springframework.org/schema/context http://www.springframework.org/schema/context/spring-context.xsd
        http://www.springframework.org/schema/aop http://www.springframework.org/schema/aop/spring-aop.xsd
">
    <context:component-scan base-package="cn.aop3"/>
    <aop:aspectj-autoproxy/>
</beans>
只需要两步,开启注释扫描,开启代理的自动创建
通过aop命名空间的<aop:aspectj-autoproxy />声明自动为spring容器中那些配置@aspectJ切面的bean创建代理,织入切面。当然,spring在内部依旧采用AnnotationAwareAspectJAutoProxyCreator进行自动代理的创建工作,但具体实现的细节已经被<aop:aspectj-autoproxy />隐藏起来了。
<aop:aspectj-autoproxy />有一个proxy-target-class属性,默认为false,表示使用jdk动态代理织入增强,当配为<aop:aspectj-autoproxy poxy-target-class=“true”/>时,表示使用CGLib动态代理技术织入增强。不过即使proxy-target-class设置为false,如果目标类没有声明接口,则spring将自动使用CGLib动态代理。


 1万+
1万+


 被折叠的 条评论
为什么被折叠?


