


目录
1.5、为 Zabbix server/proxy 配置数据库
1.1、添加 Zabbix 软件仓库
安装软件仓库配置包,这个包包含了 yum(软件包管理器)的配置文件
[root@localhost yum.repos.d]# rpm -ivh http://repo.zabbix.com/zabbix/4.0/rhel/7/x86_64/zabbix-release-4.0-1.el7.noarch.rpm
获取http://repo.zabbix.com/zabbix/4.0/rhel/7/x86_64/zabbix-release-4.0-1.el7.noarch.rpm
警告:/var/tmp/rpm-tmp.Nr34YL: 头V4 RSA/SHA512 Signature, 密钥 ID a14fe591: NOKEY
准备中...                          ################################# [100%]
正在升级/安装...
   1:zabbix-release-4.0-1.el7         ################################# [100%]
安装后,/etc/yum.repos.d/目录下就多了zabbix.repo文件
[root@localhost yum.repos.d]# ls
CentOS-Base.repo  CentOS-Debuginfo.repo  CentOS-Media.repo    CentOS-Vault.repo          zabbix.repo
CentOS-CR.repo    CentOS-fasttrack.repo  CentOS-Sources.repo  CentOS-x86_64-kernel.repo
[root@localhost yum.repos.d]# cat zabbix.repo
[zabbix]
name=Zabbix Official Repository - $basearch
baseurl=http://repo.zabbix.com/zabbix/4.0/rhel/7/$basearch/
enabled=1
gpgcheck=1
gpgkey=file:///etc/pki/rpm-gpg/RPM-GPG-KEY-ZABBIX-A14FE591

[zabbix-non-supported]
name=Zabbix Official Repository non-supported - $basearch
baseurl=http://repo.zabbix.com/non-supported/rhel/7/$basearch/
enabled=1
gpgkey=file:///etc/pki/rpm-gpg/RPM-GPG-KEY-ZABBIX
gpgcheck=1
Zabbix 前端需要额外的基础安装包。 您需要在运行 Zabbix 前端的系统中启用可选 rpms 的软件仓库:
yum install -y centos-release-scl
1.2、安装 Server/proxy/前端
yum install zabbix-server-mysqlyum install zabbix-proxy-mysqlyum install zabbix-web-mysql1.3、创建数据库
yum install mariadb mariadb-server -y
创建zabbix数据库,zabbix用户
[root@localhost yum.repos.d]# mysql -u root -p
Enter password:
Welcome to the MariaDB monitor.  Commands end with ; or \g.
Your MariaDB connection id is 2
Server version: 5.5.68-MariaDB MariaDB Server

Copyright (c) 2000, 2018, Oracle, MariaDB Corporation Ab and others.

Type 'help;' or '\h' for help. Type '\c' to clear the current input statement.

MariaDB [(none)]> create database zabbix character set utf8 collate utf8_bin;
Query OK, 1 row affected (0.00 sec)

MariaDB [(none)]> create user zabbix@localhost identified by 'zabbix';
Query OK, 0 rows affected (0.01 sec)

MariaDB [(none)]> grant all privileges on zabbix.* to zabbix@localhost ;
Query OK, 0 rows affected (0.00 sec)

MariaDB [(none)]> quit
Bye
1.4、导入数据
[root@localhost yum.repos.d]# zcat /usr/share/doc/zabbix-server-mysql*/create.sql.gz | mysql -uzabbix -p zabbix
Enter password:
[root@localhost yum.repos.d]# mysql -u root -p
Enter password:
Welcome to the MariaDB monitor.  Commands end with ; or \g.
Your MariaDB connection id is 4
Server version: 5.5.68-MariaDB MariaDB Server

Copyright (c) 2000, 2018, Oracle, MariaDB Corporation Ab and others.

Type 'help;' or '\h' for help. Type '\c' to clear the current input statement.

MariaDB [(none)]> show databases;
+--------------------+
| Database           |
+--------------------+
| information_schema |
| mysql              |
| performance_schema |
| test               |
| zabbix             |
+--------------------+
5 rows in set (0.00 sec)

MariaDB [(none)]> use zabbix
Reading table information for completion of table and column names
You can turn off this feature to get a quicker startup with -A

Database changed
MariaDB [zabbix]> show tables;
+----------------------------+
| Tables_in_zabbix           |
+----------------------------+
| acknowledges               |
| actions                    |
| alerts                     |
| application_discovery      |
| application_prototype      |
| application_template       |
| applications               |
| auditlog                   |
| auditlog_details           |
| autoreg_host               |
| conditions                 |
| config                     |
| corr_condition             |
........
......
.....
1.5、为 Zabbix server/proxy 配置数据库
# vi /etc/zabbix/zabbix_server.conf
       DBHost=localhost
       DBName=zabbix
       DBUser=zabbix
       DBPassword=<password>
# service httpd restart
1.6、 启动 Zabbix server 进程
# service zabbix-server start
systemctl enable zabbix-server
1.7、zabbix前端配置
对于 RHEL 7 和更高版本,Zabbix 前端的 Apache 配置文件位于 /etc/httpd/conf.d/zabbix.conf。
如果使用 RHEL 6,详见 在 RHEL 6 上使用Zabbix前端 章节来了解如何配置前端。
虽然已经配置了一些 PHP 参数。但是有必要取消 "date.timezone" 注释,并为其 设置正确的时区 。
php_value max_execution_time 300
       php_value memory_limit 128M
       php_value post_max_size 16M
       php_value upload_max_filesize 2M
       php_value max_input_time 300
       php_value always_populate_raw_post_data -1
       php_value date.timezone Asia/Shanghai
SELinux 配置
在 enforcing 模式下启用 SELinux 状态后,您需要执行以下命令以启用 Zabbix 前端和 Zabbix server 之间的通信:
# setsebool -P httpd_can_connect_zabbix on
       如果数据库可以通过网络访问(在 PostgreSQL 情况下包括 'localhost'),您也需要允许 Zabbix 前端连接到数据库:

       # setsebool -P httpd_can_network_connect_db on
# service httpd restart1.8、安装 Agent
# yum install zabbix-agent
# service zabbix-agent start
1.9、启动zabbix
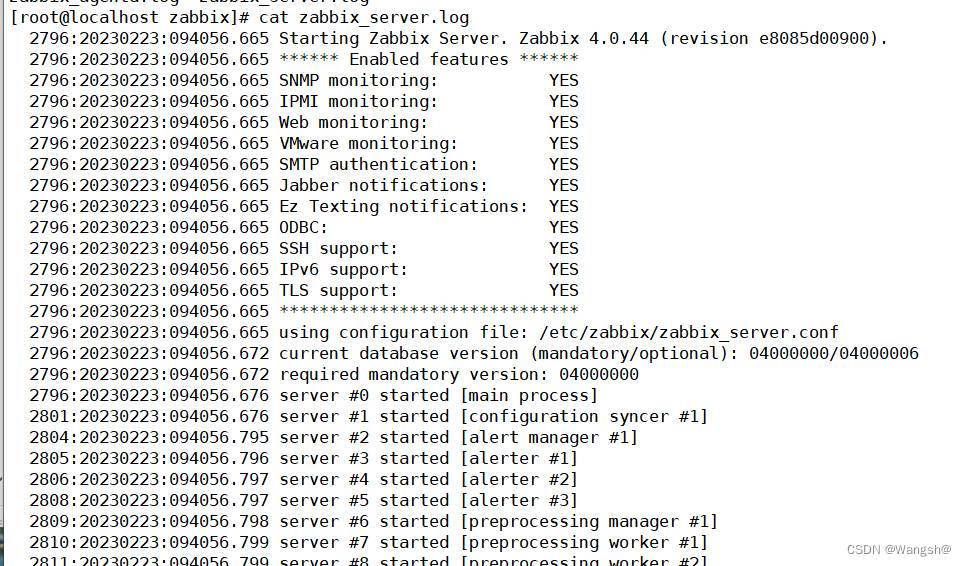
在zabbix各个进程都启动以后,查看zabbix-server的日志,查看是否启动成功
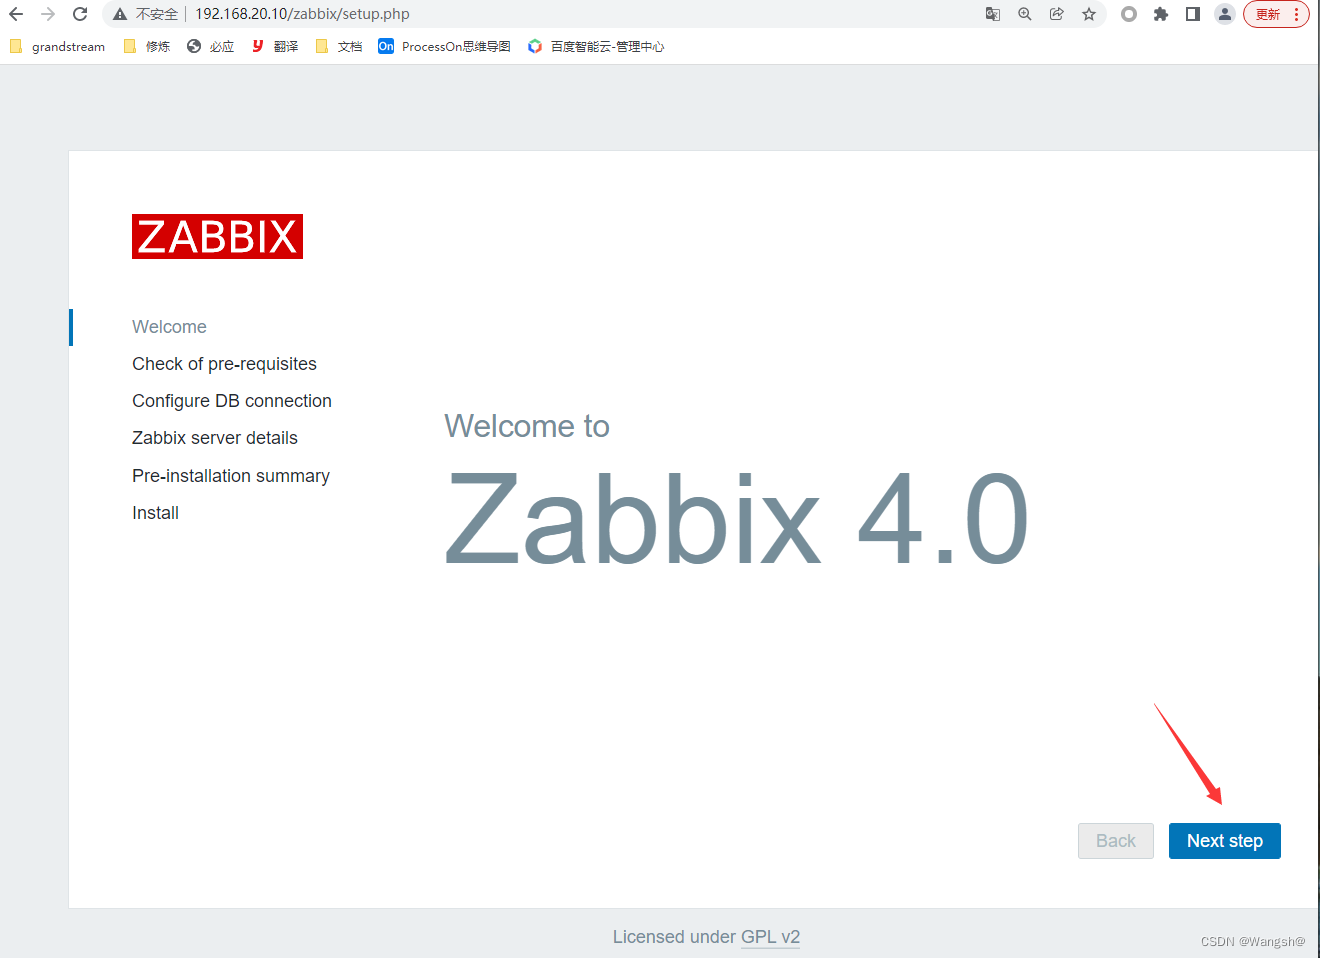
2.0、访问zabbix
在浏览器输入 http://192.168.20.10/zabbix/setup.php


 3134
3134


 被折叠的 条评论
为什么被折叠?
被折叠的 条评论
为什么被折叠?
 到【灌水乐园】发言


