


文章目录
1. 粘包,半包背景介绍
1.1 概念解析
TCP 粘包就是连续给对端发送两个或者两个以上的数据包,对端在一次收取中可能收到的数据包大于 1 个,小于 1 个,可能是几个包加上某个包的一部分,或者干脆就是几个完整的包在一起;当对端收到的数据只是一个数据包的一部分,这种情况叫做半包
下面我用一张图来向你清晰的解释粘包,半包问题

从这张图上,发送端发送了 ABC 和 DEF 两个 TCP 数据包,但是接收端不知道如何组装这两个数据包,于是就产生了上图中的两种组合方式,上面的将两个数据包合并的现象就是 粘包,而下面的完整数据包被拆分的现象就是 半包
1.2 案例演示
这里我定义了一个客户端,在和服务器建立连接时发送了十次 abcdefghi,具体代码如下所示:
@Slf4j
public class HelloClient {
    public static void main(String[] args) {
        NioEventLoopGroup worker = new NioEventLoopGroup();
        try {
            Bootstrap bootstrap = new Bootstrap();
            bootstrap.channel(NioSocketChannel.class);
            bootstrap.group(worker);
            bootstrap.handler(new ChannelInitializer<SocketChannel>() {
                @Override
                protected void initChannel(SocketChannel ch) throws Exception {
                    log.debug("connetted...");
                    ch.pipeline().addLast(new ChannelInboundHandlerAdapter() {
                        @Override
                        public void channelActive(ChannelHandlerContext ctx) throws Exception {
                            log.debug("sending...");
                            char c = 'a';
                            // 发送十次数据
                            for (int i = 0; i < 10; i++) {
                                ByteBuf buffer = ctx.alloc().buffer();
                                buffer.writeBytes(new byte[]{(byte) (c), (byte) (c+ 1), (byte) (c+2), (byte) (c+3), (byte) (c+4), (byte) (c+5), (byte) (c+6), (byte) (c+7), (byte) (c+8)});
                                ctx.writeAndFlush(buffer);
                            }
                        }
                    });
                }
            });
            ChannelFuture channelFuture = bootstrap.connect("127.0.0.1", 8080).sync();
            Channel channel = channelFuture.channel();
            channel.writeAndFlush("Hello");
            channelFuture.channel().closeFuture().sync();
        } catch (InterruptedException e) {
            log.error("client error", e);
        } finally {
            worker.shutdownGracefully();
        }
    }
}
1.2.1 粘包演示
这里我定义了一个服务器来接收客户端的数据,由于客户端每次只发送了 9 Bytes 数据,并且只发送了 10 次,并不会将服务器的 缓冲区 填满,就会导致将十个数据包全部粘合在一起,产生粘包现象,服务器代码如下所示:
public class HelloServer {
    public static void main(String[] args) {
        NioEventLoopGroup bossGroup = new NioEventLoopGroup();
        NioEventLoopGroup workerGroup = new NioEventLoopGroup(2);
        // 创建启动器
        ServerBootstrap bootstrap = new ServerBootstrap();
        // 设置线程组
        bootstrap.group(bossGroup,workerGroup);
        bootstrap.channel(NioServerSocketChannel.class);
        bootstrap.childHandler(new ChannelInitializer<NioSocketChannel>() {
            @Override
            protected void initChannel(NioSocketChannel ch) throws Exception {
                ch.pipeline().addLast(new ChannelInboundHandlerAdapter(){
                    @Override
                    public void channelActive(ChannelHandlerContext ctx) throws Exception {
                        log.debug("connect: {}",ctx.channel());
                        super.channelActive(ctx);
                    }

                    @Override
                    public void channelInactive(ChannelHandlerContext ctx) throws Exception {
                        log.debug("disconnect: {}",ctx.channel());
                        super.channelInactive(ctx);
                    }
                });
                ch.pipeline().addLast(new LoggingHandler());
            }
        });

        bootstrap.bind(8080);

    }
}
运行服务器和客户端代码就会看到下图所示的粘包现象:

可以看到十次发送的 abcdefghi 都被粘合在了一起
1.2.2 半包演示
相比于上面的服务器端代码,我们只需要调小服务端接受数据的 ByteBuf 大小,就可以看到半包现象了,具体代码如下所示:
public class HelloServer {
    public static void main(String[] args) {
        NioEventLoopGroup bossGroup = new NioEventLoopGroup();
        NioEventLoopGroup workerGroup = new NioEventLoopGroup(2);
        // 创建启动器
        ServerBootstrap bootstrap = new ServerBootstrap();
        // 设置线程组
        bootstrap.group(bossGroup,workerGroup);
        // !!! 应用层面设置接受数据分配的 ByteBuf 的大小
        bootstrap.childOption(ChannelOption.RCVBUF_ALLOCATOR,new AdaptiveRecvByteBufAllocator(4,4,4));

        bootstrap.channel(NioServerSocketChannel.class);

        // 设置channel的初始化
        bootstrap.childHandler(new ChannelInitializer<NioSocketChannel>() {
            @Override
            protected void initChannel(NioSocketChannel ch) throws Exception {
                ch.pipeline().addLast(new ChannelInboundHandlerAdapter(){
                    @Override
                    public void channelActive(ChannelHandlerContext ctx) throws Exception {
                        log.debug("connect: {}",ctx.channel());
                        super.channelActive(ctx);
                    }

                    @Override
                    public void channelInactive(ChannelHandlerContext ctx) throws Exception {
                        log.debug("disconnect: {}",ctx.channel());
                        super.channelInactive(ctx);
                    }
                });
                ch.pipeline().addLast(new LoggingHandler());
            }
        });

        bootstrap.bind(8080);

    }
}
运行服务器和客户端代码就会看到下图所示的半包现象:

2. 产生原因
上面讲述了什么是 TCP 粘包和半包现象,以及案例演示,接下来就说一下这两种现象出现的原因:
-
粘包产生的主要原因
- 发送方发送的数据 < 套接字缓冲区的大小 (应用程序每次读取到的数据是大于一个数据包大小的)
- 接收方读取套接字缓冲区数据不够及时(多个数据包的数据在缓冲区积压,之后应用程序一次读取了多个数据包的数据)
-
半包产生的主要原因
- 发送方发送的数据 < 套接字缓冲区的大小 (应用程序读取缓冲区所有的数据,凑不齐一个数据包大小)
- 发送的数据大于协议的 MTU(Maximum Transmission Unit,最大传输单元),必须拆包
我们再从收发和传输角度来理解一下这两个问题:
- 收发:一次发送可能被多次接收,多个发送也可能被一次接收
- 传输:一个发送可能占用多个传输数据包,多个发送可能共用一个传输数据包
⭐️ 那么究其根本原因就是: TCP 是一个流式协议,消息是没有边界的,服务器接受到的数据不知道以何种方式进行拆分和组合
3. 解决方案
从上面的 粘包半包问题产生原因可以看到,我们只要确定消息的边界,就能解决粘包半包问题
💡Tips: 这里我主要是讲解如何从应用层面解决 TCP 粘包和半包现象的
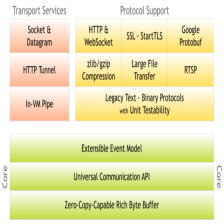
其实业界里面有各种各样的解决方案,这里我以表格的形式呈现四种解决方案,并列举了每种方案的寻找消息边界的方式,优缺点:

接下来我就结合代码向你简单地介绍并使用一下四种方式
3.1 短连接方案
短连接方案: 主要利用释放连接的消息作为传输消息的边界。
这种方案实现简单 ,我们只需要在每次连接建立时只发送一次请求,之后断开连接就好了。这种方式的弊端也很明显,我们每次发送请求都要重新建立连接,这不仅效率低下而且耗费系统资源,是不太推荐的一种方式。
这里我还是通过代码的方式向你演示一下如何利用短连接解决粘包半包问题:
@Slf4j
public class ShortLinkClient {
    static byte[] basicBytes;
    static final int BYTE_LEN = 26;
    static final Random BYTE_SEED = new Random(BYTE_LEN); // 随机数
    // 初始化 basicBytes ===> 用来存放 a-z 26个字符
    static {
        basicBytes = new byte[BYTE_LEN];
        char c = 'a';
        for (int i = 0; i < BYTE_LEN; i++) {
            basicBytes[i] = (byte)(c+i);
        }
    }

    public static void main(String[] args) {
    	// 发送 10 条消息 ,每次发送 i+1 个字符
        for (int i = 0; i < 10; i++) {
            sendMsg(generateBytes(i+1));
        }
    }

	// 随机生成长度为 n 的字符数组
    private static byte[] generateBytes(int n) {
        byte[] bytes = new byte[n];
        for (int i = 0; i < n; i++) {
            bytes[i] = basicBytes[BYTE_SEED.nextInt(BYTE_LEN)];
        }
        return bytes;
    }

	// 负责建立短连接
    private static void sendMsg(byte[] bytes) {
        NioEventLoopGroup worker = new NioEventLoopGroup();
        try {
            Bootstrap bootstrap = new Bootstrap();
            bootstrap.channel(NioSocketChannel.class);
            bootstrap.group(worker);
            bootstrap.handler(new ChannelInitializer<SocketChannel>() {
                @Override
                protected void initChannel(SocketChannel ch) throws Exception {
                    log.debug("connetted...");
                    ch.pipeline().addLast(new ChannelInboundHandlerAdapter() {
                        @Override
                        public void channelActive(ChannelHandlerContext ctx) throws Exception {
                            ByteBuf buffer = ctx.alloc().buffer();
                            // 发送消息
                            buffer.writeBytes(bytes);
                            log.debug("sending...total: {}",bytes.length);
                            ctx.writeAndFlush(buffer);
                            // 关闭连接通道
                            ctx.channel().close();
                        }
                    });
                }
            });
            ChannelFuture channelFuture = bootstrap.connect("127.0.0.1", 8080).sync();
            channelFuture.channel().closeFuture().sync();

        } catch (InterruptedException e) {
            log.error("client error", e);
        } finally {
            worker.shutdownGracefully();
        }
    }
}

public class HelloServer {
    public static void main(String[] args) {
        NioEventLoopGroup bossGroup = new NioEventLoopGroup();
        NioEventLoopGroup workerGroup = new NioEventLoopGroup(2);
        ServerBootstrap bootstrap = new ServerBootstrap();
        bootstrap.group(bossGroup,workerGroup);

        bootstrap.channel(NioServerSocketChannel.class);
        bootstrap.childHandler(new ChannelInitializer<NioSocketChannel>() {
            @Override
            protected void initChannel(NioSocketChannel ch) throws Exception {
                ch.pipeline().addLast(new ChannelInboundHandlerAdapter(){
                    @Override
                    public void channelActive(ChannelHandlerContext ctx) throws Exception {
                        log.debug("connect: {}",ctx.channel());
                        super.channelActive(ctx);
                    }
                    @Override
                    public void channelInactive(ChannelHandlerContext ctx) throws Exception {
                        log.debug("disconnect: {}",ctx.channel());
                        super.channelInactive(ctx);
                    }
                });
                ch.pipeline().addLast(new LoggingHandler());
            }
        });
        bootstrap.bind(8080);
    }
}
这里我向你解释一下客户端的代码含义:
main 函数向服务器发送了十次数据,每次发送数据都会建立新的连接,并且发送 i+1 个字符
接下来我们运行一下客户端和服务器代码,并验证是否解决了粘包半包问题:


3.2 固定长度方案
固定长度方案 指的是固定客户端每次发送消息的长度,这样服务端每次累积到指定长度的数据,才进行后续的业务逻辑处理就可以了。
这种方案实现同样简单,但是缺点就是我们很多时候可能无法预估消息的最大长度,并且每条消息的长度不是固定的,这样就可能浪费了很多空间,传输了很多无用的数据,所以也不太推荐使用
Netty 为我们提供了一个 FixedLengthFrameDecoder类,用来对传输的数据进行解码,它有一个核心参数,就是帧的长度
这里我还是通过案例向你演示一下这种方案:
public class FixedLengthClient {
    public static void main(String[] args) {
        NioEventLoopGroup worker = new NioEventLoopGroup();
        try {
            Bootstrap bootstrap = new Bootstrap();
            bootstrap.channel(NioSocketChannel.class);
            bootstrap.group(worker);
            bootstrap.handler(new ChannelInitializer<SocketChannel>() {
                @Override
                protected void initChannel(SocketChannel ch) throws Exception {
                    log.debug("connetted...");
                    ch.pipeline().addLast(new LoggingHandler(LogLevel.DEBUG));
                    ch.pipeline().addLast(new ChannelInboundHandlerAdapter() {
                        @Override
                        public void channelActive(ChannelHandlerContext ctx) throws Exception {
                            log.debug("sending...");
                            // 发送内容随机的数据包
                            Random r = new Random();
                            char c = 'a';
                            ByteBuf buffer = ctx.alloc().buffer();
                            // 总共向服务器发送了十次数据
                            for (int i = 0; i < 10; i++) {
                            	// 每次数据的长度为 8
                                byte[] bytes = new byte[8];
                                // 随机的为前几个字节赋值
                                for (int j = 0; j < r.nextInt(8); j++) {
                                    bytes[j] = (byte) c;
                                }
                                c++;
                             	// 只是写到 ByteBuf 并未发送
                                buffer.writeBytes(bytes);
                            }
                            // 一次性将十条数据发送出去
                            ctx.writeAndFlush(buffer);
                        }
                    });
                }
            });
            ChannelFuture channelFuture = bootstrap.connect("127.0.0.1", 8080).sync();
            channelFuture.channel().closeFuture().sync();

        } catch (InterruptedException e) {
            log.error("client error", e);
        } finally {
            worker.shutdownGracefully();
        }
    }
}

@Slf4j
public class HelloServer {
    public static void main(String[] args) {
        NioEventLoopGroup bossGroup = new NioEventLoopGroup();
        NioEventLoopGroup workerGroup = new NioEventLoopGroup(2);
        ServerBootstrap bootstrap = new ServerBootstrap();
        bootstrap.group(bossGroup,workerGroup);
        bootstrap.channel(NioServerSocketChannel.class);

        // 设置channel的初始化
        bootstrap.childHandler(new ChannelInitializer<NioSocketChannel>() {
            @Override
            protected void initChannel(NioSocketChannel ch) throws Exception {
                // !!!!设置固定长度帧解码器
                ch.pipeline().addLast(new FixedLengthFrameDecoder(8));
                ch.pipeline().addLast(new ChannelInboundHandlerAdapter(){
                    @Override
                    public void channelActive(ChannelHandlerContext ctx) throws Exception {
                        log.debug("connect: {}",ctx.channel());
                        super.channelActive(ctx);
                    }

                    @Override
                    public void channelInactive(ChannelHandlerContext ctx) throws Exception {
                        log.debug("disconnect: {}",ctx.channel());
                        super.channelInactive(ctx);
                    }
                });
                ch.pipeline().addLast(new LoggingHandler());
            }
        });

        bootstrap.bind(8080);

    }
}
这里我先向你解释一下代码内容:
客户端在建立连接的时候向服务器一次性发送了10 次数据,每条数据的长度都是 8 字节(每条数据都是只包含一个类型字符: a/b/…)
服务器设置了一个定长解码器,规定了每条数据的长度为 8 字节
我们查看一下运行结果:


3.3 分隔符方案
分隔符方案就是在每条完整的数据结尾添加指定的 特殊标记(分隔符),表示一个数据包的结束,服务器端只要按照规定的分割符来划分数据包就可以解决粘包半包问题
这种方案相比于短连接和固定长度来说,实现不会太过复杂,并且不浪费空间;但是由于传输的内容本身包括分隔符时是需要进行转义的,这就导致每次解析数据时都要全部扫描,这导致效率不会太高
和固定长度方案一样,Netty 为我们提供了一个 DelimiterBasedFrameDecoder类,用来对传输的数据进行解码,它有两个核心参数
maxFrameLength: 解码帧的最大长度delimiters: 分隔符数组,我们可以指定多个分隔符
这里我还是通过案例的形式向你演示一下它的用法
public class DelimiterClient {
    public static void main(String[] args) {
        NioEventLoopGroup worker = new NioEventLoopGroup();
        try {
            Bootstrap bootstrap = new Bootstrap();
            bootstrap.channel(NioSocketChannel.class);
            bootstrap.group(worker);
            bootstrap.handler(new ChannelInitializer<SocketChannel>() {
                @Override
                protected void initChannel(SocketChannel ch) throws Exception {
                    log.debug("connetted...");
                    ch.pipeline().addLast(new LoggingHandler(LogLevel.DEBUG));
                    ch.pipeline().addLast(new ChannelInboundHandlerAdapter() {
                        @Override
                        public void channelActive(ChannelHandlerContext ctx) throws Exception {
                            log.debug("sending...");
                            // 发送内容随机的数据包
                            Random r = new Random();
                            char c = 'a';
                            ByteBuf buffer = ctx.alloc().buffer();
                            // 发送十次数据包,每次还是随机长度
                            for (int i = 0; i < 10; i++) {
                                byte[] bytes = new byte[8];
                                // 数据包内容从 a - j
                                for (int j = 0; j < r.nextInt(16)+1; j++) {
                                    buffer.writeByte(c);
                                }
                                c++;

                                // 在每个数据包的结尾添加 $
                                buffer.writeByte('$');
                            }
                            ctx.writeAndFlush(buffer);
                        }
                    });
                }
            });
            ChannelFuture channelFuture = bootstrap.connect("127.0.0.1", 8080).sync();
            channelFuture.channel().closeFuture().sync();

        } catch (InterruptedException e) {
            log.error("client error", e);
        } finally {
            worker.shutdownGracefully();
        }
    }
}

@Slf4j
public class HelloServer {
    public static void main(String[] args) {
        // core --> 设置分隔符 $
        ByteBuf buffer = ByteBufAllocator.DEFAULT.buffer(1, 1);
        buffer.writeByte('$');
        NioEventLoopGroup bossGroup = new NioEventLoopGroup();
        NioEventLoopGroup workerGroup = new NioEventLoopGroup(2);
        ServerBootstrap bootstrap = new ServerBootstrap();
        bootstrap.group(bossGroup,workerGroup);
        bootstrap.channel(NioServerSocketChannel.class);
        bootstrap.childHandler(new ChannelInitializer<NioSocketChannel>() {
            @Override
            protected void initChannel(NioSocketChannel ch) throws Exception {

                // core --> 设置分隔符解码器
                ch.pipeline().addLast(new DelimiterBasedFrameDecoder(1024,buffer));
                ch.pipeline().addLast(new ChannelInboundHandlerAdapter(){
                    @Override
                    public void channelActive(ChannelHandlerContext ctx) throws Exception {
                        log.debug("connect: {}",ctx.channel());
                        super.channelActive(ctx);
                    }

                    @Override
                    public void channelInactive(ChannelHandlerContext ctx) throws Exception {
                        log.debug("disconnect: {}",ctx.channel());
                        super.channelInactive(ctx);
                    }
                });
                ch.pipeline().addLast(new LoggingHandler());
            }
        });

        bootstrap.bind(8080);

    }
}
在核心代码处我都加了注释:
客户端代码: 我还是在建立连接时发了 10 条数据 ,每条数据 1-16 长度不等,并且在每条数据末尾添加了 $ 作为分隔符
服务器代码: 这里只是将之前的 FixedLengthFrameDecoder 解码器换成 DelimiterBasedFrameDecoder 解码器
我们查看一下运行结果:


可以看到,服务端正确的对客户端传来的 10 条数据进行了解码操作
3.4 固定长度字段方案
固定长度字段方案 传输数据时按照 字段长度:字段内容的格式传输数据,在解码时先读取字段长度,再根据长度读取指定数据内容
这种方式可以精确地定位到每条消息的边界,并且效率比较高,相比于其它几种方式,这也是业内比较广泛使用的
Netty 提供了 LengthFieldBasedFrameDecoder 类来实现这种方案的解码,这种方式的参数比较多,主要有以下五个
maxFrameLength: 数据的最大长度(包括附加信息和长度标志)lengthFieldOffset:数据长度标志的起始偏移量(指明从起始位置的第几个字节开始解析字段长度)lengthFieldLength:字段长度所占的字节数lengthAdjustment:字段长度与字段内容之间的附加信息所占字节数initialBytesToStrip:解析之后抛弃的字节数

这里我放了一张图片来帮助你理解这五个参数的作用,其实这个类的源码注释上也有很详细的 Demo 来帮你了解这些核心参数,如果你感兴趣的话,也可以读一读源码的注释
这里我还是举一个例子,来帮你理解这个解码器的工作流程:
⭐️ 这里我利用 Netty 自带的 EmbeddedChannel 来进行服务器模拟,有兴趣的话你可以自行了解一下
public class LengthFieldClient {
    public static void main(String[] args) {
        // 模拟服务器
        // 使用EmbeddedChannel测试handler
        EmbeddedChannel channel = new EmbeddedChannel(
                // 数据最大长度为1KB,长度标识前后各有1个字节的附加信息,长度标识长度为4个字节(int)
                new LengthFieldBasedFrameDecoder(1024, 4, 4, 1, 0),
                new LoggingHandler(LogLevel.DEBUG)
        );

        // 模拟客户端,写入数据
        ByteBuf buffer = ByteBufAllocator.DEFAULT.buffer();

        send(buffer, "Hello world");
        send(buffer, "World");
        channel.writeInbound(buffer);
    }

    private static void send(ByteBuf buf, String msg) {
        // 得到数据的长度
        int length = msg.length();
        byte[] bytes = msg.getBytes(StandardCharsets.UTF_8);
        buf.writeShort(0xCAFE);
        buf.writeShort(0xBABE);

        // 写入数据长度标识
        buf.writeInt(length);
        // 写入长度标识后的其他信息
        buf.writeByte(0xFE);
        // 写入具体的数据
        buf.writeBytes(bytes);
    }
}
这里我分别写入了两条数据,他们都以 CAFEBABE 开头,之后在字段长度和字段内容之间添加了 0xFE;这里定义了LengthFieldBasedFrameDecoder并设置了它的五个参数,运行结果如下图所示:

我们可以发现两条消息都被成功的分割了,并没有出现粘包半包现象
至此,我向你介绍完了四种常见的解决 TCP 粘包半包问题的方法,希望你读完之后有所收获^_^
4. 源码解析
上面我展示了 Netty 提供的三种解决粘包半包问题的解码器,这里我就简单的讲解以下它的实现流程

从上面的继承图上看,这三种解码器都继承自 ByteToMessageDecoder,这个类作为一个 InboundHandler,其核心方法就是 channelRead(ChannelHandlerContext ctx, Object msg)
public void channelRead(ChannelHandlerContext ctx, Object msg) throws Exception {
       if (msg instanceof ByteBuf) {
           CodecOutputList out = CodecOutputList.newInstance();
           try {
               ByteBuf data = (ByteBuf) msg;
               first = cumulation == null;
               if (first) {
                   cumulation = data;
               } else {
               		// 调用累加器累加数据
                   cumulation = cumulator.cumulate(ctx.alloc(), cumulation, data);
               }
               // 进行解码
               callDecode(ctx, cumulation, out);
           } catch (DecoderException e) {
               throw e;
           } catch (Exception e) {
               throw new DecoderException(e);
           } finally {
               if (cumulation != null && !cumulation.isReadable()) {
                   numReads = 0;
                   cumulation.release();
                   cumulation = null;
               } else if (++ numReads >= discardAfterReads) {
                   // We did enough reads already try to discard some bytes so we not risk to see a OOME.
                   // See https://github.com/netty/netty/issues/4275
                   numReads = 0;
                   discardSomeReadBytes();
               }

               int size = out.size();
               firedChannelRead |= out.insertSinceRecycled();
               fireChannelRead(ctx, out, size);
               out.recycle();
           }
       } else {
           ctx.fireChannelRead(msg);
       }
   }
从源码可以看到,这里涉及两个核心问题
- 累加器是如何存储传输到服务端的数据
- 解码器是如何对数据进行解码的
4.1 累加器简介
通过上面的讲解,你应该清楚一个前提条件: 数据在到达应用程序之前是没有处理 TCP 粘包半包问题的
基于上述前提,我们的解码器必须拦截所有的数据,直到按照指定规则进行数据分隔之后才能传输给后面的处理器进行数据处理
这时我们的累加器就登场了,它主要负责以什么样的形式对数据进行存储,ByteToMessageDecoder 内部主要提供了两种累加器
MERGE_CUMULATOR: 将新旧数据合并到一个 ByteBuf 中COMPOSITE_CUMULATOR: 将所有的 ByteBuf 存储到一个CompositeByteBuf中,所有数据以组合的形式存在
注意: 所有解码器使用的累加器默认是
MERGE_CUMULATOR,理由在COMPOSITE_CUMULATOR注释上面:CompositeByteBuf使用更复杂的索引实现,因此根据您解码器实现,这可能比使用MERGE_CUMULATOR更慢
这里我只是向你介绍了两种累加器的工作方式,具体的代码实现你可以自行阅读
4.2 解码流程
ByteToMessageDecoder 在解码时调用了 callDecode 方法,其内部又调用了 decodeRemovalReentryProtection 方法进行解码,最终调用了 decode 方法进行解码
protected abstract void decode(ChannelHandlerContext ctx, ByteBuf in, List<Object> out) throws Exception;
而这个方法又是一个抽象方法,需要子类进行具体实现,这里用到了典型的 模板模式,所以核心的解码方法就是子类的 decode 方法,这里我以 FixedLengthFrameDecoder#decode()为例,向你解释一下解码流程,剩下的两个解码器也是类似,只不过解码逻辑不同而已
    @Override
   protected final void decode(ChannelHandlerContext ctx, ByteBuf in, List<Object> out) throws Exception {
       Object decoded = decode(ctx, in);
       if (decoded != null) {
           out.add(decoded);
       }
   }
   protected Object decode(
           @SuppressWarnings("UnusedParameters") ChannelHandlerContext ctx, ByteBuf in) throws Exception {
       if (in.readableBytes() < frameLength) {
           return null;
       } else {
           return in.readRetainedSlice(frameLength);
       }
   }
从源码上可以看到,它有调用另一个方法来进行数据解码,当发现 ByteBuf 里的数据长度大于等于指定的固定分割帧长度时就会调用 ByteBuf#readRetainedSlice 将数据进行切割,从原始的 ByteBuf 中剔除前 frameLength 个数据并将该部分数据返回给调用方,之后将数据存储到 List<Object> out 中,传给下个 InBoundHandler 进行处理
通过上面两个部分的源码简单解析,我相信你对这三种解决粘包半包问题的方法有了更深层次的理解,由于篇幅原因,我并没有解析另外两中解码方式,你可以自行阅读源码进行扩展阅读,希望你有所收获
5. 总结
这篇文章,我主要向你介绍了:
- TCP 粘包半包问题的概念以及产生原因
- 四种解决方案以及案例演示
- Netty 提供的三种方案的简单源码分析
最后,我希望你看完本篇文章后,掌握如何使用 Netty 解决 TCP 粘包半包问题,也希望你指出我在文章中的错误点,希望我们一起进步,也希望你能给我的文章点个赞,原创不易!


 729
729

 被折叠的 条评论
为什么被折叠?
被折叠的 条评论
为什么被折叠?
 到【灌水乐园】发言


