


很多小伙伴苦于无法搭建一个规范的前端项目,导致后续开发不规范,今天给大家带来一个基于Vite6+TypeScript+React+ESlint9+Prettier的搭建教程。
最近查看React官网的时候突然发现官方在最新版本的React19文档中已经把vite作为官方主推的构建工具了
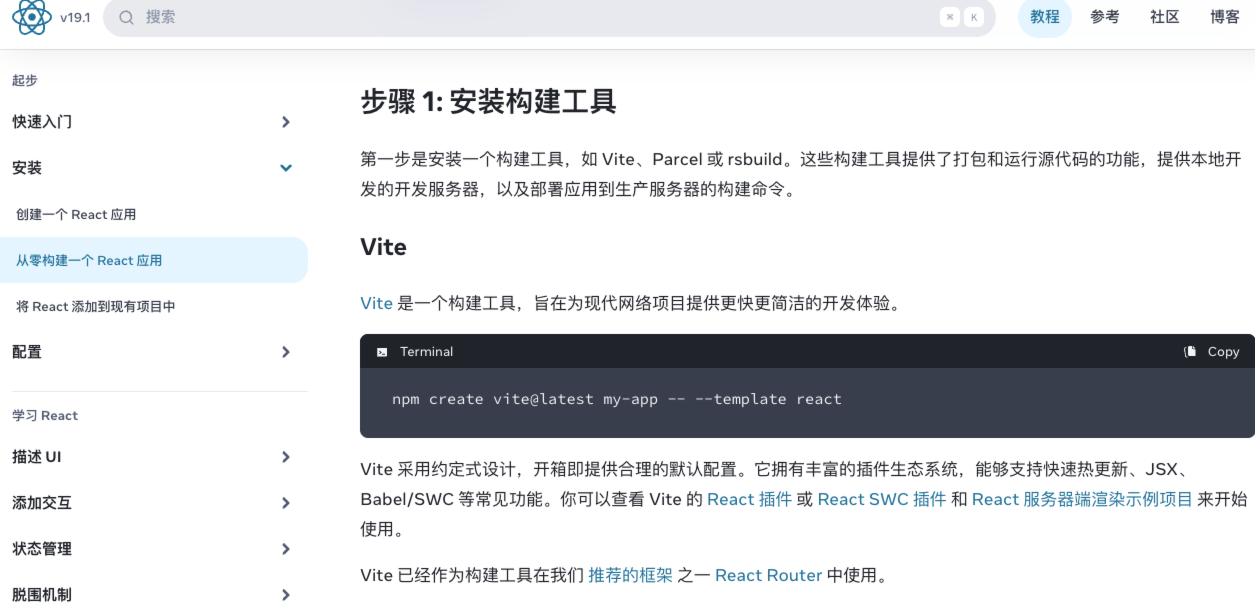
为此我还去查看了上个版本的文档,react18时vite还尚未成为react主推的构建工具

尽管成立时间相对较短,但 Vite 迅速获得了关注,成为现代 Web 开发领域一个颇具潜力的参与者。
目录
环境依赖版本
- node:v20.17.0
- vite:^6.3.5
- typescript:~5.8.3
- react:^19.1.0
- eslint: ^9.25.0,
- vite-plugin-checker: ^^0.9.1
- husky: ^9.1.7
- lint-staged: ^15.5.1
一、基础配置
react跟vue不太一样,vite是vue官方推出的构建工具,我们搭建vue项目的时候完全可以使用官方提供的脚手架。对于react官方并没有提供相应的脚手架,但是vite官方还是提供了react相关的预设模版,我们可以基于官方提供的预设模版进行项目搭建
1、初始化项目

1.1、模版的区别
我们可以看到官方提供的react+ts相关的模版有两个,react-ts和react-swc-ts 是两种不同的 React 开发方案,它们在编译器层面有着本质的区别。让我们详细对比它们的特点和适用场景。

| 特性 | React-TS | React-SWC-TS |
|---|---|---|
| 编译器 | Babel 或 TypeScript 编译器(TSC) | SWC (Rust 编写的编译器) |
| 性能 | 基础性能,较为稳定 | 显著更快,特别是大型项目 medium.com |
| 开发体验 | 完整的类型检查和错误提示 | 快速但可能缺少一些高级类型特性 |
| 生态系统成熟度 | 完全成熟,社区支持广泛 | 正在发展中,但基础特性已完善 medium.com |
| 配置复杂度 | 相对简单,官方支持完整 | 需要额外的插件配置 |
| 适用场景 | 所有项目,特别是小型到中型项目 | 大型项目或性能关键的应用 medium.com |
1.1.1、性能对比
SWC 的性能优势主要体现在以下几个方面:
- 构建速度显著提升,特别是在大型项目中
- 内存占用更低
- 热更新速度更快
1.1.2、开发者体验
React-TS 提供了完整的类型系统支持和错误提示,而 SWC 虽然快速但可能在某些高级类型特性上有所限制。选择时需要权衡开发效率与编译速度之间的平衡。
1.1.3、推荐使用场景
根据项目需求,可以按以下原则选择:
如果是:
新项目且团队规模较小
注重开发体验和类型安全
不追求极致的构建速度
→ 推荐使用
react-ts如果是:
大型复杂项目
需要快速的开发反馈
CI/CD 构建时间敏感
→ 推荐使用
react-swc-ts
1.2、创建项目
此处建议用pnpm,因为它可以很好的解决幽灵依赖的问题,什么是幽灵依赖部分本文重点,不做过多解释,可以自行百度或者参考这篇文章,运行以下命令:
选择需要的模版,运行命令:
// pnpm create vite 项目名称 --template 模版

pnpm create vite my-vue-app --template react-swc-ts
运行指令后接下来就是根据需要安装所需的功能
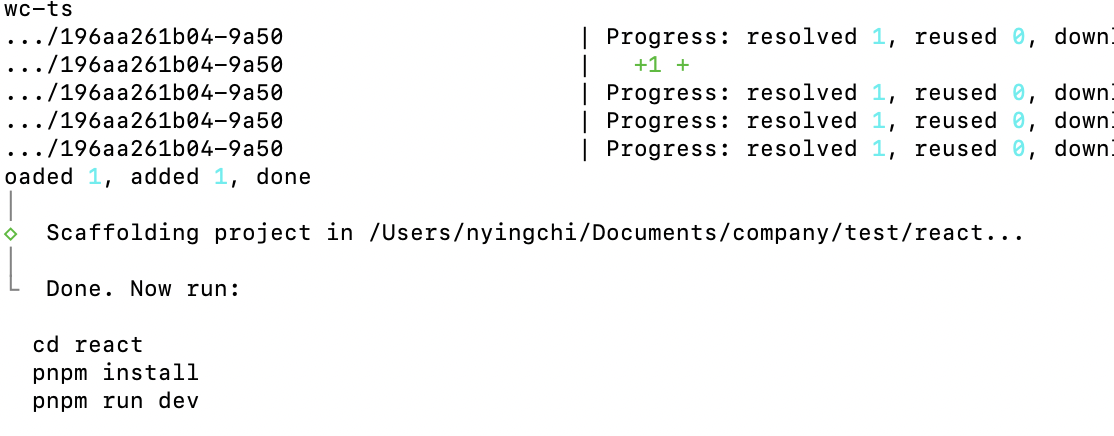
初始化完成的结构如图所示
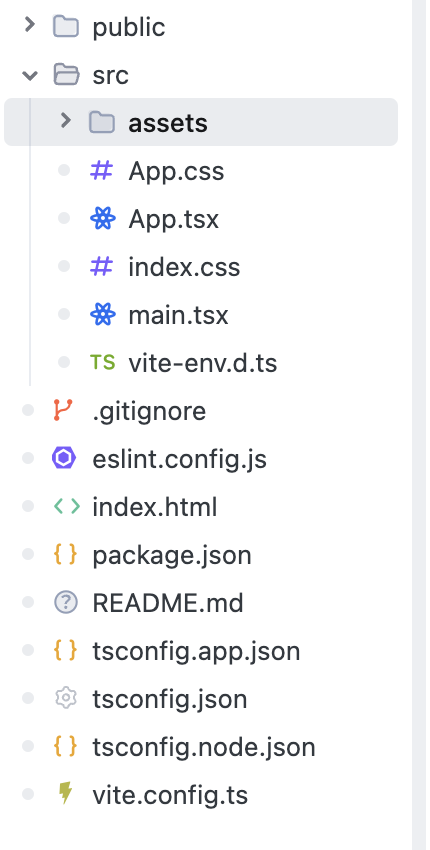
跟vue脚手架搭建的项目对比简直是光秃秃啥也没有。。。
2、代码质量风格的统一
eslint可以保证项目的质量,prettier可以保证项目的统一格式、风格。
每个公司的开发规则各有不同,此处根据各自的需求自行配置,下方是我常用的风格配置(仅供参考)
2.1、配置eslint
- 注意
最新版本的配置已经不是 .eslintrc.cjs 文件了!!!旧版的内容不能直接复制到新版!!!
1、自 ESLint v9.0.0 以后,平面配置文件格式就是默认的配置文件格式。
2、默认情况下,
ESLint CLI将搜索eslint.config.(js | cjs | mjs)而不是.eslintrc.*文件。如果未找到eslint.config.*文件,CLI会将其视为错误,并且不会运行。 https://eslint.org.cn/docs/latest/use/configure/configuration-files3、如果一定要用
.eslintrc.cjs,那就看文档自个配置→https://eslint.org.cn/docs/latest/use/configure/configuration-files-deprecated#configuration-file-formats以下是官方给出的具体解释:https://eslint.org/docs/latest/use/configure/migration-guide
可参考以下文章:
探索 Antfu ESLint 配置:一款极为便捷的 ESLint 设置方案
ESLint 扁平化配置使用指南
2.1.1 eslint9拓展(熟悉的略过)
拓展一:扁平化配置
- 导出一个配置对象数组,结构如下:
export default [
    { 配置对象 },
    扩展插件1,
    { 扩展插件1的配置对象 },
    扩展插件2,
    { 扩展插件2的配置对象 },
  	......
]
- 重要配置属性
files: 指定配置对象应用到的文件,如果当前对象未指定,则配置对象内容应用于全局所有文件。**
ignores:**指示配置对象不应用到的文件。如果未指定,则配置对象应用于files匹配的所有文件。如果ignores在配置对象中没有任何其他属性一起使用,则这些模式充当全局忽略项。
plugins: 一个插件对象,当指定files时,这些插件仅对匹配的文件可用,不指定则对全局的files生效, 定义了可用的规则,但不启用它们需要在 rules 中明确启用和配置每条规则
rules: 一个对象,包含已配置的规则。当指定files或ignores时,这些规则配置仅对匹配的文件可用,不指定则对全局的files生效。
拓展二:plugins和extends
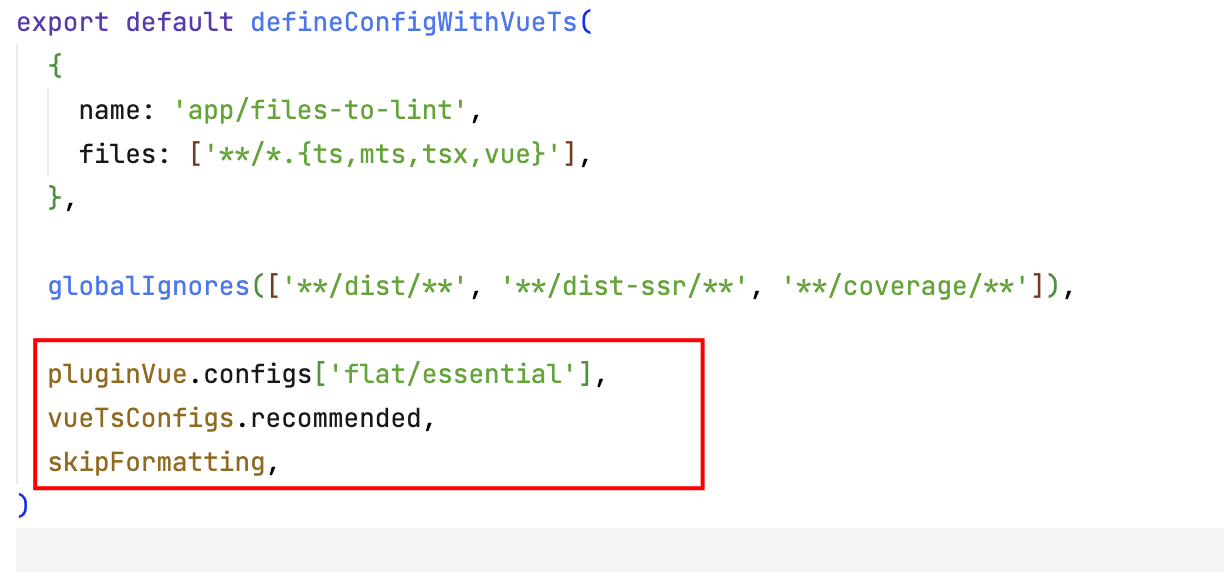
我分别创建了react和vue两个项目,得到了以下配置信息
- vue配置文件
- react配置文件
我发现这两个项目中关于plugins的配置不太一样,然后询问了ai,得到以下解释
预设配置 (vue当前使用的方式):
- 是最高级别的抽象
- 通常包含了插件、规则和其他配置的组合,不需要手动配置每条规则,配置对象会被合并到最终的配置中
- 简洁明了,直接使用官方或社区维护的预设配置
plugins 配置 :
- 是中间级别的抽象
- 定义了可用的规则,但不启用它们
- 需要在 rules 中明确启用和配置每条规则
extends (旧版配置系统):
- 在旧版配置中用于继承其他配置,虽然官方基础示例中可能没有直接展示 extends 参数,但这是扁平化配置中完全有效的一个属性
- 在新版扁平化配置中,通过直接传递配置对象来实现类似功能,也就是预设配置
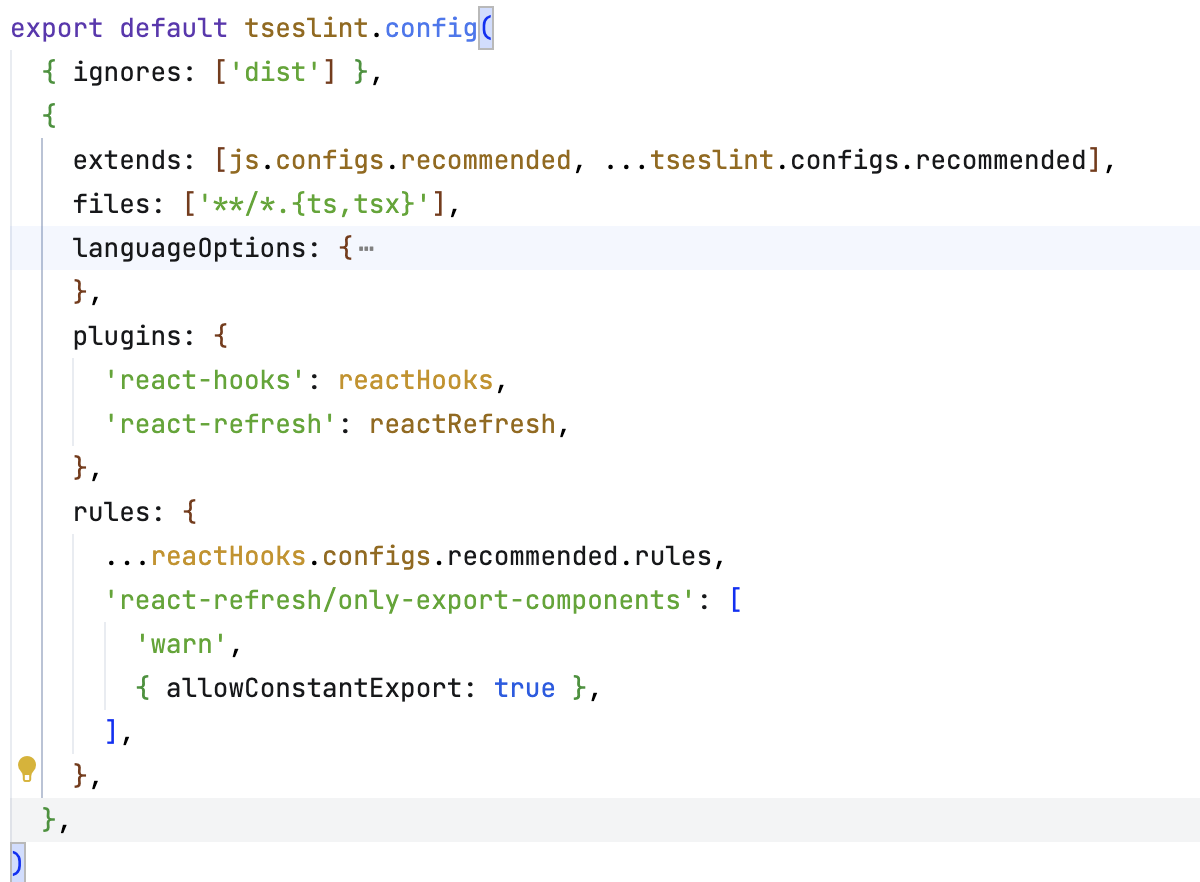
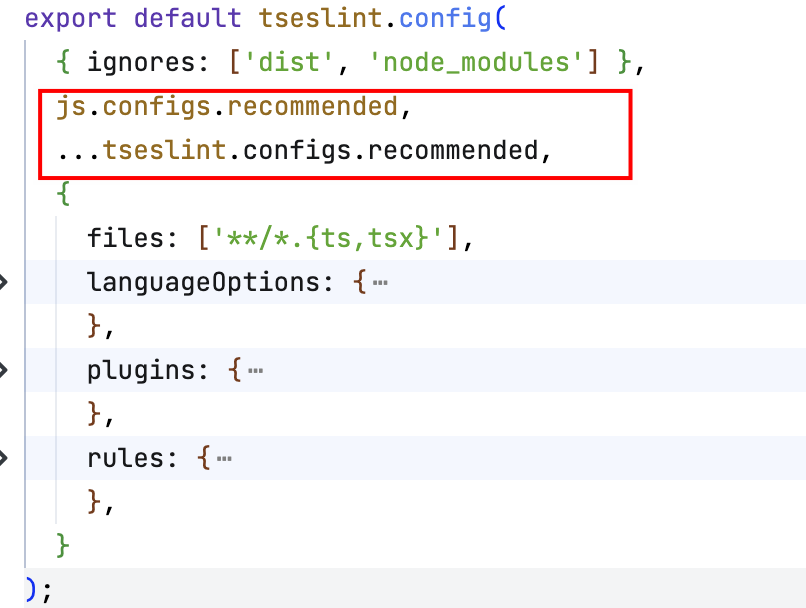
所以根据以上解释可以得出,假设不考虑file的显示,插件可作用于全局的情况下,react中的extends可做如下更改
拓展三:ESlint合并的逻辑
扁平化结构的配置顺序很重要,首先ESlint会在数组中对象依次执行,对每个配置对象都会先看 files 和 ignores 是否与目标执行文件路径匹配,匹配上的配置对象,会从前往后依次合并,同属性的后面覆盖前面。可参考配置文件 - 级联配置对象,配置文件 - 配置规则,配置文件 - 组合配置。
我的理解是,类似于 Object.assign() 的合并规则,后面的相同的对象属性会覆盖前面的对象属性
2.1.2 安装插件
我们可以看到react初始化的框架跟vue脚手架搭建的框架对比插件还是有些少,我们需要再原有的配置基础上安装一些插件来维护规则
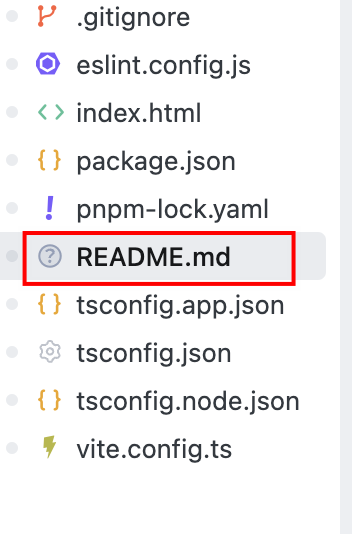
我们可以点开项目初始的README.md 文件中推荐了两种增强配置
- 类型感知的 Lint 规则
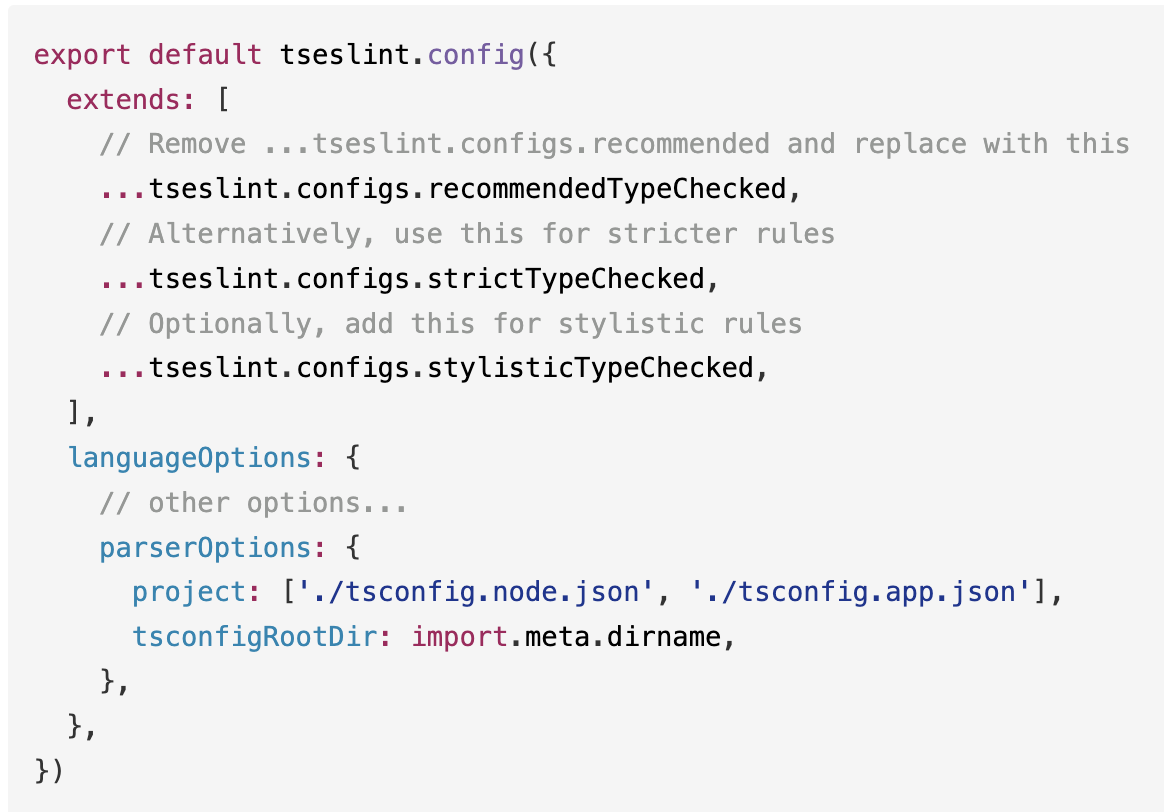
- React 特定的 Lint 规则
由于我很懒,懒得去查官网他们分别都有什么用,所以我选择了询问AI,AI给出的回答是:
类型感知检查 :
- recommendedTypeChecked :基于类型信息的推荐规则
- strictTypeChecked :更严格的类型检查规则
- stylisticTypeChecked :代码风格相关的类型检查规则
- 需要配置 parserOptions.project 指向
TypeScript配置文件React 专用插件 :
- eslint-plugin-react-x :现代
React代码的 Lint 规则- eslint-plugin-react-dom:
React DOM相关的 Lint 规则建议:
如果您的项目处于开发初期或是学习/实验性质,当前配置已经足够:
- 已经包含了基本的
TypeScript和React Hooks检查- 支持热重载功能
- 配置简单,不会过度干扰开发流程
如果您正在开发生产级应用,建议采纳
README.md中的增强配置:
启用类型感知检查 :
- 可以捕获更多潜在问题
- 提供更严格的类型安全保障
- 需要注意这会增加
ESLint的运行时间添加
React专用插件 :
eslint-plugin-react-x和eslint-plugin-react-dom提供更全面的React代码检查- 可以捕获
React特有的问题和最佳实践
[!TIP]
建议的综合配置
启用感知类型检查recommendedTypeChecked以及
React专用插件
执行下方命令安装依赖:
pnpm add -D eslint-plugin-react-x eslint-plugin-react-dom
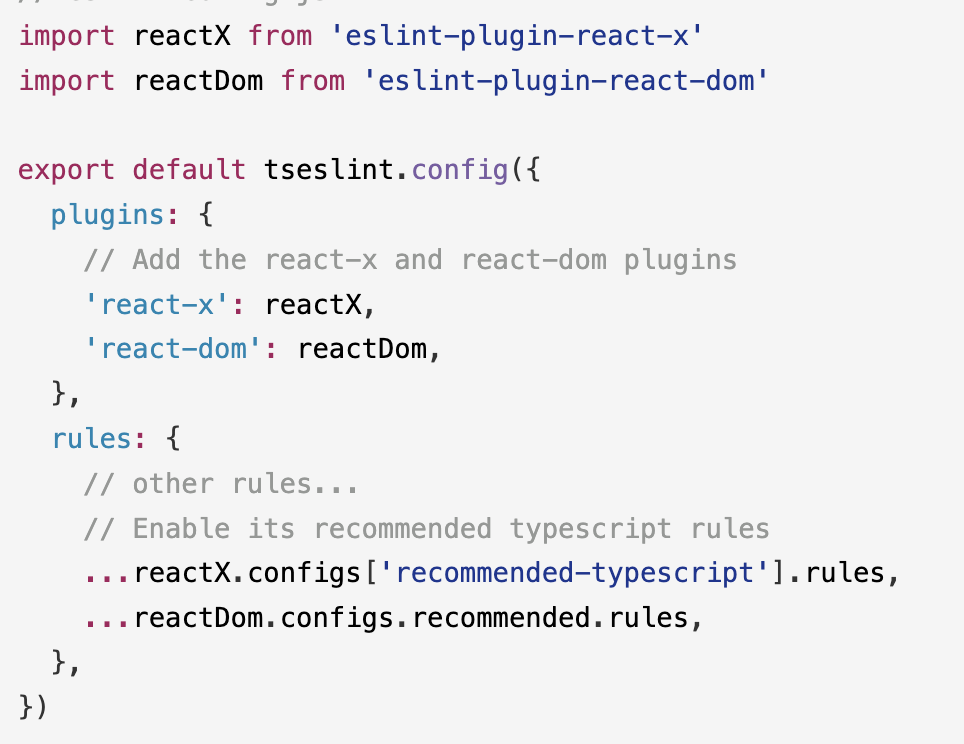
2.1.3 修改eslint.config.js配置信息
再原有配置的基础上新增规则配置
- 规则
- “off” 或 0 - 关闭规则
- “warn” 或 1 - 打开规则作为警告(不影响退出代码)
- “error” 或 2 - 打开规则作为错误(触发时退出代码为 1)
import js from '@eslint/js';
import globals from 'globals';
import reactHooks from 'eslint-plugin-react-hooks';
import reactRefresh from 'eslint-plugin-react-refresh';
import tseslint from 'typescript-eslint';
// 新增的插件
import reactX from 'eslint-plugin-react-x';
import reactDom from 'eslint-plugin-react-dom';
// 引入Prettier相关插件
import prettierPlugin from 'eslint-plugin-prettier';
import prettierConfig from 'eslint-config-prettier';

export default tseslint.config(
  { ignores: ['dist'] },
  {
    extends: [
      js.configs.recommended,
      // 替换为类型感知的配置
      ...tseslint.configs.recommendedTypeChecked,
      // 添加Prettier配置,必须放在最后以覆盖其他样式规则
      prettierConfig,
    ],
    files: ['**/*.{ts,tsx}'],
    languageOptions: {
      ecmaVersion: 2020,
      globals: globals.browser,
      parserOptions: {
        project: ['./tsconfig.node.json', './tsconfig.app.json'],
        tsconfigRootDir: import.meta.dirname,
      },
    },
    plugins: {
      'react-hooks': reactHooks,
      'react-refresh': reactRefresh,
      'react-x': reactX,
      'react-dom': reactDom,
      // 添加Prettier插件
      prettier: prettierPlugin,
    },
    rules: {
      ...reactHooks.configs.recommended.rules,
      'react-refresh/only-export-components': ['warn', { allowConstantExport: true }],
      ...reactX.configs['recommended-typescript'].rules,
      ...reactDom.configs.recommended.rules,
      // 添加Prettier规则,将格式问题报告为错误
      'prettier/prettier': 'error',
      'no-console': 'off',
      'no-debugger': 'off',
      'max-len': 'off',
      'no-multi-spaces': 'off', // 由Prettier处理
      'no-return-assign': 'off',
      semi: 'off', // 由Prettier处理
      eqeqeq: 'error',
      'jsx-quotes': 'off', // 由Prettier处理
      'import/prefer-default-export': 'off',
      'import/extensions': 'off',
      'import/no-unresolved': 'off',
      'no-multiple-empty-lines': 'off', // 由Prettier处理
      'no-param-reassign': 'off',
      '@typescript-eslint/no-shadow': 'off',
      '@typescript-eslint/no-explicit-any': 'off',
      '@typescript-eslint/no-unused-vars': 'warn',
      '@typescript-eslint/ban-ts-comment': 'off',
      '@typescript-eslint/indent': 'off', // 由Prettier处理
      '@typescript-eslint/no-empty-object-type': 'off',
      '@typescript-eslint/no-unsafe-member-access': 'off',
      '@typescript-eslint/no-unsafe-assignment': 'off',
    },
  },
);
2.2、配置prettier
- 安装
eslint-plugin-prettier: 将 Prettier 作为 ESlint 的扩展插件,成为 ESlint 语法检查规则的扩展部分。
**eslint-config-prettier :**关闭所有与Prettier冲突的ESLint规则
pnpm add -D prettier eslint-plugin-prettier eslint-config-prettier
- 修改eslint.config.ts配置信息
import js from '@eslint/js';
import globals from 'globals';
import reactHooks from 'eslint-plugin-react-hooks';
import reactRefresh from 'eslint-plugin-react-refresh';
import tseslint from 'typescript-eslint';
// 新增的插件
import reactX from 'eslint-plugin-react-x';
import reactDom from 'eslint-plugin-react-dom';
// 引入Prettier相关插件
import prettierPlugin from 'eslint-plugin-prettier';
import prettierConfig from 'eslint-config-prettier';

export default tseslint.config(
  { ignores: ['dist'] },
  {
    extends: [
      js.configs.recommended,
      // 替换为类型感知的配置
      ...tseslint.configs.recommendedTypeChecked,
      // 添加Prettier配置,必须放在最后以覆盖其他样式规则
      prettierConfig,
    ],
    files: ['**/*.{ts,tsx}'],
    languageOptions: {
      ecmaVersion: 2020,
      globals: globals.browser,
      parserOptions: {
        project: ['./tsconfig.node.json', './tsconfig.app.json'],
        tsconfigRootDir: import.meta.dirname,
      },
    },
    plugins: {
      'react-hooks': reactHooks,
      'react-refresh': reactRefresh,
      'react-x': reactX,
      'react-dom': reactDom,
      // 添加Prettier插件
      'prettier': prettierPlugin,
    },
    rules: {
      ...reactHooks.configs.recommended.rules,
      'react-refresh/only-export-components': [
        'warn',
        { allowConstantExport: true },
      ],
      ...reactX.configs['recommended-typescript'].rules,
      ...reactDom.configs.recommended.rules,
      // 添加Prettier规则,将格式问题报告为错误
      'prettier/prettier': 'error',
      'no-console': 'off',
      'no-debugger': 'off',
      'max-len': 'off',
      'no-multi-spaces': 'off', // 由Prettier处理
      'no-return-assign': 'off',
      'semi': 'off', // 由Prettier处理
      'eqeqeq': 'error',
      'jsx-quotes': 'off', // 由Prettier处理
      'import/prefer-default-export': 'off',
      'import/extensions': 'off',
      'import/no-unresolved': 'off',
      'no-multiple-empty-lines': 'off', // 由Prettier处理
      'no-param-reassign': 'off',
      '@typescript-eslint/no-shadow': 'off',
      '@typescript-eslint/no-explicit-any': 'off',
      '@typescript-eslint/no-unused-vars': 'warn',
      '@typescript-eslint/ban-ts-comment': 'off',
      '@typescript-eslint/indent': 'off', // 由Prettier处理
      '@typescript-eslint/no-empty-object-type': 'off',
    },
  }
);Ï
-
创建.prettierrc.json文件
{
  "$schema": "https://json.schemastore.org/prettierrc",
  "semi": true,
  "tabWidth": 2,
  "singleQuote": true,
  "printWidth": 150,
  "bracketSpacing": true,
  "arrowParens": "always",
  "endOfLine": "lf",
  "trailingComma": "all",
  "bracketSameLine": false,
  "embeddedLanguageFormatting": "auto",
  "useTabs": false,
  "htmlWhitespaceSensitivity": "ignore"
}
- package.json 中添加格式化脚本
{
  "scripts": {
    "format": "prettier --write src/",
    ....
  }
}
[!TIP]
如果您使用
VSCode,建议安装Prettier插件,并在设置中启用**“Format On Save”**功能
3、配置typescript规则
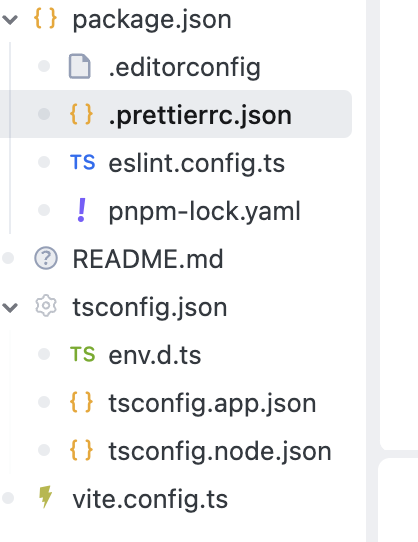
3.1、配置文件的区别
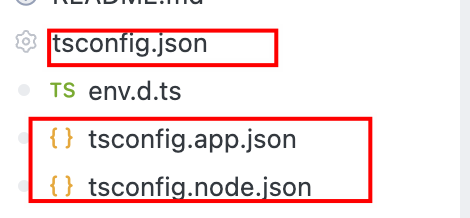
我们可以看到vite的项目结构中有tsconfig.app.json、tsconfig.node.json 和 tsconfig.json三个文件,那么我们配置他相关规则的时候又需要配置再哪里呢?他们的区别是什么呢?
tsconfig.json
- 顶层的
TypeScript配置文件,作为项目的主入口,通过references字段引用其他子配置文件(如app和node)。- 采用“项目引用”模式,可以将不同用途的 TypeScript 配置拆分,提升构建效率和灵活性,便于分别管理前端应用代码和 Node 脚本/配置的类型检查。
- 一般不直接在这里写具体的编译选项,而是通过 references 字段指向其他 tsconfig 文件,如需全局配置可在此补充。
tsconfig.app.json
专门为前端应用(
src目录下的Vue/TS代码)服务的TypeScript配置文件,让前端业务代码(包括.ts、.vue文件)拥有独立的类型检查和编译选项。可以根据前端需求定制编译目标、模块解析、路径别名等。
需要为前端代码调整的
TypeScript配置(如baseUrl 、 paths 、 lib 、 jsx 、 strict等),都应该写在这里。
tsconfig.node.json
- 专门为
Node.js相关脚本(如 Vite 配置、测试配置、脚本工具等)服务的TypeScript配置文件。Node环境和前端环境的类型需求不同(如全局变量、模块解析方式等),需要单独配置。- 避免
Node脚本和前端代码的类型冲突,提高类型检查的准确性。- 需要为
Node脚本调整的TypeScript配置(如types 、 moduleResolution 、 include指向配置文件等),都应该写在这里。- 如果你要让
Vite、Vitest、Cypress等配置文件获得Node类型提示,或调整Node相关的编译选项,就在这个文件里配置。
总结
- 全局/项目结构相关配置 :放在
tsconfig.json,主要维护references。- 前端业务代码相关配置 :放在
tsconfig.app.json,如路径别名、严格模式、前端库等。- Node 脚本相关配置 :放在
tsconfig.node.json,如Node类型、配置文件包含等。
3.2、调整的 TypeScript 配置
通过上述文件的区分,我们可以很清楚的知道,我们主要只用配置tsconfig.app.json 文件(如果没有特殊需求可以直接将tsconfig.app.json文件的内容复制到 tsconfig.json中,然后删除 tsconfig.app.json、tsconfig.node.json )
修改配置tsconfig.app.json文件
{
  "compilerOptions": {
    "tsBuildInfoFile": "./node_modules/.tmp/tsconfig.app.tsbuildinfo",
    "target": "ES2020",
    "useDefineForClassFields": true,
    "lib": ["ES2020", "DOM", "DOM.Iterable"],
    "module": "ESNext",
    "skipLibCheck": true,

    /* Bundler mode */
    "moduleResolution": "bundler",
    "allowImportingTsExtensions": true,
    "verbatimModuleSyntax": true,
    "moduleDetection": "force",
    "noEmit": true,
    "jsx": "react-jsx",

    /* Linting */
    "strict": true,
    "noUnusedLocals": true,
    "noUnusedParameters": true,
    "erasableSyntaxOnly": true,
    "noFallthroughCasesInSwitch": true,
    "noUncheckedSideEffectImports": true,
     /* 添加路径别名配置 */
     "baseUrl": ".",
      "paths": {
        "@/*": ["src/*"],
      }
  },
  "include": [
    "src",
    "src/*",
  ],
  "exclude": [
    "node_modules"
  ]
}
4、配置代码检查器
vite-plugin-checker 是一个 Vite 插件,它能够在工作线程中运行 TypeScript、ESLint、Stylelint 等多种静态代码检查工具,以提高开发效率并确保代码质量。
- 安装
pnpm add vite-plugin-checker -D
- 修改vite.config.ts配置
import { fileURLToPath, URL } from 'node:url';
import { defineConfig } from 'vite';
import react from '@vitejs/plugin-react-swc';
import checker from 'vite-plugin-checker';

// https://vite.dev/config/
export default defineConfig({
  plugins: [
    react(),
    checker({
      typescript: true,
      eslint: {
        useFlatConfig: true,
        lintCommand: 'eslint "./src/**/*.{ts,tsx,js,jsx}"',
      },
      terminal: true,
    }),
  ],
});
5、修改路由配置信息
- 安装依赖
pnpm add react-router-dom
- 创建两个路由页面
src/pages/Index/Index.tsx
import { useState } from 'react';

const Index = () => {
  const [count, setCount] = useState(0);
  console.log(count);

  if (count === 5) {
    console.log('Count is 5');
    throw new Error('Count is 5');
  }
  return (
    <div className="index">
      Index
      <button
        type="button"
        onClick={() => {
          setCount(count + 1);
        }}
      >
        count+
      </button>
    </div>
  );
};

export default Index;
src/pages/About/Index.tsx
const About = () => {
  return <div className="about">About</div>;
};

export default About;
-
创建路由文件
src/router/index.tsx
为什么是.tsx,文件包含 JSX 元素,它必须使用 .tsx 扩展名,否则 TypeScript 编译器会报错,因为它不会在 .ts 文件中处理 JSX 语法。
如果公司对应服务没有做相关的路由映射则选择createHashRouter,反之选择createBrowserRouter
import { lazy } from 'react';
import { createHashRouter, Navigate } from 'react-router-dom';
import type { RouteObject } from 'react-router-dom';
import Layout from '@/components/Layout/Index.tsx';

type NewRouteObject = Omit<RouteObject, 'children'> & {
  icon?: string;
  treeCode?: string; // 添加这个属性,因为你在使用它
  children?: NewRouteObject[];
};

// 引入懒加载的组件
const Index = lazy(() => import('@/pages/Index/Index.tsx'));
const About = lazy(() => import('@/pages/About/Index.tsx'));

export const List: NewRouteObject[] = [
  {
    path: '/',
    element: <Layout />,
    children: [
      {
        index: true,
        path: '/',
        treeCode: 'home',
        element: <Index />,
      },
      {
        path: '/about',
        treeCode: 'aboutUs',
        element: <About />,
      },
    ],
  },
  {
    path: '*',
    element: <Navigate to="/" replace />,
  },
];

const routes = createHashRouter(List as RouteObject[]);

export default routes;
- 创建布局文件src/components/Layout/Index.tsx(可选)
import { Suspense } from 'react';
import { Outlet, NavLink } from 'react-router-dom';

function Layout() {
  return (
    <div className="app-container">
      <header>
        <nav>
          <NavLink to="/" end className={({ isActive }) => (isActive ? 'active' : '')}>
            首页
          </NavLink>

          <NavLink to="/about" className={({ isActive }) => (isActive ? 'active' : '')}>
            关于
          </NavLink>
        </nav>
      </header>

      <main>
        <Suspense fallback={<div>加载中...</div>}>
          <Outlet />
        </Suspense>
      </main>
    </div>
  );
}

export default Layout;
- 使用 RouterProvider 组件引入路由配置来提供路由功能
修改src/App.tsx文件(可自行根据需需求修改引入的位置)
import { RouterProvider } from 'react-router-dom';
import routes from './router';

function App() {
  return <RouterProvider router={routes} />;
}

export default App;
tip:如果使用了严格模式(
React.StrictMode),在严格模式下开发时,它将会调用每个组件函数两次。通过重复调用组件函数,严格模式有助于找到违反这些规则的组件,介意的可以把src/main.tsx中的React.StrictMode删掉
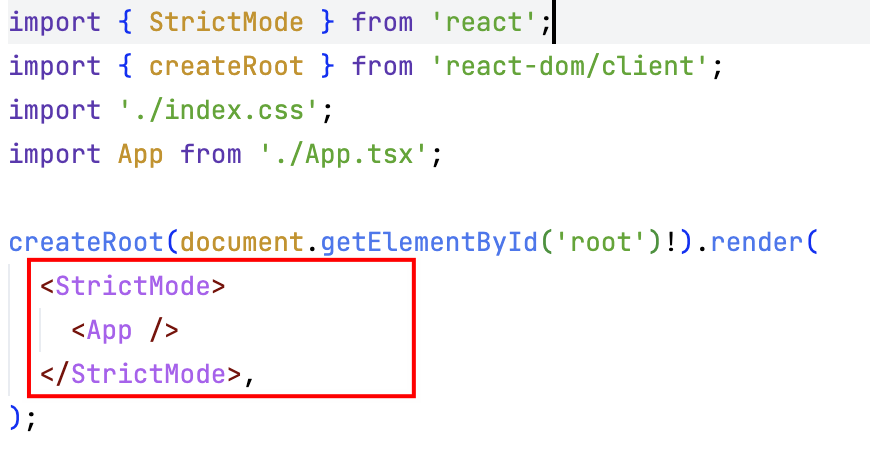
import { createRoot } from 'react-dom/client';
import './index.css';
import App from './App.tsx';

createRoot(document.getElementById('root')!).render(<App />);
目录结构如下: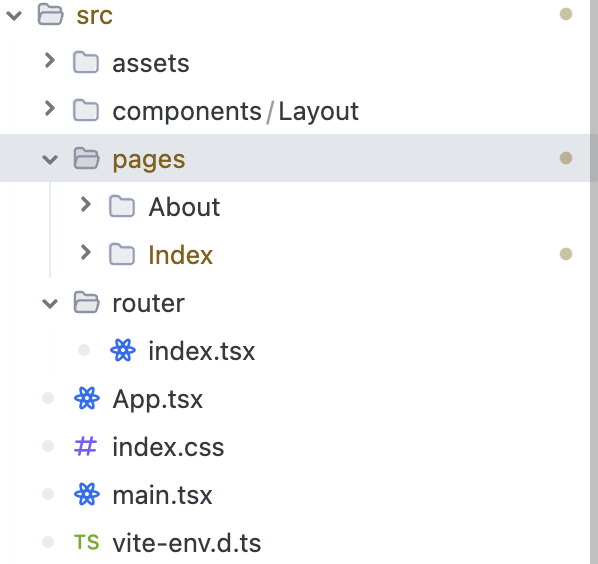
二、重置浏览器默认样式(可选)
normalize.css 是一个用于重置浏览器默认样式的库,使得不同浏览器之间的渲染更加一致
- 安装
pnpm add normalize.css
- src/mian.tsx引入
import { StrictMode } from 'react';
import { createRoot } from 'react-dom/client';
import './index.css';
import 'normalize.css';
import App from './App.tsx';

createRoot(document.getElementById('root')!).render(<App />);
三、安装样式预处理器(可选)
大家可以自行安装自己熟悉的预处理器(less、sass、stylus……),此处选择sass(根据自己开发习惯选择是否下载)
pnpm add sass -D
tip:vite内置了常用的预处理器支持无需安装配置sass-loader 即可使用
四、UI组件库安装(可选)
市面上的UI组件库有很多,此处选择国内常用的Ant Design,大家可根据项目需求自行安装需要的组件库
- 安装
pnpm install antd --save
因为antd默认支持按需加载,所以不需要做任何的配置,开箱即用。

五、二次封装axios(可选)
- 安装
pnpm add axios
新增src/request/type.ts文件
import axios from 'axios';
import type {
  AxiosResponse,
  AxiosInstance,
  AxiosRequestConfig,
} from 'axios';

// 提取函数参数类型
export type AxiosMethodParams<
  T extends (...args: any) => any,
> = Parameters<T>;

// export type AxiosMethodReturn<T extends (...args: any) => any> = ReturnType<T>;
//  axios 请求方法的返回类型
export type AxiosMethodReturn<T = any> = Promise<
  AxiosResponse<T>
>;

export interface AxiosStatic extends AxiosInstance {
  GET: <T = any, D = any>(
    url: string,
    params?: D,
    config?: AxiosRequestConfig<D>,
  ) => AxiosMethodReturn<T>;

  POST: <T = any, D = any>(
    ...args: AxiosMethodParams<
      typeof axios.post<T, AxiosResponse<T>, D>
    >
  ) => AxiosMethodReturn<T>;

  PUT: <T = any, D = any>(
    ...args: AxiosMethodParams<
      typeof axios.put<T, AxiosResponse<T>, D>
    >
  ) => AxiosMethodReturn<T>;

  DELETE: <T = any, D = any>(
    url: string,
    params?: D,
    config?: AxiosRequestConfig<D>,
  ) => AxiosMethodReturn<T>;
}
新增src/request/index.ts文件
import axios from 'axios';
import type { AxiosResponse, AxiosRequestConfig, InternalAxiosRequestConfig } from 'axios';
import type { AxiosStatic, AxiosMethodParams } from './type.ts';
import { message } from 'antd';

// 创建一个扩展的 axios 实例
const Axios = axios.create({
  timeout: 20000,
}) as AxiosStatic;

// 创建统一的错误处理函数
const handleRequestError = (error: any) => {
  if (error?.message === 'Network Error') {
    message.open({
      type: 'error',
      content: '网络开小差啦,请稍后重试~',
    });
  }
  return Promise.reject(error);
};

Axios.interceptors.request.use((config: InternalAxiosRequestConfig) => {
  return config;
}, handleRequestError);

// 请求结束关闭loading
Axios.interceptors.response.use((res: AxiosResponse) => {
  return res || {};
}, handleRequestError);

Axios.GET = <T = any, D = any>(url: string, params?: D, config?: AxiosRequestConfig<D>) => {
  const mergedConfig: AxiosRequestConfig<D> = {
    ...config,
    params: {
      ...params,
      ...(config?.params || {}),
    },
  };

  return Axios.get<T, AxiosResponse<T>, D>(url, mergedConfig);
};

Axios.POST = <T = any, D = any>(...args: AxiosMethodParams<typeof axios.post<T, AxiosResponse<T>, D>>) => {
  return Axios.post<T, AxiosResponse<T>, D>(...args);
};

Axios.PUT = <T = any, D = any>(...args: AxiosMethodParams<typeof axios.put<T, AxiosResponse<T>, D>>) => {
  return Axios.put<T, AxiosResponse<T>, D>(...args);
};

Axios.DELETE = <T = any, D = any>(url: string, params?: D, config?: AxiosRequestConfig<D>) => {
  const mergedConfig: AxiosRequestConfig<D> = {
    ...config,
    params: {
      ...params,
      ...(config?.params || {}),
    },
  };

  return Axios.delete<T, AxiosResponse<T>, D>(url, mergedConfig);
};

export default Axios;
六、配置状态管理工具(可选)
可根据项目需求选择合适的工具进行配置,此处我选择Zustand和Jotai作为示例(此处只做简单示例,具体教程自行百度)
6.1、Zustand配置
- 安装
pnpm add zustand
- 创建状态仓库src/store/index.ts
import { create } from 'zustand';

export type State = {
  count: number;
  dispatch: (action: Action) => void;
};

export type Actions = {
  increment: (qty: number) => void;
  decrement: (qty: number) => void;
};

export type Action = {
  type: keyof Actions;
  qty: number;
};

const countReducer = (state: State, action: Action) => {
  switch (action.type) {
    case 'increment':
      return { count: state.count + action.qty };
    case 'decrement':
      return { count: state.count - action.qty };
    default:
      return state;
  }
};

export const useCountStore = create<State>((set) => ({
  count: 0,
  dispatch: (action: Action) => set((state) => countReducer(state, action)),
}));
- 使用
src/pages/Index/Index.tsx
import './index.scss';
import type { State } from '@/store/index.ts';
import { useCountStore } from '@/store/index.ts';

const Index = () => {
  const count = useCountStore((state: State) => state.count);
  const dispatch = useCountStore((state: State) => state.dispatch);

  console.log(count);

  if (count === 5) {
    console.log('Count is 5');
    throw new Error('Count is 5');
  }
  return (
    <div className="index">
      Index
      <button
        type="button"
        onClick={() => {
          dispatch({
            type: 'increment',
            qty: 1,
          });
        }}
      >
        count+
      </button>
    </div>
  );
};

export default Index;
6.2、Jotai配置
- 安装
pnpm add jotai
- 创建状态仓库src/store/index.ts
import { atom } from 'jotai';

export const animeAtom = atom([
  {
    title: 'Ghost in the Shell',
    year: 1995,
    watched: true,
  },
  {
    title: 'Serial Experiments Lain',
    year: 1998,
    watched: false,
  },
]);

export const progressAtom = atom((get) => {
  const anime = get(animeAtom);
  return anime.filter((item) => item.watched).length / anime.length;
});
- 使用
src/pages/About/Index.tsx
import './index.scss';
import { animeAtom } from '@/store/index.ts';
import { useAtom } from 'jotai';

const About = () => {
  const [, setAnime] = useAtom(animeAtom);
  return (
    <div className="about">
      About
      <button
        type="button"
        onClick={() => {
          setAnime([
            {
              title: '111',
              year: 2001,
              watched: true,
            },
          ]);
        }}
      >
        修改
      </button>
    </div>
  );
};

export default About;
src/pages/Index/Index.tsx
import { animeAtom } from '@/store/jotaiIndex';
import './index.scss';
import { useAtom } from 'jotai';

const Index = () => {
  const [anime] = useAtom(animeAtom);

  return (
    <div className="index">
      Index
      <pre style={{ border: 'none' }}>{JSON.stringify(anime)}</pre>
    </div>
  );
};

export default Index;
七、配置环境变量
我们开发系统肯定会分为环境开发。有时候在开发、测试环境想要打印调试,但是生产环境又不想进行打印的,或者说开发测试环境生成source map文件定位错误,打包的时候不生成,这个时候环境变量就能派上用场了(如果不想创建多环境文件,直接用
mode进行判断也可以;也可以直接创建一个.env文件,然后每次手动修改开发、测试、生产环境的变量)
1、创建配置文件(可选)
根目录创建环境变量配置文件,更多环境一样如此操作
注: 定义的变量必须以VITE_开头, vite做了一个拦截, 他为了防止我们将隐私性的变量直接送进import.meta.env中, 所以他做了一层拦截, 如果你的环境变量不是以VITE开头的, 他就不会帮你注入到客户端中去, 如果我们想要更改这个前缀, 可以去使用envPrefix配置
- .env(所有环境都用到的环境变量)
VITE_APP_ENV = 'production';
- .env.dev (开发环境)
VITE_APP_ENV = 'development';
VITE_APP_API_URL = /api / xxx务后地服本端 / xxx测试 / xxx生产都行;
- .env.test (测试环境)
VITE_APP_ENV = 'test';
VITE_APP_API_URL = xxx测试域名;
- .env.prod (生产环境)
VITE_APP_ENV = 'production';
VITE_APP_API_URL = xxx生产域名;
2、使用变量
- 在代码中使用
const baseUrl = import.meta.env.VITE_BASE_URL;
- 在vite.config.ts中使用环境变量
// 使用loadEnv方法加载环境变量
import { defineConfig, loadEnv } from 'vite';
//...

export default ({ mode }) => {
  console.log('加载的环境变量', loadEnv(mode, process.cwd()).VITE_BASE_URL);
  return defineConfig({
    //...
  });
};
3、修改package.json启动命令
"scripts": {
  "dev": "vite --host --mode dev",
  "build": "vite build",
  "build:dev": "vite build --mode development",
  "build:test": "vite build --mode test",
  "build-preview:dev": "pnpm build:dev && vite preview --mode development",
  "build-preview:test": "pnpm build:test && vite preview --mode test",
  "build-preview": "pnpm build && vite preview"
},
在vite中的环境变量处理:
vite内置了dotenv这个第三方库,dotenv会自动读取.env文件, 并解析这个文件中的对应环境变量 并将其注入到process对象下(但是vite 考虑到和其他配置的一些冲突问题, 他不会直接注入到process对象下)
--mode development 会将mode设置为development传递进来
当我们调用loadenv的时候, 他会做如下几件事:
-
直接找到
.env文件不解释 并解析其中的环境变量 并放进一个对象里 -
会将传进来的
mode这个变量的值进行拼接:.env.development, 并根据我们提供的目录去取对应的配置文件并进行解析, 并放进一个对象 -
我们可以理解为
 const baseEnvConfig = 读取.env的配置
 const modeEnvConfig = 读取env相关配置
 const lastEnvConfig = { ...baseEnvConfig, ...modeEnvConfig }
如果是客户端,vite会将对应的环境变量注入到import.meta.env里去
4、修改vite.config.ts文件配置
import { fileURLToPath, URL } from 'node:url';
import { defineConfig, loadEnv } from 'vite';
import react from '@vitejs/plugin-react-swc';
import checker from 'vite-plugin-checker';

// https://vite.dev/config/
export default defineConfig(({ mode }) => {
  // const isProd = mode === 'production';
  const isProd = loadEnv(mode, process.cwd()).VITE_APP_ENV === 'production';
  console.log('加载的环境变量', loadEnv(mode, process.cwd()).VITE_APP_ENV, isProd);
  return {
    base: './', // 设置静态资源的基础路径
    esbuild: {
      drop: isProd ? ['console', 'debugger'] : [], // 移除 console 和 debugger
    },
    build: {
      assetsDir: 'assets',
      chunkSizeWarningLimit: 1000, //chunk 大小警告阈值(KB)
      minify: 'terser', // 压缩方式,默认 'esbuild'(看项目需求可配可不配)
      sourcemap: isProd ? false : 'inline', // 是否生成sourcemap文件定位错误,生产环境禁用,开发环境内联(看项目需求可配可不配)
      reportCompressedSize: false, // 禁用压缩大小报告以提高构建速度(看项目需求可配可不配)
      target: 'es2015', // 兼容性目标,默认 'modules'(看项目需求可配可不配)
      rollupOptions: {
        output: {
          experimentalMinChunkSize: 100, //最小 chunk 大小
          assetFileNames: 'assets/[ext]/[name]-[hash][extname]',
          entryFileNames: 'assets/js/[name]-[hash].js',
          chunkFileNames: 'assets/js/[name]-[hash].js',
          // 实现手动分包
          manualChunks(id) {
            if (id.includes('node_modules')) {
              if (id.includes('react')) {
                return 'react-vendor';
              }
              return 'vendor';
            }
          },
        },
      },
    },
    plugins: [
      react(),
      checker({
        // 启用 TS 检查
        typescript: true,
        //配置 ESLint 检查命令。
        eslint: {
          useFlatConfig: true,
          lintCommand: 'eslint "./src/**/*.{ts,tsx,js,jsx}"',
        },
        //在终端输出检查结果
        terminal: true,
      }),
    ],
    resolve: {
      // 路径别名
      alias: {
        '@': fileURLToPath(new URL('./src', import.meta.url)),
      },
    },
    // 配置外部 ip 访问与端口
    server: {
      host: '0.0.0.0',
      port: 8888,
      open: true, // 自动打开浏览器
      cors: true, // 启用CORS
    },
    // 指定需要预构建的依赖,加快冷启动速度
    optimizeDeps: {
      include: ['react', 'react-dom'], // 预构建频繁使用的依赖
    },
  };
});
上述配置大部分都做了注释,可根据项目需求自行调整(仅供参考),不理解的官网自查配置信息 ☞ https://cn.vite.dev/config/
要是还不懂,就去问AI!
八、配置Husky和Lint-staged (可选)
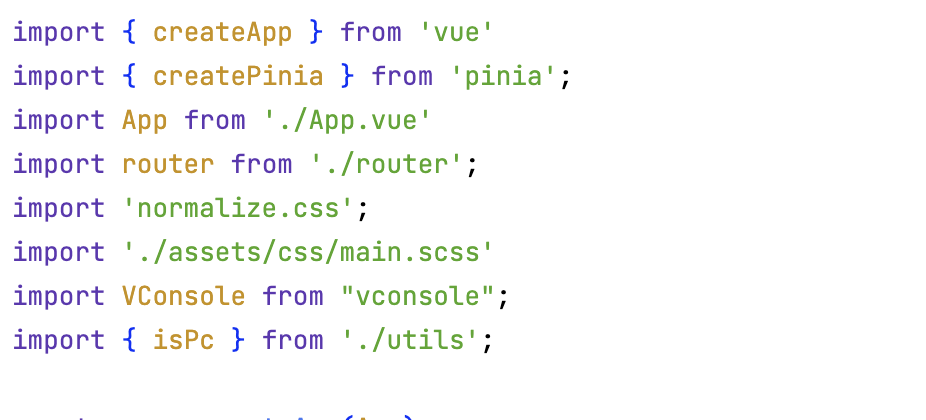
不知道大家有没有过这种经历,在同一套项目代码里,遇到这种两模两样的代码风格。
当你pnpm i 和pnpm run dev运行项目的时候,控制台呼啦呼啦的冒出n多条的warning和error,你找同事了解情况,得知人家不仅把编辑器的报错行为关闭了,还把保存自动修复也给关闭了,还直接忽略warning提示,然后就直接提交了。此时内心一万匹草泥马飘过😒……
于是乎开始思考解决方案,有没有什么东西能让同事的报错代码提交不了,提交的时候有格式问题的代码自动修复呢?
借助
eslint --fix的代码修复功能,可以尽最大可能的保持代码一致。当我执行eslint --fix的修复功能时,代码中所有的格式相关问题都被自动修复了,并且提示相关代码中格式的错误。那么有没有什么方法可以让代码在提交到git之前执行自动修复的指令呢?这个时候,优秀的第三方工具库Husky和Lint-staged就出现了。
1、什么是Husky和Lint-staged
Husky 和 Lint-staged 是现代前端开发中常用的工具组合,用于在提交代码前进行检查和修复,确保代码质量并规范团队协作流程。
Husky: husky 是一个用于简化Git钩子(hooks)的设置的工具,允许开发者轻松地在各种Git事件触发时运行脚本。例如,在提交之前(pre-commit)、推送之前(pre-push)、或者在提交信息被写入后(commit-msg)等,它通常与lint-staged一起使用,以在提交前自动执行代码的静态检查。
- 替代 Git 原生钩子,方便管理和配置。
- 集成团队协作流程,减少低质量代码进入仓库。
Lint-staged: lint-staged 是一个在提交代码之前运行linter或其他工具的工具。使用lint-staged可以确保只有符合项目规定代码质量标准的代码被提交,减少了不必要的错误和风格问题被引入代码库的可能性。
- 仅处理需要提交的文件,节约时间。
- 可结合 ESLint、Prettier 等工具自动修复代码。
2、配置Husky
- 安装
pnpm add -D husky
- 初始化husky
npx husky init
自动生成的 .husky 目录和指令:
prepare 是 NPM 的一个特殊生命周期脚本,它会在以下场景自动执行:
- 安装依赖时(运行
npm install)。- 发布包时(运行
npm publish)。
- 修改 .husky/pre-commit
根目录 .husky 目录下 pre-commit 文件中的 npm test 修改为 npx lint-staged

3、配置Lint-staged
- 安装
pnpm add -D lint-staged
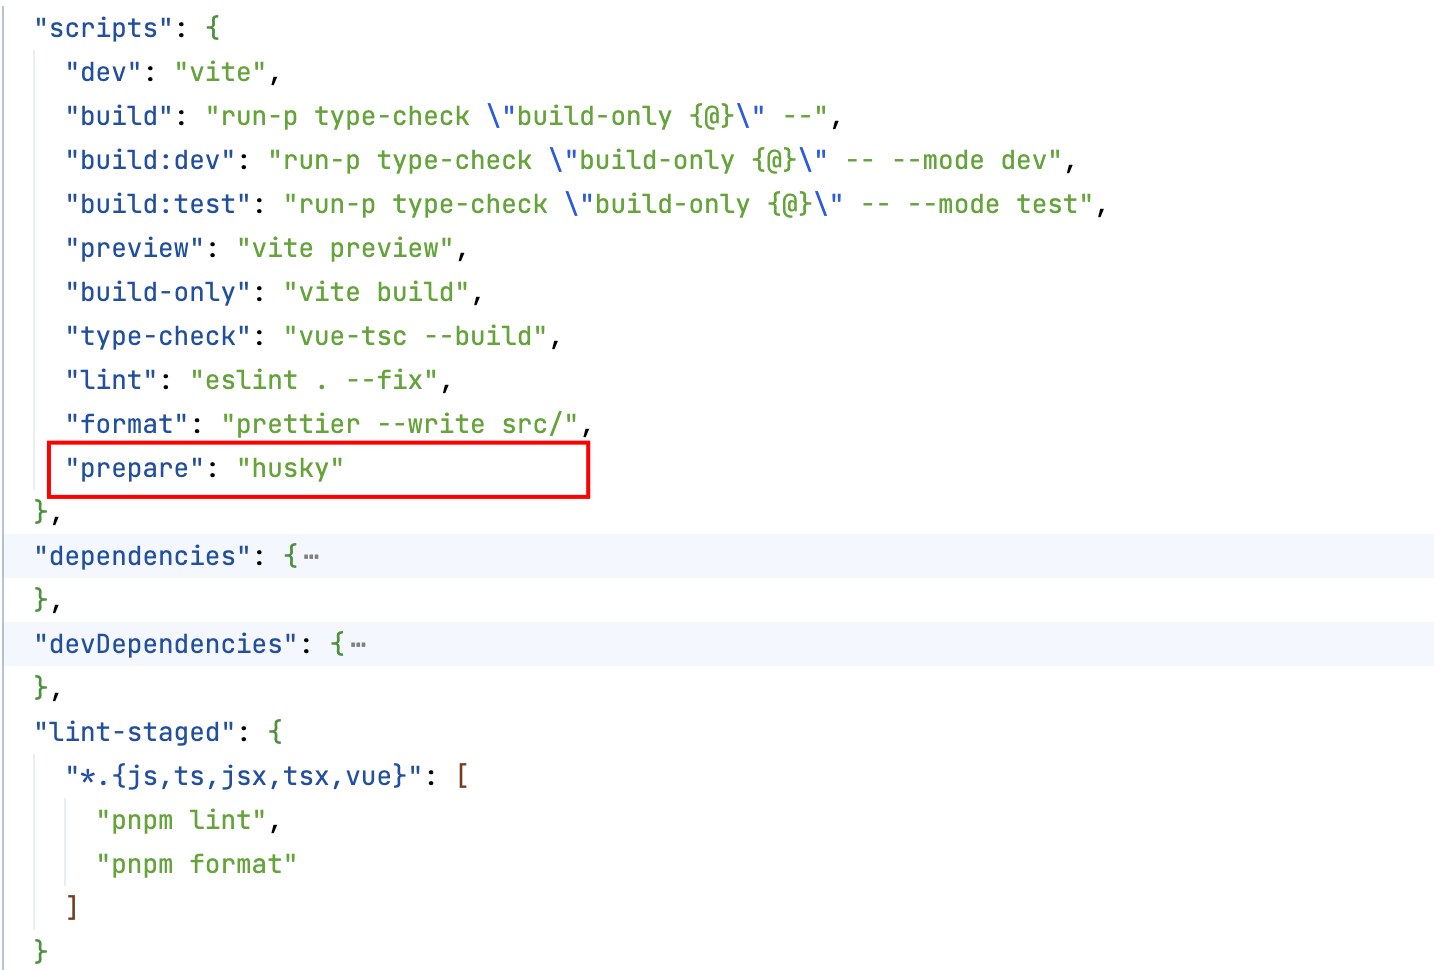
- 修改package.json
在 package.json 中添加以下字段
"scripts": {
  "lint": "eslint . --fix",
  "format": "prettier --write src/",
  "prepare": "husky"
},
"lint-staged": {
  "*.{js,ts,jsx,tsx,vue}": [
    "pnpm lint",
    "pnpm format"
  ],
  "*.{scss,css,html,json,md}": [
    "pnpm format"
  ]
}
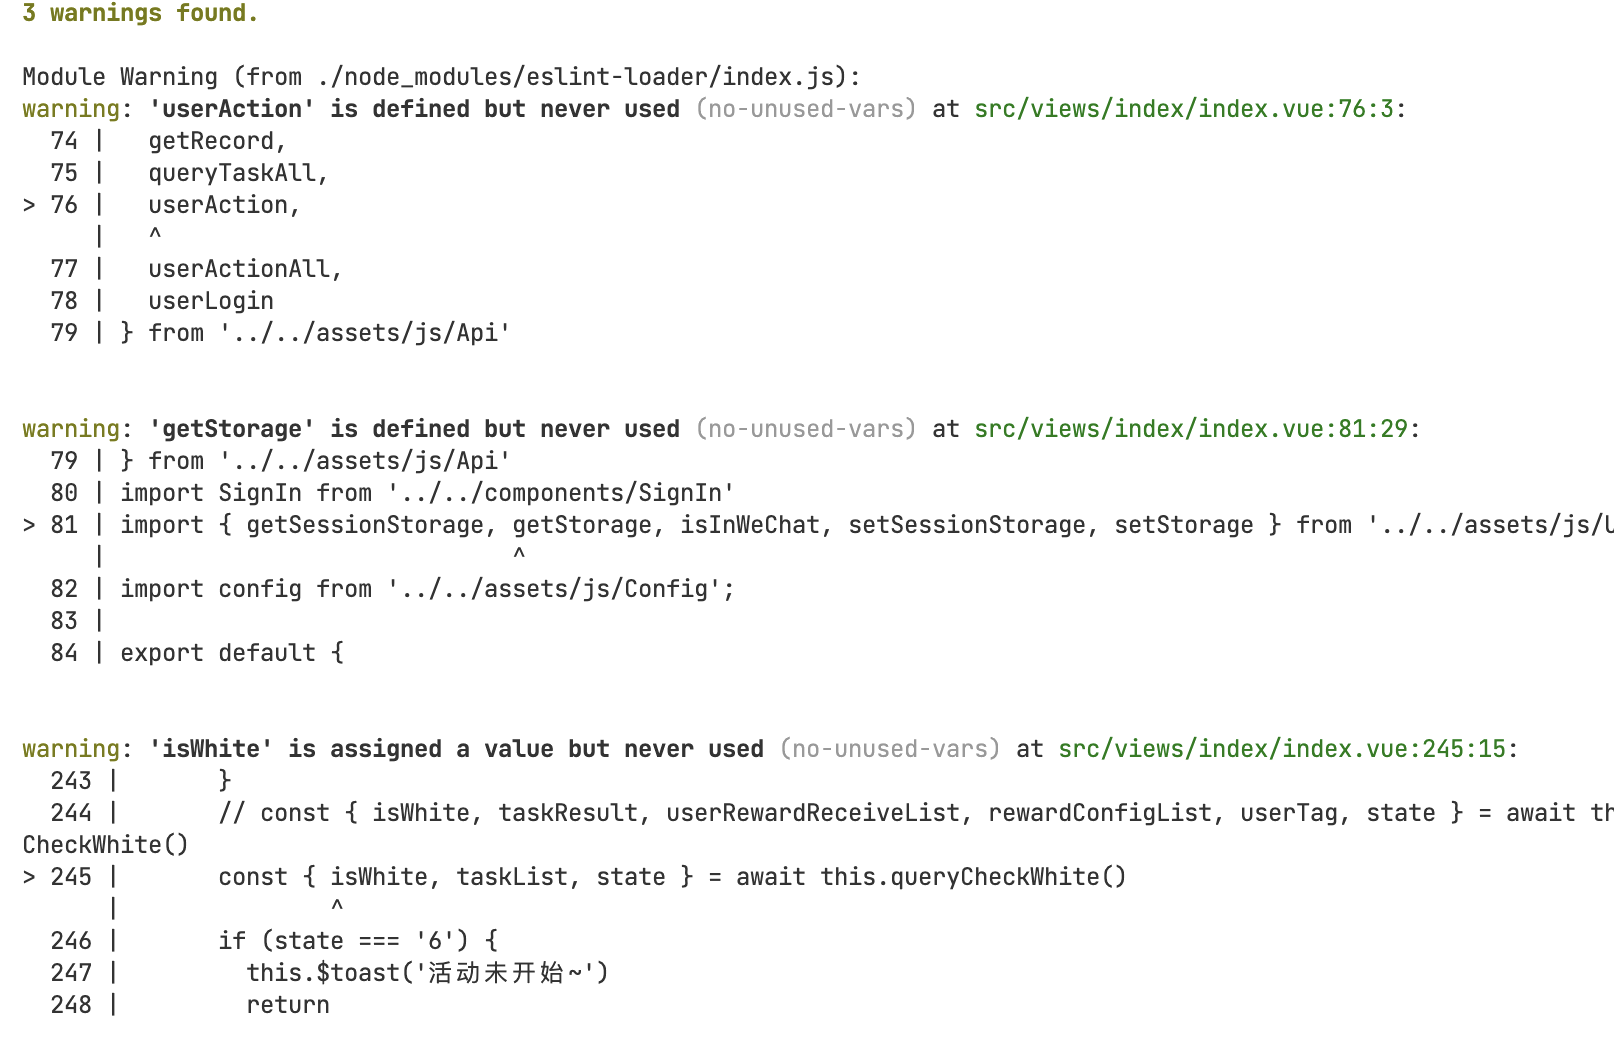
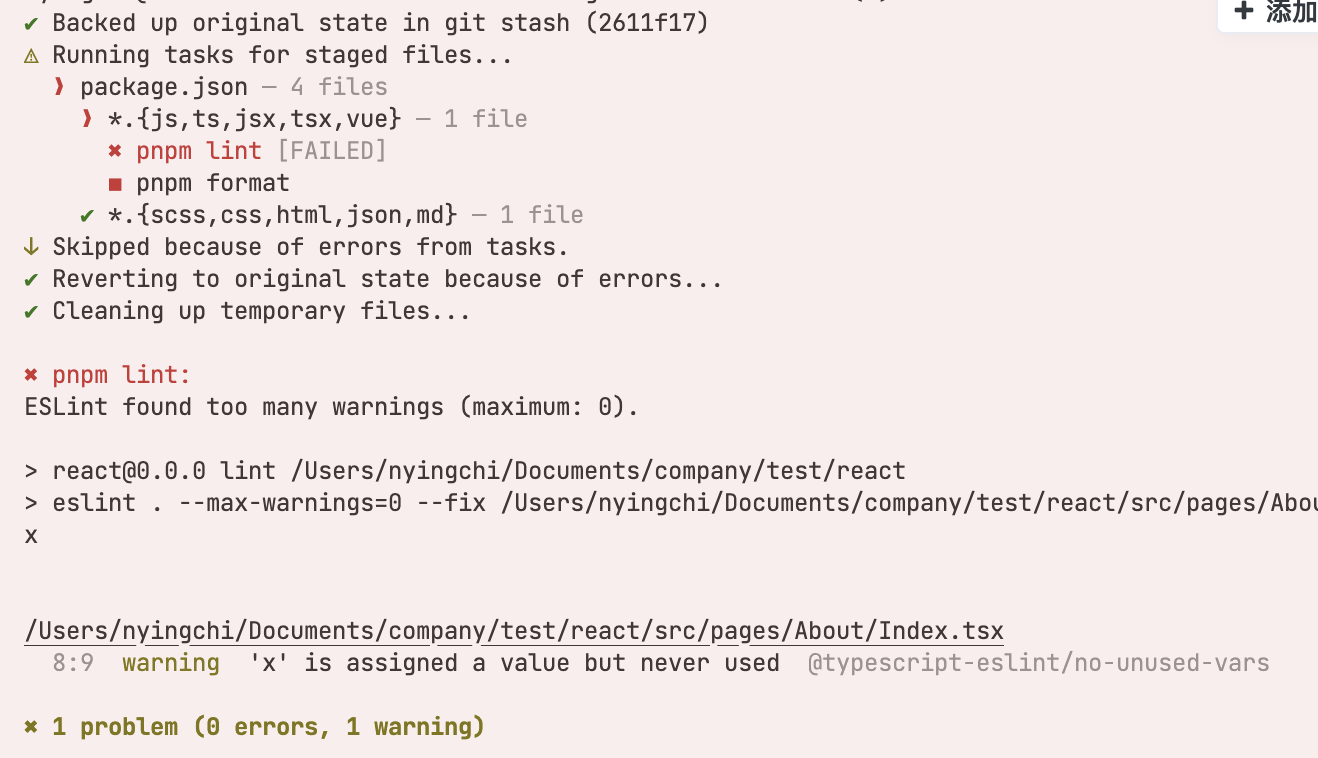
如果你希望不止拦截error还要拦截warn的信息,则将 "lint": "eslint . --fix" 配置成 "lint": "eslint . --max-warnings=0 --fix"
4、提交代码后执行结果
现在,当我们提交代码时,husky会帮我们执行git的git commit钩子,从而触发lint-staged,针对js,ts,jsx,tsx,vue文件执行pnpm lint,pnpm format。
九、拓展实用插件(按需安装配置)
此处推荐一些我常用的工具库,大家可以参考按需安装。相关使用方法网上一搜一大堆,这边就不多余再演示了
9.1、@vitejs/plugin-legacy(兼容旧浏览器)
@vitejs/plugin-legacy 是一个 Vite 插件,用于为 Vite 项目提供对旧版浏览器的支持。 这个插件可以根据你在项目配置中指定的目标浏览器列表(通过 browserslist 字段),自动生成兼容旧版浏览器的构建文件。这些构建文件将包含经过转换和降级处理的代码,以 确保在不支持最新 JavaScript 特性的浏览器中正常运行。 使用 @vitejs/plugin-legacy 插件后,当用户访问你的网站时,Vite 将根据用户的浏览器版本动态加载适合其浏览器的构建文件。
官方地址: https://github.com/vitejs/vite/tree/main/packages/plugin-legacy#readme
- 安装
pnpm add -D @vitejs/plugin-legacy
- 配置vite.config.ts
import legacy from '@vitejs/plugin-legacy';
import { defineConfig } from 'vite';

// https://vitejs.dev/config/
export default defineConfig({
  	plugins: [
	  legacy({
      targets: ['defaults', 'not IE 11'],
      modernPolyfills: true, //启用现代浏览器 polyfills
      renderLegacyChunks: false, // 禁用旧版本代码块生成
    }),
   ],
  resolve: {
  ...
  },
});
-
使用效果
-
自动生成
ES5兼容代码,支持旧版浏览器 -
按需注入必要的
polyfills,避免冗余代码 -
现代浏览器加载优化版本,旧浏览器加载兼容版本
-
无需手动配置复杂的
Babel设置
-
-
适用场景
-
需要支持旧版浏览器(如 IE11)的项目
-
企业级应用,用户环境复杂多样
-
政府、金融、教育等行业网站,需要广泛的浏览器兼容性
-
国际化应用,需要考虑不同地区的浏览器使用情况
-
9.2 、vite-plugin-image-optimizer(图像优化)
vite-plugin-image-optimizer 是一个用于优化图像资源的 Vite 插件。它基于 Sharp.js 处理标量图像(如 PNG、JPEG、GIF、TIFF、WebP、AVIF),并使用 SVGO 优化 SVG 文件。该插件支持多种常见图片格式,默认以无损模式(质量100%)处理图像,也可以通过配置指定不同的压缩质量和参数来平衡体积与效果.
官方地址:github.com
- 安装
pnpm add vite-plugin-image-optimizer -D
pnpm add sharp svgo -D
- 配置vite.config.ts
import { defineConfig } from 'vite';
import { ViteImageOptimizer } from 'vite-plugin-image-optimizer';

// https://vitejs.dev/config/
export default defineConfig({
  plugins: [
    ViteImageOptimizer(),
  ],
});
-
使用效果
-
图片体积平均减小 30-70%,具体取决于原图质量和压缩设置
-
保持图片视觉质量的同时优化加载性能
-
减少带宽使用,提高页面加载速度
-
自动处理项目中的所有图片资源,无需手动优化
-
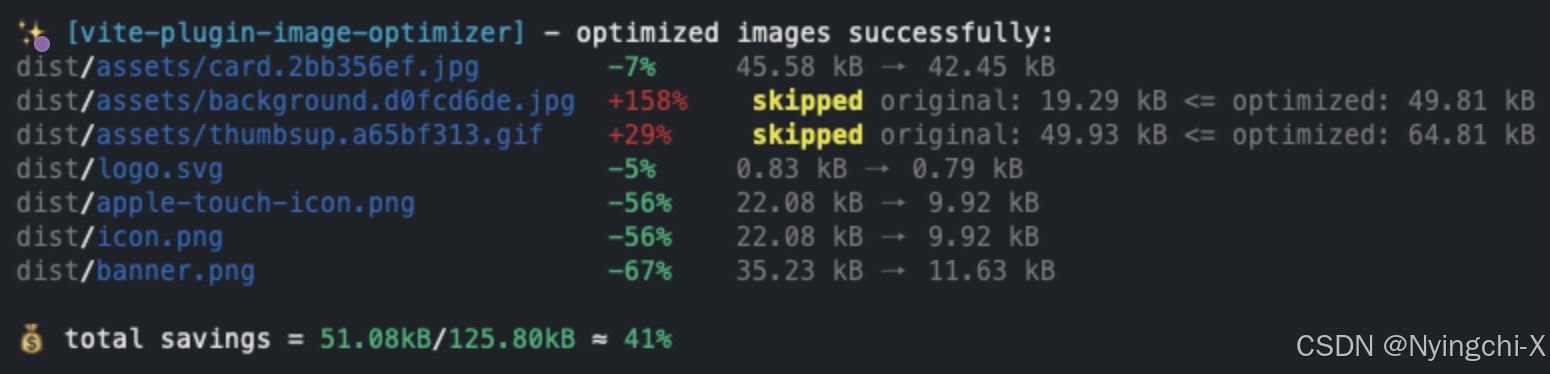
Tip: 可以看到图片中有些资源优化后优化后反而变大了,这是因为图片优化插件会尝试用不同的压缩算法和参数对图片进行压缩,但对于某些已经高度压缩过的图片(比如原图就是经过web优化的jpg/png),再次压缩可能会导致体积反而变大(比如格式转换、元数据处理等带来的体积增加)。插件检测到“优化后比原图还大”,就会 skipped ,即跳过优化,保留原图。也可以通过配置可以大幅减小体积,但会牺牲部分图片质量(如模糊、色彩丢失)。
-
适用场景
-
包含大量图片资源的网站(如电商、摄影、旅游网站)
-
**移动端应用,**需要考虑流量消耗
-
需要兼顾视觉效果和加载性能的项目
-
需兼容 WebP/AVIF 等格式以提升性能的应用
-
9.3、vite-plugin-svgr
vite-plugin-svgr 是一个将 SVG 文件转换为 React 组件的 Vite 插件。它基于 SVGR,允许开发者将 SVG 作为组件导入,并支持通过 props 动态控制 SVG 的样式和行为(如颜色、大小等),使开发者能够像使用普通组件一样灵活地控制 SVG 的属性和样式。
官方地址: https://github.com/pd4d10/vite-plugin-svgr#readme
- 安装
pnpm add vite-plugin-svgr -D
- 配置vite.config.ts
import { defineConfig } from 'vite';
import svgr from 'vite-plugin-svgr';

// https://vitejs.dev/config/
export default defineConfig({
  plugins: [
    svgr();
  ],
});
-
使用效果
-
SVG 组件化:将 SVG 文件转换为 React 组件,支持 Props 动态修改颜色、尺寸369。
-
SVGO 集成:优化 SVG 代码,删除冗余属性,减少文件体积36。
-
动态加载:支持按需加载 SVG 文件,适用于图标库或动态场景
import { ReactComponent as Logo } from './logo.svg'; function App() { return <Logo width="100" fill="blue" />; } -
-
适用场景
-
UI 组件开发:如图标库、按钮或导航栏,SVG 作为可重用组件。
-
数据可视化:在图表或图形中使用 SVG,支持动态样式。
-
响应式设计:SVG 作为组件可轻松调整大小和样式。
-
下面是我已搭建好的项目初始化框架,各位有需要的自取:https://gitee.com/nanwu-aga/react-template.git
vue的搭建教程: vite6+vue3+ts+prettier+husky9+lint-staged+eslint9配置前端项目(后台管理系统、移动端H5项目通用配置)


 被折叠的 条评论
为什么被折叠?
被折叠的 条评论
为什么被折叠?
 到【灌水乐园】发言


