


Vue+Springboot上传图片将 Base64 码转换为图片保存在指定文件夹
注意!!!
注意!!!
1、现在我已经将把
base64转换成文件保存到指定位置的代码上传到了maven 中央仓库,你们可以直接引入这个依赖使用
2、如果想学习源码,那么就继续往下面看,下面第二章是我最简化的代码,实际我封装的方法要更复杂,支持更多传参类型和容错,比如你不需要传入文件后缀名,可以自动判断文件类型而你不需要传入文件后缀名,自动判断windows还是linux的路径格式,自动处理base64前缀,增加更多方法,将文件转换为 base64 码,你可以传入文件路径或者二进制文件流。
<!-- https://mvnrepository.com/artifact/icu.xuyijie/Base64Utils -->
<dependency>
    <groupId>icu.xuyijie</groupId>
    <artifactId>Base64Utils</artifactId>
    <version>1.3.3</version>
</dependency>
// 将文件编码成Base64,可传入文件全路径,或者一个 File 对象,第二个参数是是否生成前缀
String s = Base64Utils.transferToBase64("D:/下载/Screenshot_20221008-090627.png", false);
File file = new File(filePath);
String s = Base64Utils.transferToBase64(file, false);
System.out.println(s);
// 将Base64转换成文件保存到指定位置,可传入文件全路径或者分别传入保存位置和文件名,路径分隔符可使用/或\
String s1 = Base64Utils.generateFile(s, "D:\\下载\\aaa.png");
String s1 = Base64Utils.generateFile(s, "D:/下载", "aaa.png");
System.out.println(s1);
//也可以从base64获取文件对象流,或者文件类型
File file = Base64Utils.getFile("D:/下载/a.png");
FileInputStream fileInputStream = Base64Utils.getFileStream("D:/下载/a.png");
String fileType = Base64Utils.getFileType("传入base64Str");
前言
整体思路:
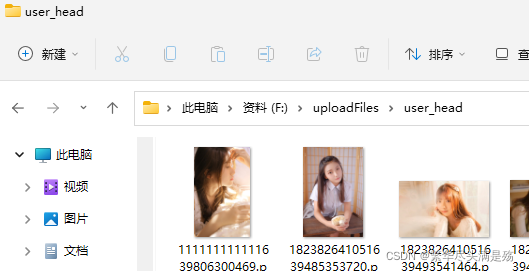
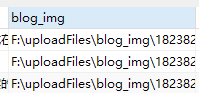
vant插件默认的图片从前端上传到后端,是以 base64 码的形式传输的,而 base64 码很长很长,有几千个字符,存入数据库会占用空间,每次读取都传输 base64 的话也很消耗带宽和流量,所以后端接收以后要转化 base64 为图片存到硬盘或服务器,而数据库只保存图片的物理地址的路径,例如 F:/img/aa.png
一、Vue 前端
我用的时 vant 的上传框架,你们用js什么的把图片转化为 base64 码。
<van-uploader :after-read="uploadImg" preview-size="50px" v-model="userHead" :max-count="1" />

<script>
methods:{
    submit() {
        this.$axios
            .post("/user/userInfo", {
                //userHead传给后台的是一串base64,后台要进行转化
                userHead: this.file,
                username: this.username,
            })
            .then(successResponse => {
                console.log(successResponse)
            })
    }
}
</script>
二、Springboot 后端
这里是一些简单的源码示例
1、引入Base64依赖
<!--        工具(包含Base64)-->
        <dependency>
            <groupId>commons-codec</groupId>
            <artifactId>commons-codec</artifactId>
            <version>1.10</version>
        </dependency>
2、在项目里新建 utils 包,新建一个Base64Util类
import org.apache.commons.codec.binary.Base64;
import java.io.*;

public class Base64Util {
    // 对字节数组字符串进行Base64解码并生成图片
    //imgFilePath 待保存的本地路径
    public static void GenerateImage(String base64Str, String imgFilePath) {
        if (base64Str == null) // 图像数据为空
            return;
        try {
            // Base64解码
            byte[] bytes = Base64.decodeBase64(base64Str);
            for (int i = 0; i < bytes.length; ++i) {
                if (bytes[i] < 0) {// 调整异常数据
                    bytes[i] += 256;
                }
            }
            // 生成jpeg图片
            OutputStream out = new FileOutputStream(imgFilePath);
            out.write(bytes);
            out.flush();
            out.close();
            //====
        } catch (Exception e) {
        }
    }
}
下面模拟一个保存用户头像信息的方法
String base64 = StringUtils.substringAfter(userInfo.getUserHead(), “;base64,”); 这句是把 base64 码的前缀去掉,base64转换为图片是不需要这个前缀的,不去掉会影响转换,当然,如果你使用了我一里面封装的依赖,就不需要这一行自己去除了,代码会自动判断是否去除。
path 里面就写你要保存图片的位置,和文件名,文件名是以用户手机号+当前时间毫秒数命名的,记得写文件类型,我这里是png,当然,如果你使用了我一里面封装的依赖,就不需要写后缀了,会自动判断文件类型。
Base64Util.GenerateImage(base64, path); 是用我们的工具把前端传来的 base64 解析成图片保存在path定义的路径下
File file = new File(path);
userInfo1.setUserHead(file.getPath()); 就是保存 path 路径到数据库
@Override
    public String userInfo(UserInfo userInfo) {
        //处理前端传来的base64为文件路径
        String base64 = StringUtils.substringAfter(userInfo.getUserHead(), ";base64,");
        //保存到设置的路径下,文件名手机号加毫秒命名
        String path = "F:\\" + user.getMobilePhone() + System.currentTimeMillis() + ".png";
        Base64Util.GenerateImage(base64, path);
        File file = new File(path);
        userInfo1.setUserHead(file.getPath());
        userMapper.updateById(user);
        return "保存成功";
    }
总结
读取的话就不写了,看我的另一篇,另一篇怎么从服务器读取也有教


 2369
2369


 被折叠的 条评论
为什么被折叠?
被折叠的 条评论
为什么被折叠?
 到【灌水乐园】发言


