


Nginx国密改造
所谓的国密Nginx就是指在SSL加密时将加密算法改为国密,本次演示的为Nginx单向国密
所需环境:
nginx1.18 http://nginx.org/en/download.html
国密Openssl https://github.com/guanzhi/GmSSL/archive/master.zip
centos7.6
支持国密的浏览器 https://www.gmssl.cn/gmssl/index.jsp
国密测试证书下载 https://www.gmssl.cn/gmssl/index.jsp
准备好服务器侧所需的程序包
[root@test1 nginx]# ll
总用量 7208
-rw------- 1 root root 8251537 5月 30 10:21 GmSSL-master.zip
-rw------- 1 root root 1039530 5月 26 14:18 nginx-1.18.0.tar.gz
先安装国密Openssl
[root@test1 nginx]# unzip -b GmSSL-master.zip
解压进入目录编译安装
[root@test1 nginx]# cd GmSSL-master
[root@test1 GmSSL-master]# ./config --prefix=/usr/local/gmssl --openssldir=/usr/local/gmssl no-shared && make && make install
为了验证gmssl安装是否成功,修改当前用户变量文件,添加变量,查看gmssl版本
[root@test1 ~]# echo ‘export PATH=$PATH:/usr/local/gmssl/bin’ >> ~/.bashrc
[root@test1 ~]# cat ~/.bashrc
.bashrc
User specific aliases and functions
alias rm=‘rm -i’
alias cp=‘cp -i’
alias mv=‘mv -i’
Source global definitions
if [ -f /etc/bashrc ]; then
. /etc/bashrc
fi
export PATH=$PATH:/usr/local/gmssl/bin
[root@test1 ~]# source ~/.bashrc
[root@test1 ~]# gmssl version -a
GmSSL 2.5.4 - OpenSSL 1.1.0d 19 Jun 2019
built on: reproducible build, date unspecified
platform: linux-x86_64
compiler: gcc -DDSO_DLFCN -DHAVE_DLFCN_H -DNDEBUG -DOPENSSL_THREADS -DOPENSSL_NO_DYNAMIC_ENGINE -DOPENSSL_PIC -DOPENSSL_IA32_SSE2 -DOPENSSL_BN_ASM_MONT -DOPENSSL_BN_ASM_MONT5 -DOPENSSL_BN_ASM_GF2m -DSHA1_ASM -DSHA256_ASM -DSHA512_ASM -DRC4_ASM -DMD5_ASM -DAES_ASM -DVPAES_ASM -DBSAES_ASM -DGHASH_ASM -DECP_NISTZ256_ASM -DPADLOCK_ASM -DGMI_ASM -DPOLY1305_ASM -DOPENSSLDIR=“”/usr/local/gmssl"" -DENGINESDIR=“”/usr/local/gmssl/lib/engines-1.1"" -Wa,–noexecstack
OPENSSLDIR: “/usr/local/gmssl”
ENGINESDIR: “/usr/local/gmssl/lib/engines-1.1”
[root@test1 ~]#
gmssl安装完成,下面就开始安装nginx
[root@test1 nginx]# tar -zxf nginx-1.18.0.tar.gz
[root@test1 nginx]# cd nginx-1.18.0
在编译前需要更改解压目录内的auto/lib/openssl/conf,将全部 O P E N S S L / . o p e n s s l / 修改为 OPENSSL/.openssl/修改为 OPENSSL/.openssl/修改为OPENSSL/并保存,
[root@test1 nginx-1.18.0]# vim auto/lib/openssl/conf
39 CORE_INCS=“$CORE_INCS O P E N S S L / i n c l u d e " 40 C O R E D E P S = " OPENSSL/include" 40 CORE_DEPS=" OPENSSL/include"40COREDEPS="CORE_DEPS O P E N S S L / i n c l u d e / o p e n s s l / s s l . h " 41 C O R E L I B S = " OPENSSL/include/openssl/ssl.h" 41 CORE_LIBS=" OPENSSL/include/openssl/ssl.h"41CORELIBS="CORE_LIBS O P E N S S L / l i b / l i b s s l . a " 42 C O R E L I B S = " OPENSSL/lib/libssl.a" 42 CORE_LIBS=" OPENSSL/lib/libssl.a"42CORELIBS="CORE_LIBS $OPENSSL/lib/libcrypto.a”
[root@test1 nginx-1.18.0]# ./configure \
–without-http_gzip_module
–with-http_ssl_module
–with-http_stub_status_module
–with-http_v2_module
–with-file-aio
–with-openssl=“/usr/local/gmssl”
–with-cc-opt=“-I/usr/local/gmssl/include”
–with-ld-opt=“-lm”[root@test1 nginx-1.18.0]# make && make install
安装完成后,我们准备好本次用于测试的国密证书,开始修改配置文件
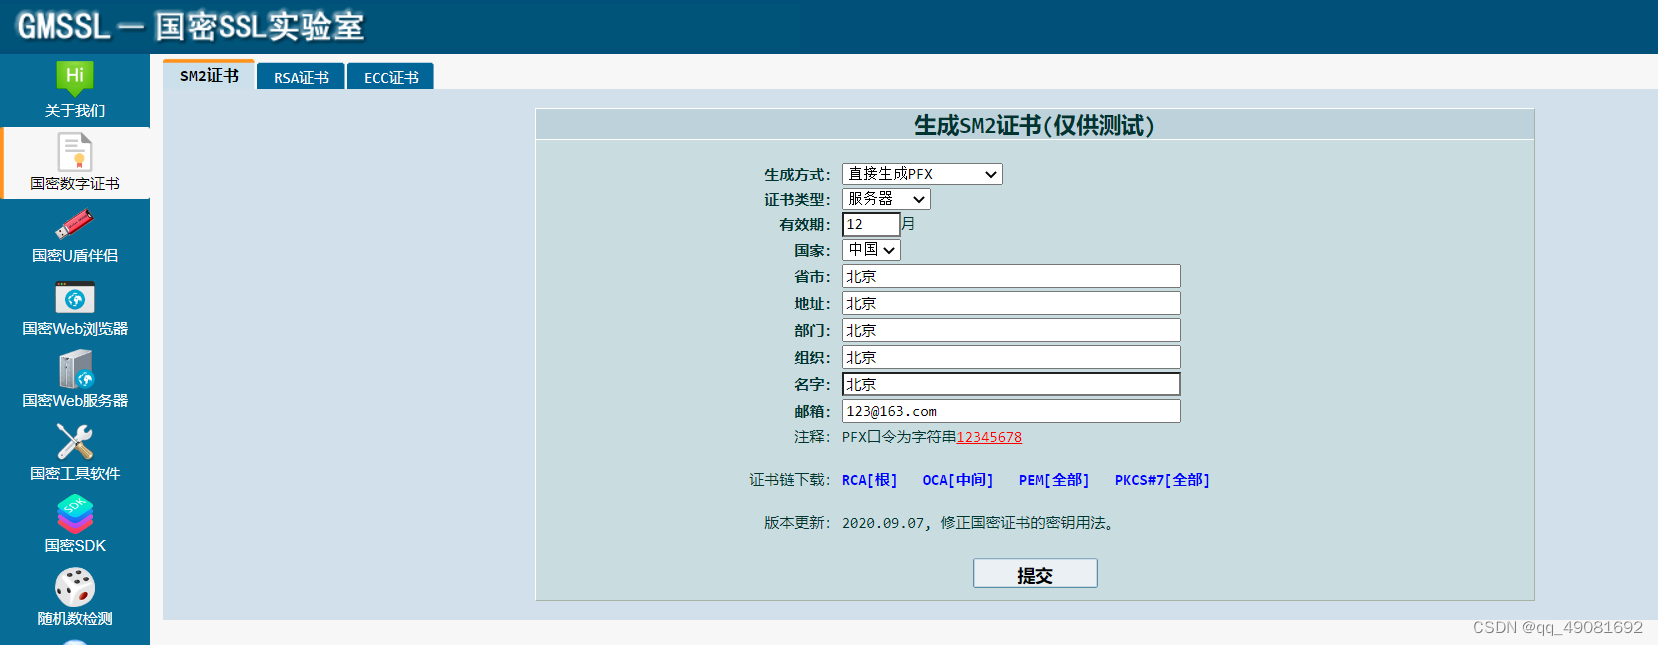
提交之后我们会下载一个SM2.zip的压缩包,打开之后就会有我们需要的四个文件了,把他们放到服务器之后开始配置nginx
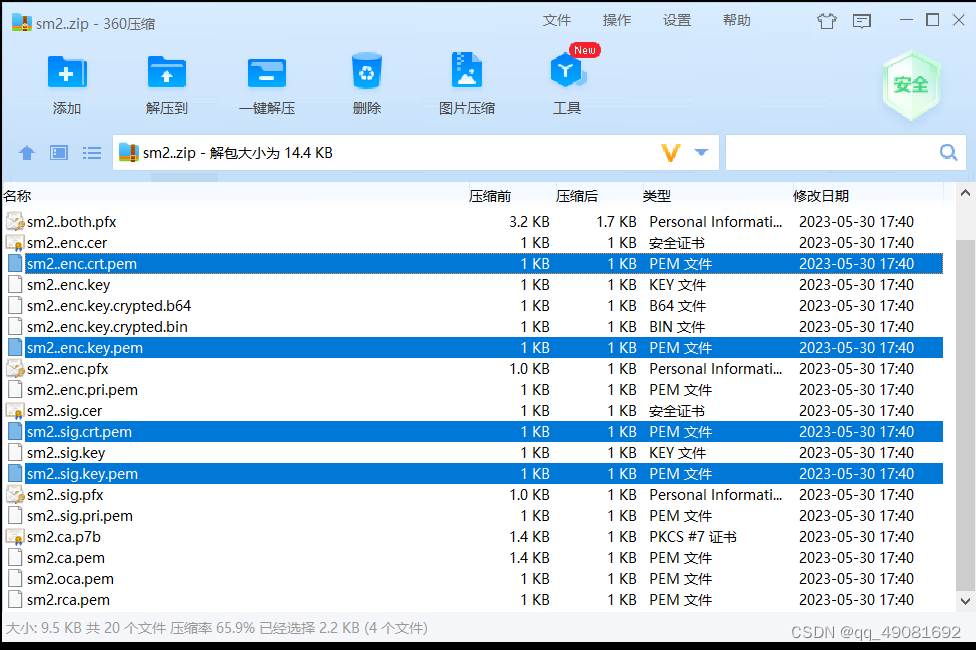
[root@test1 ~]# cd /opt/nginx/gmkey/
[root@test1 gmkey]# ll
总用量 16
-rw------- 1 root root 863 5月 30 17:34 sm2…enc.crt.pem
-rw------- 1 root root 258 5月 30 17:34 sm2…enc.key.pem
-rw------- 1 root root 863 5月 30 17:34 sm2…sig.crt.pem
-rw------- 1 root root 258 5月 30 17:34 sm2…sig.key.pem
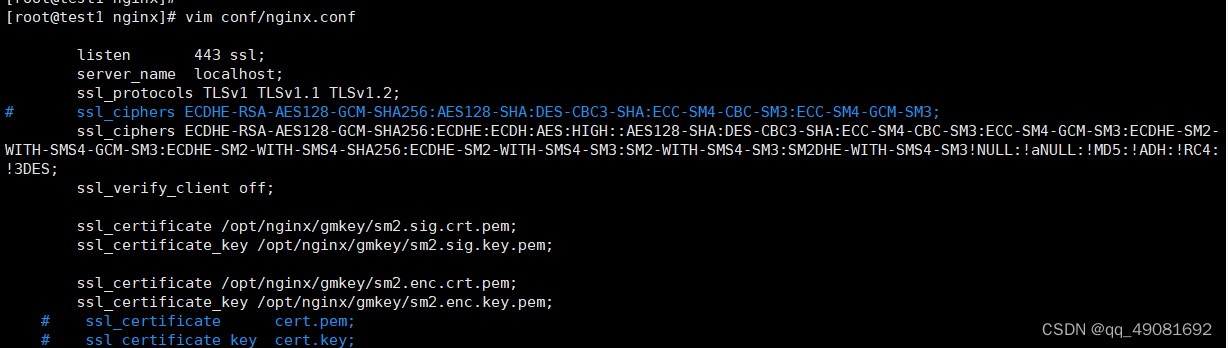
将nginx配置文件修改如下
[root@test1 gmkey]# vim /usr/local/nginx/conf/nginx.conf
server {
    listen       443 ssl;
    server_name  localhost;
    ssl_protocols TLSv1 TLSv1.1 TLSv1.2;
    ssl_ciphers ECDHE-RSA-AES128-GCM-SHA256:ECDHE:ECDH:AES:HIGH::AES128-SHA:DES-CBC3-SHA:ECC-SM4-CBC-SM3:ECC-SM4-GCM-SM3:ECDHE-SM2-WITH-SMS4-GCM-SM3:ECDHE-SM2-WITH-SMS4-SHA256:ECDHE-SM2-WITH-SMS4-SM3:SM2-WITH-SMS4-SM3:SM2DHE-WITH-SMS4-SM3!NULL:!aNULL:!MD5:!ADH:!RC4:!3DES;
    ssl_verify_client off;

    ssl_certificate /opt/nginx/gmkey/sm2.sig.crt.pem;
    ssl_certificate_key /opt/nginx/gmkey/sm2.sig.key.pem;

    ssl_certificate /opt/nginx/gmkey/sm2.enc.crt.pem;
    ssl_certificate_key /opt/nginx/gmkey/sm2.enc.key.pem;
    location / {
        root   html;
        index  index.html index.htm;
    }
}
[root@test1 gmkey]# cd /usr/local/nginx/sbin/
[root@test1 sbin]# ./nginx -t ###检查配置文件正确性
[GMTLS_DEBUG] set sm2 signing certificate
[GMTLS_DEBUG] set sm2 signing private key
[GMTLS_DEBUG] set sm2 encryption certificate
[GMTLS_DEBUG] set sm2 decryption private key
nginx: the configuration file /usr/local/nginx/conf/nginx.conf syntax is ok
nginx: configuration file /usr/local/nginx/conf/nginx.conf test is successful
[root@test1 sbin]# ./nginx -s reload ### 重载nginx
[GMTLS_DEBUG] set sm2 signing certificate
[GMTLS_DEBUG] set sm2 signing private key
[GMTLS_DEBUG] set sm2 encryption certificate
[GMTLS_DEBUG] set sm2 decryption private key
[root@test1 sbin]# netstat -anput | grep nginx ###查看监听端口是否启动
tcp 0 0 0.0.0.0:80 0.0.0.0:* LISTEN 15918/nginx: master
tcp 0 0 0.0.0.0:443 0.0.0.0:* LISTEN 15918/nginx: master
[root@test1 sbin]# systemctl status firewalld ###查看防火墙状态,如果是用到了防火墙的阻断,可先放行80和443端口,防火墙拦截往往是最常见的。
● firewalld.service - firewalld - dynamic firewall daemon
Loaded: loaded (/usr/lib/systemd/system/firewalld.service; disabled; vendor preset: enabled)
Active: inactive (dead)
Docs: man:firewalld(1)
[root@test1 sbin]#
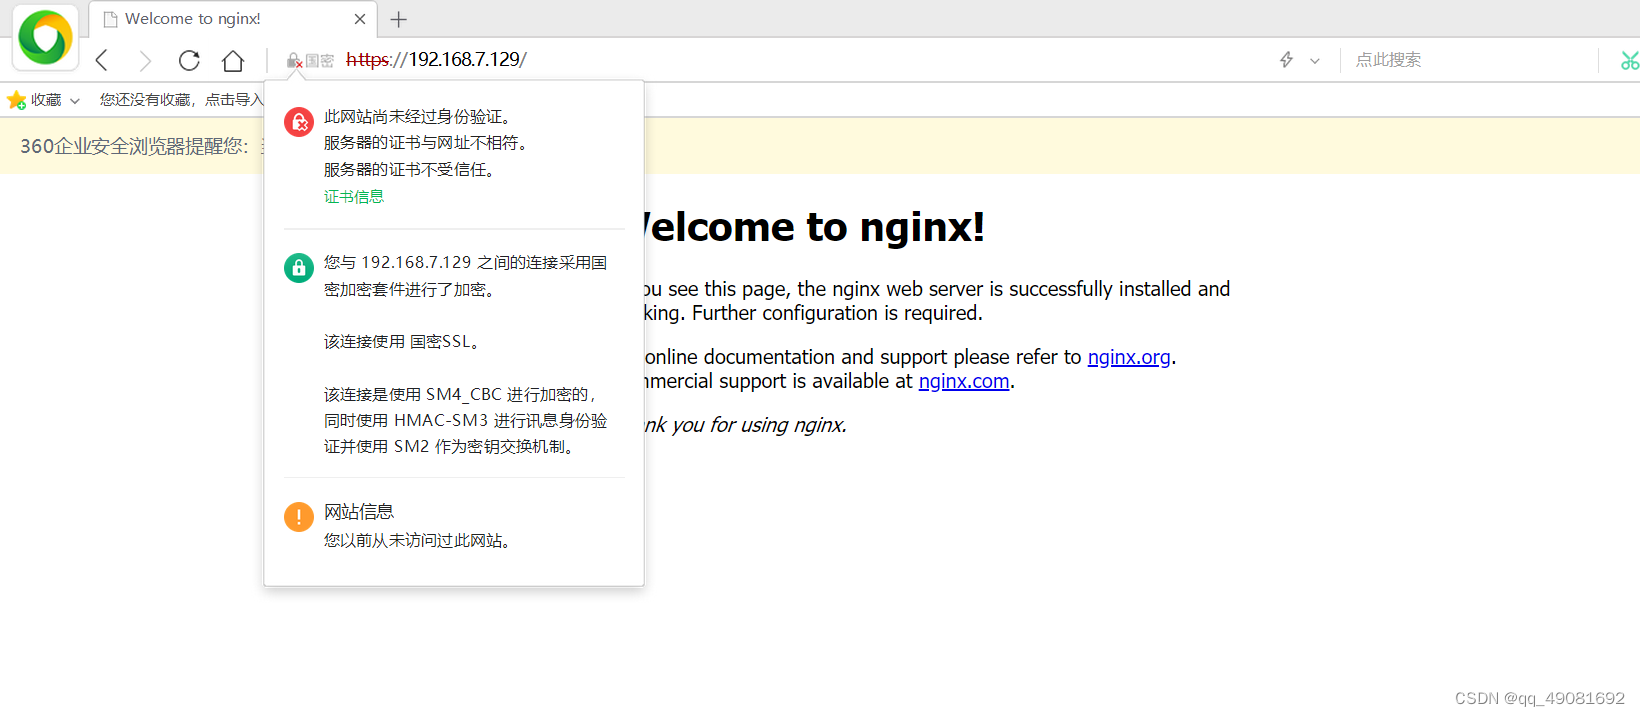
使用国密浏览器做出验证是正常显示国密了
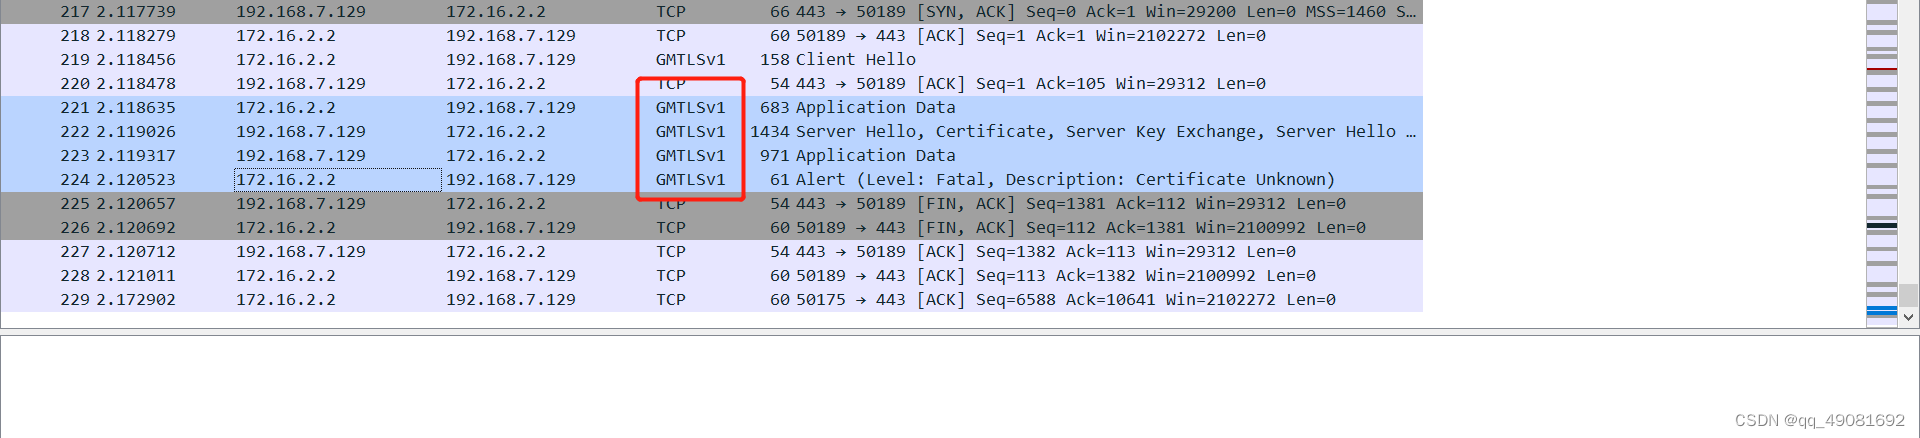
服务器上抓个包看看
[root@test1 nginx]# tcpdump -i ens192 -vnn port 443 -w /root/gm.pcap
tcpdump: listening on ens192, link-type EN10MB (Ethernet), capture size 262144 bytes
然后需要使用支持国密的Wireshark去打开(下载地址:https://www.gmssl.cn/gmssl/down/wireshark-win32-2.9.0-gm.3.exe)
能看到GMTLSv.x即是国密算法了。
这里说写些在过程汇总遇到的问题吧
1、访问nginx的http和https返回403,这种通常是因为权限不足导致,详见error日志内出现:
2023/05/30 17:54:16 [error] 18320#0: *154 “/usr/local/nginx/html/index.html” is forbidden (13: Permission denied), client: 172.16.2.2, server: localhost1, request: “GET / HTTP/1.1”, host: “192.168.7.129”
2023/05/30 17:54:16 [error] 18320#0: *154 “/usr/local/nginx/html/index.html” is forbidden (13: Permission denied), client: 172.16.2.2, server: localhost1, request: “GET / HTTP/1.1”, host: “192.168.7.129”
2023/05/30 17:54:16 [error] 18320#0: *154 “/usr/local/nginx/html/index.html” is forbidden (13: Permission denied), client: 172.16.2.2, server: localhost1, request: “GET / HTTP/1.1”, host: “192.168.7.129”
chmod 644 /站点路径 修改权限便可解决
2、在nginx同时存在http和https的时候,http能够正常访问,但HTTPS不能,浏览器回显没有值得参考信息,查看error日志发现
2023/05/30 18:04:55 [info] 18320#0: *183 SSL_do_handshake() failed (SSL: error:1417A0C1:SSL routines:tls_post_process_client_hello:no shared cipher) while SSL handshaking, client: 172.16.2.2, server: 0.0.0.0:443
2023/05/30 18:04:55 [info] 18320#0: *184 SSL_do_handshake() failed (SSL: error:1417A0C1:SSL routines:tls_post_process_client_hello:no shared cipher) while SSL handshaking, client: 172.16.2.2, server: 0.0.0.0:443
2023/05/30 18:04:59 [info] 18320#0: *185 SSL_do_handshake() failed (SSL: error:1417A0C1:SSL routines:tls_post_process_client_hello:no shared cipher) while SSL handshaking, client: 172.16.2.2, server: 0.0.0.0:443
这类日志,表示连接握手失败,通常是因为SSL算法问题,我的解决方法是将nginx配置文件内的算法扩容,解决了该问题(别忘了,修改配置文件,重载nginx生效)
SSL handshaking, client: 172.16.2.2, server: 0.0.0.0:443
这类日志,表示连接握手失败,通常是因为SSL算法问题,我的解决方法是将nginx配置文件内的算法扩容,解决了该问题(别忘了,修改配置文件,重载nginx生效)


 2003
2003

 被折叠的 条评论
为什么被折叠?
被折叠的 条评论
为什么被折叠?
 到【灌水乐园】发言


