


安装包版本:elasticsearch-7.9.3-linux-x86_64.tar.gz
1、安装包上传至安装目录/app/TRT/,解压:tar -zxvf elasticsearch-7.9.3-linux-x86_64.tar.gz
![]()
2、修改文件夹名:mv elasticsearch-7.9.3 elasticsearch
![]()
3、创建数据目录:mkdir /app/TRT/elasticsearch/data
4、root用户无法启动es,需另创建用户启动。创建elastic用户
4.1、创建elastic用户组:groupadd elastic
![]()
4.2、创建elastic用户:useradd elastic -g elastic
![]()
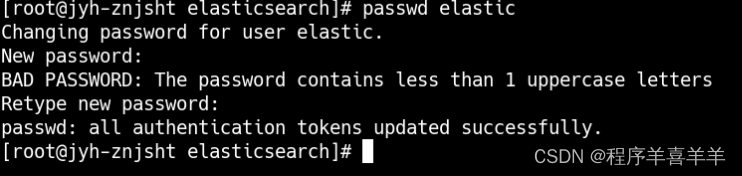
4.3、设置elastic用户密码:passwd elastic
4.4、授权elastic用户elasticsearch文件夹操作权限:chown -R elastic:elastic /app/TRT/elasticsearch
![]()
5、修改elasticsearch.yml配置:vim /app/TRT/elasticsearch/config/elasticsearch.yml
![]()
cluster.name: my-es
# 节点名称
node.name: node-1
cluster.initial_master_nodes: ["node-1"]

# 设置索引数据的存储路径
path.data: /app/TRT/elasticsearch/data

# 设置日志的存储路径
path.logs: /app/TRT/elasticsearch/logs

# 设置当前的ip地址,通过指定相同网段的其他节点会加入该集群中
network.host: 0.0.0.0

# 设置对外服务的http端口
http.port: 9200

# 开启跨域
http.cors.enabled: true

# 允许所有
http.cors.allow-origin: "*"

# 开启密码访问
xpack.security.enabled: true
xpack.license.self_generated.type: basic
xpack.security.transport.ssl.enabled: true
6、安装ik分词器、sql转换器:
将elasticsearch-analysis-ik-7.9.3.zip上传至/app/TRT/elasticsearch/plugins/ik下并解压
将elasticsearch-sql-7.9.3.0.zip上传至/app/TRT/elasticsearch/plugins/sql下并解压
7、启动es
进入/app/TRT/elasticsearch/bin目录,切换elastic用户进行启动

启动报错处理:
max virtual memory areas vm.max_map_count [65530] is too low, increase to at least [262144]
原因:最大虚拟内存值设置过小,无法支持ElasticSearch的运行。
解决:
vim /etc/sysctl.conf
修改配置:vm.max_map_count = 262144
刷新配置:sysctl -p
max file descriptors [4096] for elasticsearch process is too low, increase to at least [65536]
vim /etc/security/limits.conf
添加:
* soft nofile 65536
* hard nofile 65536
重新登录root用户生效
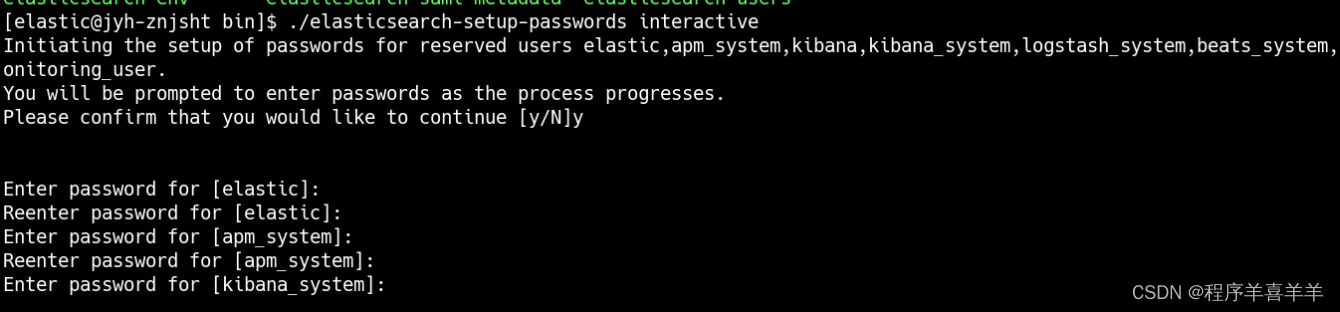
8、设置es连接密码
为4个用户分别设置密码,elastic, kibana, logstash_system,beats_system
进入es bin目录下,执行:./elasticsearch-setup-passwords interactive
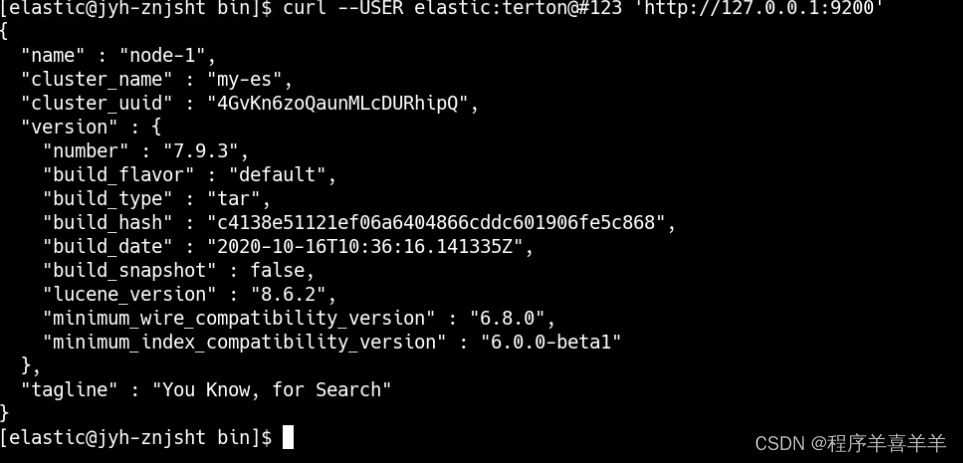
9、测试连接是否成功:curl --USER elastic:你的密码 'http://127.0.0.1:9200'


 589
589

 被折叠的 条评论
为什么被折叠?
被折叠的 条评论
为什么被折叠?
 到【灌水乐园】发言


