


通过 vuex 实现 TodoList :
我们先做一个小的 TodoList 的案例,应用 vuex 来实现,然后逻辑跑通之后再在此的基础上我们一点点手写自己的 vuex ,进而实现和原来一样的效果。
采用 vite 创建项目:
yarn create vite vuex-core-dev --template vue安装vuex:
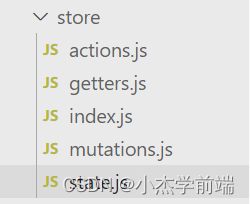
yarn add vuex@next --save删掉 hellowolrd.vue,在 src 目录下新建 store 文件夹,完善 vuex 结构:
在 main.js 中引入:
import { createApp } from 'vue'
import './style.css'
import App from './App.vue'
import store from './store'

createApp(App).use(store).mount('#app')
我们在 store 目录下的 index.js 中返回的对象,里面一定包含一个 install(app)。这是根据 vue 的 plugin 来决定的,你用 use 了就一定得对应 install。只不过这是 vuex 内部已经帮我们实现好的,但是在我们自己的 vuex 中要注意,如果在 main.js 中 sue了,那我们必须在返回的对象中包含 install。
根据 TodoList 的逻辑,我们来编写 vuex 的实现:
state.js:
export default {
    todos: [],
    filter: 'all', //all finished unfinished
    id: 0
}
在 state 中 todos 存储着所有信息,filter 则是当前整体的 TodoList 处于什么状态,是 all 的话就显示所有 list,是 finished 就显示全部已完成的 list,unfinished 就显示全部未完成的 list。并且每条 list 都有对应的 id。
actions.js:
export default {
    addTodo ({ commit }, text) {
        commit('addTodo', text)
    },
    toggleTodo ({ commit }, id) {
        commit('toggleTodo', id)
    },
    removeTodo ({ commit }, id) {
        commit('removeTodo', id)
    }
}
这应该不难理解,就是通过 actions 来提交指定的 mutation 进而改变 state 中的数据将。
mutations.js:
export default {
    addTodo (state, text) {
        state.todos.push({
            id: state.id++,
            text,
            isFinished: false
        })
    },
    toggleTodo (state, id) {
        state.todos = state.todos.map(item => {
            if (item.id === id) {
                item.isFinished = !item.isFinished
            }
            return item
        })
    },
    removeTodo (state, id) {
        state.todos = state.todos.filter(item => {
            if (item.id !== id) {
                return true
            }
        })
    },
    setFilter (state, filter) {
        state.filter = filter
    }
}
getters.js:
export default {
    finishedTodos (state) {
        return state.todos.filter(todos => todos.isFinished)
    },
    unfinishedTodos (state) {
        return state.todos.filter(todos => !todos.isFinished)
    },
    filteredTodos (state, getters) {
        switch (state.filter) {
            case 'finished':
                return getters.finishedTodos
            case 'unfinished':
                return getters.unfinishedTodos
            default:
                return state.todos
        }
    }
}
getters 就类似于计算属性,我们在 getters 中通过 filteredTodos 来根据当前状态筛选数据。
最后在 index.js 中我们把这些传入一个对象再导出出去:
import state from "./state";
import getters from "./getters";
import mutations from "./mutations";
import actions from "./actions";

import { createStore } from 'vuex'

export default createStore ({
    state,
    getters,
    mutations,
    actions
})
重点:
因为我们要实现自己的 vuex 。所以我们要非常清楚我们提交的 mutation ,派发的 action 和 vuex 中的 actions,mutations 他们的参数都是什么
提交 mutation 派发 action
mutations -> commit(type, payload) type就是 mutaion 的名字
actions -> dispatch(type, payload)
执行 actions
action -> (store, payload)
执行 mutations
mutation -> (state, payload)
编写 TodoList 视图:
在 components 目录下新建 TodoList 文件夹,创建 Form.vue,index.vue,Tab.vue,Todos.vue。分别别编写这四个组件的内容:
Form.vue:
<template>
    <div>
       <input
       type="text"
       placeholder="Please input something"
       v-model="inputRef"
       />
       <button @click="addTodo">ADD TODO</button>
    </div>
</template>

<script>
import { ref } from 'vue'
import { useStore } from 'vuex'
    export default {
        setup () {
            const store = useStore()
            const inputRef = ref('')

            const addTodo = () => {
                store.dispatch('addTodo', inputRef.value)
                inputRef.value = ''
            }
            return {
                inputRef,
                addTodo
            }
        }

    }
</script>

<style lang="scss" scoped>

</style>
Tab.vue:
<template>
    <div>
        <a href="javascript:;"
        @click="setFilter('all')"
        :class="{ active: store.state.filter === 'all' }"
        >All</a>
        <a href="javascript:;"
        @click="setFilter('finished')"
        :class="{ active: store.state.filter === 'finished' }"
        >Finished</a>
        <a href="javascript:;"
        @click="setFilter('unfinished')"
        :class="{ active: store.state.filter === 'unfinished' }"
        >unFinished</a>
    </div>
</template>

<script>
import { useStore } from 'vuex'
    export default {
        setup () {
            const store  = useStore()

            const setFilter = (filter) => {
                store.commit('setFilter',filter)
            }
            return {
                store,
                setFilter
            }
        }
    }
</script>

<style lang="scss" scoped>
    a {
        margin-right:15px;
    }
    .active {
        text-decoration: none;
        color: #000;
    }
</style>
Todos.vue:
<template>
    <div>
        <div v-for="item of store.getters.filteredTodos"
          :key="item.id"
        >
            <input type="checkbox"
            :checked="item.isFinished"
            @click="toggleTodo(item.id)"
            >
            <span :class="{ finished: item.isFinished }">{{item.text}}</span>
            <button @click="removeTodo(item.id)">DELETE</button>
        </div>
    </div>
</template>

<script>
import { useStore } from 'vuex'
    export default {
        setup () {
            const store = useStore()

            const toggleTodo = (id) => {
                store.dispatch('toggleTodo',id)
            }

            const removeTodo = (id) => {
                store.dispatch('removeTodo',id)
            }
            return {
                store,
                toggleTodo,
                removeTodo
            }
        }
    }
</script>

<style lang="scss" scoped>
.finished {
    text-decoration: line-through;
}
</style>
index.vue 作为入口文件将这三个组件导入:
<template>
    <div>
        <todo-tab></todo-tab>
        <todo-form></todo-form>
        <todos></todos>
    </div>
</template>

<script>
import TodoTab from './Tab'
import TodoForm from './Form'
import Todos from './Todos'
    export default {
        components: {
            TodoTab,
            TodoForm,
            Todos
        }
    }
</script>

<style lang="scss" scoped>

</style>
修改一下 voite.config.js,否则运行会报错:
import { defineConfig } from 'vite'
import vue from '@vitejs/plugin-vue'
import { resolve } from 'path'
// https://vitejs.dev/config/
export default defineConfig({
  plugins: [vue()],
  resolve: {
    extensions: ['.vue', '.js'],
    alias: {
      '@': resolve(__dirname, 'src')
    }
  }
})
现在我们的 TodoList 就做好了,启动项目:
点击“吃饭”,当选择 All 时:
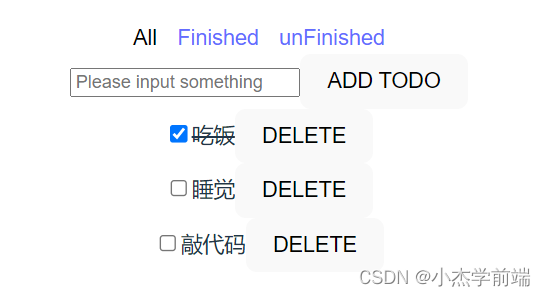
选择已完成:

选择未完成:

实现自己的 vuex
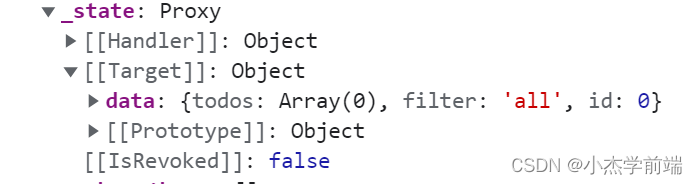
在实现我们自己的 vuex 之前,我们先把 store 对象做一个输出,看看 vuex 里的 store d都有啥:
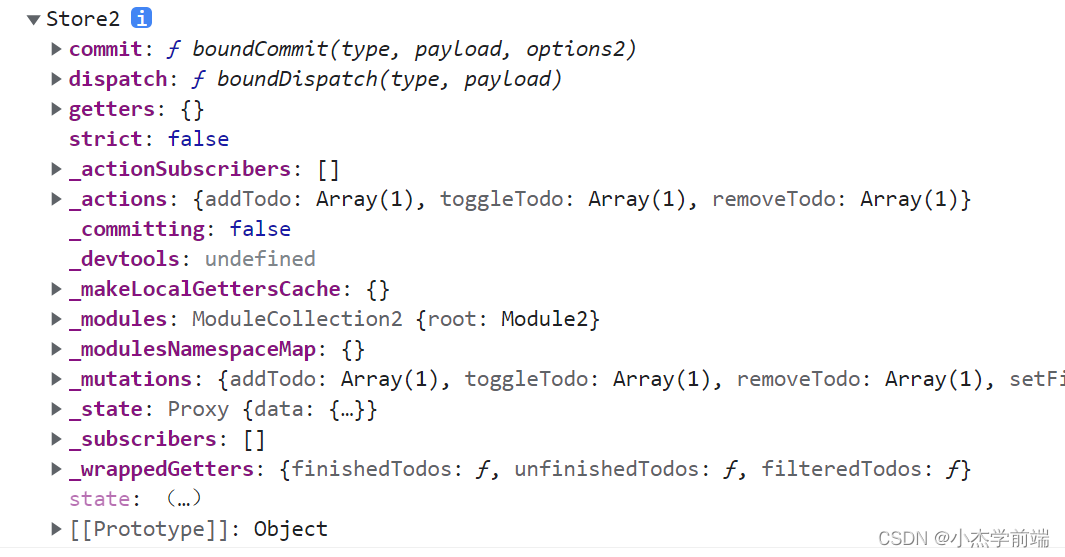
这里的 actions,mutations,state 的前面都加了 " _ ",这就是 vuex 把我们写的 actions,mutations,state给包装了。
在 _state 中,我们的数据保存在 data 属性里,这个 data 是哪来的呢,这也是 vuex 帮我们做的,其实就是 reactive 它保存了一个对象,这个对象里面是 data = 我们的 state。
前面我们说到过一个非常重要的问题,就是我们调用对应的 mutation 和 action 的时候,传入的参数是 type 和 payload。而我们的 mutations 和 actions 这两种函数是分别传入 state,payload 和 store,payload。这样的话传参不统一,我们就需要转换一下,我们可以定义一个函数先传 payload,然后再去调用 mutation,把它的 this 指向改成 store,然后再去传入他本身的 state,payload 或者 store,payload。
所以这就是为什么他要单独保存 mutations 和 actions,因为我们要首先定义一个函数,把 commit 和 dispatch 的 payload 给传进来,然后再调用 mutations 和 actions,再把 state,payload 或 store,payload 传递给他们。
下面我们先在 src 目录下新建 my-vuex 文件夹,把之前所有用到 vuex 的地方都换成我们的 my-vuex:
![]()
现在我们首先要实现的就是 store 里的 index.js 中的 createStore 这个函数:

它接收一个 options 参数,我们要把用户写的东西先拿进来并且在用户使用 vuex 的过程中,会从 useStore 里抛出一个 store 对象:

那我们就先写抛给用户用的这两个方法,createStore 和 useStore。我们在 my-vuex 下新建 store.js 来实现这两个方法。
createStore 的实现:
class Store {
    constructor (options) {
        const {
            state,
            getters,
            mutations,
            actions
        } = options
    }
}


export function createStore (options) {
    return new Store(options)
}
因为 createStore 接收用户传进来的 options,所以我们可以写一个 Store 类,返回的就是 Store 的实例对象,这样就非常易于扩展和维护。
那我们在 main.js 中引入的就是这个实例,use 中传入的也是这个实例,因为我们之前说过 use 了,就必须 install。所以我们得在 Store 类中添加这个方法

class Store {
    constructor (options) {
        const {
            state,
            getters,
            mutations,
            actions
        } = options
    }

    install (app) {

    }
}
因为它找这个 install 就是先在实例对象上找,没有的话就去它的原型对象上找,而我们的 install 就是挂在类的原型对象上的。
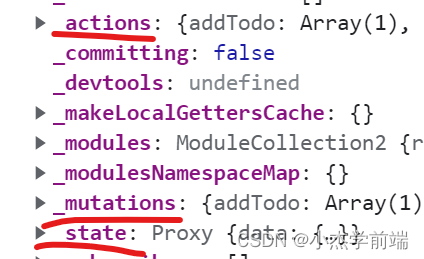
在我们打印出的 store 实例中,_mutations 和 _actions 里面只有我们定义的函数,没有什么链,他不想让我们继承。所以我们就可以直接创建对象就行了。
constructor (options) {
        const {
            state,
            getters,
            mutations,
            actions
        } = options

        this._state = reactive({ data: state })
        this._mutations = Object.create(null)
        this._actions = Object.create(null)
    }
用户在创建 mutation 和 action 的时候都会被添加到对应的 _mutations 和 _actions,所以我们就新建一个 creator.js ,来把用户传进来的 mutations 和 actions 都给添加进 _mutations 和 _actions。
因为我们肯定需要遍历用户传进来的对象并且拿到他的 key,value,来做下面的逻辑,所以我们再新建一个 utils.js :
// 对 mutations,actions 做一个循环。传入一个回调函数,参数就是我们获取的键值对,然后在里面做一些事情
export function forEachValueKey (obj, callback) {
    Object.keys(obj).forEach(key => callback(obj[key], key))
}
现在回到我们的 creator.js,下面看一下处理 mutations 的代码:
export function createMutations (store, mutations) {
    forEachValueKey(mutations, (mutationFn, mutationKey) => {
        store._mutations[mutationKey] = (payload) => {
            mutationFn.apply(store, [ store.state, payload ])
        }
    })
}
这里我们就是调用在 utils 中定义的 forEachValueKey 来遍历传进来的 mutations,我们在 store 中拿到我们自己定义的 _mutations,mutationKey 就是用户通过提交 commit 传进来的 type,payload 就是 commit 的第二个参数,然后在回调中我们调用 mutationFn,这里要通过 apply 来改变 this 指向,因为要让 mutationFn 里的 this 指向到我们定义的类的实例,然后参数传入的就是 state 和 payload。
下面 createActions 是一样的逻辑:
export function createActions (store, actions) {
    forEachValueKey(actions, (actionFn, actionKey) => {
        store._actions[actionKey] = (payload) => {
            actionFn.apply(store, [ store, payload ])
        }
    })
}
值得注意的是 createGetters :
export function createGetters (store, getters) {
    store.getters = {}
    forEachValueKey(getters, (getterFn, getterKey) => {
        Object.defineProperty(store.getters, getterKey, {
            get: () => computed(() =>  getterFn(store.state, store.getters)).value
        })
    })
}
因为我们要通过 getters 来访问 state 中的数据,所以可以用 Object.defineProperty 来做一层代理。
现在我们回到 store 类中,调用刚才定义好的三个函数:
现在用户在调用 createStore 的时候,就会返回给他我们定义的 store 实例,然后接收到用户传进来的 options,然后把 mutations 传入 _mutations 池子,把 actions 传入 _actions 池子,调用 createGetters 来定义一个 store.getters 对象,进而做一层代理。
这样整个逻辑就清晰多了,现在我们定义用户提交的 commit 方法和 dispatch 方法:
// 用户提交 commit 就是调用指定的 mutations
    commit(type, payload) {
        this._mutations[type](payload)
    }
    dispatch(type, payload) {
        this._actions[type](payload)
    }
因为我们可以通过 store.state 来访问到 state 里的数据,所以现在只有一个 _state 是不行的,因为这个 _state 是方便我们的 vuex 做其他事情的,用户并不是通过 store._state 来调用的,所以我们还得再做一层代理:
get state() {
        return this._state.data
    }
这样我们返回的就是 state 中的数据了
在项目中我们可以通过调用 vuex 提供的 useStore 方法来获取到 store 实例,那我们怎么让项目中的其他组件都能获取到 store 实例呢,其实这就是跨组件传值嘛,我们要传这个 store 实例,我们呢就可以在 install 方法中调用 app.provide 方法来传出这个实例,然后在 useStore 方法中 inject 一下不就接收到了吗,因为 install 方法对应的是 mian.js 中的 use ,我们在 vue 根组件上使用 use 方法就相当于根组件 provide 了一个数据,那么在子组件中想要用这个数据的就可以直接调用useStore 方法。
install (app) {
        app.provide('store', this)
        app.config.globalProperties.$store = this
    }
这里 app.config.gloabalPropertries.$store 是因为还要兼容 vue2,我们可以在项目中用 this.$store.state 来访问 state 中的数据。
下面是 useStore 方法:
export function useStore () {
    return inject('store')
}
现在我们整个写的已经差不多了,启动项目:

发现报错了,他说 _mutations 访问不到,也就是这块它调不到:

那我们在 commit 里输出一下 this 看看会不会打印 store:
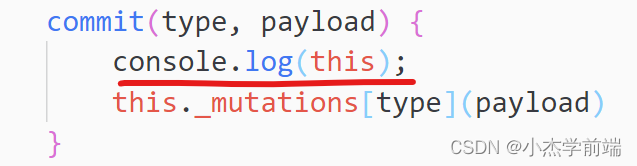
控制台上输出的是 undefined。那他为啥是 undefined 呢?
因为用户在调用 commit 的时候,commit 里的 this 指向已经改变了,不再指向当前 this 实例了,所以我们得对 commit 和 dispatch 函数做一个绑定当前 this 环境的处理,在 creator 中我们实现这块的代码:
export function createCommitFn (store, commit) {
store.commit = function (type, payload) {
commit.apply(store, [ type, payload ])
}
}
export function createDispatchFn (store, dispatch) {
store.dispatch = function (type, payload) {
dispatch.apply(store, [ type, payload ])
}
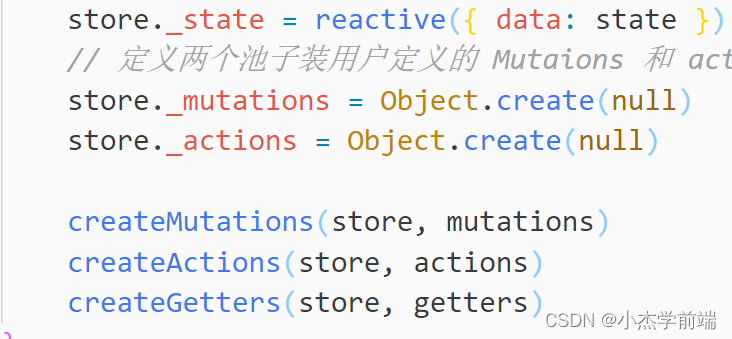
}然后在 constructor 中我们从 store 中解构出 commit 和 dispatch 作为参数传入这两个函数:
class Store {
    constructor (options) { //把用户传进来的 options 做初始化
        const {
            state,
            getters,
            mutations,
            actions
        } = options
        const store = this
        const { commit, dispatch } = store
        store._state = reactive({ data: state })
        // 定义两个池子装用户定义的 Mutaions 和 actions
        store._mutations = Object.create(null)
        store._actions = Object.create(null)

        createMutations(store, mutations)
        createActions(store, actions)
        createGetters(store, getters)
        createCommitFn(store, commit)
        createDispatchFn(store, dispatch)
    }
    // 用户提交 commit 就是调用指定的 mutations
    commit(type, payload) {
        console.log(this);
        this._mutations[type](payload)
    }
    dispatch(type, payload) {
        this._actions[type](payload)
    }
    get state() {
        return this._state.data
    }
    install (app) {
        app.provide('store', this)
        app.config.globalProperties.$store = this
    }
}
启动项目:
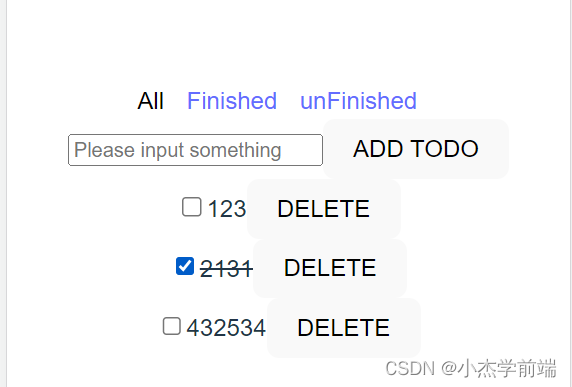
现在我们整个项目都能正常运行了,我们的 mini-vuex 的基本功能也就实现了。


 512
512


 被折叠的 条评论
为什么被折叠?
被折叠的 条评论
为什么被折叠?
 到【灌水乐园】发言


