


文章目录
- 前言
- File(文件)
- 解码和编码
- IO流
- Properties 类使用
前言
初学IO真的乱啊,看了两三遍视频,我才差不多理清楚,可能我人比较傻吧,所以我建议大家,最好看看思维导图理清楚,我相信大家一定能学会的
File(文件)
基本概念
File 对象就表示一个文件,或文件夹的路径,可以存在也可以不存在
假如有一个路径是 D:\ bbb\ ccc\ a.txt,这里 D:\ bbb\ ccc\ 就是父级路径,a.txt就是子级路径
构造方法
| 方法名称 | 说明 |
|---|---|
| public File(String pathname) | 根据文件路径字符串创建文件对象 |
| public File(String parent, String child | 根据父级路径,和子级路径字符串创建文件 |
| public File(File parent, String child | 根据父路径对应文件对象,和子路径字符串创建文件 |
public class Main {
    public static void main(String[] args) {

        //第一种构造方法
        String pathname = "e:\\a.txt";
        File file1 = new File(pathname);
        //也可以这样
        File file2 = new File("e:\\a.txt");


        //第二种构造方法
        String parent = "e:\\";
        String child = "a.txt";
        File file3 = new File(parent, child);
        //也可以这样
        File file4 = new File("e:\\", "a.txt");


        //第三种构造方法
        File file5 = new File("e:\\");
        String child2 =  "a.txt";
        File file6 = new File(file5, child2);
        //也可以这样
        File file7 = new File(new File("e:\\"), "a.txt");

    }
}
可见下面两种都有点繁琐,所以一般用第一种
这里有两个斜杠是因为一个是转义字符
常见成员方法
判断和获取

public class Main {
    public static void main(String[] args) {

      File file = new File("e:\\a.txt");
      System.out.println(file.isDirectory());
      System.out.println(file.isFile());
      System.out.println(file.exists());
      System.out.println(file.length());
      System.out.println(file.getAbsoluteFile());
      System.out.println(file.getPath());
      System.out.println(file.getName());
      System.out.println(file.lastModified());

    }
}
创建和删除
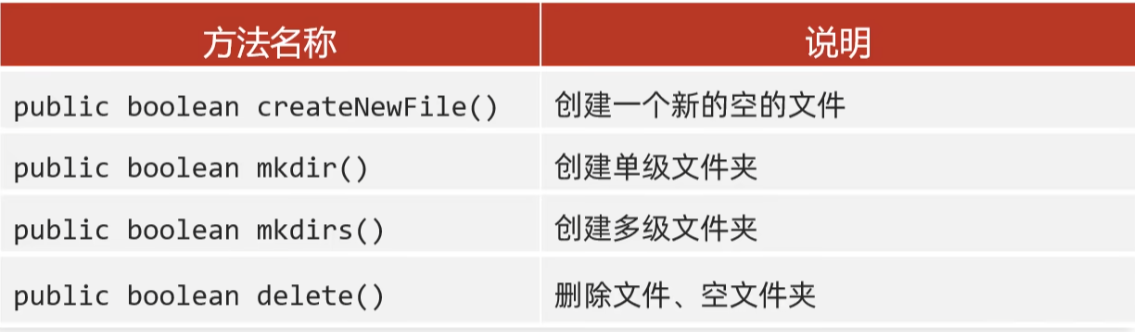
public class Main {
    public static void main(String[] args) throws IOException {

		//1. 创建一个新的空文件
		//细节1:如果当前路径文件存在,创建失败返回 false
        //细节2:如果父级路径不存在,抛出 IOException
        //细节3:如果文件不包含路径名,则创建一个没有后缀的文件
        File file = new File("e:\\test");
        System.out.println(file.createNewFile());

		//2. mkdir:创建单级文件夹
        //细节1:windows 当中路径是唯一的,如果当前路径已经存在,创建失败 返回 false
        //细节2:只能创建单级文件夹
        File file2 = new File("e:\\a");
        System.out.println(file.mkdir());

		//3. mkdirs 创建多级文件夹
        //细节:既可以创建单级文件夹,也可以创建多级文件夹
        File file3 = new File("e:\\a\\aa");
        System.out.println(file.mkdirs());

		//4. 删除文件,文件夹
		 //细节1:如果删除的是文件,则直接删除,不走回收站
        // 		如果删除的是空文件夹,则直接删除,不走回收站
        //      如果是有内容的文件夹则删除失败
        System.out.println(file.delete());

    }
}
delete方法不走回收站,直接删除
获取并遍历
- public File[] listFiles():获取当前路径下所有内容
- public String[] list:获取当前路径下所有内容(仅仅是获取名字)
- public static File[] listRoots():获取系统中所有可用的盘符
注意点
当调用者File表示的路径不存在时,返回null
当调用者File表示的路径是文件时,返回null
当调用者File表示的路径需要权限时,返回null
当调用者File表示的路径是一个空文件夹时候,返回长度为0的数组
当调用者File表示的路径是一个有内容的文件夹时,将里面所有文件和文件夹路径放在FIle数组返回,如果包含隐藏文件,就包含隐藏文件一起返回
粗略的说就是返回 文件夹 里所有文件包括隐藏文件
public class Main {
    public static void main(String[] args) throws IOException {

        //1. listRoots 获取系统中所有的盘符
        File[] arr = File.listRoots();
        //数组内容转成字符串形式
        System.out.println(Arrays.toString(arr));

		//2.获取当前路径下所有内容
        File file = new File("e:\\a");
        File[] files = file.listFiles();
        for (File temp : files) {
            System.out.println(temp);
        }

        //3.获取当前路径下所有内容
        File file2 = new File("e:\\a");
        String[] files = file.list();
        for (String f : files) {
             System.out.println(f);
        }
    }
}
解码和编码
编码:比如 字符 a 查询 ASCII 表是 97,那么编码就是把 97 编成 01100001 二进制
解码:把 01100001 转成 97(按照字符编码转) 然后 查表 变成 字符 a
这个 97 就是所谓的码点
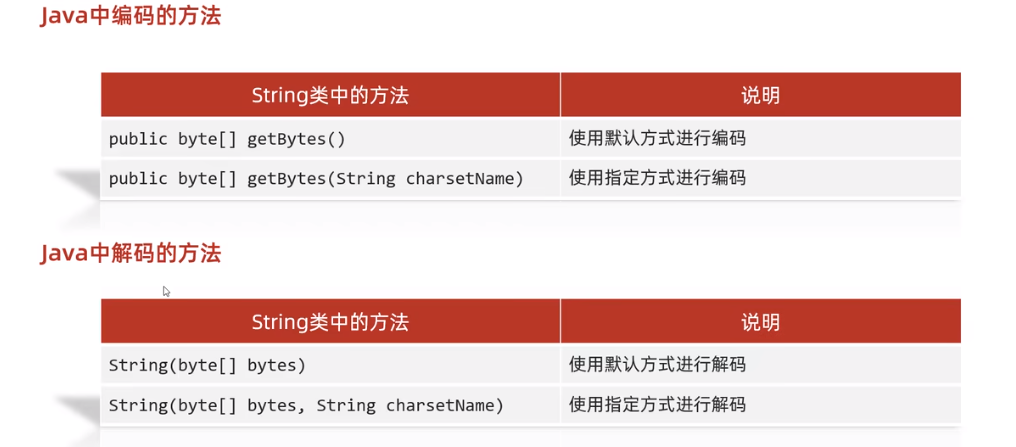
		//编码
        String data = "a我b";
        byte[] bytes = data.getBytes("utf-8");

        //解码
        String res = new String(bytes, "utf-8");
        System.out.println(res);
放进 byte数组就是按照编码表编码放进去,以码点表示
转成字符串就是解码
几种常见的字符标准
- GBK编码:英文占一个字节,中文占两个字节
- Unicode 编码:
utf-8:英文占一个字节,中文占三个字节
utf-16:英文中文都是两个字节,中文占两个字节
utf-32:英文中文都是四个字节
中文二进制首位一定是1
思考一个问题,为什么char 占两个字节,编码格式 utf-8 中文占三个字节却能存进去
回答:因为存的是码点
码点: 编码表中某个字符对应的代码值,例如 a 的 码点是 97
如何才能不产生乱码
回答:不要用字节流读取文本文件,编码解码时使用同一个码表,同一个编码方式
IO流
先看下体系图
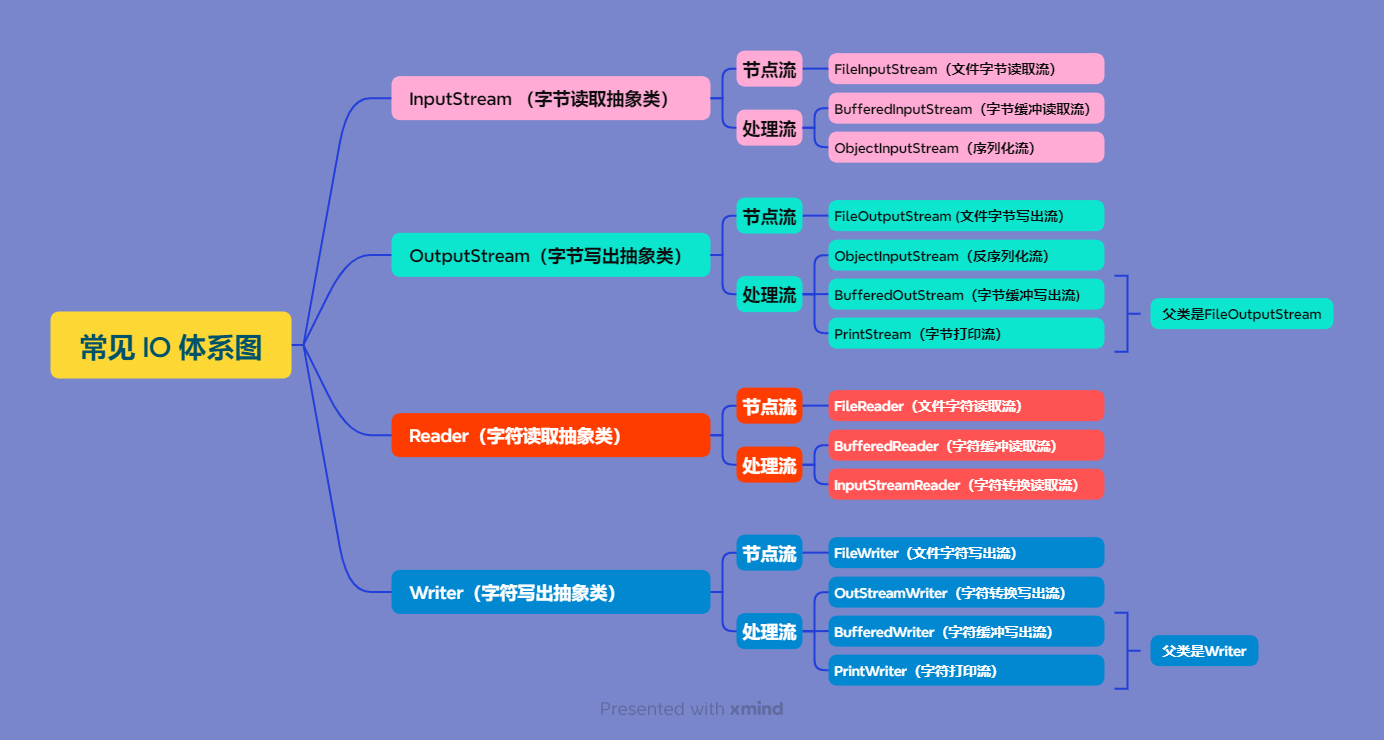
节点流和处理流概念
- 节点流:从一个特定数据源(存放数据的地方),读写数据
- 处理流:也叫包装流)是“连接” 在已存在的流(节点流或处理流)之上,为程序提供更为强大的读写功能
节点流和处理流的区别和联系
- 节点流是底层流/低级流,直接跟数据源连接
- 处理流包装节点流或处理流,提供更方便的方法来完成输入输出,消除不同节点的实现差异
处理流对 节点流/处理流 进行包装用了 装饰者模式,不会直接与数据源相连
主要方法
InputStream(字节读取流) 主要方法
| 方法名 | 说明 |
|---|---|
| int read() | 一次读一个字节,返回读到的字节的编码值,读不到就返回-1 |
| int read(byte[] buffer) | 读取字字节到 buffer 数组中,返回读取并存入数组 buffer 的字节数量, 末尾就返回-1 |
| void close() | 关闭此流并释放与该流关联的所有系统资源 |
int read(byte[] buffer) 常常搭配 public String(byte bytes[], int offset, int length) 使用
OutputStream(字节写出流)主要方法
| 方法名 | 说明 |
|---|---|
| void write | 一次写一个字节 |
| void write(byte[] buffer) | 一次写一个字节数组数据 |
| void write(byte[] buffer, int off, int len) | 从字节数组截取 len 个字节,写到文件 |
| void close() | 关闭此流并释放与该流关联的所有系统资源 |
Reader(字符读取流)主要方法
| 方法名 | 说明 |
|---|---|
| int read() | 一次读取一个字符,成功返回编码值,读到末尾返回-1 |
| int read(char[] buffer) | 读取字符到 buffer 数组中,返回读取并存入数组 buffer 的字符数量, 末尾就返回-1 |
| void close() | 关闭此流并释放与该流关联的所有系统资源 |
| void flush() | 刷新缓冲区 |
| close() | 关闭流,并刷新缓冲区 |
int read(char[] buffer) 常常搭配 public String(char value[], int offset, int count) 使用
Writer(字符写出流)主要方法
| 方法名 | 说明 |
|---|---|
| void write(int c) | 写出一个字符 |
| void write(String str) | 写出一个字符串 |
| void write(String str, ine off, int len | 写出一个字符串的一部分 |
| void write(char[] cbuf | 写出一个字符数组 |
| void write(char[] cbuf, int off, int len | 写出字符数组一部分 |
| void flush | 刷新缓冲区 |
| void close() | 关闭流,并刷新缓冲区 |
PrintStream 与 PrintWriter (字节字符打印流)特有方法
| 方法名 | 说明 |
|---|---|
| void println() | 打印任意数据,自动刷新,自动换行 |
| void print | 打印任意数据,不换行 |
| void printf(String format, Object…args) | 带有占位符的打印语句,不换行,和C语言的差不多 |
BufferedWriter 与 BufferedReader(字符缓冲流) 特有方法
| 方法名 | 说明 |
|---|---|
| String readLIne() | 读取一行数据,没数据可以读了就返回null |
| void newLine | 跨平台换行 |
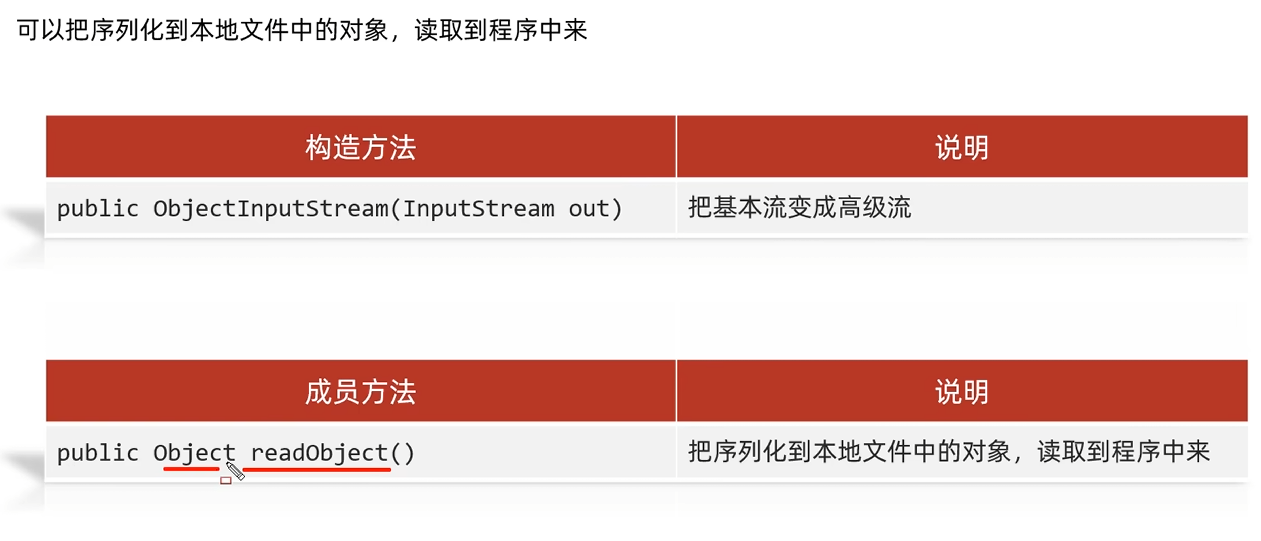
ObjectOutputStream 和 ObjectInputStream (序列化与反序列化流)特有方法
| 方法名 | 说明 |
|---|---|
| final void writeObjectr(Object obj) | 把对象序列化(写出)到文件中去 |
| public Object readObject() | 把序列化到本地文件中的对象,读取到程序中来 |
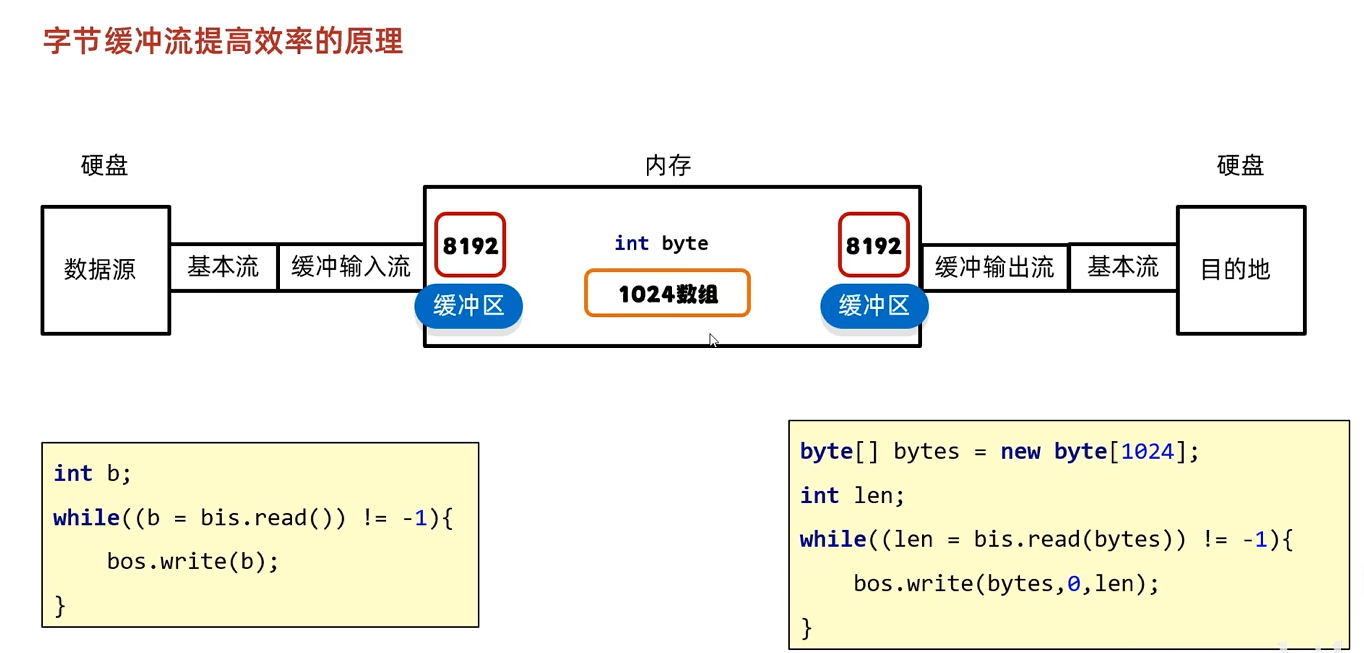
字符流原理
读取
- 创建字符输入流对象
底层:关联文件,并创建缓冲区(长度为 8192 的字节数组)
- 读取数据
底层:每次read()的时候,判断缓冲区区中是否有数据可以读取,缓冲区中没有数据: 就从文件中获取数据,装到缓冲区中,每次尽可能装满。如果文件中没有数据了,就返回 -1。
缓冲区中有数据:**就从缓冲区中读取
注意无参 read() 返回的是十进制,有参 read() 返回字符
写出
底层创建 8192 数组的缓冲区,不断往缓冲区写数据,缓冲区装满了,或者 flush 刷新,或者 close()才把缓冲区的内容推到目的地
字节流,字符流使用场景
- 字节流:
- 拷贝任意类型的文件
- 字符流
- 读取纯文本文件中的数据
- 往纯文本文件中写出数据
节点流
FileOutputStream 与 FileInputStream(文件字节写出读取流)
常用构造:
FileInputStream(File file)
FileInputStream(String name)
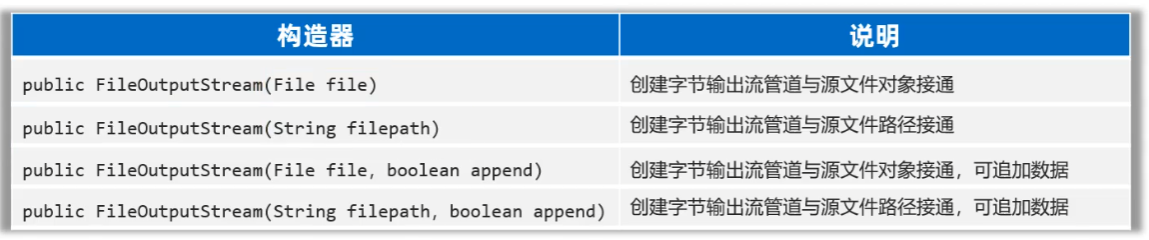
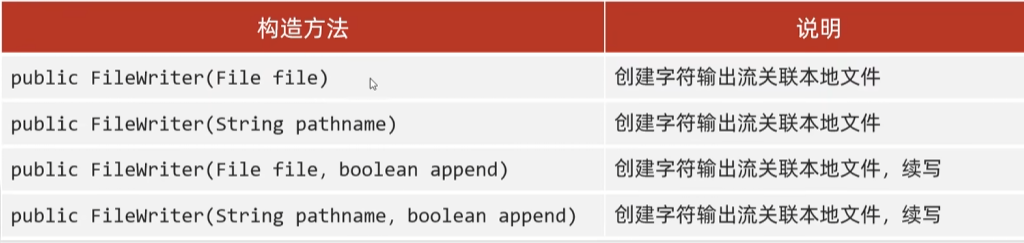
第四个构造器,追加数据,就是重新往文件写的时候是追加进去,如果没开,就是覆盖掉原来的文件
一个字节一个字节拷贝
看不懂异常不要慌下面会解释的
public class Main {
    public static void main(String[] args){

       FileInputStream fis = null;
       FileOutputStream fos = null;

       try {
           fis = new FileInputStream("e:\\a.txt");
           fos = new FileOutputStream("d:\\a.txt");
           int a = 0;
           while ((a = fis.read()) != -1 ) {
               fos.write(a);
           }

       }catch(IOException e) {
          e.printStackTrace();
       }finally {
       //一般不直接抛出去,因为直接跑出去,通道关闭不了了
           try {
               if (fos != null) {
                   fos.close();
               }
               if (fis != null) {
                   fis.close();
               }
           } catch (IOException e) {
               throw new RuntimeException(e);
           }
       }
    }
}
利用byte数组拷贝
public class Main {
    public static void main(String[] args){

        try(FileInputStream fis = new FileInputStream("e:\\a.txt");
            FileOutputStream fos = new FileOutputStream("a:\\a.txt")) {

            byte[] buff = new byte[1024];
            int len = 0;
            while ((len = fis.read(buff)) != -1) {
                fos.write(buff, 0, len);
            }

        }catch (IOException e) {
            throw new RuntimeException(e);
        }

    }
}
FIleWriter 与 FileReader(文件字节写出读取流)
构造
FileReader(File file):创建字符输入流关联本地文件
FileReader(String pathname):创建字符输入流关联本地文件
一个字符一个字符拷贝
public class Main {
    public static void main(String[] args){

        try(FileReader fr = new FileReader("e:\\a.txt");
            FileWriter fw = new FileWriter("d:\\a.txt")) {

            int a = 0;
            while ((a = fr.read()) != -1) {
                fw.write(a);
            }
        } catch (IOException e) {
            throw new RuntimeException(e);
        }

    }
}
利用 char 数组拷贝
public class Main {
    public static void main(String[] args){

        try(FileReader fr = new FileReader("e:\\a.txt");
            FileWriter fw = new FileWriter("d:\\a.txt")) {

            char[] buff = new char[1024];
            int len;
            while ((len = fr.read(buff)) != -1) {
                fw.write(buff, 0 ,len);
            }
        } catch (IOException e) {
            throw new RuntimeException(e);
        }

    }
}
文件异常抛出及释放资源问题
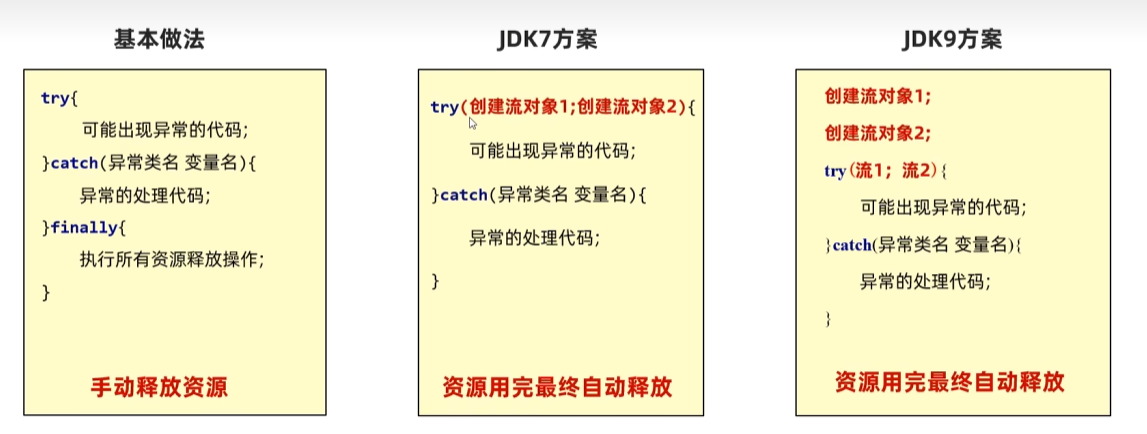
//第一种
public class Main {
    public static void main(String[] args) {
       //完成文件拷贝

        String srcFilePath = "e:\\a.txt";
        String destFilePath = "d:\\a.txt";
        FileInputStream fileInputStream  = null;
        FileOutputStream fileOutputStream = null;

        //输入
        try {
            fileInputStream = new FileInputStream(srcFilePath);
            fileOutputStream = new FileOutputStream(destFilePath);

            //定义一个字节数组,提高效率
            byte[] buf = new byte[1024];
            int readLen = 0;
            while  ((readLen = fileInputStream.read(buf)) != -1 ) {
                //读取到后,就写入到文件 通过 fileOutputStream
                //即,是一边读,一边写
                fileOutputStream.write(buf, 0, readLen); //一定要使用这个方法,因为可能会连续读入,只有buf的话只读一次
            }
            System.out.println("拷贝成功");

        } catch (IOException e) {
            e.printStackTrace();
        } finally {
            //关闭输入输出流释放资源
            try {
                if (fileInputStream != null) {
                    fileInputStream.close();
                }
                if (fileOutputStream != null) {
                    fileOutputStream.close();
                }
            } catch (IOException e) {
                e.printStackTrace();
            }

        }
    }
}
==如果没有 if (fileInputStream != null) 上面如果没有文件抛出空指针异常,空指针调用close 肯定异常了
//第二种
public class Main {
    public static void main(String[] args) throws IOException {

        //1. 创建对象
        try(FileInputStream fis = new FileInputStream("e:\\a.txt");
            FileOutputStream fos = new FileOutputStream("d:\\e.txt");) {

            //2. 拷贝
            byte[] bytes = new byte[1024 * 1024 * 5];
            int len = 0;
            while( (len = fis.read(bytes)) != -1 ) {
                fos.write(bytes, 0, len);
            }
        }catch (IOException e) {
            e.printStackTrace();
        }

    }
}
//第三种
public class Main {
    public static void main(String[] args) throws IOException {


        //1. 创建对象
        FileInputStream fis = new FileInputStream("e:\\a.txt");
        FileOutputStream fos = new FileOutputStream("d:\\e.txt");

        //1. 创建对象
        try(fis;fos) {

            //2. 拷贝
            byte[] bytes = new byte[1024 * 1024 * 5];
            int len = 0;
            while( (len = fis.read(bytes)) != -1 ) {
                fos.write(bytes, 0, len);
            }
        }catch (IOException e) {
            e.printStackTrace();
        }

    }
}
处理流
BufferedInputStream 与 BufferedOutputStream (字节写出读取缓冲流)
构造方法
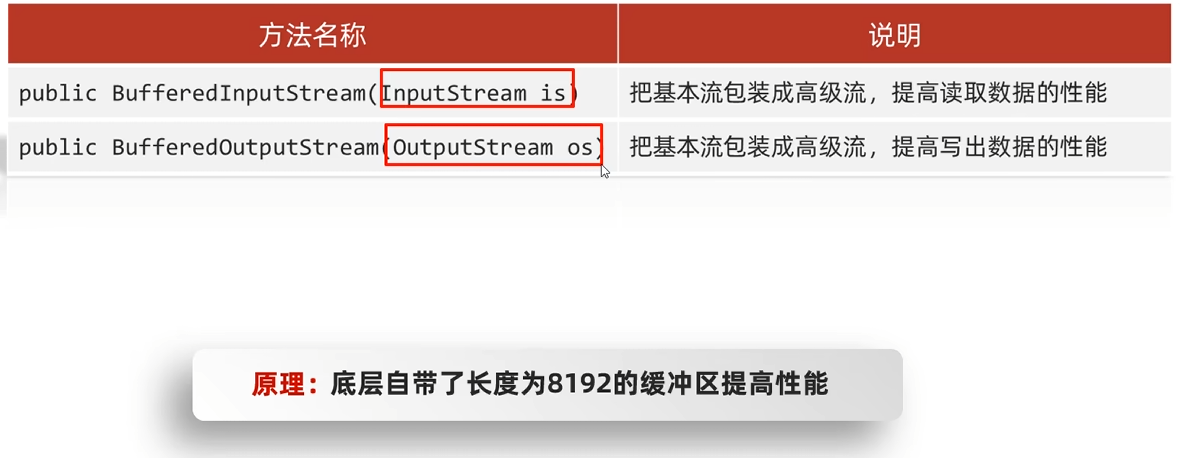
InputStream 和 OutputStream 的子类都可以
BufferedInputStream 和 BufferedOutStream包装
public class Main {
    public static void main(String[] args){

        FileInputStream fis = null;
        FileOutputStream fos = null;
        BufferedInputStream  bi = null;
        BufferedOutputStream bo = null;

        try {
            fis = new FileInputStream("e:\\a.txt");
            fos = new FileOutputStream("d:\\a.txt");
            //就是包装一次,多一个缓冲区,效率更高
            bi = new BufferedInputStream(fis);
            bo = new BufferedOutputStream(fos);
            int a = 0;
            while ((a = fis.read()) != -1 ) {
                fos.write(a);
            }

        }catch(IOException e) {
            e.printStackTrace();
        }finally {
            //一般不直接抛出去,因为直接跑出去,通道关闭不了了
            try {
                if (bo != null) {
                    bo.close();
                }
                if (bi != null) {
                    bi.close();
                }
            } catch (IOException e) {
                throw new RuntimeException(e);
            }
        }
    }
}
释放资源释放外层就就行,底层会自动释放内层流
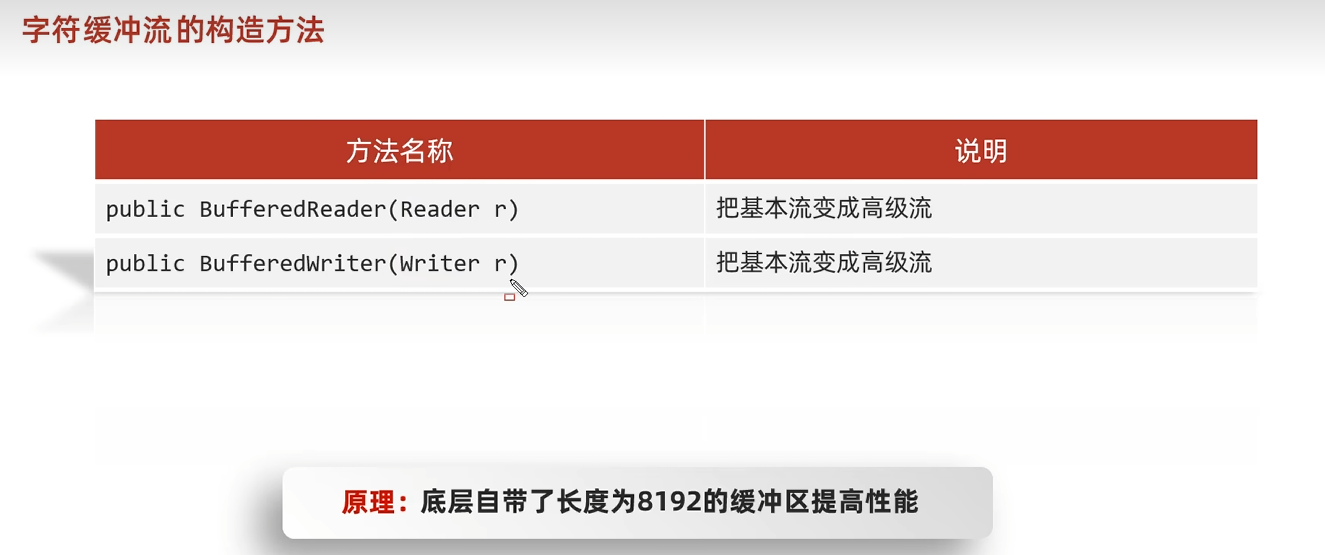
BufferedReader 与 BufferedWriter (字符写出读取缓冲流)
public class Main {
    public static void main(String[] args){

        try(BufferedWriter bw = new BufferedWriter(new FileWriter("d:\\a.txt"));
            BufferedReader br = new BufferedReader(new FileReader("e:\\a.txt"))) {

            String line;
            //readline一次读一整行,遇到回车结束,不会把回车换行读到内存中
            while ((line = br.readLine()) != null) {
                bw.write(line);
            }

        } catch (IOException e) {
            throw new RuntimeException(e);
        }

    }
}
Buffered缓冲流原理
第一次 read 的时候全部读进缓冲区,b 作为中间者,不断运输数据,到另一个缓冲区,另一个缓冲区满了或flush或close,才推出去
这两个缓冲区不一样的
字符流自带缓冲区了,所以提升不大,就是多了两个方法
InputStreamReader 与 outputStream(转换流)
代码编码 和 被读取的文本文件的编码是不一致的,使用字符流读取文本文件时就会出现乱码,这个时候可以用转化流解决
InputStreamReader (字节转字符读取流)
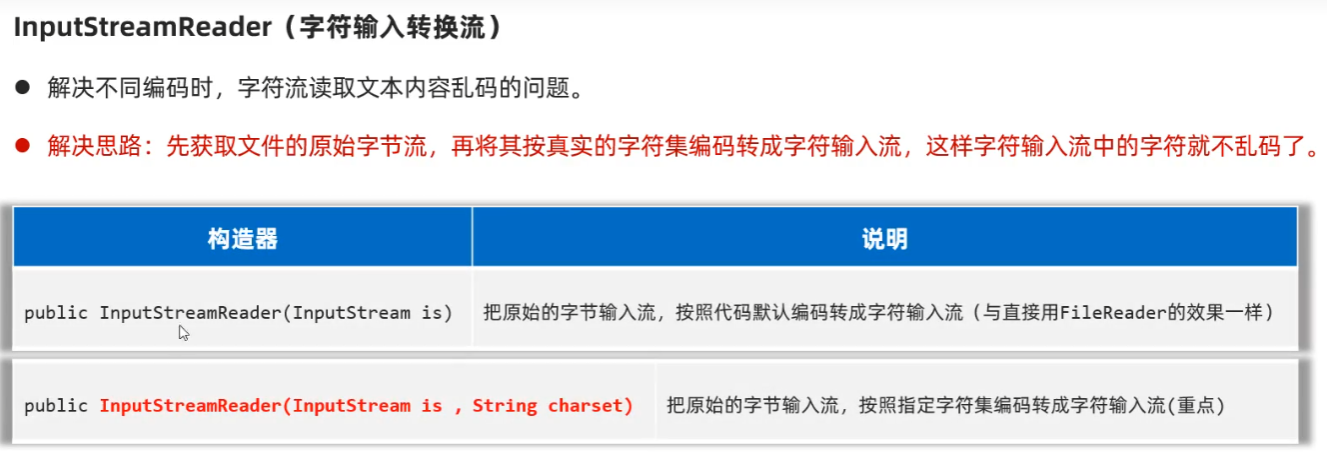
假如 文件是 GBK 编码,你编译器是 UTF-8编码,你读取的时候可以用转换流指定 GBK 编码读进来
public class Main {
    public static void main(String[] args){

            //1.得到文件的原始字节流 (GBK形式)
        try(InputStream is = new FileInputStream("e:\\a.txt");
            //2.按照原始的字节输入流按照指定的字符集编码转换成字符输入流
            InputStreamReader isr = new InputStreamReader(is, "gbk");
            //3.把字符输入流包装成缓冲字符输入流
            BufferedReader br = new BufferedReader(isr);) {

            String line;
            while ((line = br.readLine()) != null) {
                System.out.println(line);
            }


        } catch (IOException e) {
            throw new RuntimeException(e);
        }

    }
}
OutputStreamWriter (字节转字符写出流)
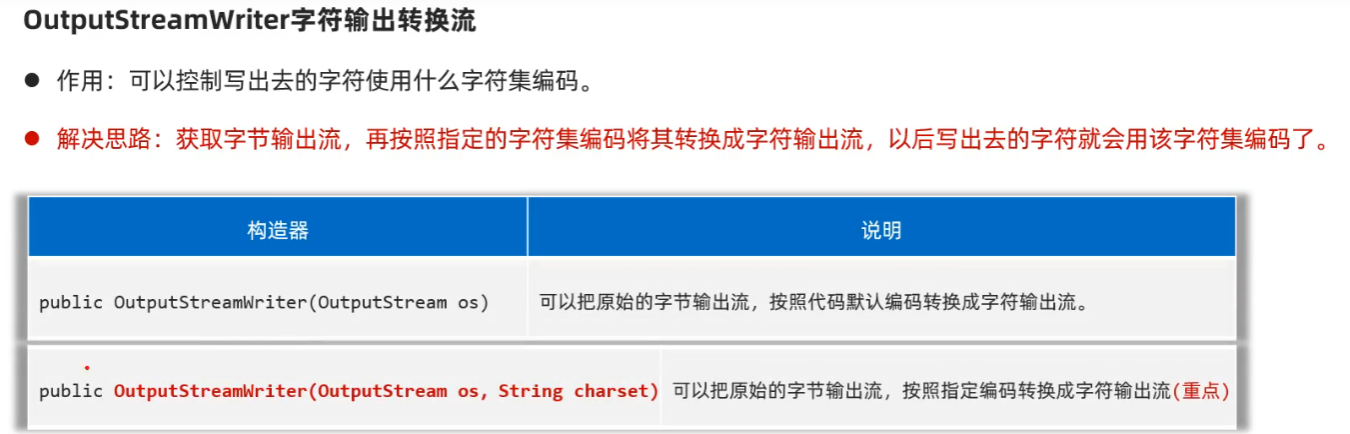
要控制写出去的字符使用自定义字符集编码
- 使用 String 提供的 getBytes 方法解决
String data = "你好 abc"
byte[] bytes = data.getBytes("gbk);
- 使用 字符写出转换流 实现
思路:获取字节输出流,再按照指定的字符集编码将其转换成字符输出流,以后写出去的字符就会用该字符集编码了
简单来说就是:假如 文件是 GBK 编码,你编译器是 UTF-8编码,写出的时候可以通过转换流这个桥梁用 GBK编码写出去
public class Main {
    public static void main(String[] args){

        //指定写出去的编码
        //1. 创建一个文件字节输出流
        try(FileOutputStream fs = new FileOutputStream("d:\\a.txt");
            //2. 把原始的字节输出流,按照指定的字符集编码转换成字符输出转化流
            OutputStreamWriter os = new OutputStreamWriter(fs, "GBK");
            //3. 把字符输出流包装成缓冲字符输出流
            BufferedWriter br = new BufferedWriter(os);) {

            br.write("你好世界");

        } catch (IOException e) {
            throw new RuntimeException(e);
        }
    }
}
ObjectOutputStream 和 ObjectInputStream (序列化与反序列化流)
序列化:保存数据时,保存数据的值和数据类型
反序列化:回复数据的值和数据类型
之前都是保存值
可以把java中的对象写到本地文件中
ObjectOutputStream (序列化)
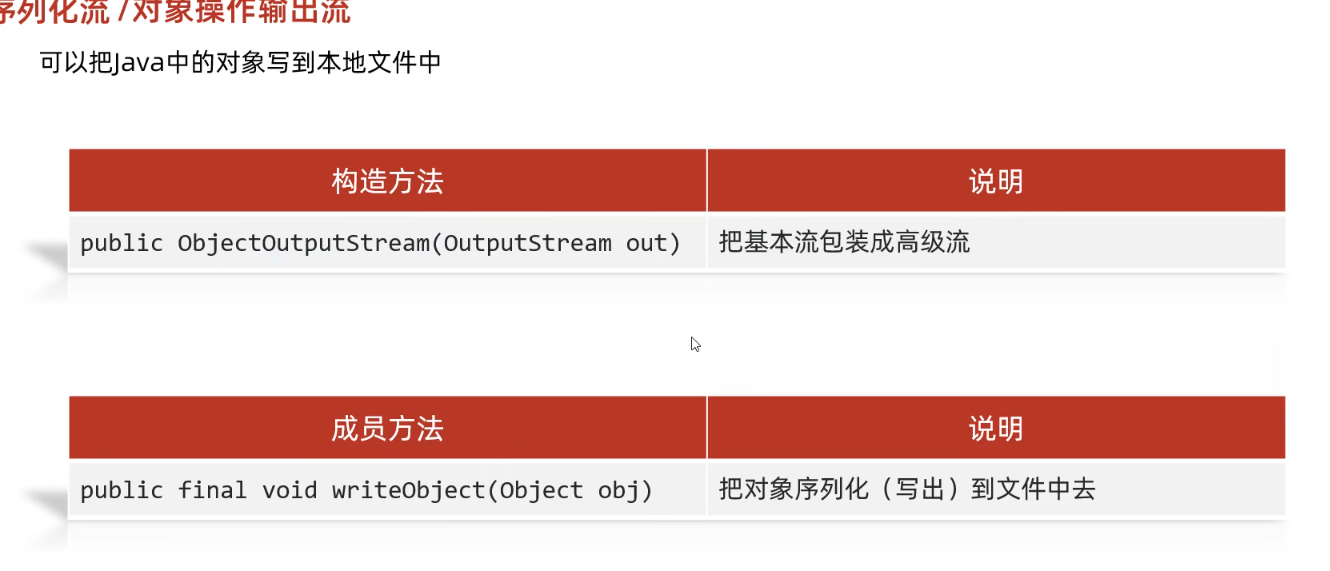
public class Main {
    public static void main(String[] args){

        Dog dog = new Dog("小张", 2);

        //用 dat后缀是标准格式
        try(ObjectOutputStream os = new ObjectOutputStream(new FileOutputStream("e:\\a.dat"));) {
            os.writeObject(dog);
        }catch (IOException e) {
            e.printStackTrace();
        }

    }
}

//如果需要序列化某个类对象,必须实现 Serializable(表示接口)
class Dog implements Serializable {
    private String name;
    private int age;

    //序列化的版本号,可以提高兼容性
    private static final long seriaVersionUID = 1L;

    public Dog(String name, int age) {
        this.name = name;
        this.age = age;
    }
	 @Override
    public String toString() {
        return "Dog{" +
                "name='" + name + '\'' +
                ", age=" + age +
                '}';
    }

}
ObjectInputStream (反序列化)
readObject() 读到末尾继续读抛出 EOFException异常
如果读不到数据会堵塞,直到有数据可读,或发生异常
public class Main {
    public static void main(String[] args){

        Dog dog = new Dog("小张", 2);

        //用 dat后缀是标准格式
        try(ObjectInputStream is = new ObjectInputStream(new FileInputStream("e:\\a.dat"));) {
            //反序列化
            Object obj = is.readObject();
            System.out.println(obj.toString());
        }catch (Exception e) {
            e.printStackTrace();
        }

    }
}

//如果需要序列化某个类对象,必须实现 Serializable(表示接口)
class Dog implements Serializable {
    private String name;
    private int age;

    //序列化的版本号,可以提高兼容性
    private static final long seriaVersionUID = 1L;

    public Dog(String name, int age) {
        this.name = name;
        this.age = age;
    }

    @Override
    public String toString() {
        return "Dog{" +
                "name='" + name + '\'' +
                ", age=" + age +
                '}';
    }
}
Serializable 接口相关
只有实现了 Serializable 才能序列化,这个接口时标志接口,里面什么都没有。不序列化的话会抛出 NotSerializableException 异常
为什么序列化流写到文件中的数据是不能修改的,一旦修改就无法再次读回来了
这是因为序列化对象后,会给一个唯一的版本号,你后面修改了这个类,版本号直接不一样了,肯定无法读回来,所以我们一般会给类添加 private static final long seriaVersionUID,你每次修改版本号就一样了
如果不想某个属性序列化该怎么办
可以用 transient 修饰这个对象
细节
- 读写顺序要一致
- 要求实现序列化和反序列化对象,需要实现 Serializable
- 序列化的类中建议添加 SerialVersionUID,为了提高版本的兼容性
- 序列化对象时,默认将里面所有属性都进行序列化,但除了static 或 transient 修饰的成员
- 序列化对象时,要求里面属性的类型也需要实现序列化接口
- 序列化具备可继承性,也就是如果某类已经实现了序列化,则它的所有子类也已经默认实现了序列化
PrintStream 与 PrintWriter (字节与字符打印流)
只有输出流,就是只能写,不能读
写什么就原样输出什么
PrintStream (字节打印流)
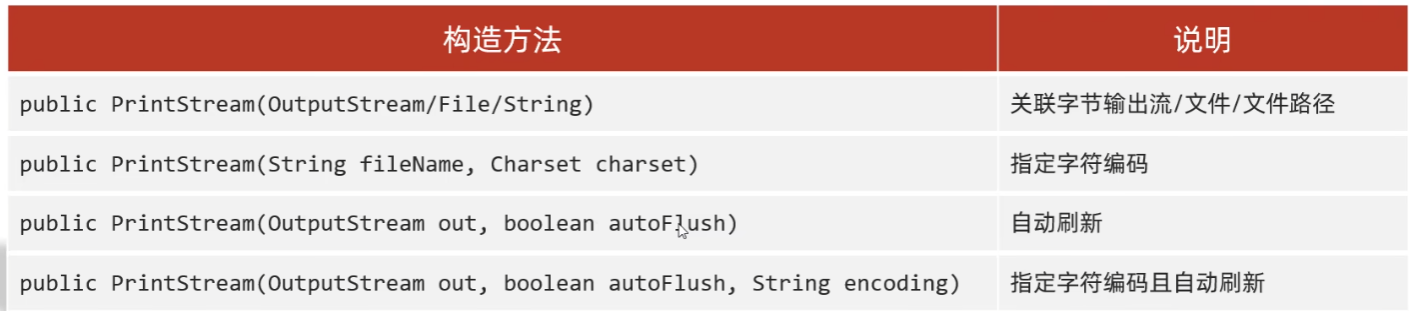
底层没有缓冲区,开不开自动刷新都一样
public class Main {
    public static void main(String[] args){

        //1. 创建字节打印流的对象
        try(PrintStream ps = new PrintStream(new FileOutputStream("e:\\a.txt"), true, "UTF-8");) {
            //2. 写出数据到 a.txt 中
            ps.println(97); //写出 + 自动刷新 + 自动换行
            ps.print(true);
            ps.printf("%d", 1);

        } catch (IOException e) {
            throw new RuntimeException(e);
        }

    }
}
PrintWriter (字符打印流)
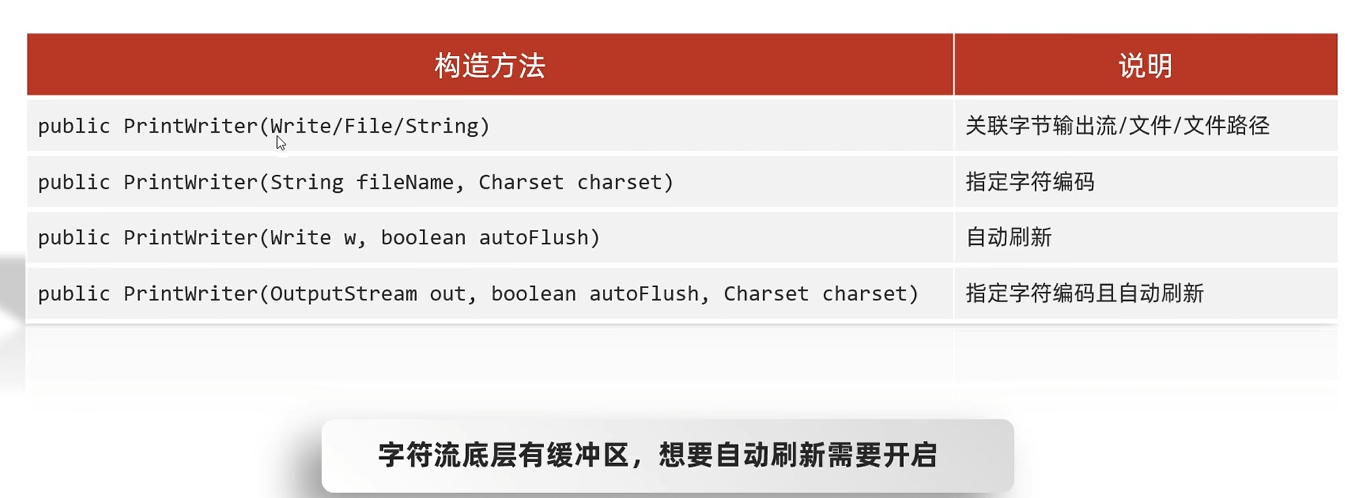
因为底层有缓冲区,所以要记得刷新
第四个构造 jdk9以上 才有
public class Main {
    public static void main(String[] args){

        //1. 创建字节打印流的对象
        try(OutputStream outputStream = new FileOutputStream("e:\\a.txt");
            Writer writer = new OutputStreamWriter(outputStream, Charset.forName("UTF-8"));
            PrintWriter pw = new PrintWriter(writer, true) ) {
            //2. 写出数据到 a.txt 中
            pw.println(97); //写出 + 自动刷新 + 自动换行
            pw.print(true);
            pw.printf("%d", 1);

        } catch (IOException e) {
            throw new RuntimeException(e);
        }

    }
}
System 类相关
Java里面已经定义好了 System 类,虚拟机会自动创建
里面有 静态变量 PrintStream out = null 默认指向控制台
public class Main {
    public static void main(String[] args){

        //获取打印流对象,此打印流在虚拟机启动的时候由虚拟机创建,默认指向控制台
        //特殊的打印流:系统中的标准输出流
        PrintStream ps = System.out;
        ps.println("123");

    }
}
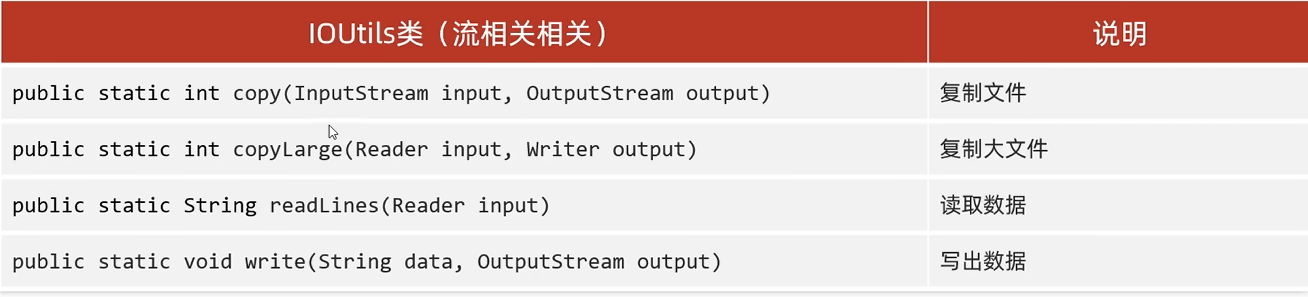
Commons-io 工具包
提高 IO 流的开发效率
使用步骤
- 在项目中创建一个文件夹: lib
- 将 jar 包赋值粘贴到 lib 文件夹
- 右键点击 jar 包,选择 Add as Libray
- 在类中导包使用
常用方法

总结:
- 字节流写出写入读取多个字节 是用 byte 数组
- 字符流写出写入读取多个字符 使用 char 数组
- 字节流没有缓冲区,字符流有缓冲区,所以用 缓冲流 包装字节流提升比较大,字符流没啥提升但是多了两个特有的方法
Properties 类使用
底层是 Hashtable
专用用于读取配置文件的集合类
配置文件的格式:
key = 值
value = 值
K-V 不需要有空格,V 不需要用引号引起来,默认类型位String
常用方法
- load(InputStream inStream): 加载配置文件的 k-v 到 Properties 对象
- list: 将数据显示到指定设备
- getProperty(key): 根据 k 获取 v
- setProperty(key, value):设置 k-v 到 Properties 对象
- store(outputstream out, string comments):将 Properties 中的 k-v 存储到配置文件,在 idea 中,保存信息到配置文件,如果含有中文会存储 unicode 码
public class test {
    public static void main(String[] args) throws IOException {

        //1. 创建 properties 对象
        Properties properties = new Properties();

        //2. 加载指定配置文件
        properties.load(new FileReader("e:\\mysql.properties"));

        //3. 把 k-v 显示到控制台
        properties.list(System.out);

        //4. 根据 key 获取对应的值
        String user = properties.getProperty("user");
        String pwd = properties.getProperty("pwd");
        System.out.println("用户名是:" + user);
        System.out.println("密码是:" + pwd);


    }
}
创建新配置文件
public class test {
    public static void main(String[] args) throws IOException {

        //使用 properties 来创建配置文件,修改配置文件内容
        //1. 如果该文件没有这个key,就是创建
        //2. 如果有这个 key 就是覆盖
        Properties properties = new Properties();
        //创建
        properties.setProperty("charest", "utf8");
        properties.setProperty("user", "汤姆");
        properties.setProperty("pwd", "abc111");

        //将 k-v 存储到文件中
        properties.store(new FileOutputStream("e:\\mysql2.Properties"), null);
        System.out.println("保存配置文件成功");


    }
}


 995
995


 被折叠的 条评论
为什么被折叠?
被折叠的 条评论
为什么被折叠?
 到【灌水乐园】发言


