


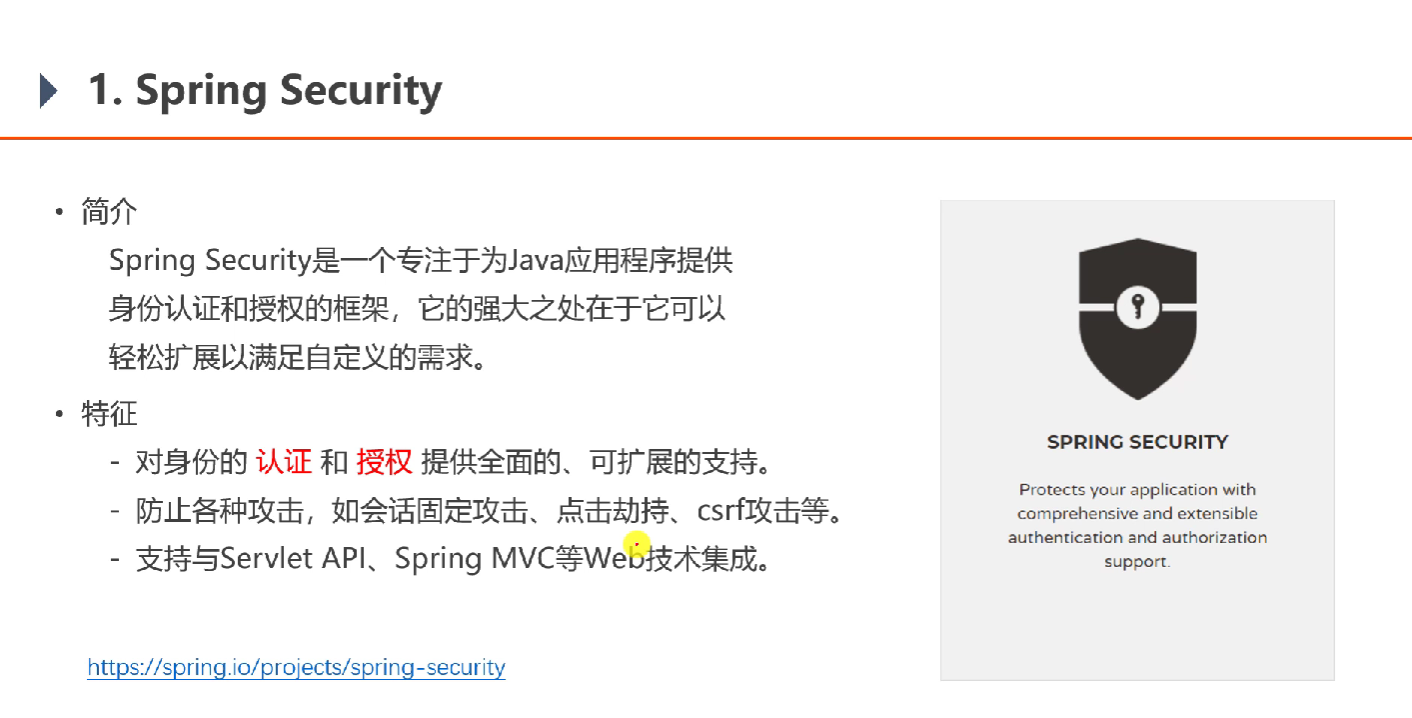
7.1 Spring Security

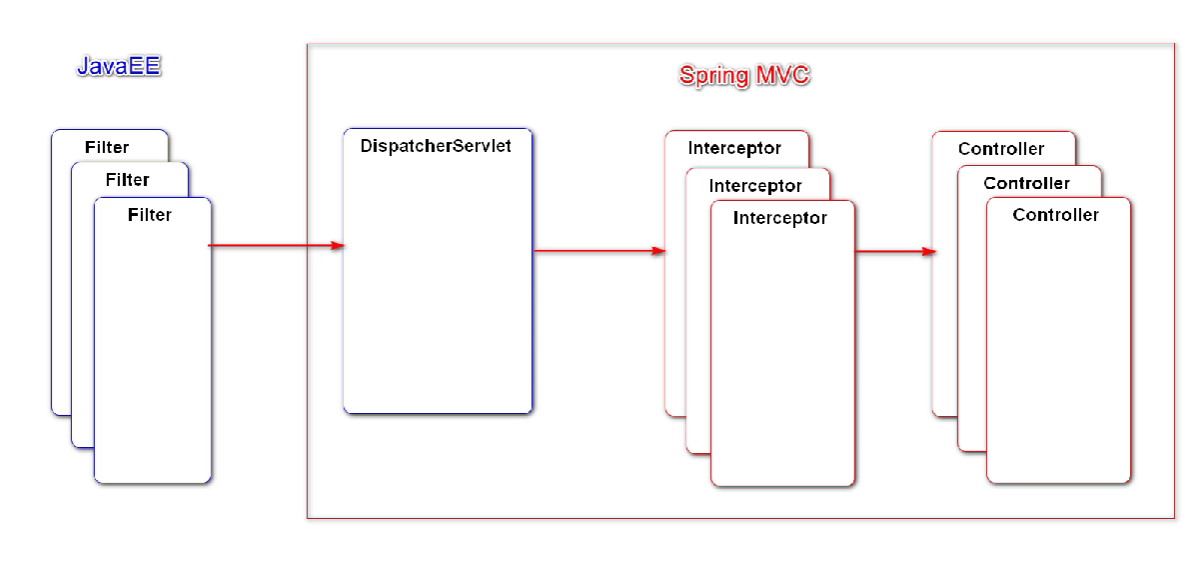
Spring Security 底层就是Filter
新创建一个 springsecuritydemo模块 先来学习一下 Spring Security
引入依赖
<dependency>
    <groupId>org.springframework.boot</groupId>
    <artifactId>spring-boot-starter-security</artifactId>
</dependency>
一引入这个包自动就会产生效果,并生成自动的登录页面和账号、密码,账号是 user,项目一启动会在控制台打印出密码。我们在使用的时候肯定不是使用它的登录界面而是使用自己的登录界面并且使用的应该也是自己数据库的账号、密码,那我们应该怎么做呢?我们开发的时候是在业务层,想做认证、授权应该是在业务层以及数据访问层做一些处理。
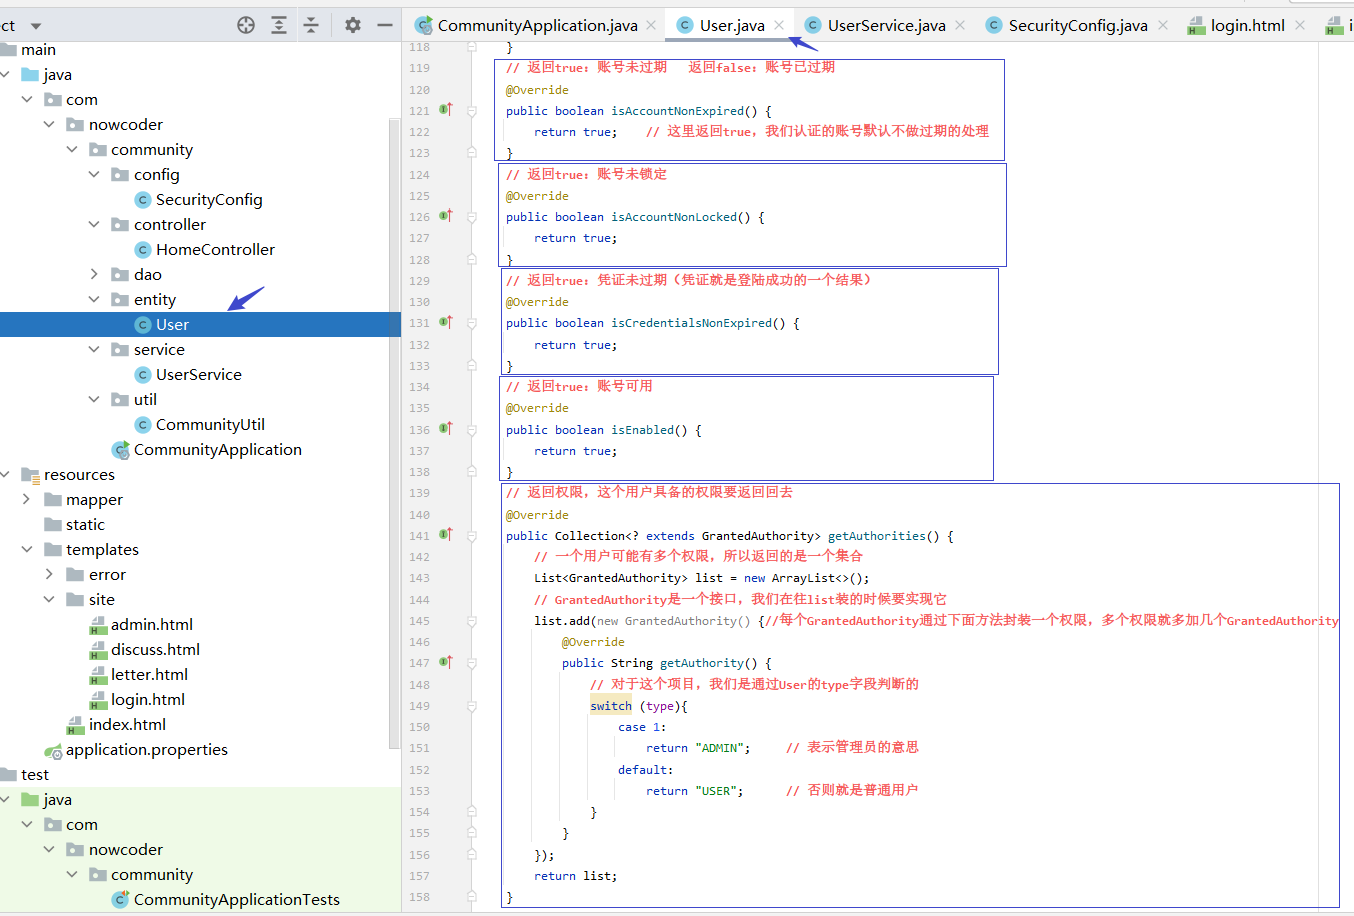
首先要处理的是User实体类,我们在做授权的时候,当前的User具备哪些权限,怎么体现,体现在 实体类User 的 Type 属性上(0-普通用户,1-超级管理员,2-版主),这个 Type字段就代表当前用户具备哪些权限了,当然我们这个比较简单,一个用户只能有一类权限,但是将来在用Spring Security做授权的时候,我们要的不是这个Type,我们要的是字符串,这个字符串能够明确表达你的权限的含义,所以我们需要定义出来这样的字符串,我们通常让User这个实体类实现UserDetails接口,这个接口中规定了一些方法需要去实现,
public class User implements UserDetails {

    private int id;
    private String username;
    private String password;
    private String salt;
    private String email;
    private int type;
    private int status;
    private String activationCode;
    private String headerUrl;
    private Date createTime;

		// 为了以免影响阅读体验,get、set。toString方法没有粘,但在开发时是有的

    // 返回true:账号未过期   返回false:账号已过期
    @Override
    public boolean isAccountNonExpired() {
        return true;    // 这里返回true,我们认证的账号默认不做过期的处理
    }
    // 返回true:账号未锁定
    @Override
    public boolean isAccountNonLocked() {
        return true;
    }
    // 返回true:凭证未过期(凭证就是登陆成功的一个结果)
    @Override
    public boolean isCredentialsNonExpired() {
        return true;
    }
    // 返回true:账号可用
    @Override
    public boolean isEnabled() {
        return true;
    }
    // 返回权限,这个用户具备的权限要返回回去
    @Override
    public Collection<? extends GrantedAuthority> getAuthorities() {
        // 一个用户可能有多个权限,所以返回的是一个集合
        List<GrantedAuthority> list = new ArrayList<>();
        // GrantedAuthority是一个接口,我们在往list装的时候要实现它
        list.add(new GrantedAuthority() {//每个GrantedAuthority通过下面方法封装一个权限,多个权限就多加几个GrantedAuthority
            @Override
            public String getAuthority() {
                // 对于这个项目,我们是通过User的type字段判断的
                switch (type){
                    case 1:
                        return "ADMIN";     // 表示管理员的意思
                    default:
                        return "USER";      // 否则就是普通用户
                }
            }
        });
        return list;
    }
}

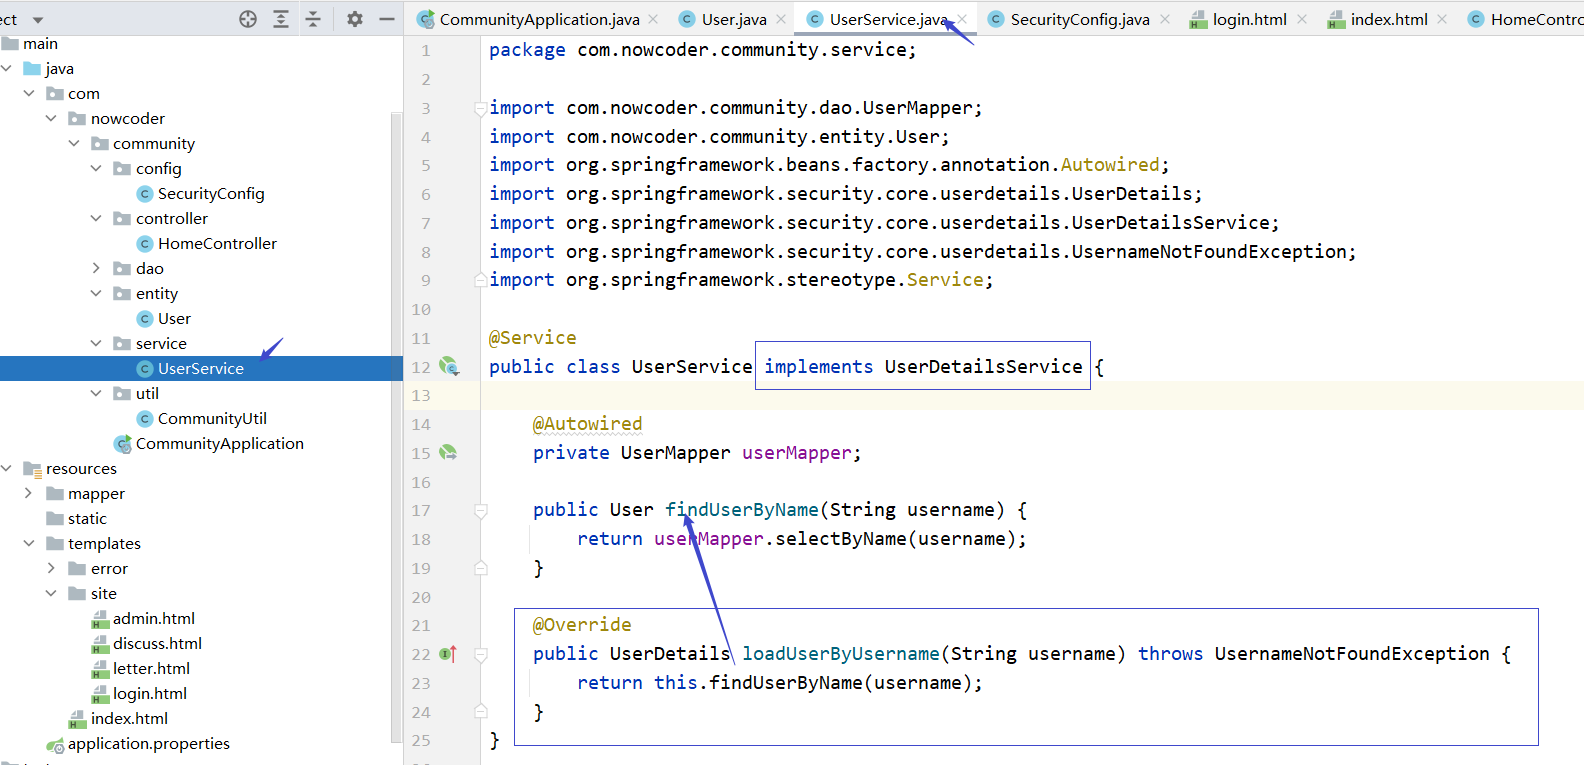
然后我们需要让UserService实现UserDetailsService接口,这个接口需要我们实现 loadUserByUsername() 根据用户名查用户方法,
@Service
public class UserService implements UserDetailsService {

    @Autowired
    private UserMapper userMapper;

    public User findUserByName(String username) {
        return userMapper.selectByName(username);
    }

    @Override
    public UserDetails loadUserByUsername(String username) throws UsernameNotFoundException {
        return this.findUserByName(username);
    }
}
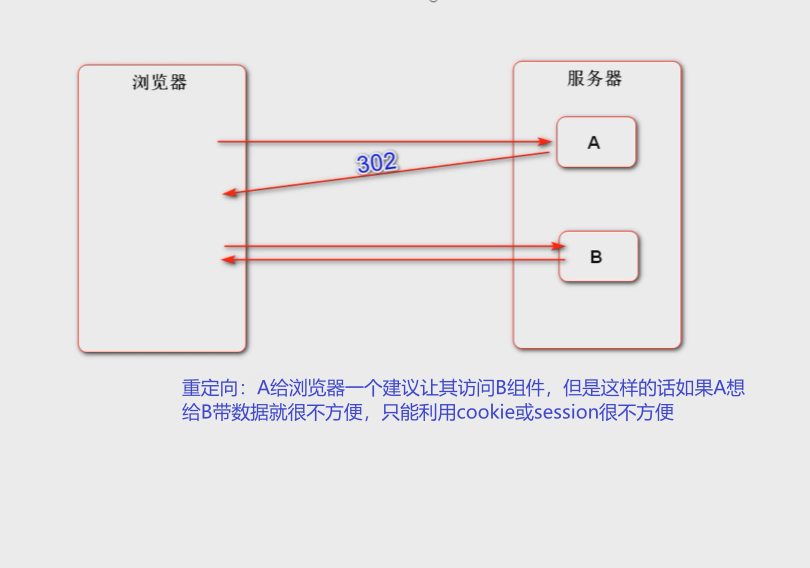
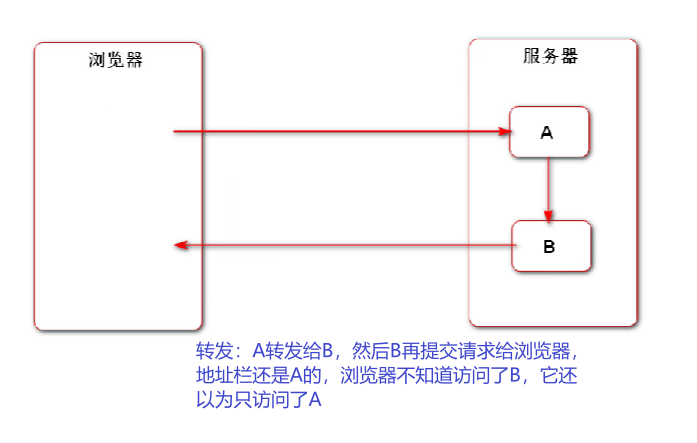
穿插一下转发和重定向的区别:
重定向
地址栏变成B的,A和B之间没有耦合
转发
地址栏还是A的,A和B之间有耦合
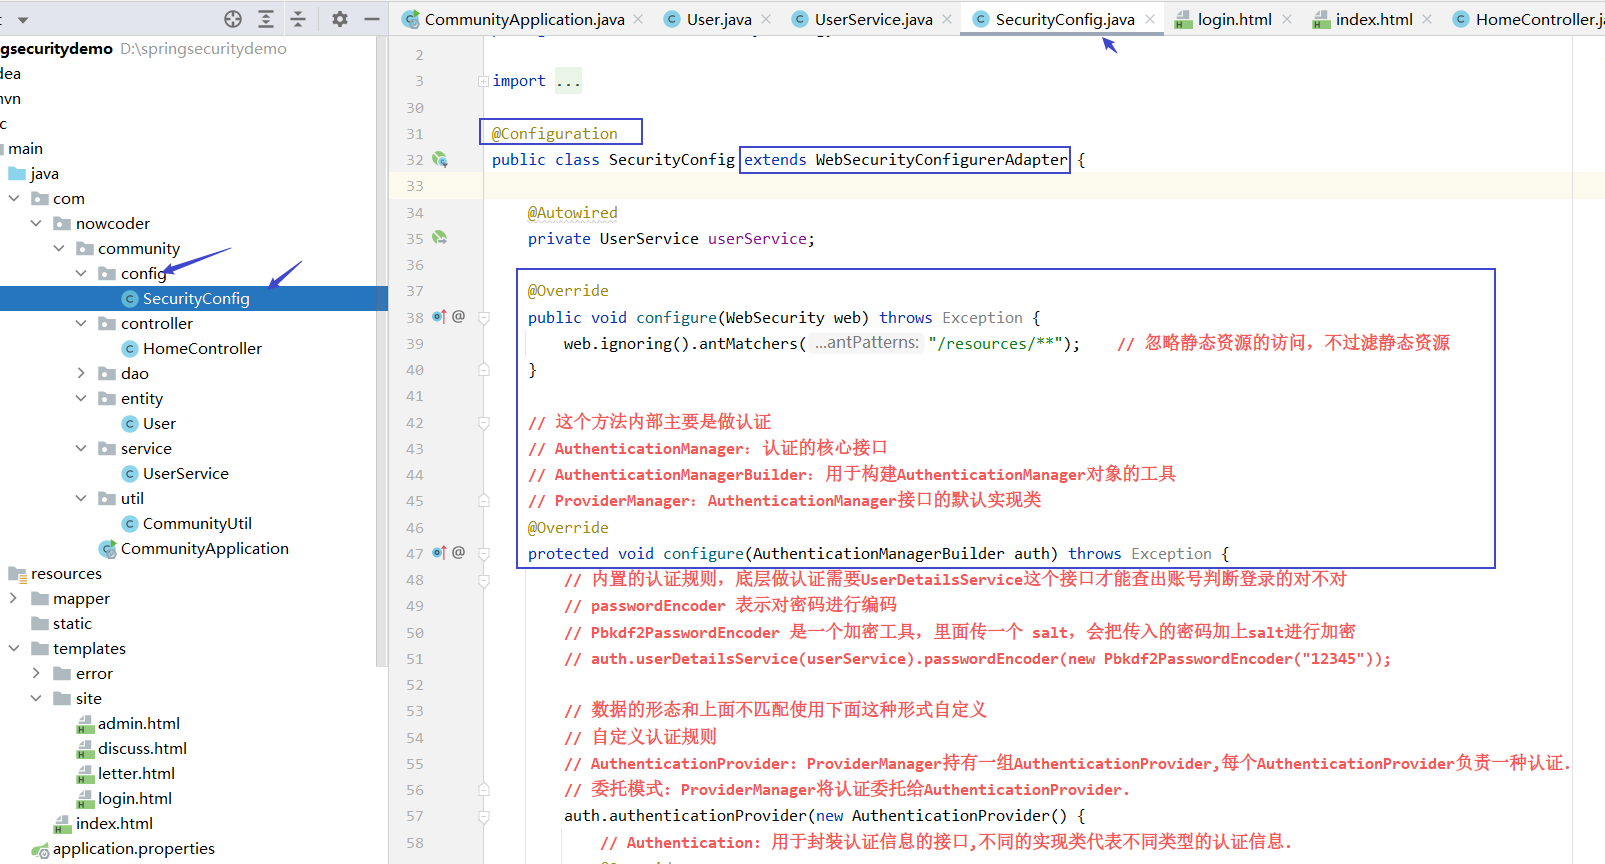
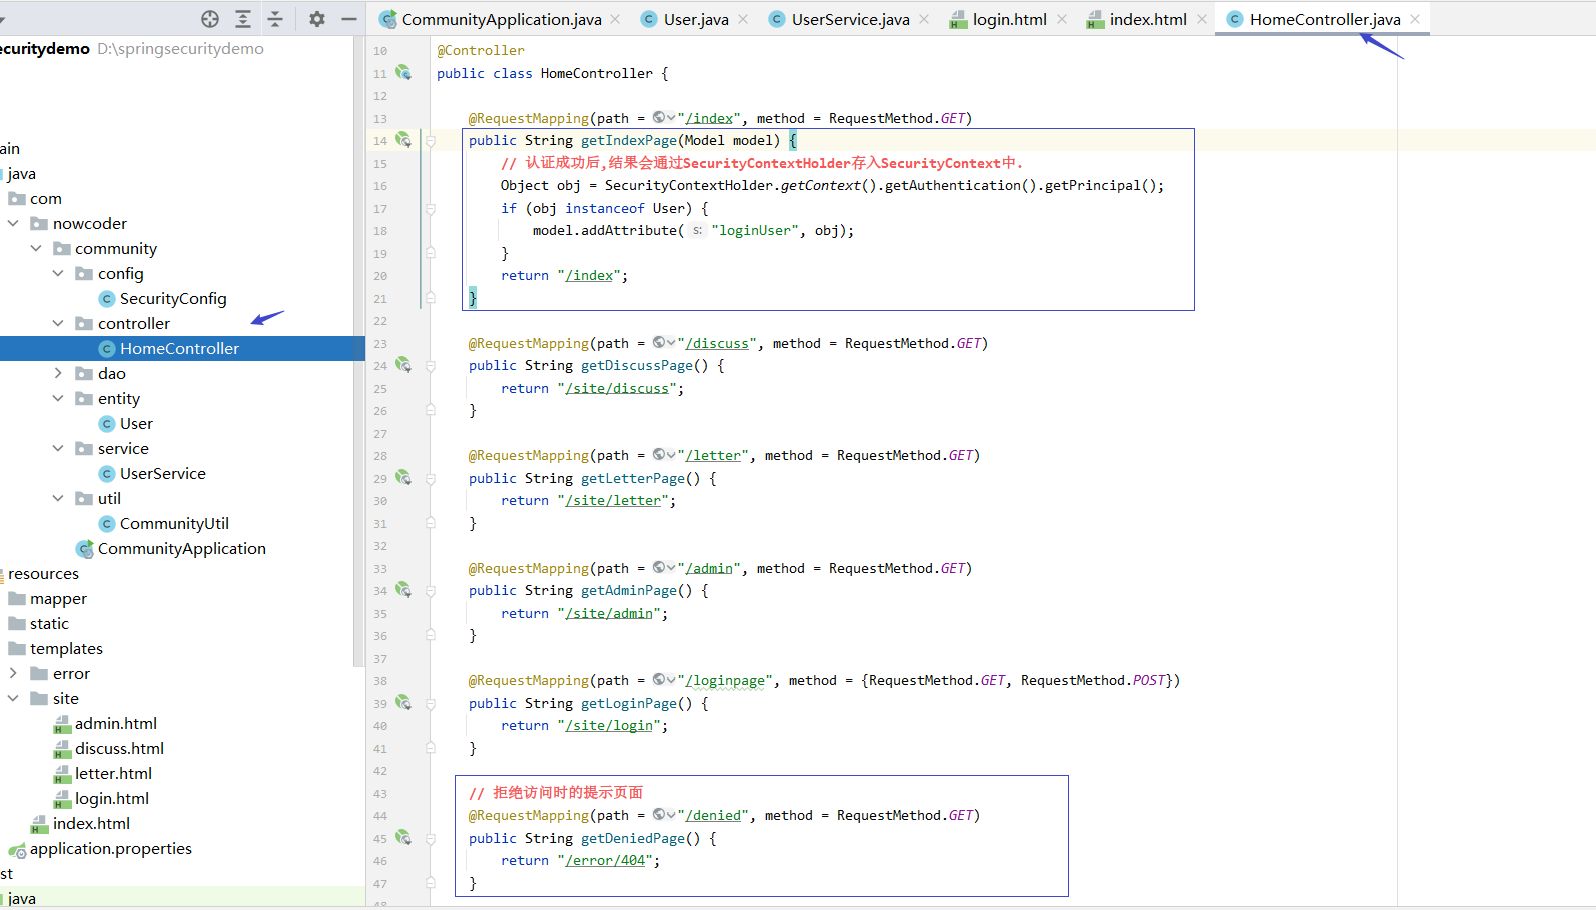
基本准备工作已经准备好了,下面就要利用Spring Security对整个系统进行认证以及授权,Spring Security并不需要我们去帖子、私信那些组件上挨个处理,它底层是基于Filter拦截大量的请求,我们只需要写一个类在一个类当中就能够解决所有的需求,也就是Spring Security的配置类,在这个类当中要注入UserService那个组件,因为 UserService实现了 UserDetailsService接口,而这个是Security底层要依赖的。在配的时候通常要重写它的三个方法,这三个方法都叫都叫configure,参数不一样,
@Configuration
public class SecurityConfig extends WebSecurityConfigurerAdapter {
@Autowired
private UserService userService;
@Override
public void configure(WebSecurity web) throws Exception {
web.ignoring().antMatchers("/resources/**"); // 忽略静态资源的访问,不过滤静态资源
}
// 这个方法内部主要是做认证
// AuthenticationManager:认证的核心接口
// AuthenticationManagerBuilder:用于构建AuthenticationManager对象的工具
// ProviderManager:AuthenticationManager接口的默认实现类
@Override
protected void configure(AuthenticationManagerBuilder auth) throws Exception {
// 内置的认证规则,底层做认证需要UserDetailsService这个接口才能查出账号判断登录的对不对
// passwordEncoder 表示对密码进行编码
// Pbkdf2PasswordEncoder 是一个加密工具,里面传一个 salt,会把传入的密码加上salt进行加密
// auth.userDetailsService(userService).passwordEncoder(new Pbkdf2PasswordEncoder("12345"));
// 数据的形态和上面不匹配使用下面这种形式自定义
// 自定义认证规则
// AuthenticationProvider: ProviderManager持有一组AuthenticationProvider,每个AuthenticationProvider负责一种认证.
// 委托模式: ProviderManager将认证委托给AuthenticationProvider.
auth.authenticationProvider(new AuthenticationProvider() {
// Authentication: 用于封装认证信息的接口,不同的实现类代表不同类型的认证信息.
@Override
public Authentication authenticate(Authentication authentication) throws AuthenticationException {
String username = authentication.getName();
String password = (String) authentication.getCredentials();
User user = userService.findUserByName(username);
if (user == null) {
throw new UsernameNotFoundException("账号不存在!");
}
password = CommunityUtil.md5(password + user.getSalt());
if (!user.getPassword().equals(password)) {
throw new BadCredentialsException("密码不正确!");
}
// principal: 主要信息; credentials: 证书; authorities: 权限;
return new UsernamePasswordAuthenticationToken(user, user.getPassword(), user.getAuthorities());
}
// 当前的AuthenticationProvider支持哪种类型的认证.
// 返回当前的接口支持的是哪种认证
@Override
public boolean supports(Class<?> aClass) {
// UsernamePasswordAuthenticationToken: Authentication接口的常用的实现类.代表的是账号密码认证
return UsernamePasswordAuthenticationToken.class.equals(aClass);
}
});
}
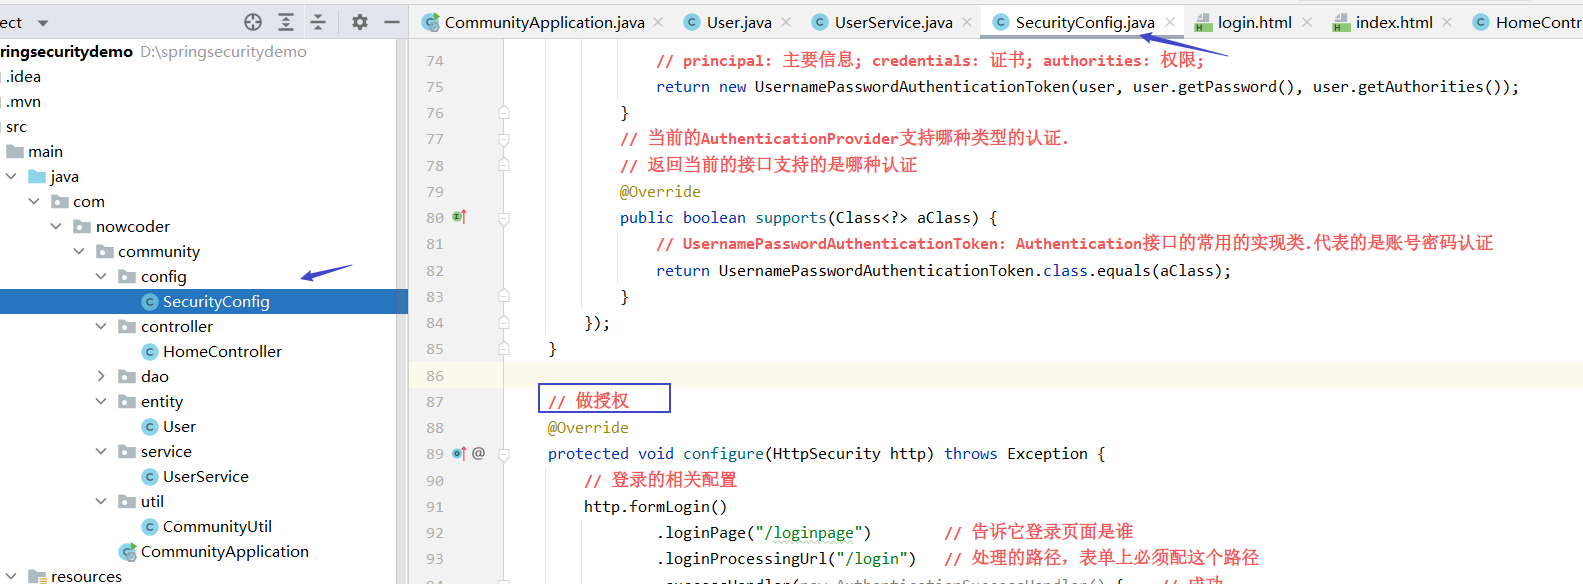
// 做授权
@Override
protected void configure(HttpSecurity http) throws Exception {
// 登录的相关配置
http.formLogin()
.loginPage("/loginpage") // 告诉它登录页面是谁
.loginProcessingUrl("/login") // 处理的路径,表单上必须配这个路径
.successHandler(new AuthenticationSuccessHandler() { // 成功
@Override
public void onAuthenticationSuccess(HttpServletRequest request, HttpServletResponse response, Authentication authentication) throws IOException, ServletException {
response.sendRedirect(request.getContextPath() + "/index"); // 成功的话跳转到首页
}
})
.failureHandler(new AuthenticationFailureHandler() { // 失败
@Override
public void onAuthenticationFailure(HttpServletRequest request, HttpServletResponse response, AuthenticationException e) throws IOException, ServletException {
request.setAttribute("error", e.getMessage()); // 失败的话返回给页面一些错误提示
request.getRequestDispatcher("/loginpage").forward(request, response);// 失败的话还回到登录页面
}
});
// 退出时的相关配置
http.logout()
.logoutUrl("/logout")
.logoutSuccessHandler(new LogoutSuccessHandler() {
@Override
public void onLogoutSuccess(HttpServletRequest request, HttpServletResponse response, Authentication authentication) throws IOException, ServletException {
response.sendRedirect(request.getContextPath() + "/index");
}
});
// 授权配置:拥有哪个权限能够访问哪个路径
http.authorizeRequests()
.antMatchers("/letter").hasAnyAuthority("USER", "ADMIN")
.antMatchers("/admin").hasAnyAuthority("ADMIN")
.and().exceptionHandling().accessDeniedPage("/denied"); //访问哪个路径:处理权限不匹配或没有权限的错误
// 增加Filter,处理验证码
http.addFilterBefore(new Filter() {
@Override
public void doFilter(ServletRequest servletRequest, ServletResponse servletResponse, FilterChain filterChain) throws IOException, ServletException {
HttpServletRequest request = (HttpServletRequest) servletRequest;
HttpServletResponse response = (HttpServletResponse) servletResponse;
if (request.getServletPath().equals("/login")) {
String verifyCode = request.getParameter("verifyCode");
if (verifyCode == null || !verifyCode.equalsIgnoreCase("1234")) {
request.setAttribute("error", "验证码错误!");
request.getRequestDispatcher("/loginpage").forward(request, response);
return;
}
}
// 让请求继续向下执行,走到下个Filter,如果下面没有Filter就走到Servlet
filterChain.doFilter(request, response);
}
}, UsernamePasswordAuthenticationFilter.class); // 在哪个Filter之前加
// 记住我
http.rememberMe()
.tokenRepository(new InMemoryTokenRepositoryImpl()) // 把记到内存里
.tokenValiditySeconds(3600 * 24) // 过期时间,单位:秒
.userDetailsService(userService); // 得传UserServiceDetail(实现类也行)
}
}
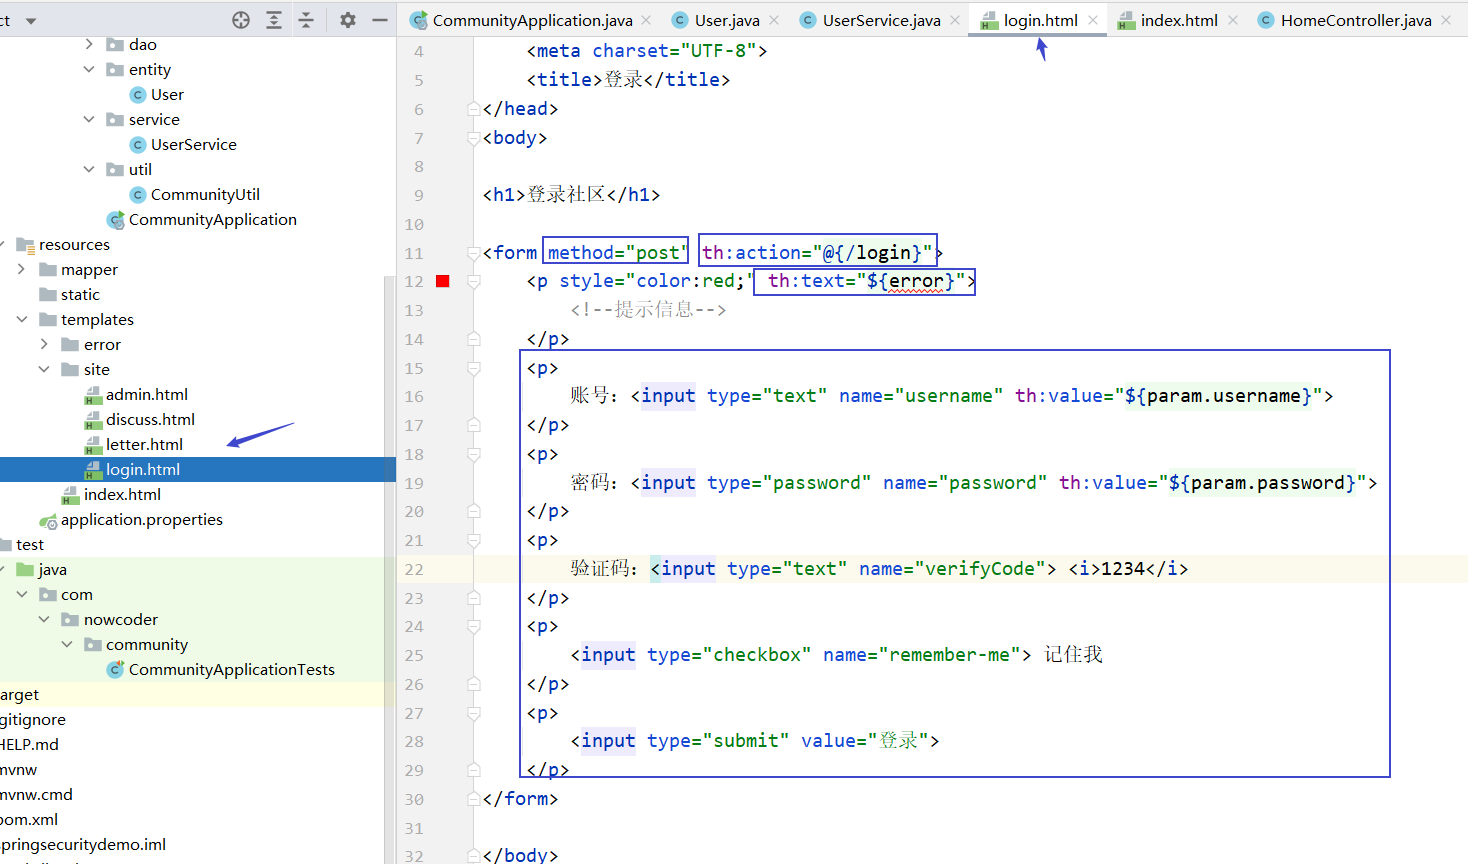
login.html:
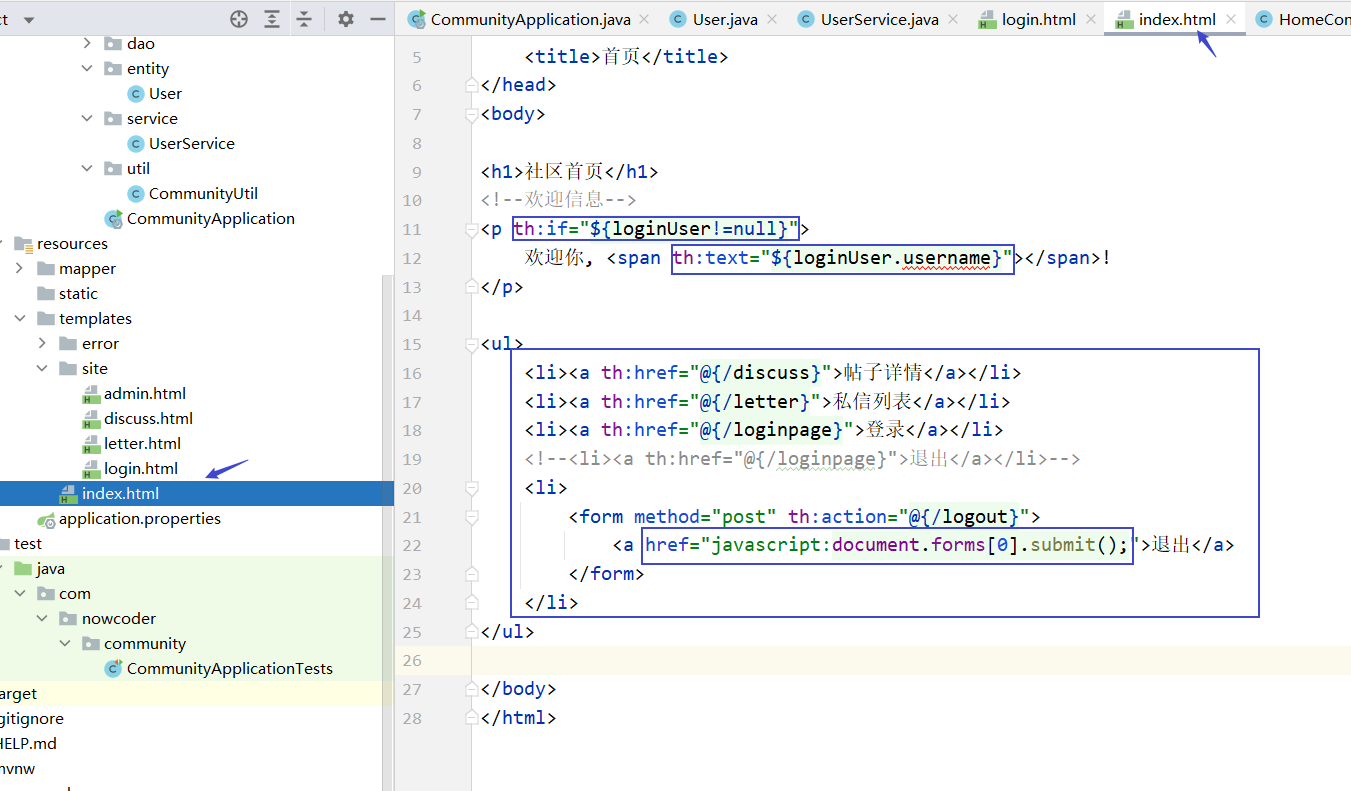
index.html
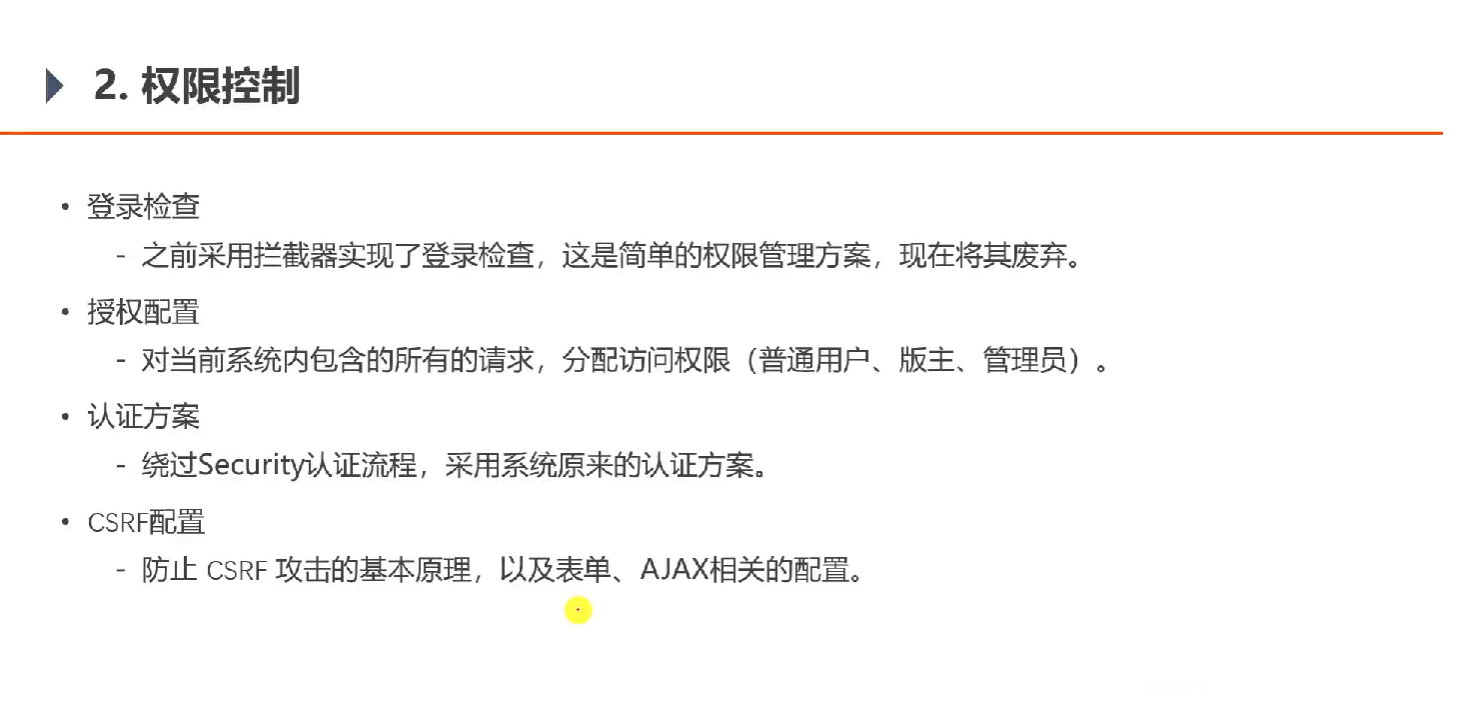
7.2 权限控制
引入 Spring Security 依赖
<dependency>
   <groupId>org.springframework.boot</groupId>
   <artifactId>spring-boot-starter-security</artifactId>
</dependency>
登录检查
废弃之前采用的登录检查拦截器(不需要删除拦截器类,只要让其配置不生效即可)
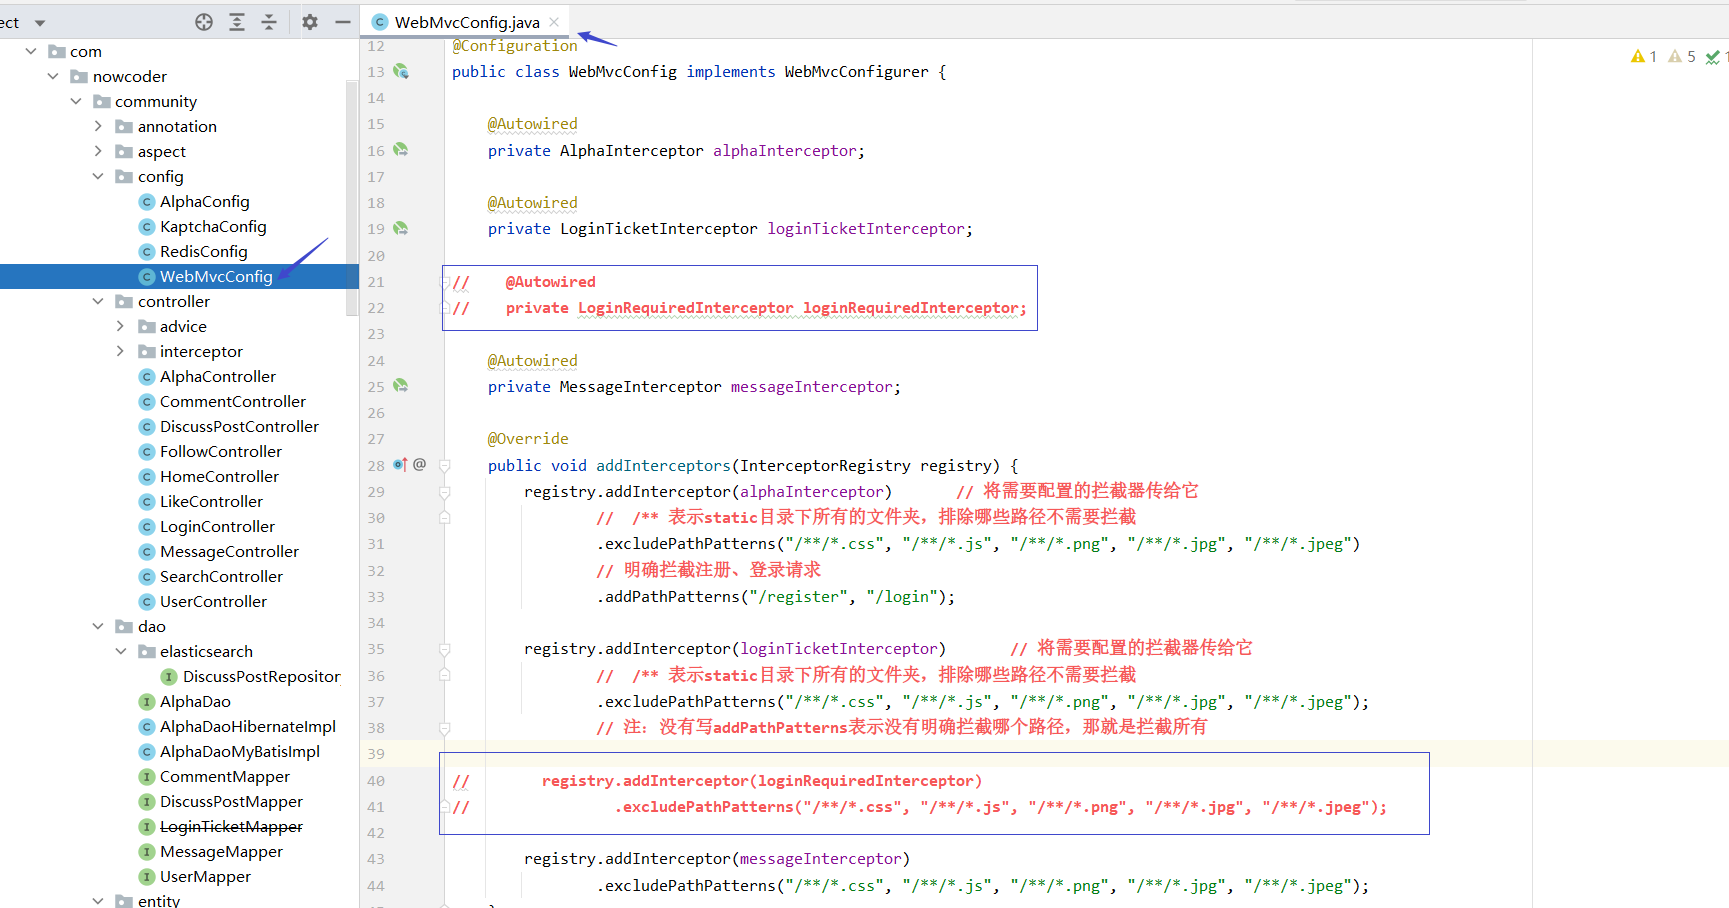
授权配置
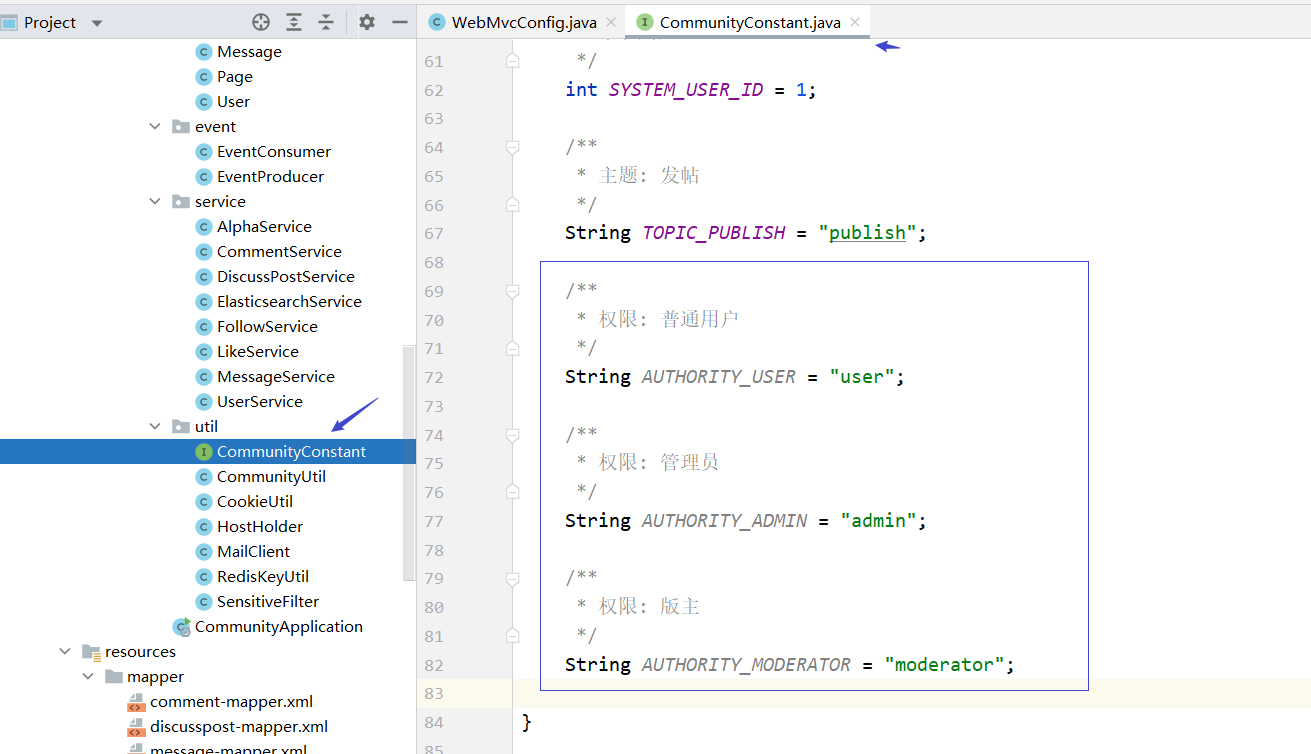
现在常量接口里增加几个常量(表示权限,下面好使用)
CommunityConstant
/**
 * 权限: 普通用户
 */
String AUTHORITY_USER = "user";

/**
 * 权限: 管理员
 */
String AUTHORITY_ADMIN = "admin";

/**
 * 权限: 版主
 */
String AUTHORITY_MODERATOR = "moderator";
然后在 HomeController 里处理一下没有权限跳转到 404 界面

接下来对 Security 做授权相关的配置
SecurityConfig
@Configuration
public class SecurityConfig extends WebSecurityConfigurerAdapter implements CommunityConstant {
@Override
public void configure(WebSecurity web) throws Exception {
web.ignoring().antMatchers("/resources/**"); // 忽略对子静态资源的过滤(拦截)
}
@Override
protected void configure(HttpSecurity http) throws Exception {
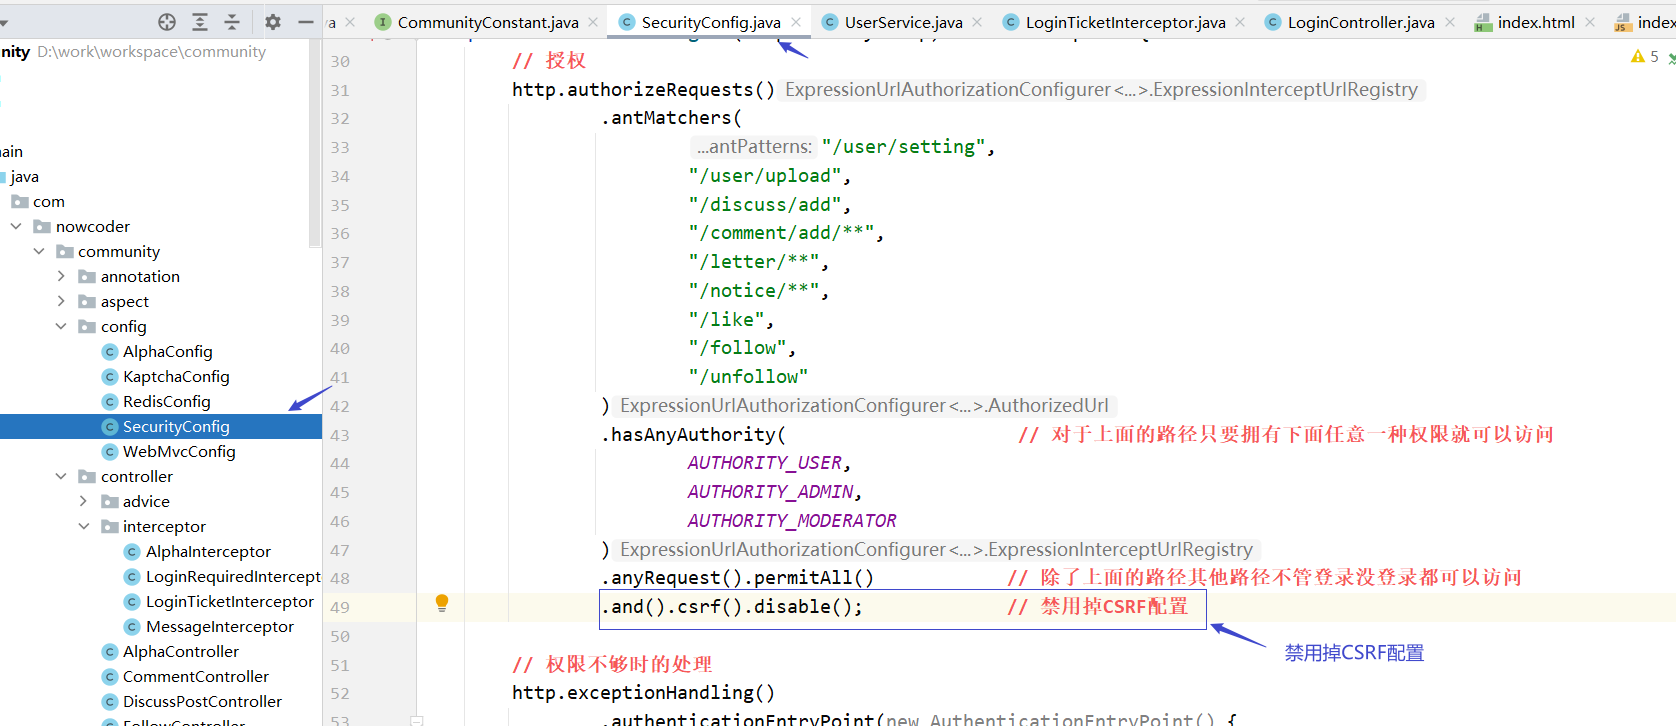
// 授权
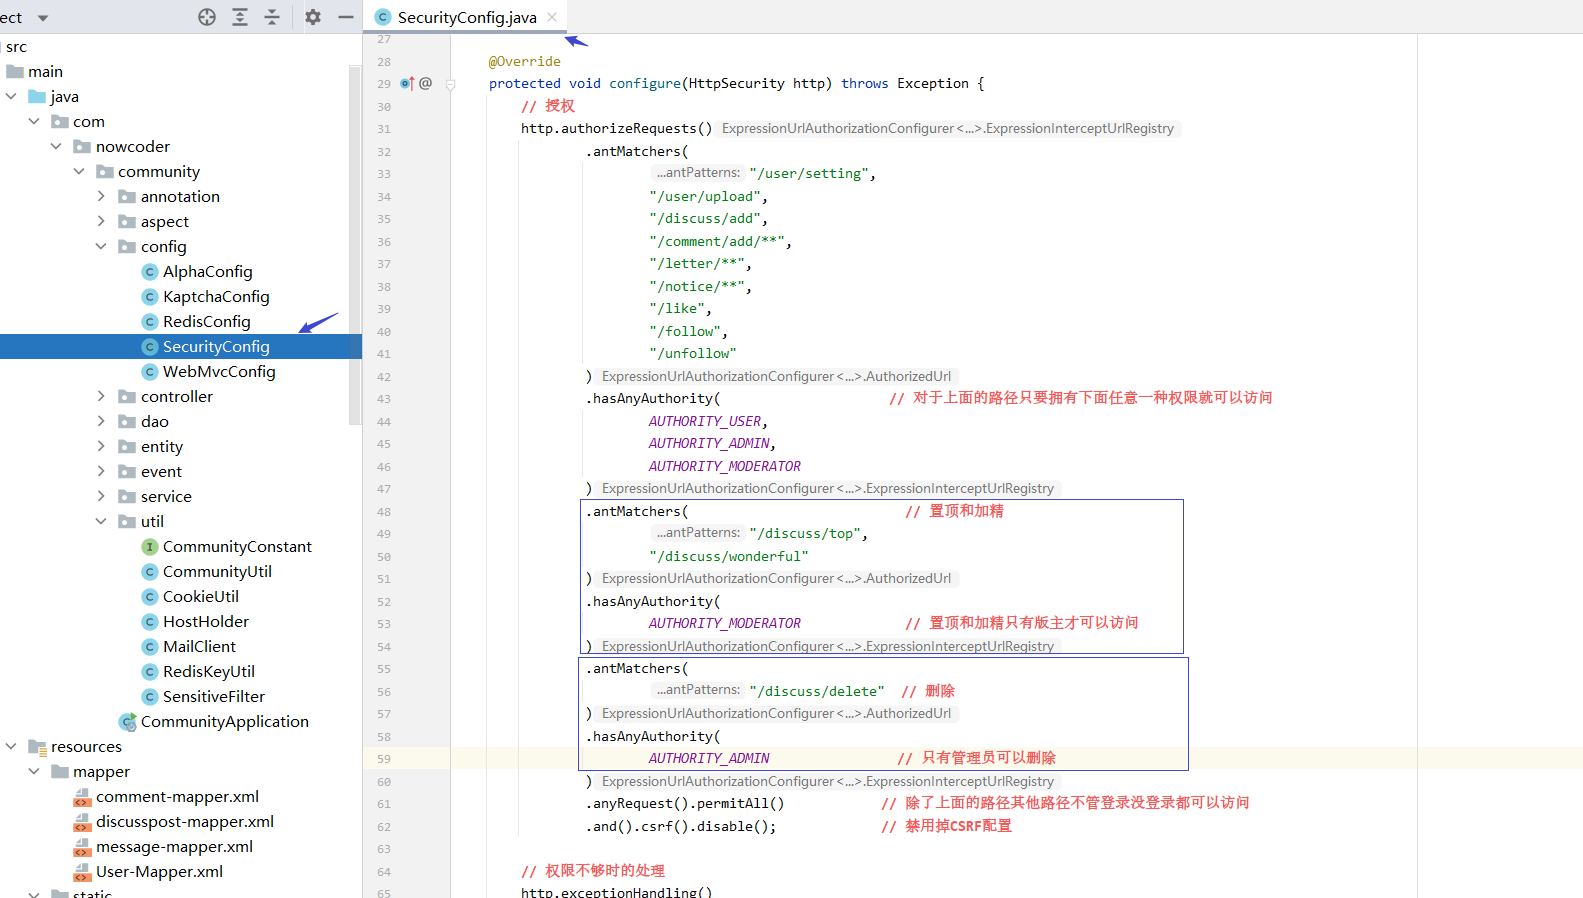
http.authorizeRequests()
.antMatchers(
"/user/setting",
"/user/upload",
"/discuss/add",
"/comment/add/**",
"/letter/**",
"/notice/**",
"/like",
"/follow",
"/unfollow"
)
.hasAnyAuthority( // 对于上面的路径只要拥有下面任意一种权限就可以访问
AUTHORITY_USER,
AUTHORITY_ADMIN,
AUTHORITY_MODERATOR
)
.anyRequest().permitAll(); // 除了上面的路径其他路径不管登录没登录都可以访问
// 权限不够时的处理
http.exceptionHandling()
.authenticationEntryPoint(new AuthenticationEntryPoint() {
// 没有登录怎么处理
@Override
public void commence(HttpServletRequest request, HttpServletResponse response, AuthenticationException e) throws IOException, ServletException {
String xRequestedWith = request.getHeader("x-requested-with");
if ("XMLHttpRequest".equals(xRequestedWith)) { // 异步请求,返回json
response.setContentType("application/plain;charset=utf-8"); //声明要返回的数据的类型,普通字符串
PrintWriter writer = response.getWriter(); // 获得字符流
writer.write(CommunityUtil.getJSONString(403, "你还没有登录哦!")); //向前台输出
} else { // 普通请求,直接重定向到登录页面,强制登录
response.sendRedirect(request.getContextPath() + "/login");
}
}
})
.accessDeniedHandler(new AccessDeniedHandler() {
// 权限不足怎么处理(登录了但权限不足)
@Override
public void handle(HttpServletRequest request, HttpServletResponse response, AccessDeniedException e) throws IOException, ServletException {
String xRequestedWith = request.getHeader("x-requested-with");
if ("XMLHttpRequest".equals(xRequestedWith)) {
response.setContentType("application/plain;charset=utf-8");
PrintWriter writer = response.getWriter();
writer.write(CommunityUtil.getJSONString(403, "你没有访问此功能的权限!"));
} else {
// 可以走到这说明已经登录了但是没有权限,我们跳转到 /denied 路径
response.sendRedirect(request.getContextPath() + "/denied");
}
}
});
// Security底层默认会拦截 /logout 请求,进行退出处理.
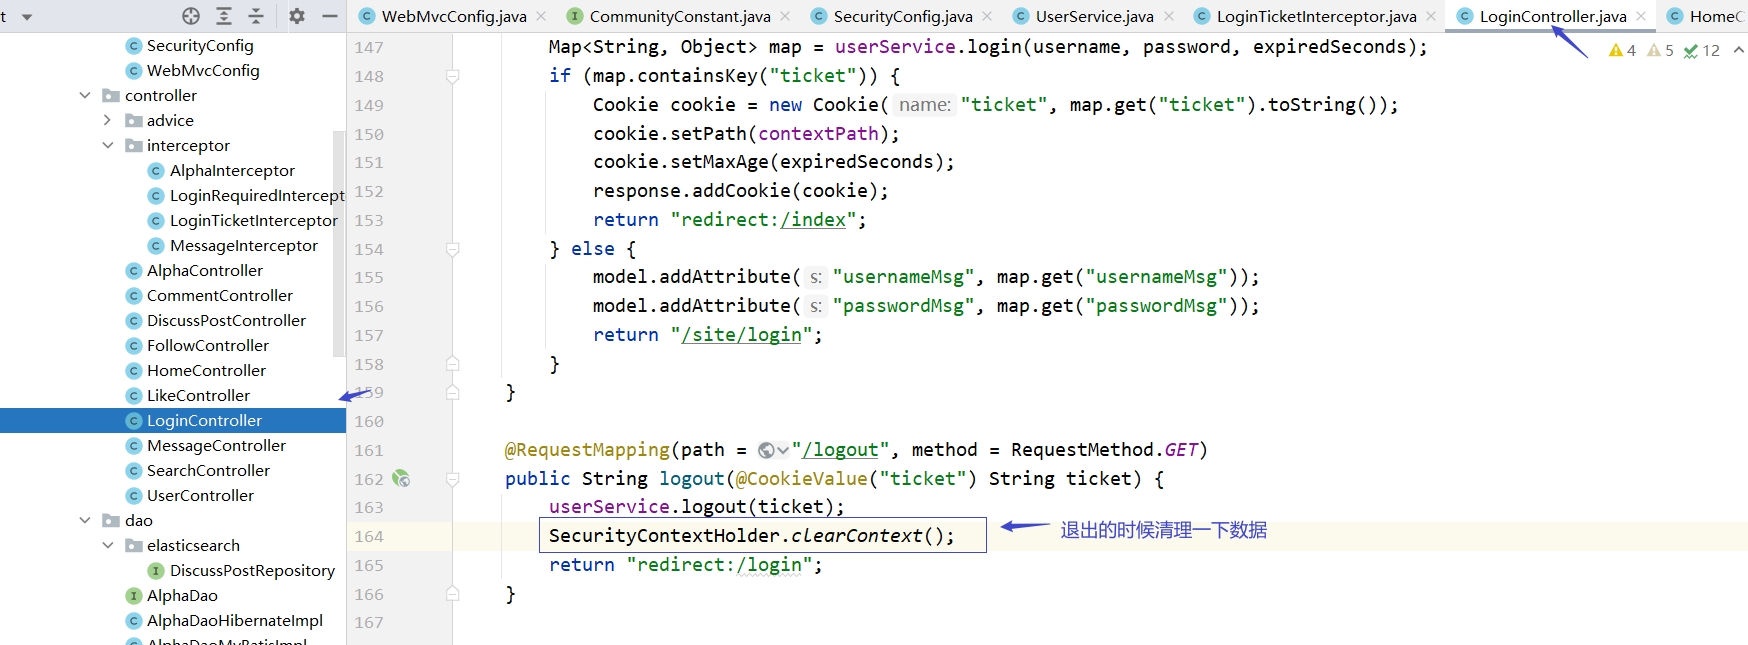
// 覆盖它默认的逻辑,才能执行我们自己的退出代码.
http.logout().logoutUrl("/securitylogout");// "/securitylogout"其实不存在,只是一个善意的欺骗,好让程序执行到我们的方法里
}
}
认证方案
认证没处理它就会走 LoginController 我们自己的认证 ,但是有一个问题,上一次写的demo的认证逻辑里会把认证的信息封装到 tooken 里,这个tooken会被security的一个Filter获取到然后这个Filter会把这个tooken存到SecurityContext里,后面判断有没有权限的时候都是从SecurityContext得到这个tooken来判断权限,所以我们绕过了它认证的逻辑,但是那个结论我们还得存到 SecurityContext 里面,因为我们已经绕过了它认证的逻辑,所以就没必要像上次demo那样User实现一个接口UserService实现一个接口,没必要这么复杂,但是我们也需要做一些必要的处理,在 UserService 里加一段逻辑
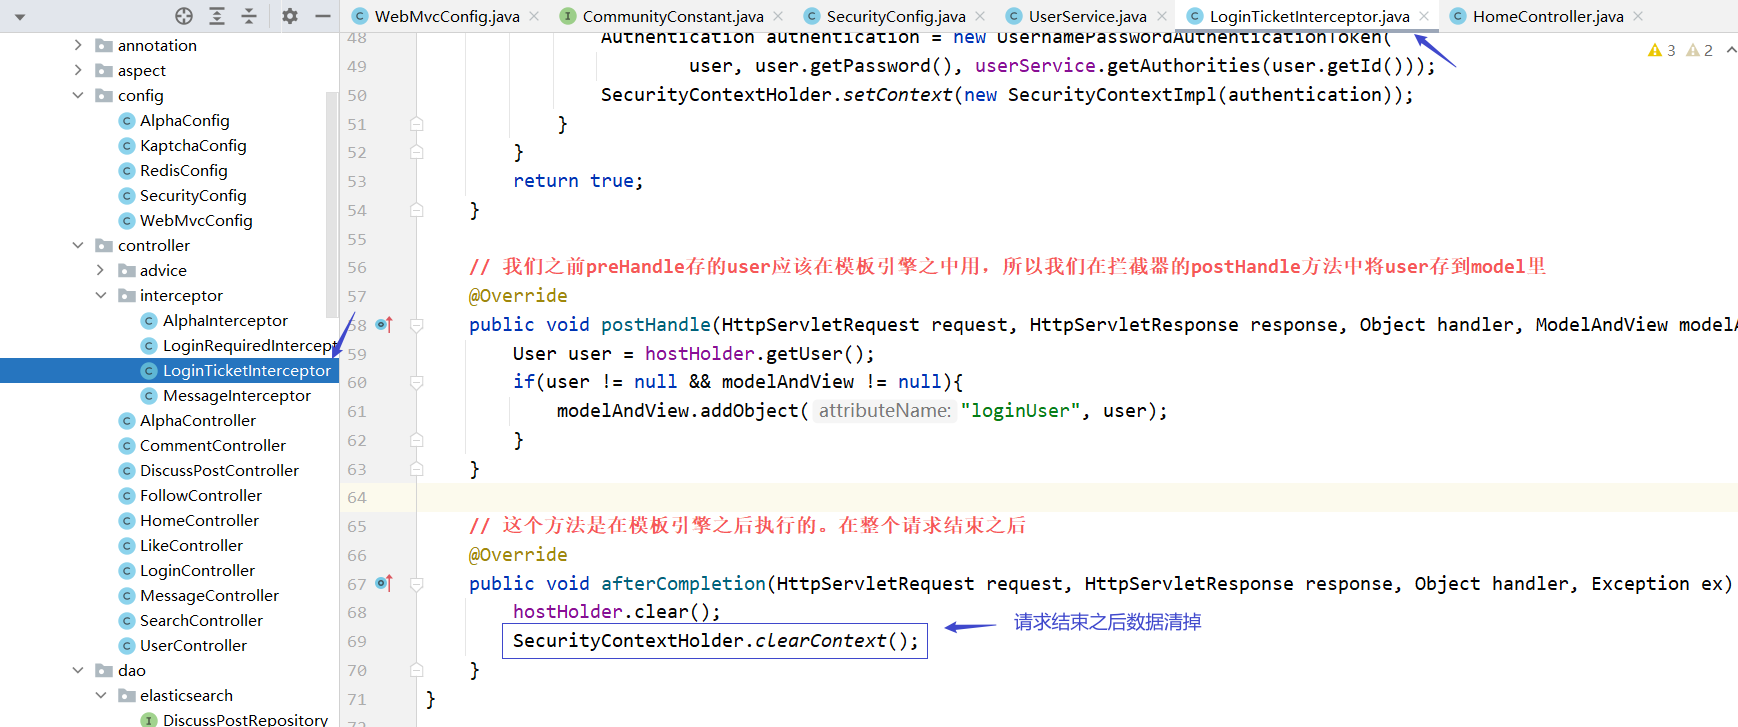
我们最终要把用户的权限存到SecurityContext里,首先这个用户查到以后具有什么权限,我们还得做一个适配,就是提供根据用户获得用户权限的方法,当需要的时候调一下就可以了。另外关键是我们什么时候去获得用户的权限并且把用户权限的tooken存到SecurityContext里,之前实现是在 LoginTicketInterceptor 里,
public Collection<? extends GrantedAuthority> getAuthorities(int userId) {
    User user = this.findUserById(userId);

    List<GrantedAuthority> list = new ArrayList<>();
    list.add(new GrantedAuthority() {

        @Override
        public String getAuthority() {
            switch (user.getType()) {
                case 1:
                    return AUTHORITY_ADMIN;
                case 2:
                    return AUTHORITY_MODERATOR;
                default:
                    return AUTHORITY_USER;
            }
        }
    });
    return list;
}
CSRF配置
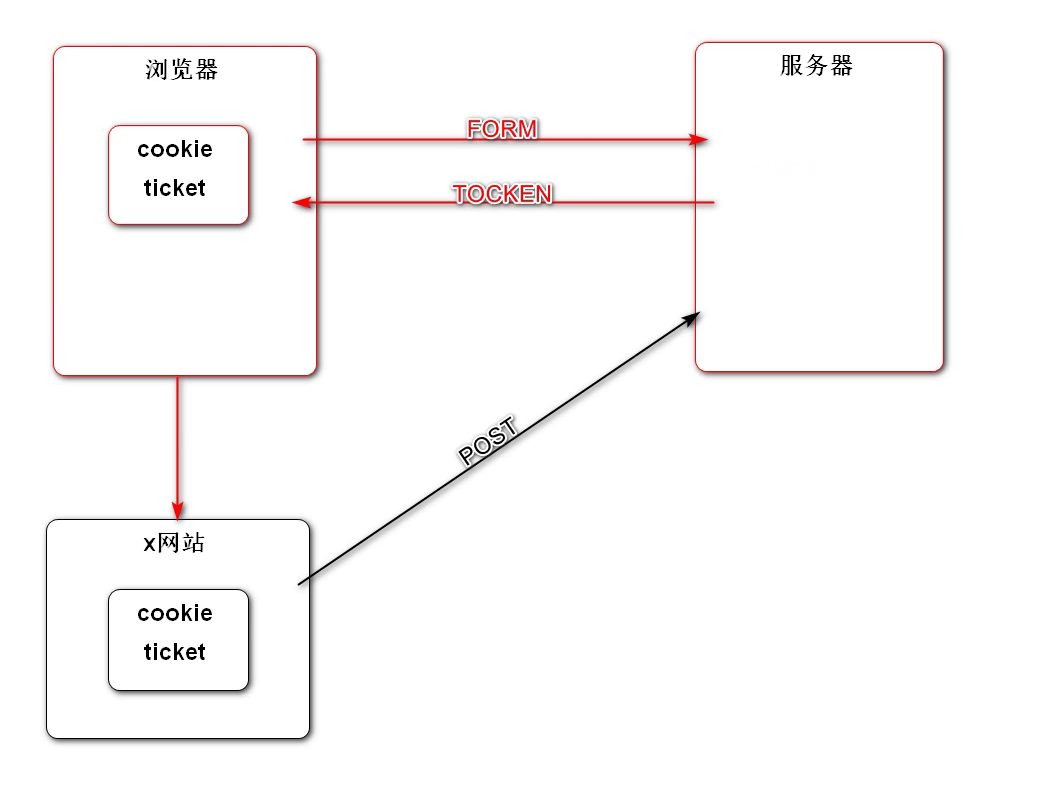
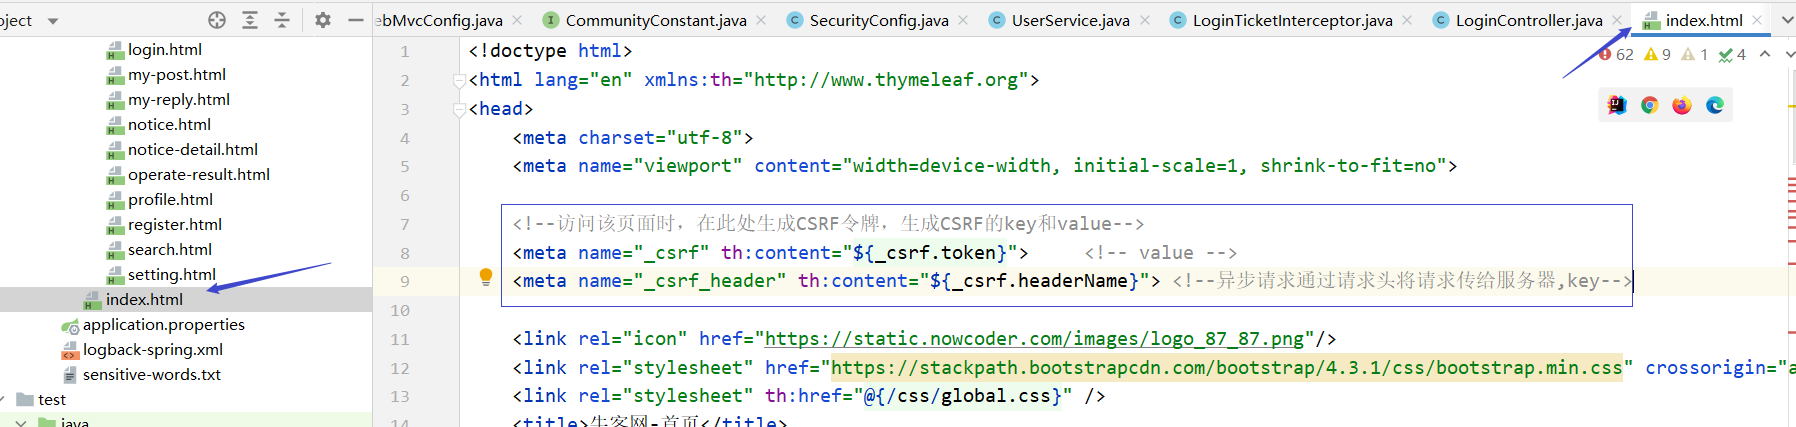
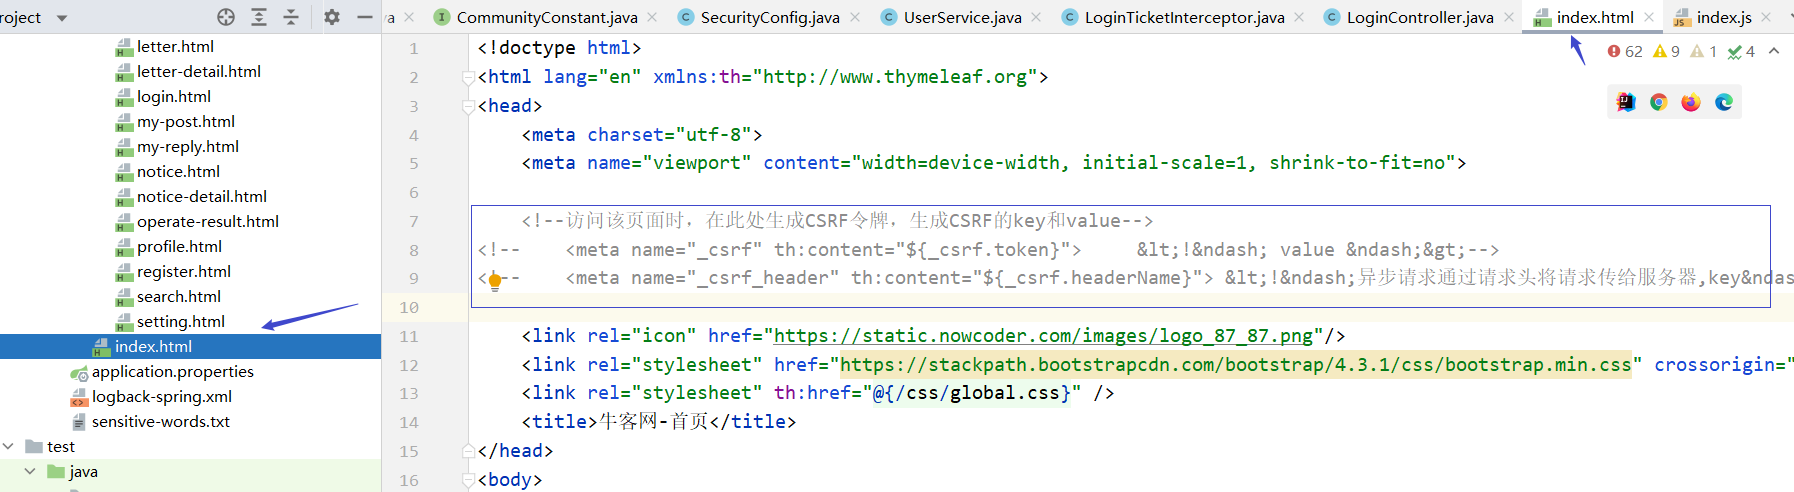
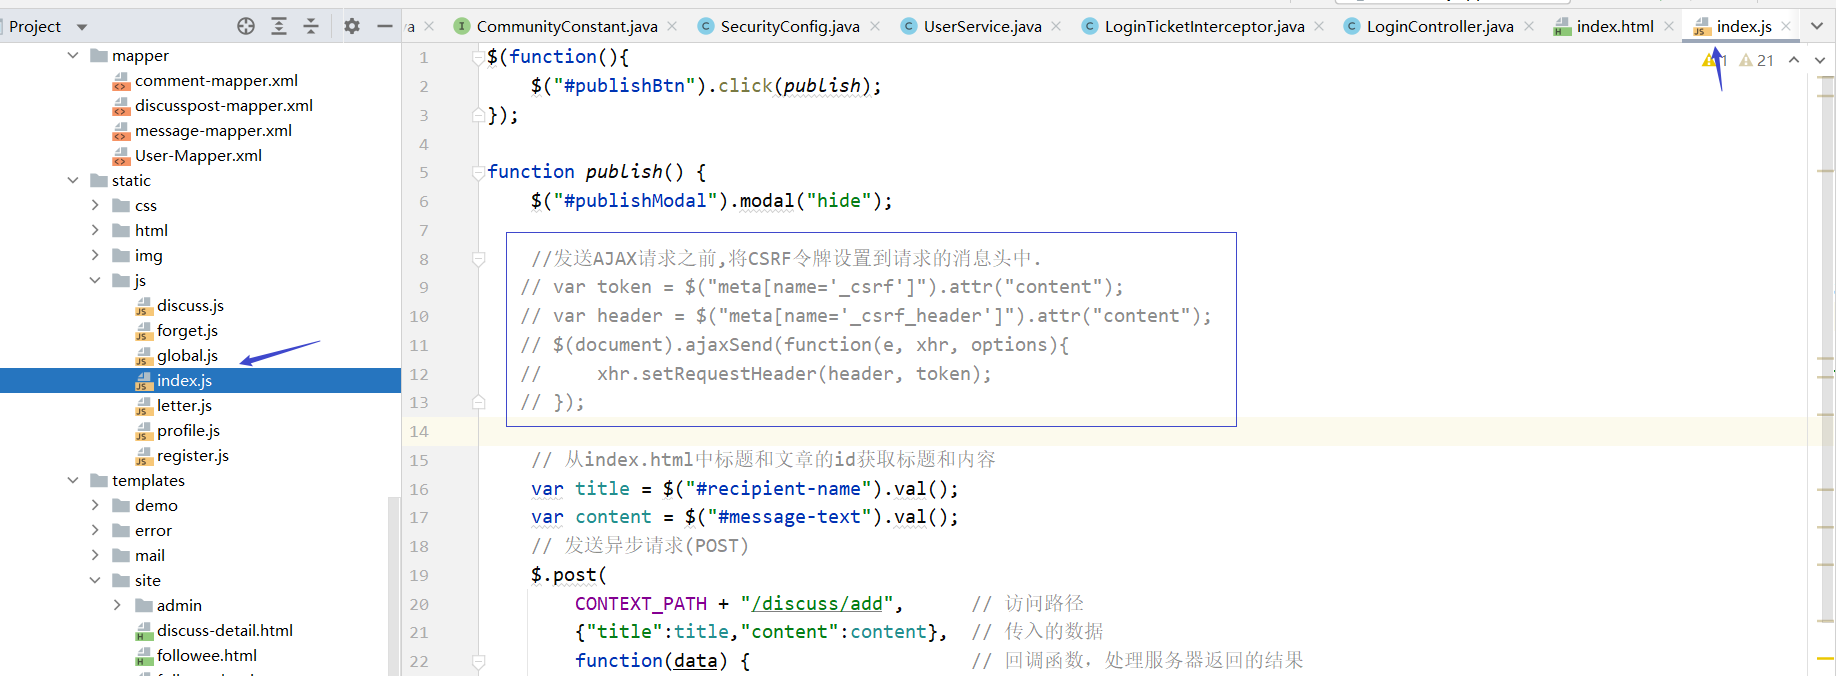
所谓CSRF攻击就是浏览器向服务器发送了一个提交表单请求,此时浏览器访问了另一个不安全的网站,这个网站获取到了浏览器的cookie,而浏览器的cookie存着登录凭证,这个时候这个不安全的网站会伪装自己为浏览器向服务器提交表单,如果这个表单是转账相关的业务的话,那就比较危险了。那Security是怎么解决这种情况的呢,服务器在向浏览器发送表单页面同时会发送一个tooken,浏览器提交表单时得把这个tooken也提交了,那个不安全的网站是没办法获取这个tooken,但是这种方式只能解决同步请求,如果是异步请求我们得在页面上强制生成tooken,我们的每一个异步请求都得这么处理。
如果不想使用CSRF认证我们在SecurityConfig禁用掉CSRF就可以了它就不走这个逻辑了就ok了,但如果想防止CSRF工具,挨个处理就好了。
在项目里我们是没有使用CSRF配置的,如果想使用可以像下面这样配置,但是在项目里我们是没有配置的
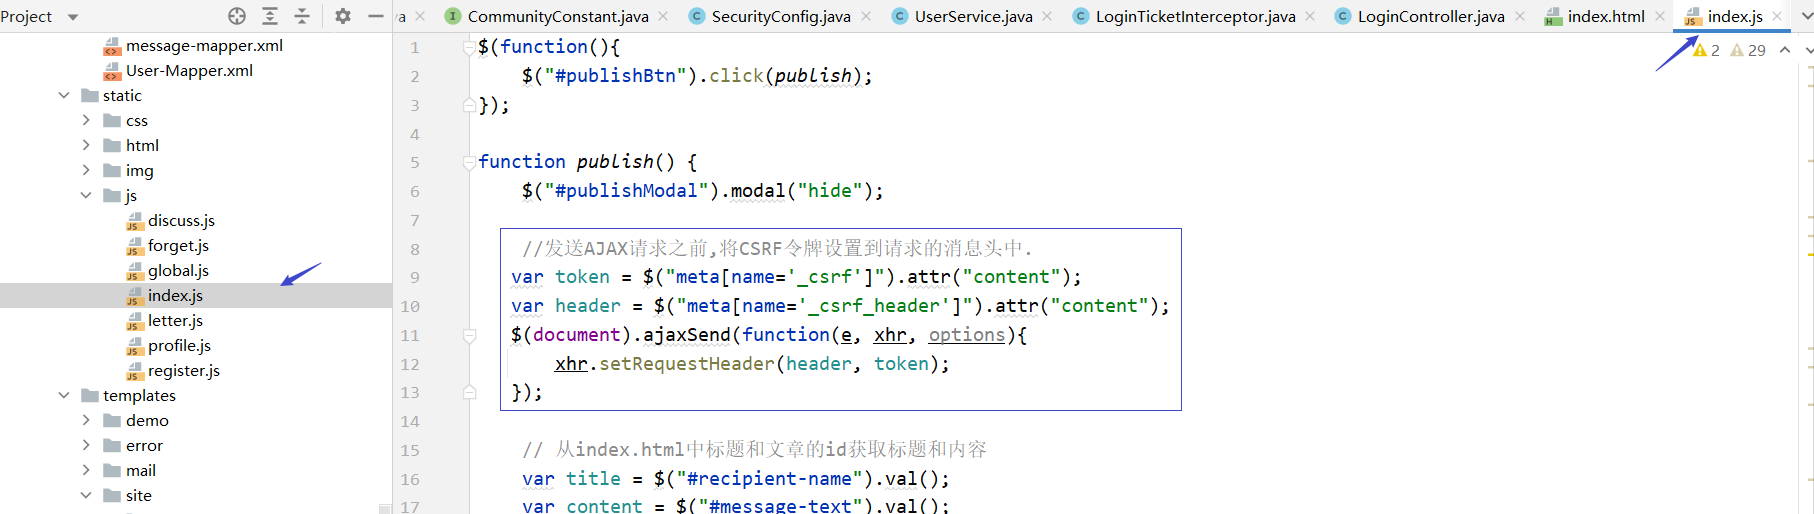
在项目中我们是这样处理的
最后以前开发时有一点小问题
在启动项目的时候 kafka 一定要打开
7.3 置顶、加精、删除
在thymeleaf中其实支持一些Spring Security的东西,去做不同权限是否可以看到相应按钮管理,我们要引入一下它们的依赖(其实在第三个阶段按钮显示时才会用到这个依赖,我们提前引入)
<dependency>
   <groupId>org.thymeleaf.extras</groupId>
   <artifactId>thymeleaf-extras-springsecurity5</artifactId>
</dependency>
功能实现
查看帖子的数据库表
CREATE TABLE `discuss_post` (
  `id` int(11) NOT NULL AUTO_INCREMENT,
  `user_id` varchar(45) DEFAULT NULL,
  `title` varchar(100) DEFAULT NULL,
  `content` text,
  `type` int(11) DEFAULT NULL COMMENT '0-普通; 1-置顶;',
  `status` int(11) DEFAULT NULL COMMENT '0-正常; 1-精华; 2-拉黑;',
  `create_time` timestamp NULL DEFAULT NULL,
  `comment_count` int(11) DEFAULT NULL,
  `score` double DEFAULT NULL,
  PRIMARY KEY (`id`),
  KEY `index_user_id` (`user_id`)
) ENGINE=InnoDB AUTO_INCREMENT=286 DEFAULT CHARSET=utf8;
type为1表示置顶
status为1表示精华,为2表示拉黑(删除,页面不显示,但是数据库还有)
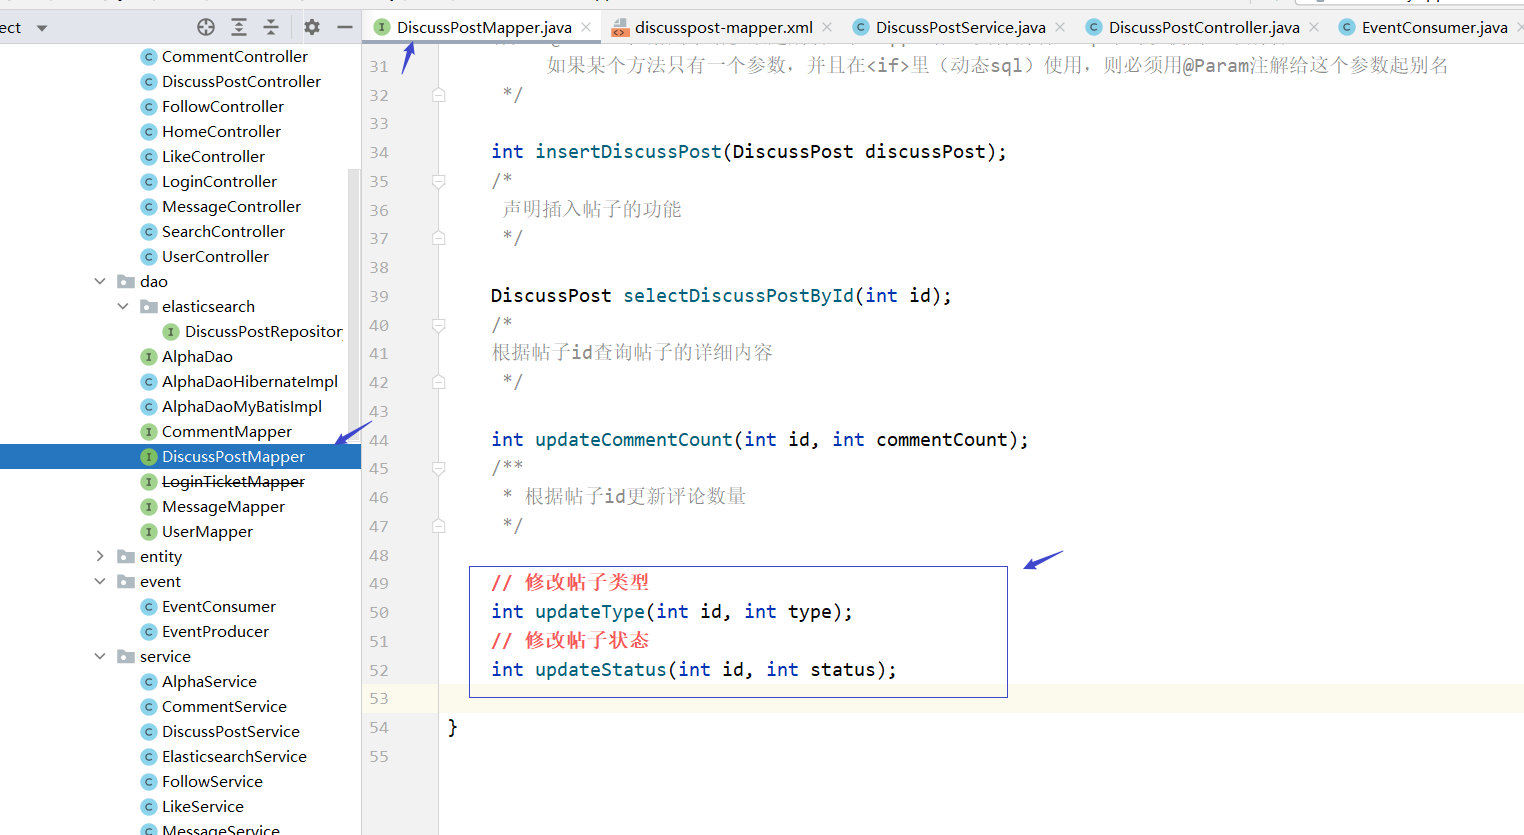
数据访问层(dao)
DiscussPostMapper
// 修改帖子类型
int updateType(int id, int type);
// 修改帖子状态
int updateStatus(int id, int status);
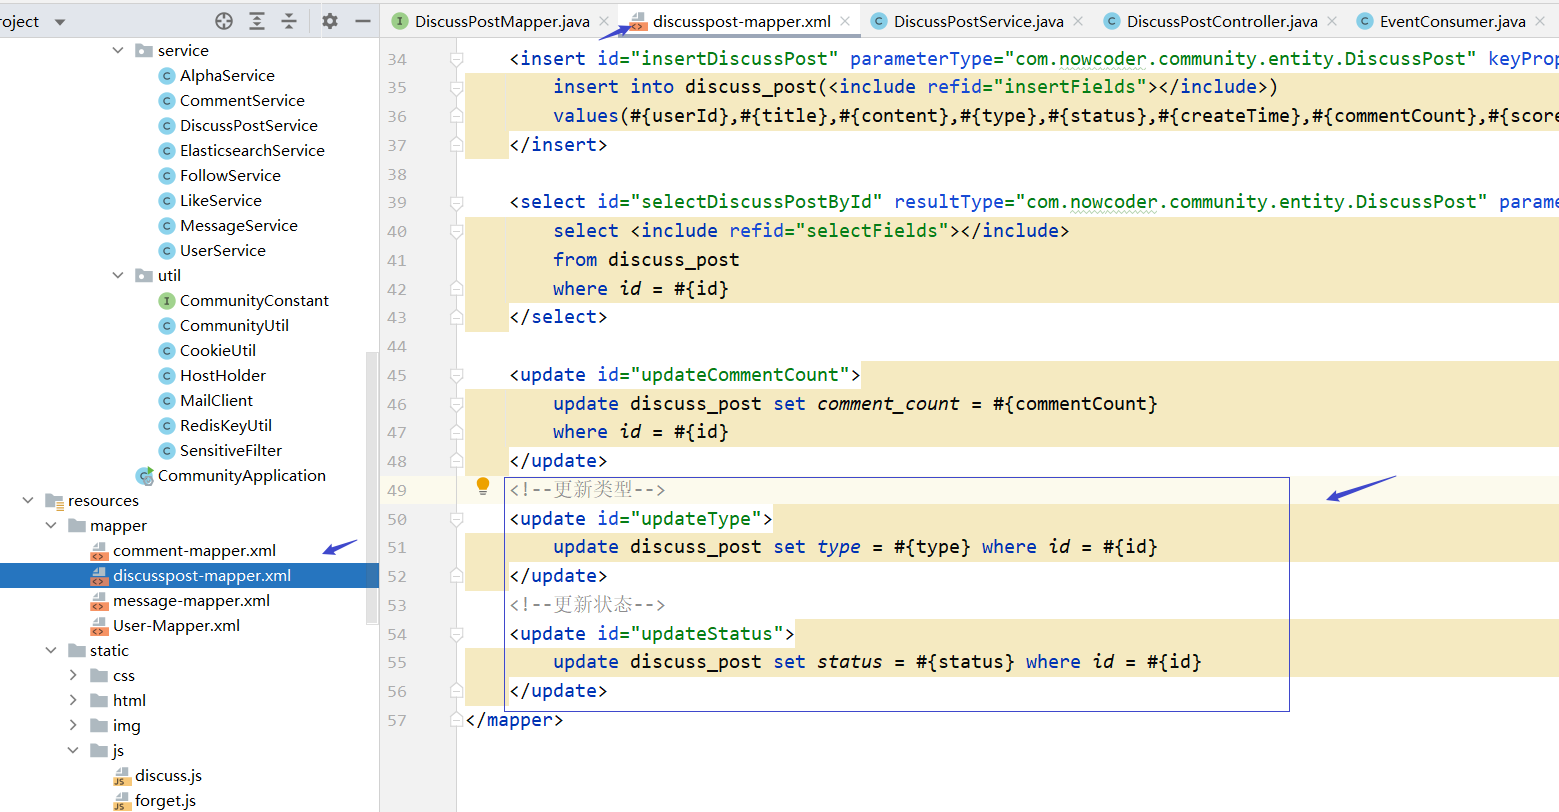
discusspost-mapper.xml
<!--更新类型-->
<update id="updateType">
    update discuss_post set type = #{type} where id = #{id}
</update>
<!--更新状态-->
<update id="updateStatus">
    update discuss_post set status = #{status} where id = #{id}
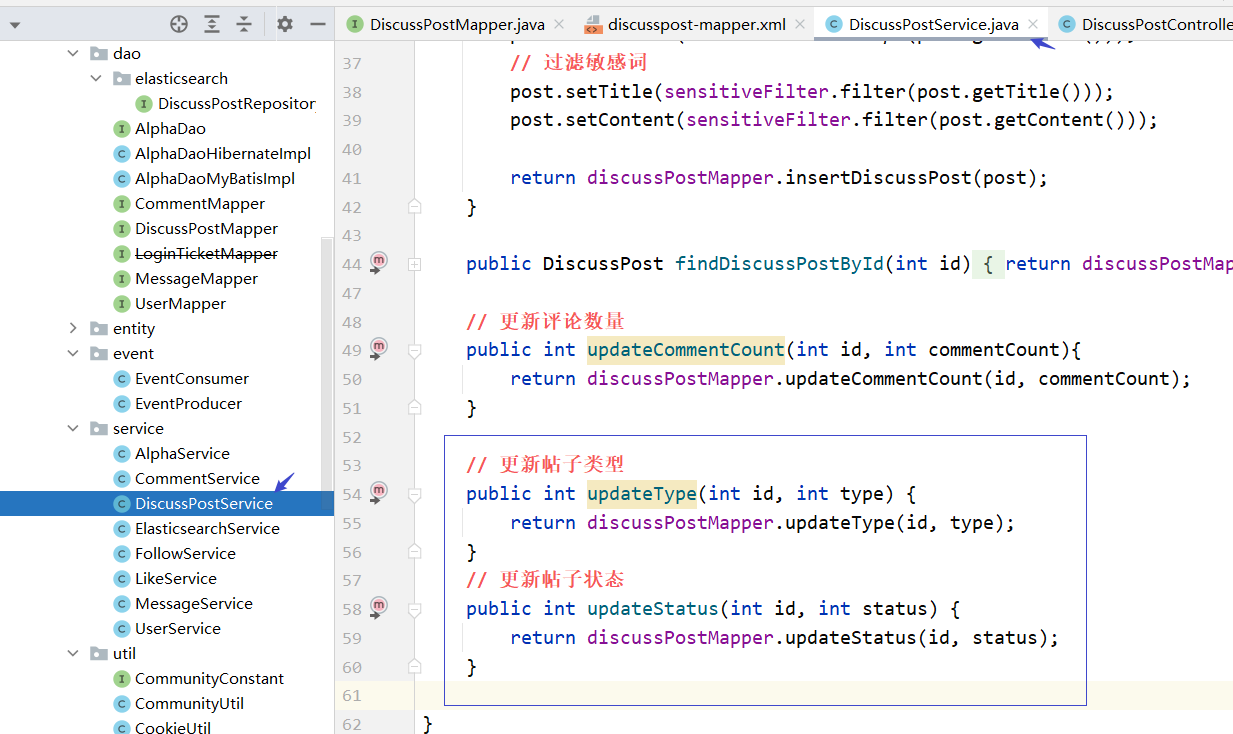
业务层(service)
DiscussPostService
// 更新帖子类型
public int updateType(int id, int type) {
    return discussPostMapper.updateType(id, type);
}
// 更新帖子状态
public int updateStatus(int id, int status) {
    return discussPostMapper.updateStatus(id, status);
}
表现层
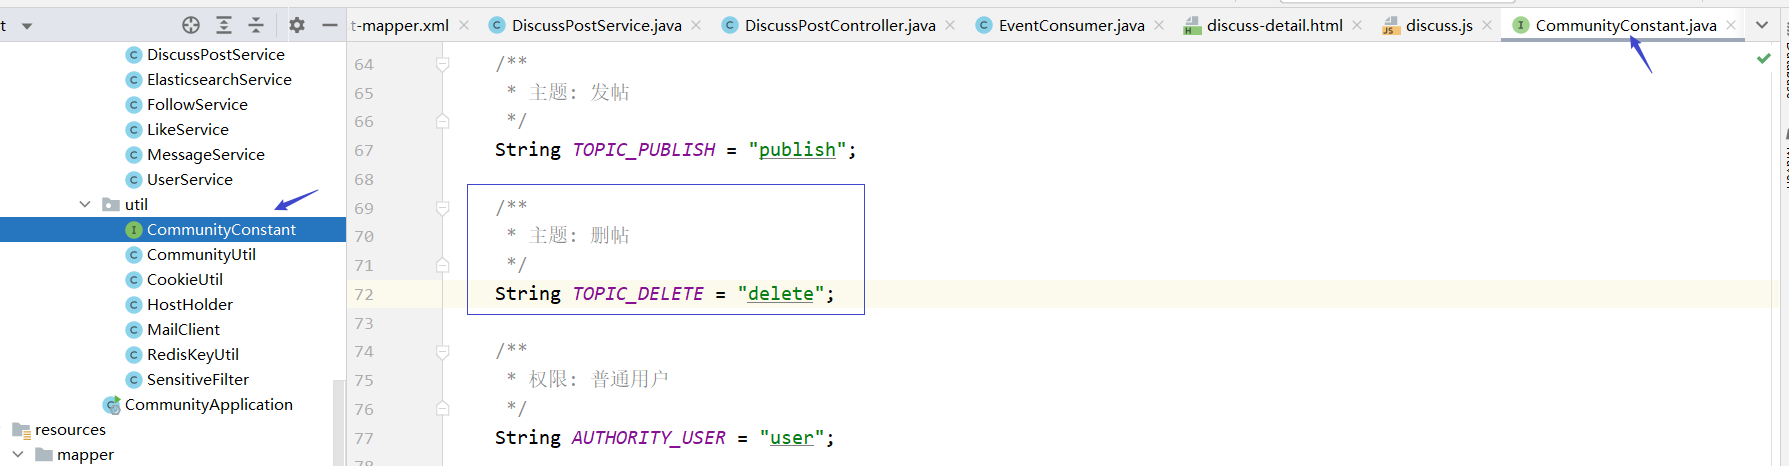
常量接口 CommunityConstant中定义一个常量表示删除帖子
/**
 * 主题: 删帖
 */
String TOPIC_DELETE = "delete";
DiscussPostController
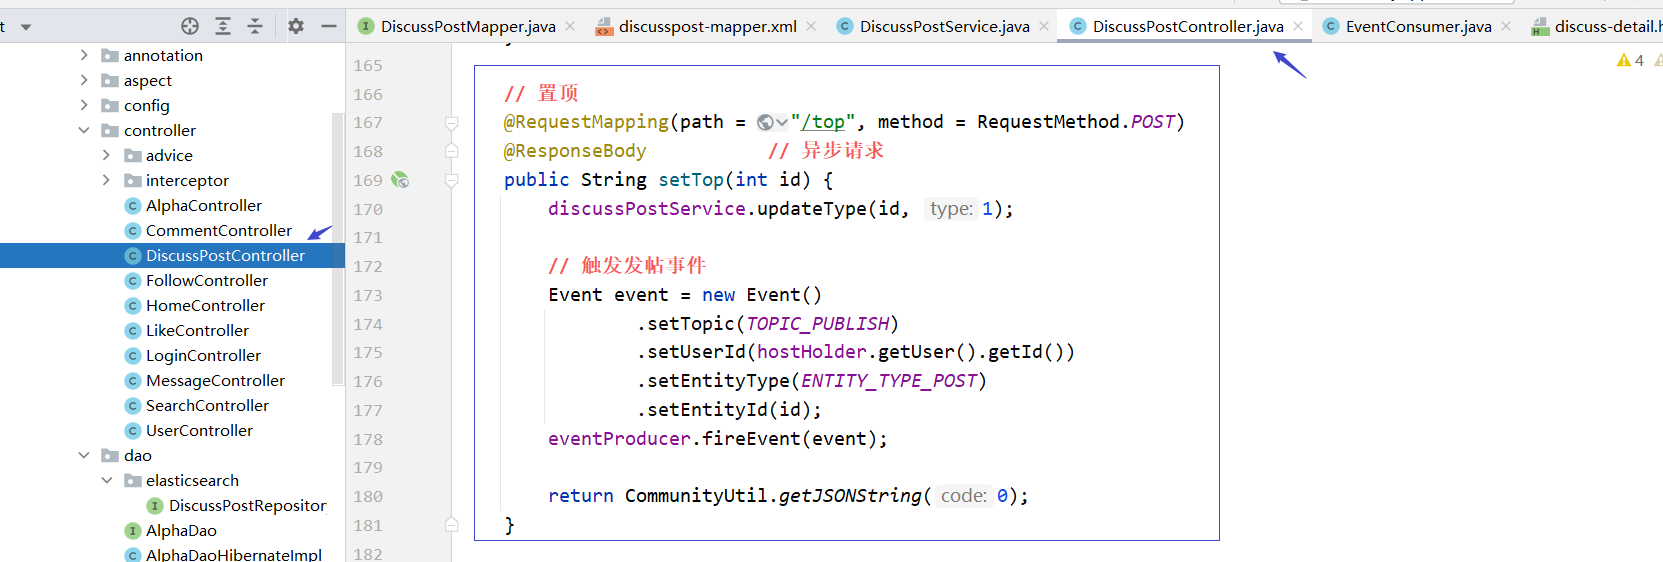
// 置顶
@RequestMapping(path = "/top", method = RequestMethod.POST)
@ResponseBody // 异步请求
public String setTop(int id) {
discussPostService.updateType(id, 1);
// 触发发帖事件
Event event = new Event()
.setTopic(TOPIC_PUBLISH)
.setUserId(hostHolder.getUser().getId())
.setEntityType(ENTITY_TYPE_POST)
.setEntityId(id);
eventProducer.fireEvent(event);
return CommunityUtil.getJSONString(0);
}
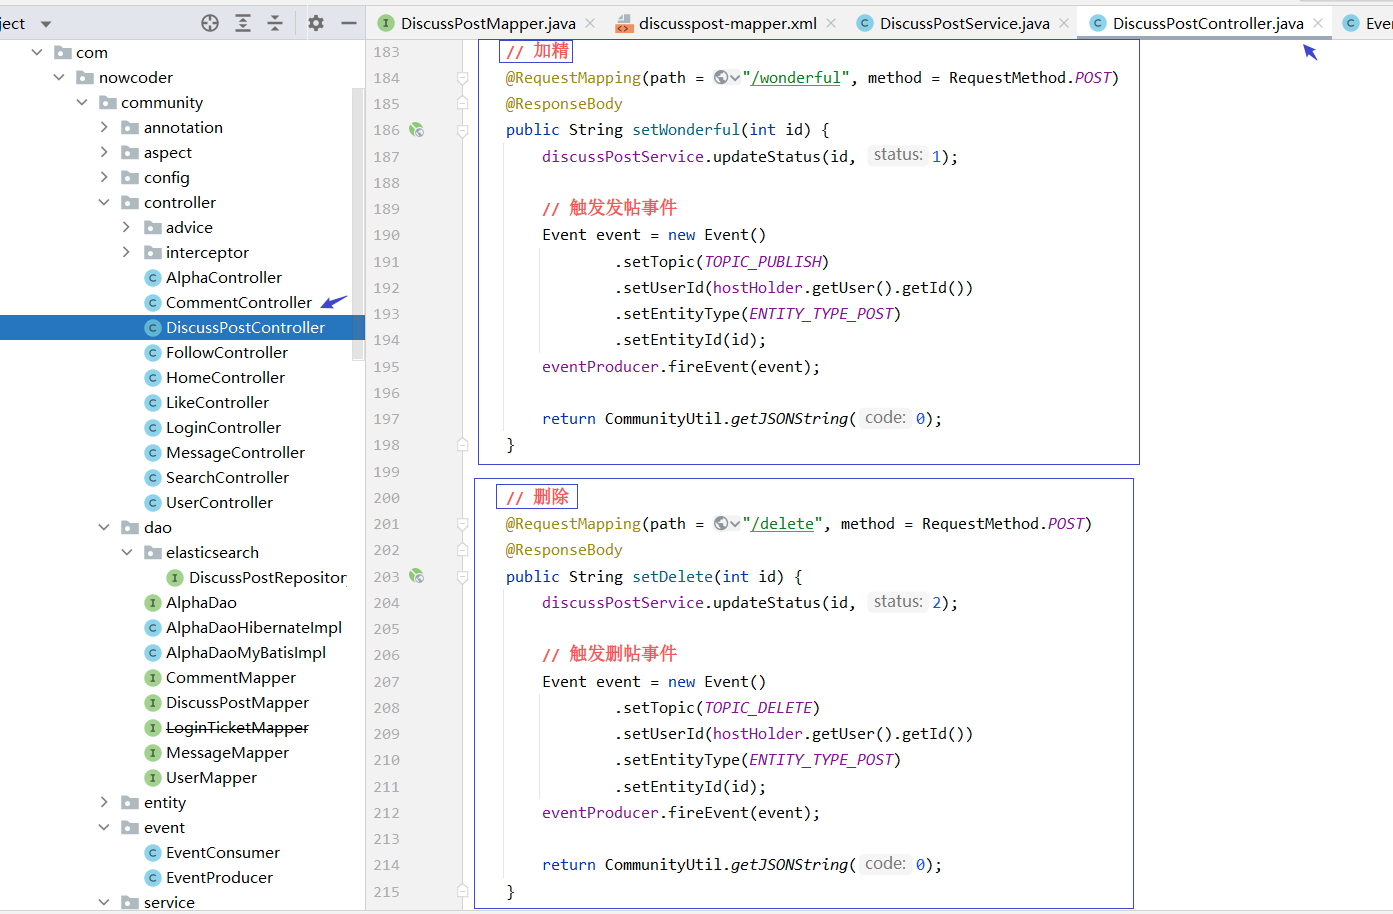
// 加精
@RequestMapping(path = "/wonderful", method = RequestMethod.POST)
@ResponseBody
public String setWonderful(int id) {
discussPostService.updateStatus(id, 1);
// 触发发帖事件
Event event = new Event()
.setTopic(TOPIC_PUBLISH)
.setUserId(hostHolder.getUser().getId())
.setEntityType(ENTITY_TYPE_POST)
.setEntityId(id);
eventProducer.fireEvent(event);
return CommunityUtil.getJSONString(0);
}
// 删除
@RequestMapping(path = "/delete", method = RequestMethod.POST)
@ResponseBody
public String setDelete(int id) {
discussPostService.updateStatus(id, 2);
// 触发删帖事件
Event event = new Event()
.setTopic(TOPIC_DELETE)
.setUserId(hostHolder.getUser().getId())
.setEntityType(ENTITY_TYPE_POST)
.setEntityId(id);
eventProducer.fireEvent(event);
return CommunityUtil.getJSONString(0);
}
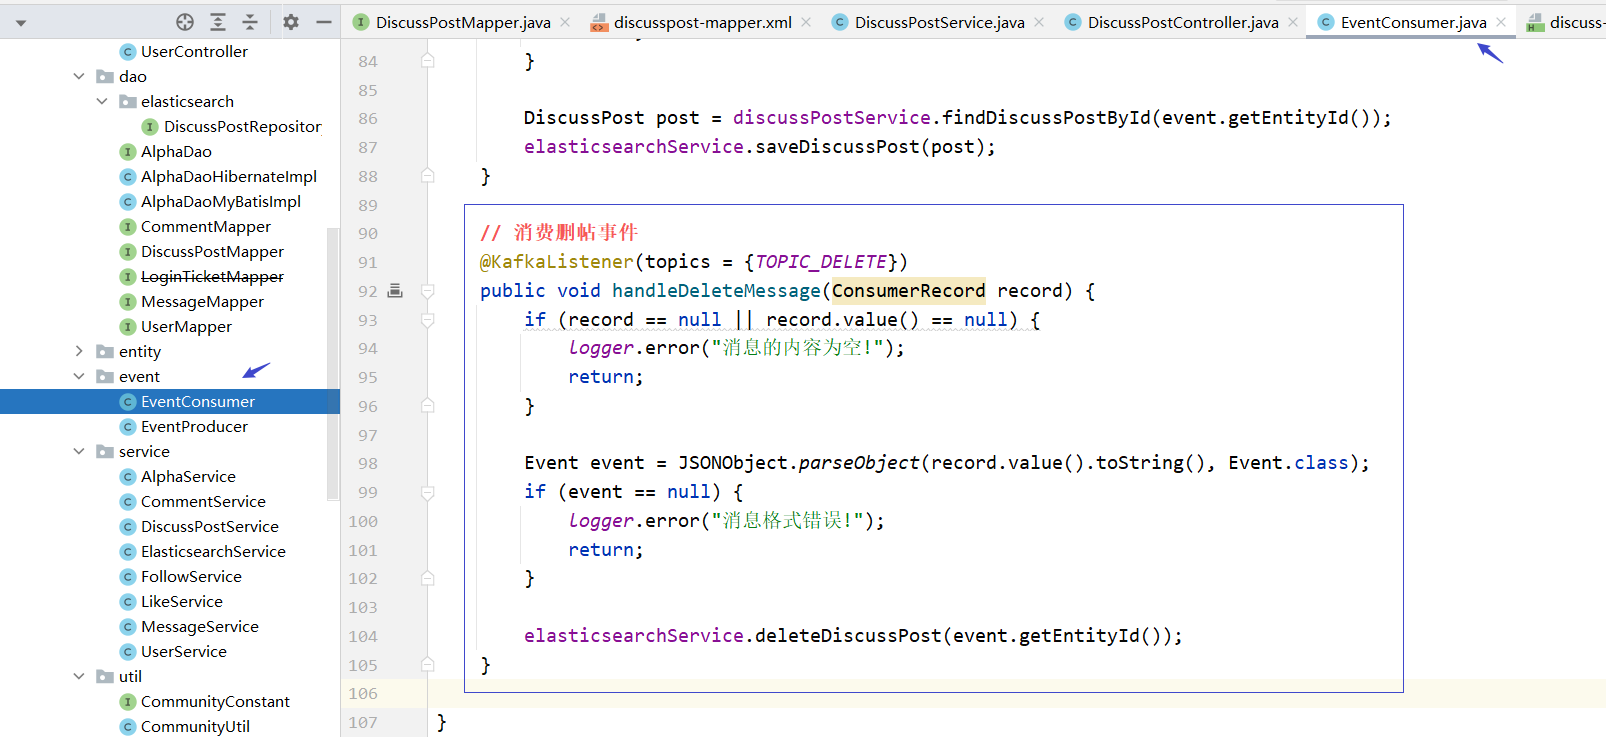
因为删帖事件是新加的事件,之前没处理过,所以需要在事件消费者里把这个事件也消费一下
EventConsumer
// 消费删帖事件
@KafkaListener(topics = {TOPIC_DELETE})
public void handleDeleteMessage(ConsumerRecord record) {
    if (record == null || record.value() == null) {
        logger.error("消息的内容为空!");
        return;
    }

    Event event = JSONObject.parseObject(record.value().toString(), Event.class);
    if (event == null) {
        logger.error("消息格式错误!");
        return;
    }

    elasticsearchService.deleteDiscussPost(event.getEntityId());
}
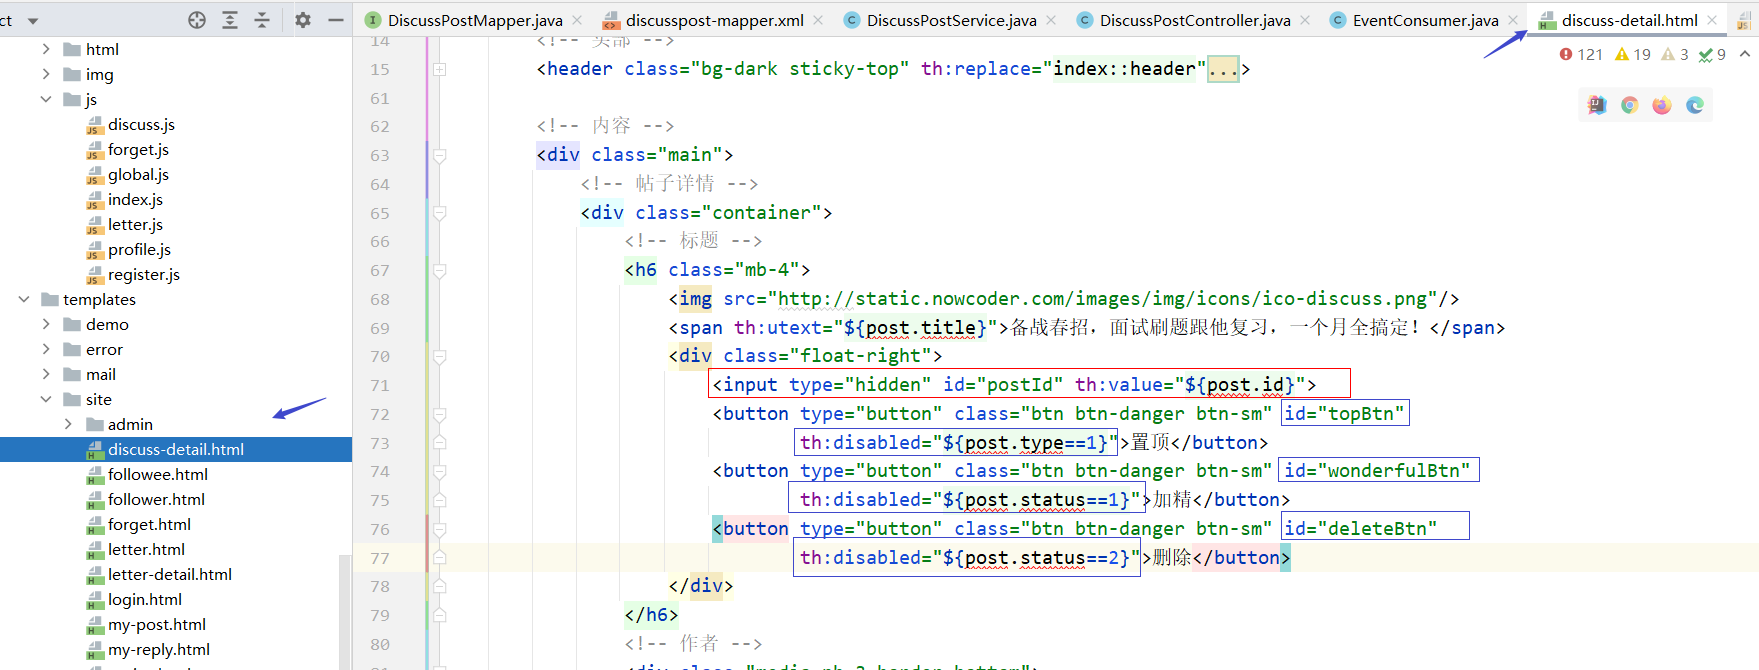
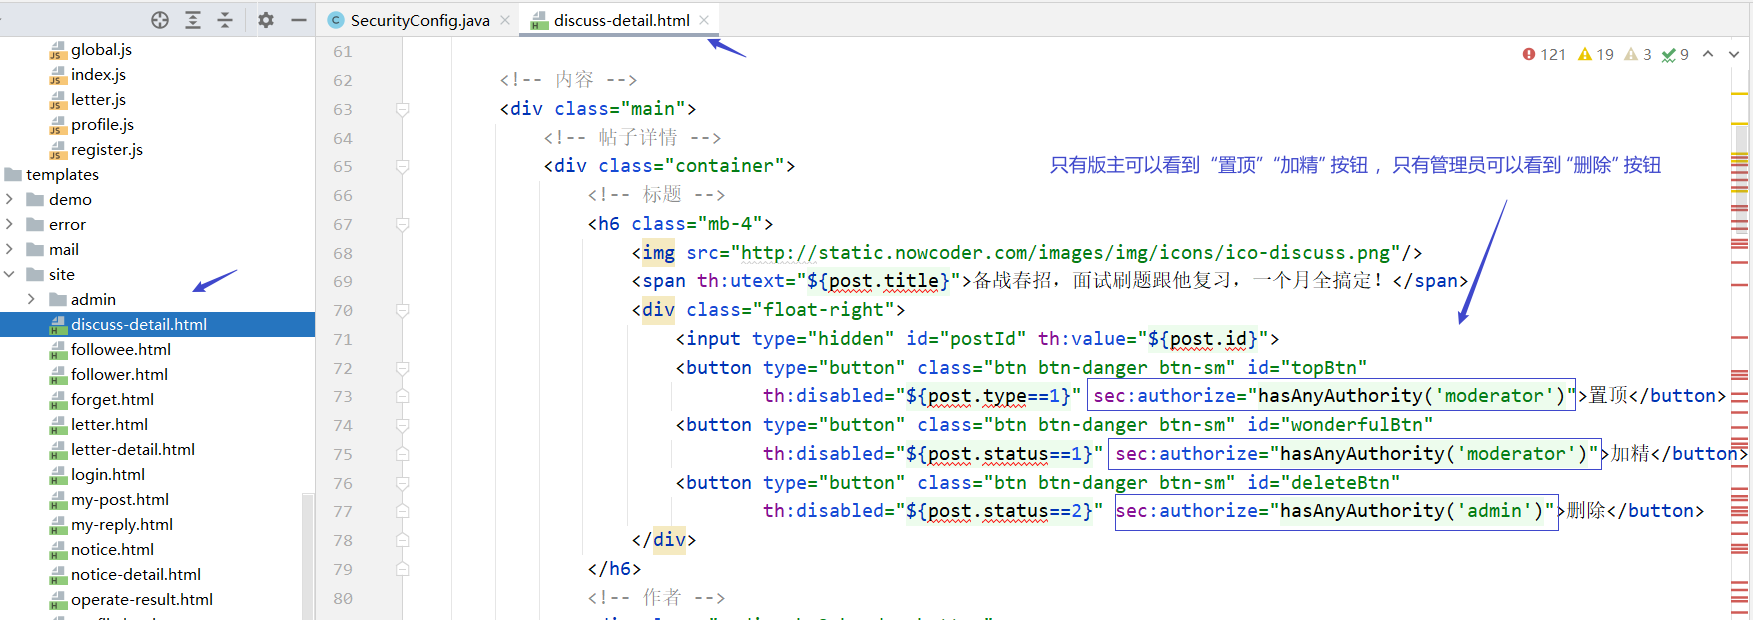
然后就是处理帖子详情页面 discuss-detail.html
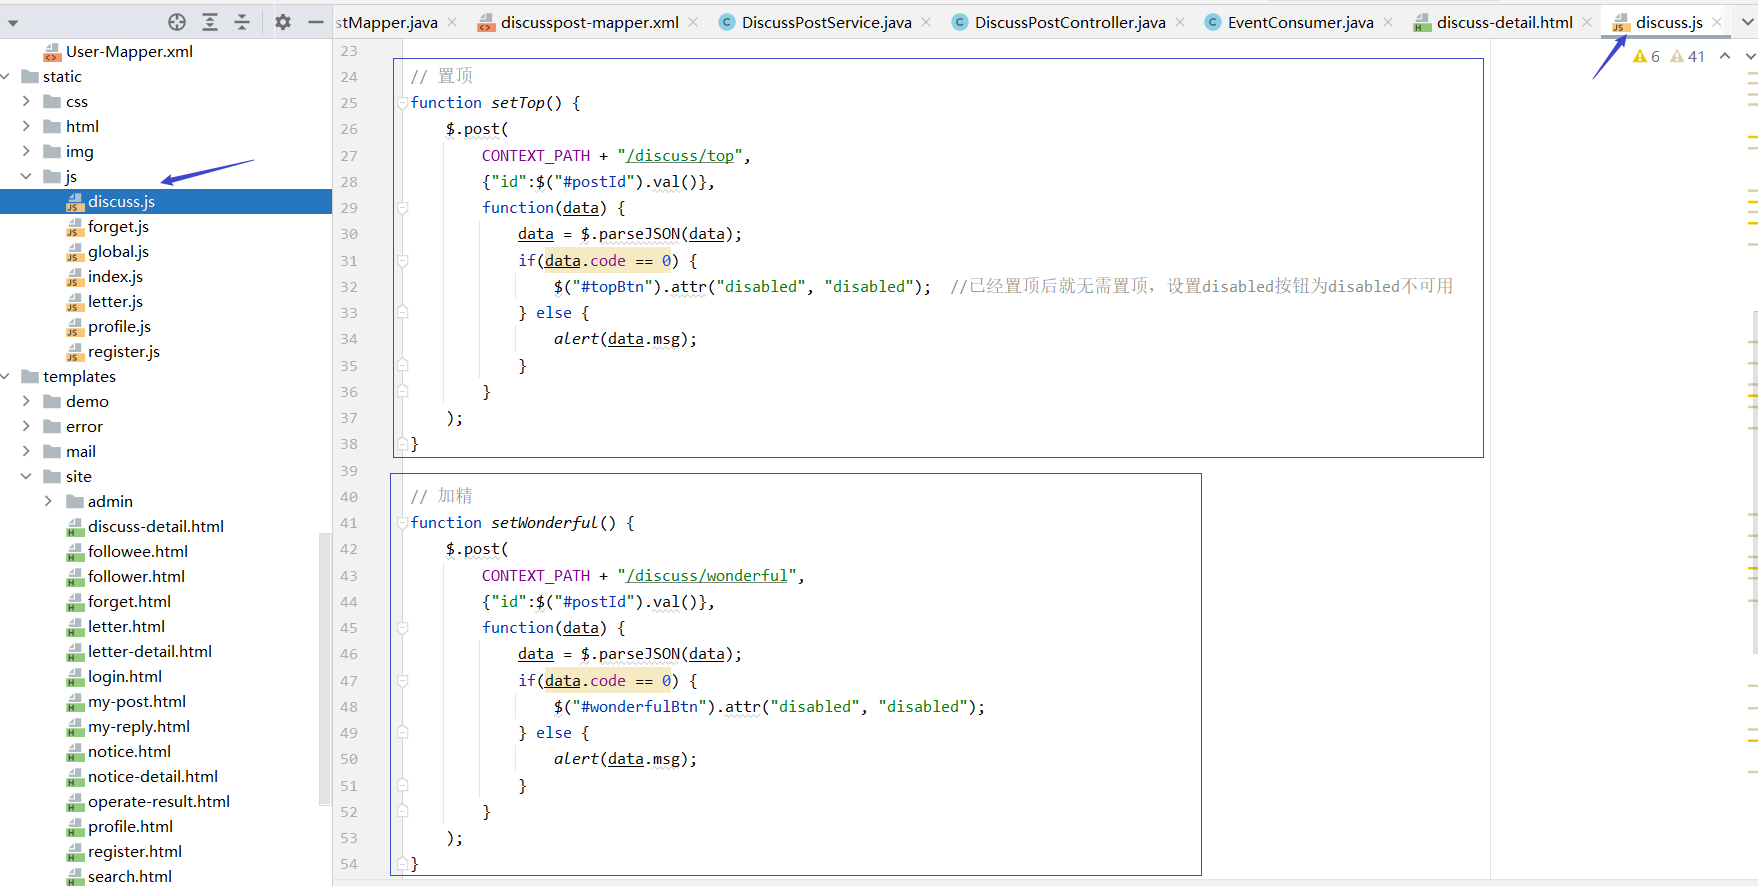
discuss.js


权限管理
对于权限管理我们要配置 SecurityConfig
按钮显示
这个需要thymeleaf对Spring Security的支持,在模板上获得当前用户的权限从而对这个按钮是否显示做出判断,这个需要我们已经引入 thymeleaf-extras-springsecurity5 依赖,之前已经引入
<dependency>
   <groupId>org.thymeleaf.extras</groupId>
   <artifactId>thymeleaf-extras-springsecurity5</artifactId>
</dependency>
在模板上声明命名空间去使用它
xmlns:sec="http://www.thymeleaf.org/extras/spring-security"

只有版主可以看到 “置顶” “加精”按钮 ,只有管理员可以看到“删除”按钮
7.4 Redis高级数据类型
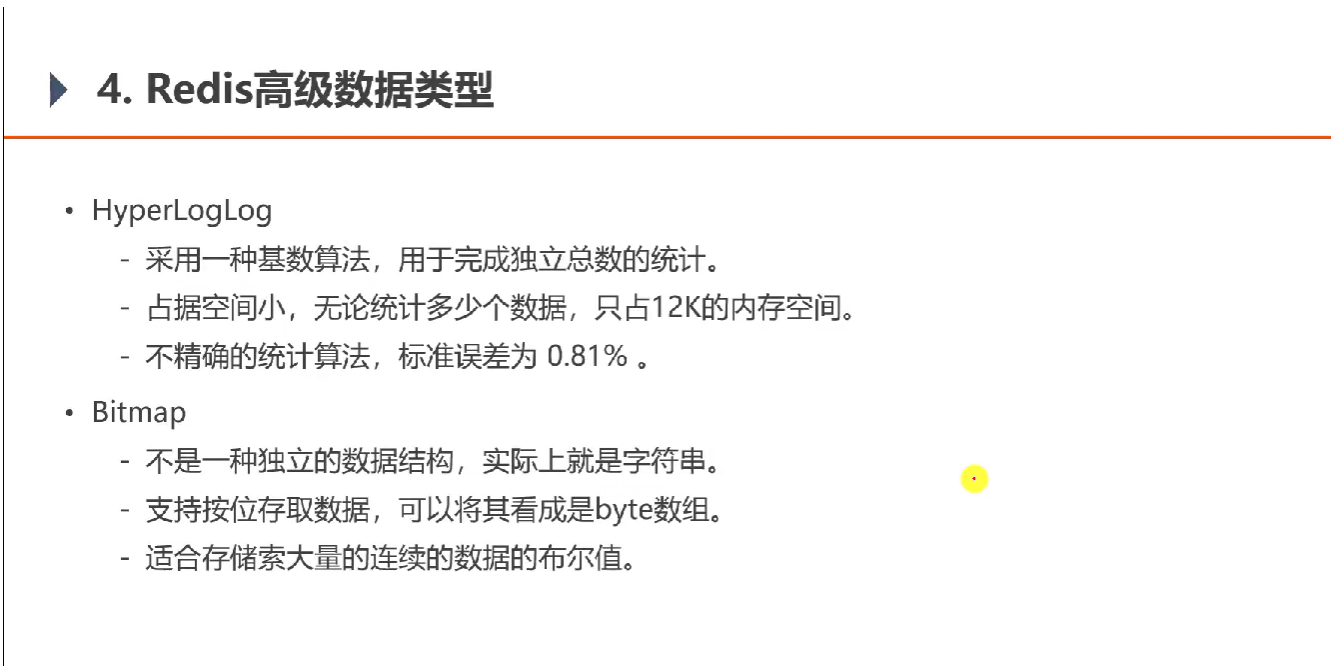
- Hyperlonglog 超级日志
独立总数的意思是比如一个人访问这个网站多次,但是这算一个访客,就是说对多次统计进行一个去重。
Hyperlonglog 在进行去重时,无论有多少个数据,占的空间都只有12K
但是它是有代价的,就是这种算法标准误差为 0.81%
- Bitmap 位图
每一位只能存0或1,按位存取,底层是字符串
比如说统计用户的签到,第1位的0 / 1 代表第一天到没到,第2位代表第二天到没到
这样的数据是连续的,所以在存字符串的时候每一位代表连续的值的索引,而每一位
的0或1代表到或没到

Bitmap统计的是精确的值
这两种类型都适合对网站运营的数据进行统计,而且在统计的时候效率比较高。
接下来写点程序来体会一下这两种类型怎么去用
测试类
@SpringBootTest
@RunWith(SpringRunner.class)
@ContextConfiguration(classes = CommunityApplication.class)
public class RedisTest {

    @Autowired
    private RedisTemplate redisTemplate;

    // 统计20万个重复数据的独立总数(意思是去重之后还有多少)
    @Test
    public void testHyperLogLog() {
        String redisKey = "test:hll:01";

        for (int i = 1; i <= 100000; i++) {
            redisTemplate.opsForHyperLogLog().add(redisKey, i);     // 先把数据存到redis才能统计
        }

        for (int i = 1; i <= 100000; i++) {
            // Math.random()是0到1之间的左开右闭区间
            int r = (int) (Math.random() * 100000 + 1);
            redisTemplate.opsForHyperLogLog().add(redisKey, r);    // 把数据存到redis才能统计
        }

        long size = redisTemplate.opsForHyperLogLog().size(redisKey);
        System.out.println(size);
    }
    /*
    Hyperlonglog算法会有一些微量的误差
    结果:
    99562
     */

    // 将3组数据合并, 在统计合并后的重复数据的独立总数.(比如说1天之内多次访问算一个uv,三天合并那这3天内多次访问算一个uv)
    @Test
    public void testHyperLogLogUnion() {
        String redisKey2 = "test:hll:02";
        for (int i = 1; i <= 10000; i++) {
            redisTemplate.opsForHyperLogLog().add(redisKey2, i);    // 在这个key里存10000个数据
        }

        String redisKey3 = "test:hll:03";
        for (int i = 5001; i <= 15000; i++) {
            redisTemplate.opsForHyperLogLog().add(redisKey3, i);    // 在这个key里存10000个数据
        }

        String redisKey4 = "test:hll:04";
        for (int i = 10001; i <= 20000; i++) {
            redisTemplate.opsForHyperLogLog().add(redisKey4, i);    // 在这个key里存10000个数据
        }

        String unionKey = "test:hll:union";
        redisTemplate.opsForHyperLogLog().union(unionKey, redisKey2, redisKey3, redisKey4); // 合并之后的存到这个key里,也可以传数组

        long size = redisTemplate.opsForHyperLogLog().size(unionKey);   // 统计合并后的
        System.out.println(size);
    }
    /*
    Hyperlonglog算法会有一些微量的误差
    结果:
    19891
     */

    // 统计一组数据的布尔值
    @Test
    public void testBitMap() {
        String redisKey = "test:bm:01";

        // 记录
        redisTemplate.opsForValue().setBit(redisKey, 1, true);   // 哪个key第几位然后值是多少
        redisTemplate.opsForValue().setBit(redisKey, 4, true);
        redisTemplate.opsForValue().setBit(redisKey, 7, true);

        // false不用存,默认的话就是false,只有true才需要设置

        // 查询
        System.out.println(redisTemplate.opsForValue().getBit(redisKey, 0));
        System.out.println(redisTemplate.opsForValue().getBit(redisKey, 1));
        System.out.println(redisTemplate.opsForValue().getBit(redisKey, 2));

        // 统计
        Object obj = redisTemplate.execute(new RedisCallback() {
            @Override
            public Object doInRedis(RedisConnection connection) throws DataAccessException {
                return connection.bitCount(redisKey.getBytes());     // 使用redis连接统计1的个数
            }
        });

        System.out.println(obj);
    }
    /*
    false
    true
    false
    3
     */

    // 统计3组数据的布尔值, 并对这3组数据做OR运算.
    @Test
    public void testBitMapOperation() {
        String redisKey2 = "test:bm:02";
        redisTemplate.opsForValue().setBit(redisKey2, 0, true);
        redisTemplate.opsForValue().setBit(redisKey2, 1, true);
        redisTemplate.opsForValue().setBit(redisKey2, 2, true);

        String redisKey3 = "test:bm:03";
        redisTemplate.opsForValue().setBit(redisKey3, 2, true);
        redisTemplate.opsForValue().setBit(redisKey3, 3, true);
        redisTemplate.opsForValue().setBit(redisKey3, 4, true);

        String redisKey4 = "test:bm:04";
        redisTemplate.opsForValue().setBit(redisKey4, 4, true);
        redisTemplate.opsForValue().setBit(redisKey4, 5, true);
        redisTemplate.opsForValue().setBit(redisKey4, 6, true);

        String redisKey = "test:bm:or";
        Object obj = redisTemplate.execute(new RedisCallback() {
            @Override
            public Object doInRedis(RedisConnection connection) throws DataAccessException {
                // 做 or 运算
                connection.bitOp(RedisStringCommands.BitOperation.OR,
                        redisKey.getBytes(), redisKey2.getBytes(), redisKey3.getBytes(), redisKey4.getBytes());
                return connection.bitCount(redisKey.getBytes());
            }
        });

        System.out.println(obj);

        System.out.println(redisTemplate.opsForValue().getBit(redisKey, 0));
        System.out.println(redisTemplate.opsForValue().getBit(redisKey, 1));
        System.out.println(redisTemplate.opsForValue().getBit(redisKey, 2));
        System.out.println(redisTemplate.opsForValue().getBit(redisKey, 3));
        System.out.println(redisTemplate.opsForValue().getBit(redisKey, 4));
        System.out.println(redisTemplate.opsForValue().getBit(redisKey, 5));
        System.out.println(redisTemplate.opsForValue().getBit(redisKey, 6));
    }
    /*
    7
    true
    true
    true
    true
    true
    true
    true
     */
}
7.5 网站数据统计

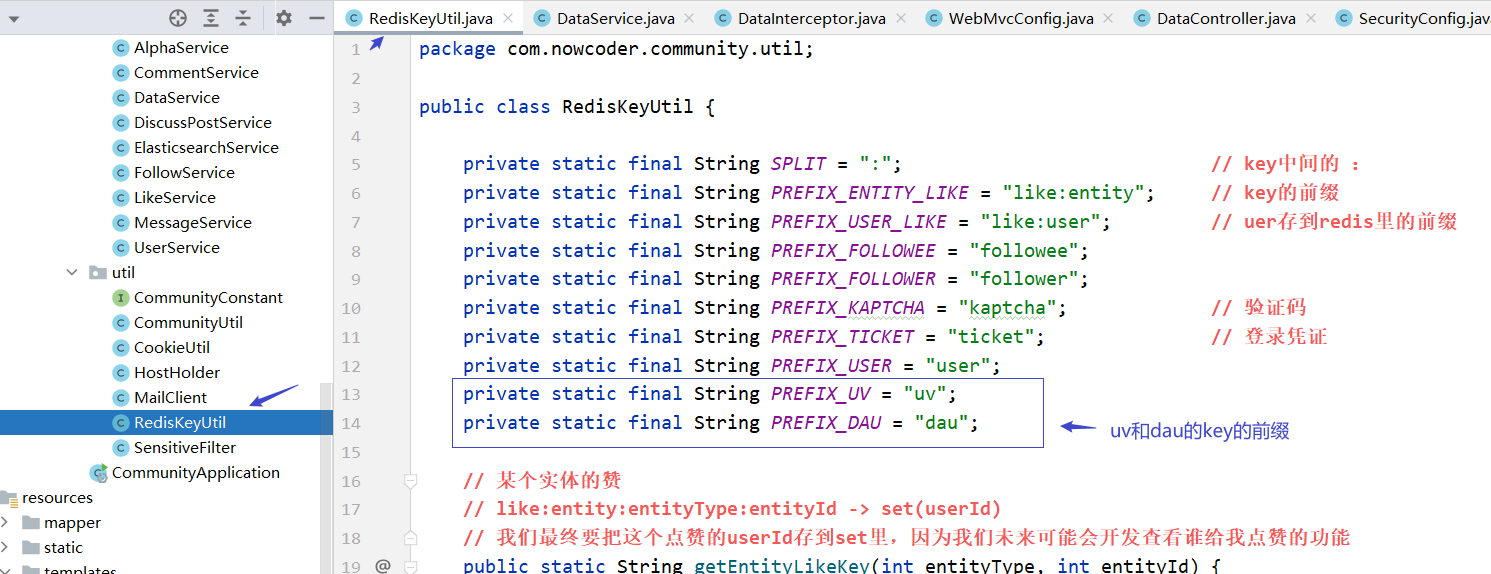
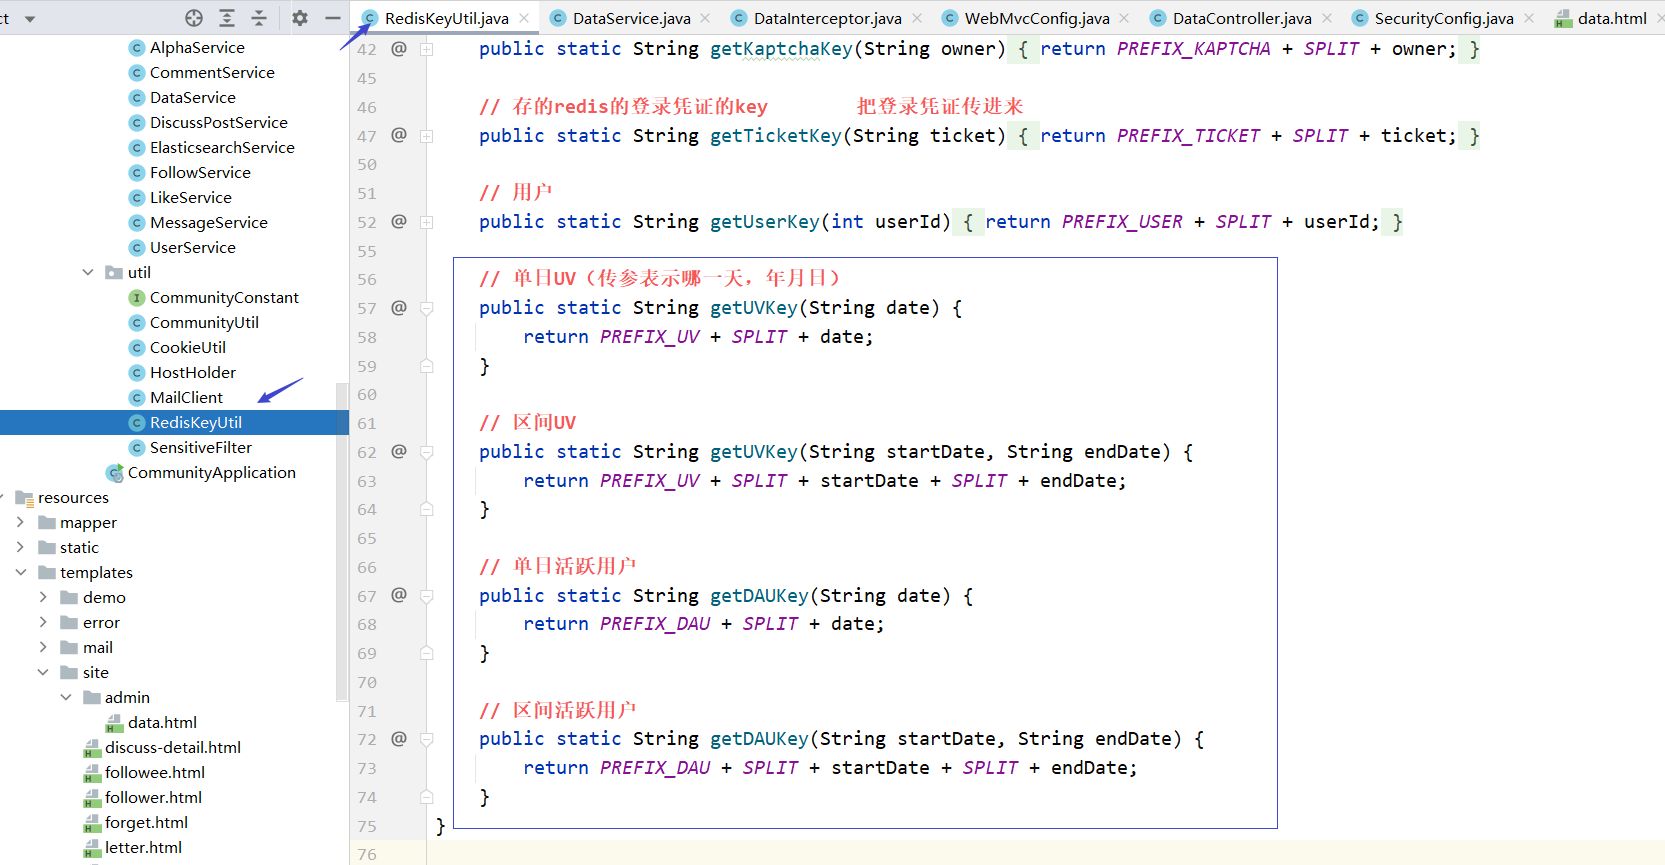
因为用到了redis做新的需求,所以打开 RedisKeyUtil,定义key
private static final String PREFIX_UV = "uv";
private static final String PREFIX_DAU = "dau";

// 单日UV(传参表示哪一天,年月日)
public static String getUVKey(String date) {
  return PREFIX_UV + SPLIT + date;
}

// 区间UV
public static String getUVKey(String startDate, String endDate) {
  return PREFIX_UV + SPLIT + startDate + SPLIT + endDate;
}

// 单日活跃用户
public static String getDAUKey(String date) {
  return PREFIX_DAU + SPLIT + date;
}

// 区间活跃用户
public static String getDAUKey(String startDate, String endDate) {
  return PREFIX_DAU + SPLIT + startDate + SPLIT + endDate;
}
使用redis的话命令式操作Redis的,比较简单,省去数据访问层,直接在业务层写即可
业务层(service)
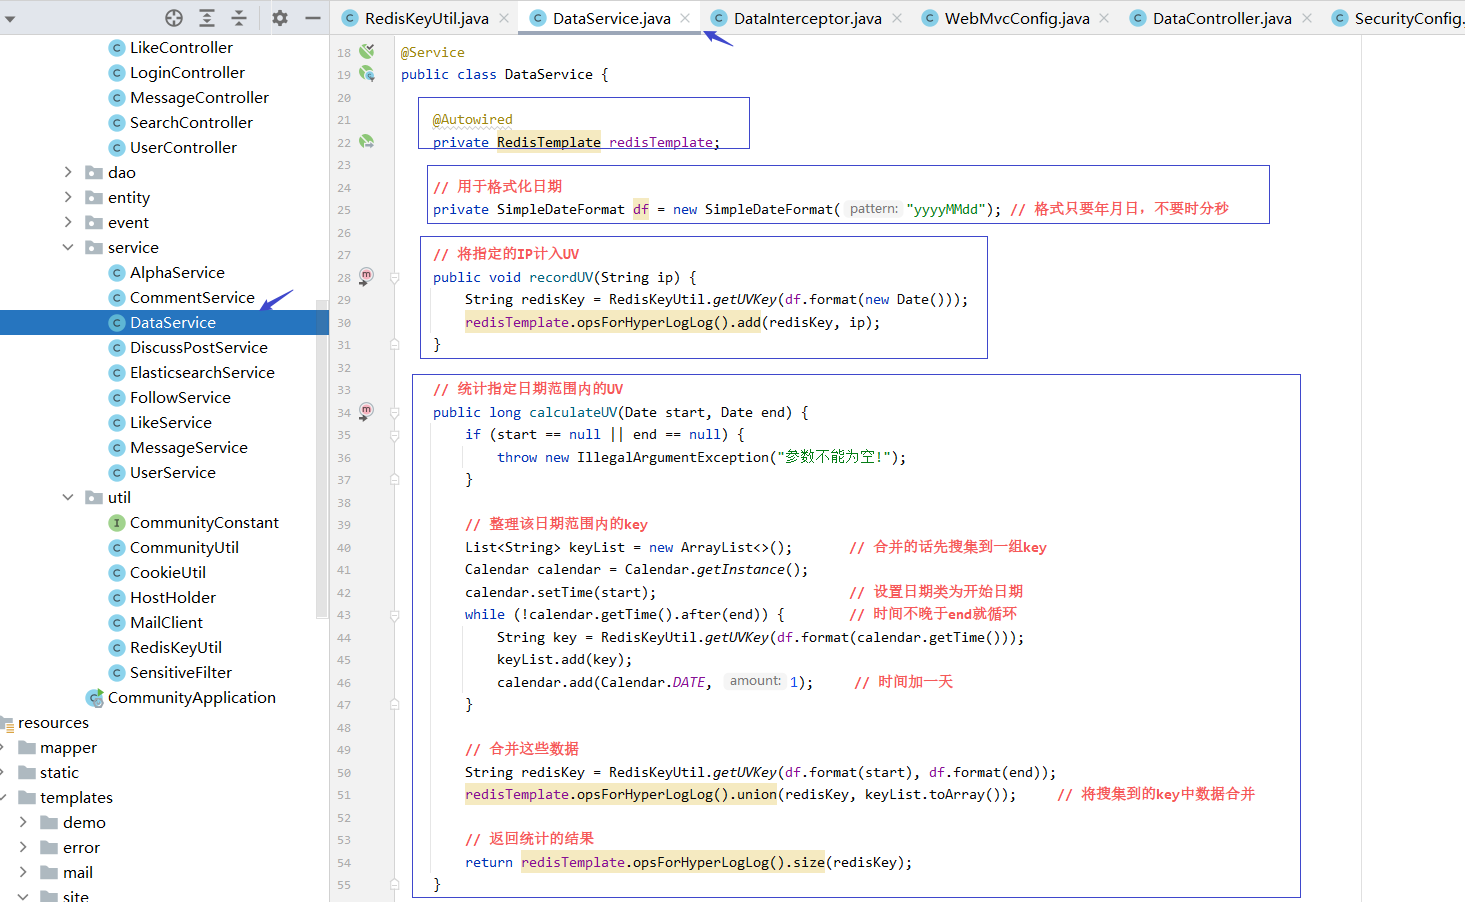
新建一个 DataService
@Service
public class DataService {
@Autowired
private RedisTemplate redisTemplate;
// 用于格式化日期
private SimpleDateFormat df = new SimpleDateFormat("yyyyMMdd"); // 格式只要年月日,不要时分秒
// 将指定的IP计入UV
public void recordUV(String ip) {
String redisKey = RedisKeyUtil.getUVKey(df.format(new Date()));
redisTemplate.opsForHyperLogLog().add(redisKey, ip);
}
// 统计指定日期范围内的UV
public long calculateUV(Date start, Date end) {
if (start == null || end == null) {
throw new IllegalArgumentException("参数不能为空!");
}
// 整理该日期范围内的key
List<String> keyList = new ArrayList<>(); // 合并的话先搜集到一组key
Calendar calendar = Calendar.getInstance();
calendar.setTime(start); // 设置日期类为开始日期
while (!calendar.getTime().after(end)) { // 时间不晚于end就循环
String key = RedisKeyUtil.getUVKey(df.format(calendar.getTime()));
keyList.add(key);
calendar.add(Calendar.DATE, 1); // 时间加一天
}
// 合并这些数据
String redisKey = RedisKeyUtil.getUVKey(df.format(start), df.format(end));
redisTemplate.opsForHyperLogLog().union(redisKey, keyList.toArray()); // 将搜集到的key中数据合并
// 返回统计的结果
return redisTemplate.opsForHyperLogLog().size(redisKey);
}
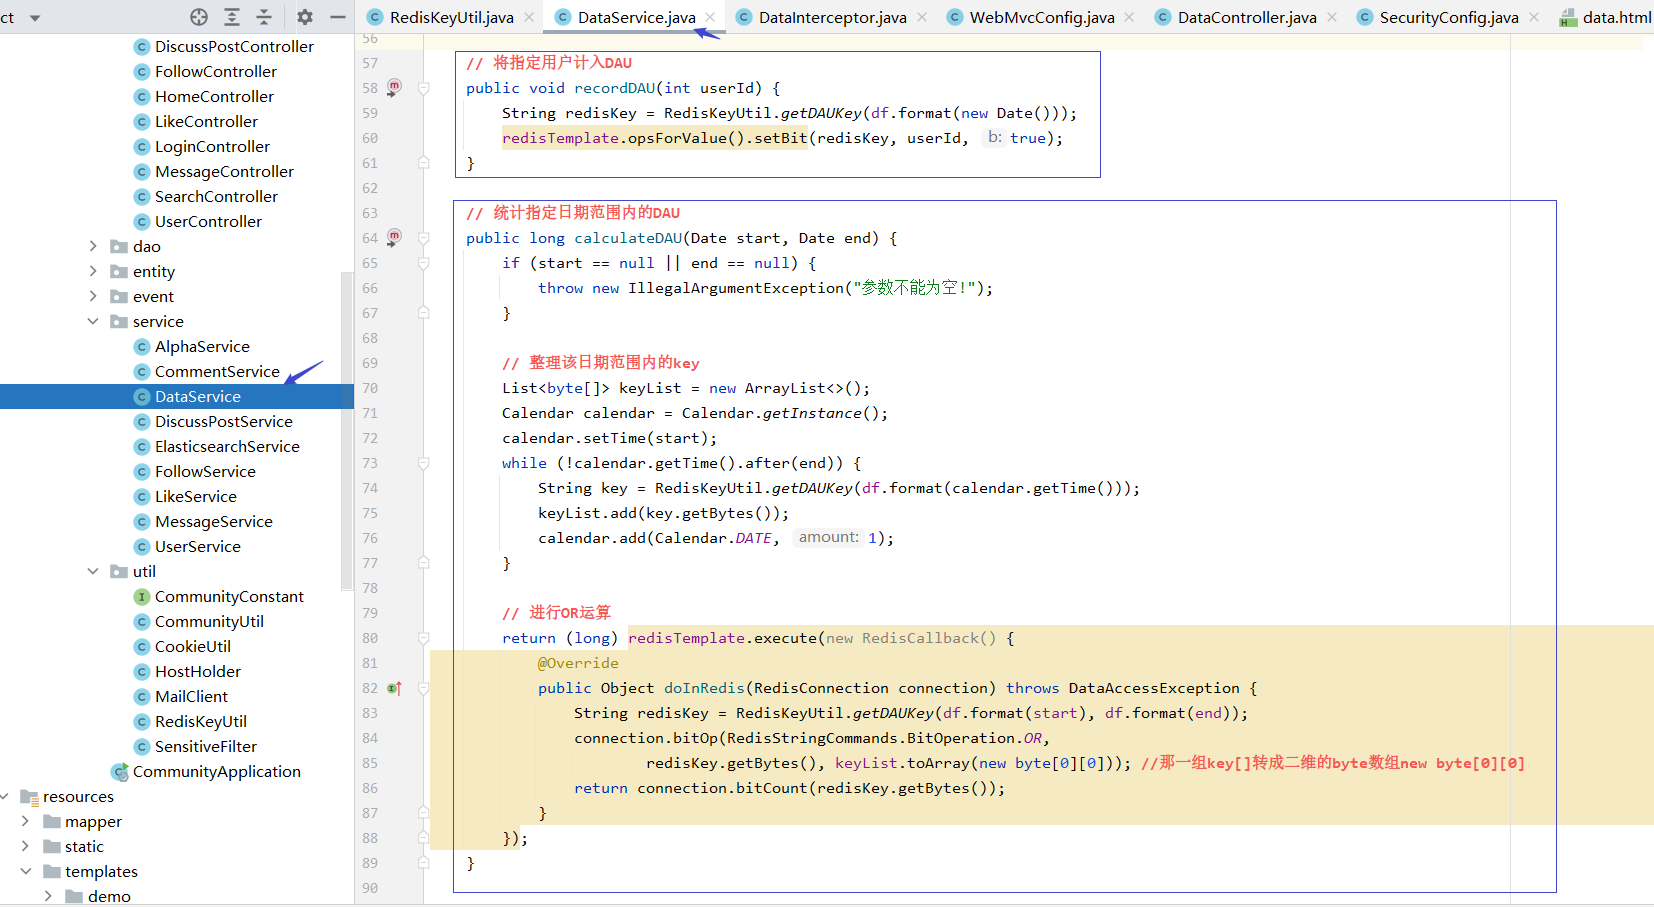
// 将指定用户计入DAU
public void recordDAU(int userId) {
String redisKey = RedisKeyUtil.getDAUKey(df.format(new Date()));
redisTemplate.opsForValue().setBit(redisKey, userId, true);
}
// 统计指定日期范围内的DAU
public long calculateDAU(Date start, Date end) {
if (start == null || end == null) {
throw new IllegalArgumentException("参数不能为空!");
}
// 整理该日期范围内的key
List<byte[]> keyList = new ArrayList<>();
Calendar calendar = Calendar.getInstance();
calendar.setTime(start);
while (!calendar.getTime().after(end)) {
String key = RedisKeyUtil.getDAUKey(df.format(calendar.getTime()));
keyList.add(key.getBytes());
calendar.add(Calendar.DATE, 1);
}
// 进行OR运算
return (long) redisTemplate.execute(new RedisCallback() {
@Override
public Object doInRedis(RedisConnection connection) throws DataAccessException {
String redisKey = RedisKeyUtil.getDAUKey(df.format(start), df.format(end));
connection.bitOp(RedisStringCommands.BitOperation.OR,
redisKey.getBytes(), keyList.toArray(new byte[0][0])); //那一组key[]转成二维的byte数组new byte[0][0]
return connection.bitCount(redisKey.getBytes());
}
});
}
}
表现层
表现层的逻辑分成两部分,1. 什么时候去记录这个值 2. 查看这个值
- 记录值
记录这个值我们每次请求都得记,因为每次请求都有可能是一个新的访问,很显然我们在拦截器里写比较合适
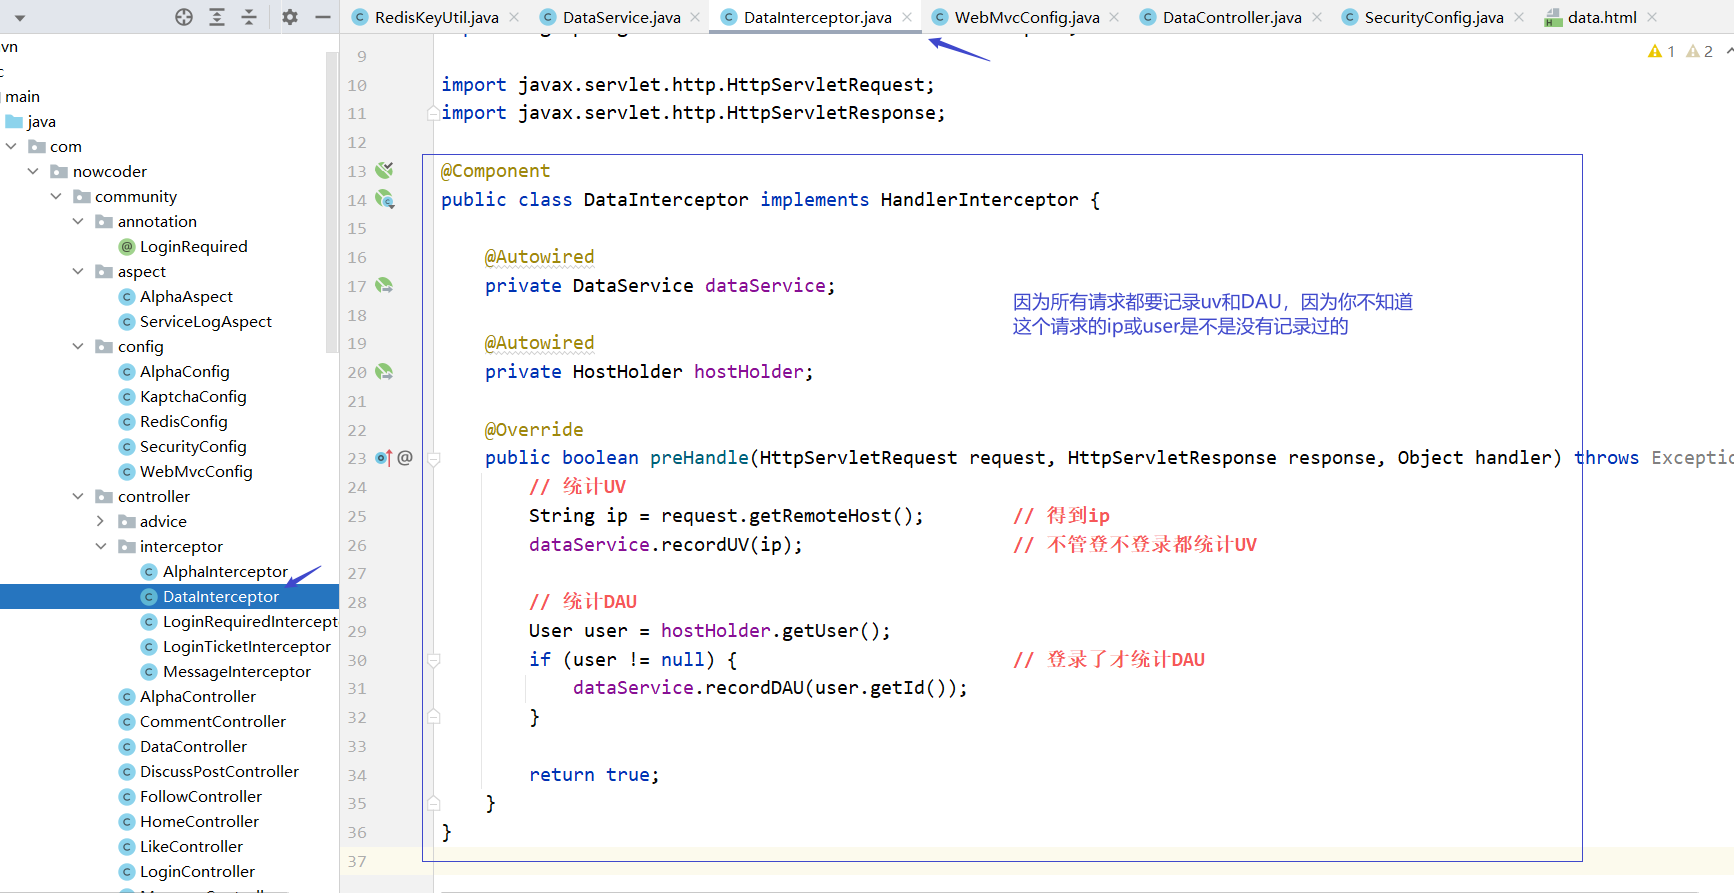
新建一个拦截器:DataInterceptor
@Component
public class DataInterceptor implements HandlerInterceptor {

    @Autowired
    private DataService dataService;

    @Autowired
    private HostHolder hostHolder;

    @Override
    public boolean preHandle(HttpServletRequest request, HttpServletResponse response, Object handler) throws Exception {
        // 统计UV
        String ip = request.getRemoteHost();        // 得到ip
        dataService.recordUV(ip);                   // 不管登不登录都统计UV

        // 统计DAU
        User user = hostHolder.getUser();
        if (user != null) {                         // 登录了才统计DAU
            dataService.recordDAU(user.getId());
        }

        return true;
    }
}
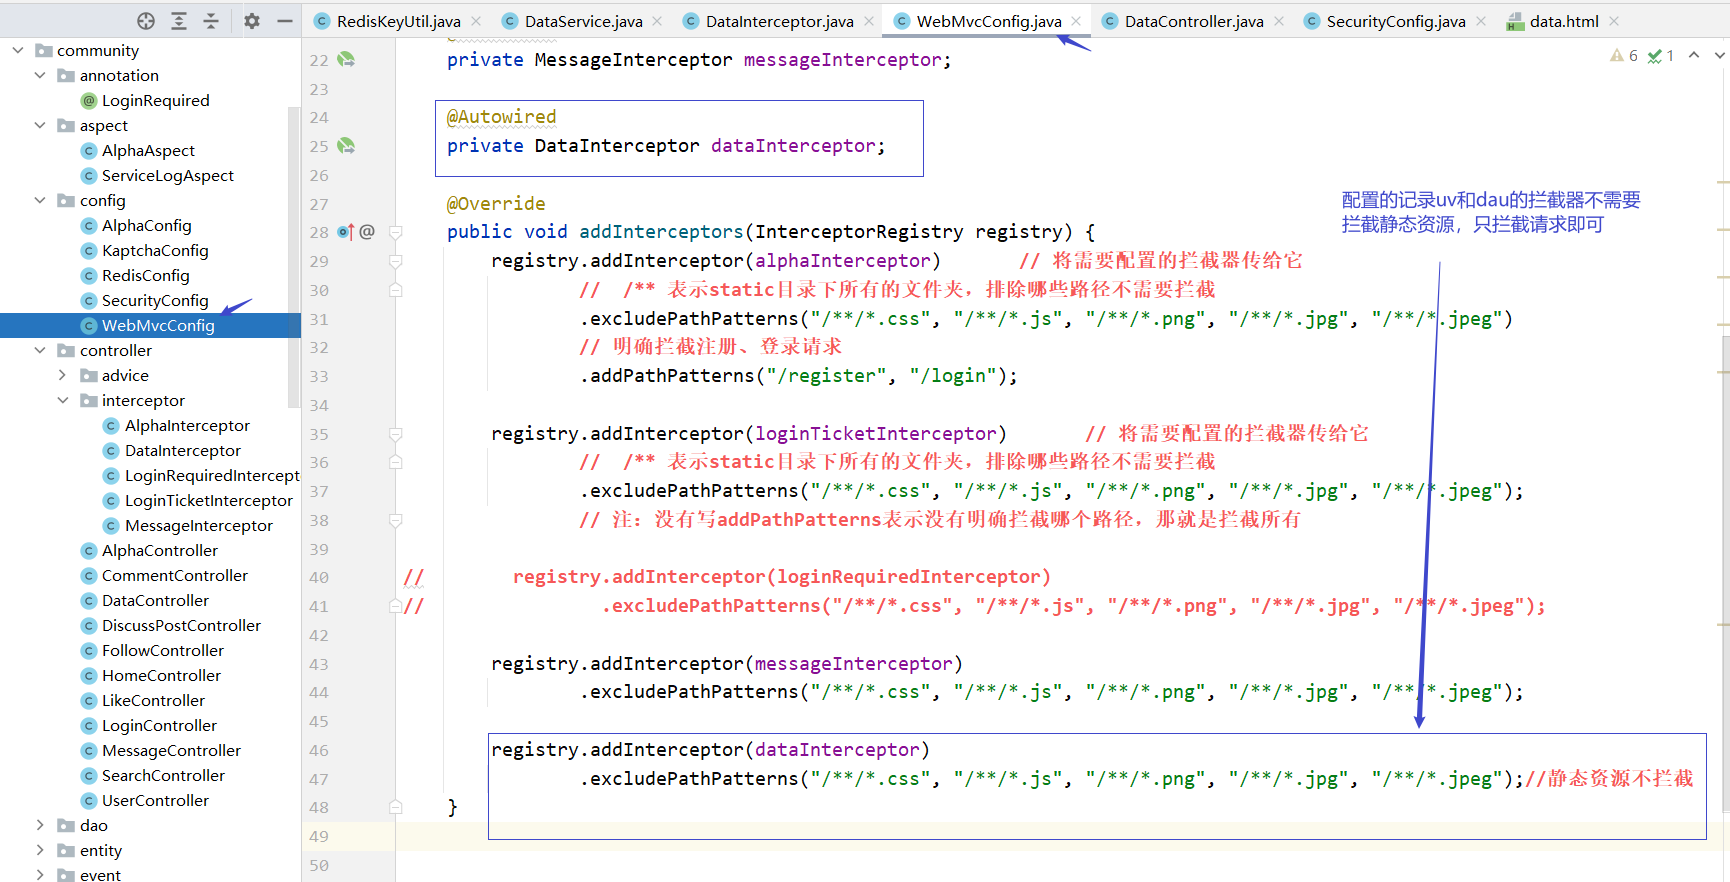
然后配置拦截器:
@Autowired
private DataInterceptor dataInterceptor;


registry.addInterceptor(dataInterceptor)
  .excludePathPatterns("/**/*.css", "/**/*.js", "/**/*.png", "/**/*.jpg", "/**/*.jpeg");
//静态资源不拦截
- 展现数据
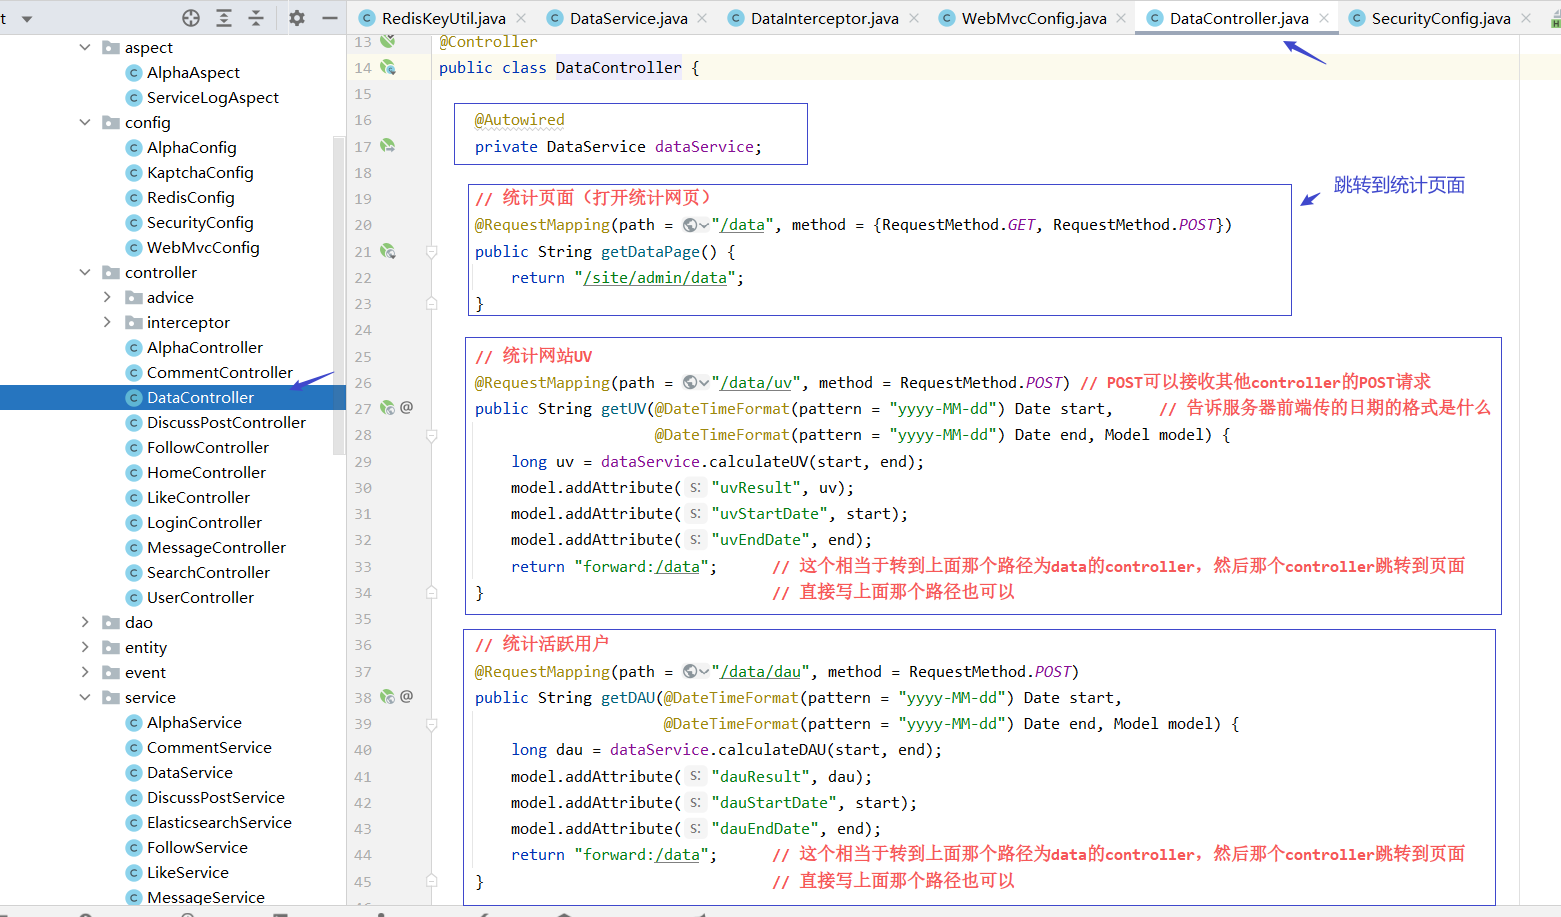
新建一个 DataController
@Controller
public class DataController {

    @Autowired
    private DataService dataService;

    // 统计页面(打开统计网页)
    @RequestMapping(path = "/data", method = {RequestMethod.GET, RequestMethod.POST})
    public String getDataPage() {
        return "/site/admin/data";
    }

    // 统计网站UV
    @RequestMapping(path = "/data/uv", method = RequestMethod.POST) // POST可以接收其他controller的POST请求
    public String getUV(@DateTimeFormat(pattern = "yyyy-MM-dd") Date start,     // 告诉服务器前端传的日期的格式是什么
                        @DateTimeFormat(pattern = "yyyy-MM-dd") Date end, Model model) {
        long uv = dataService.calculateUV(start, end);
        model.addAttribute("uvResult", uv);
        model.addAttribute("uvStartDate", start);
        model.addAttribute("uvEndDate", end);
        return "forward:/data";      // 这个相当于转到上面那个路径为data的controller,然后那个controller跳转到页面
    }                                // 直接写上面那个路径也可以

    // 统计活跃用户
    @RequestMapping(path = "/data/dau", method = RequestMethod.POST)
    public String getDAU(@DateTimeFormat(pattern = "yyyy-MM-dd") Date start,
                         @DateTimeFormat(pattern = "yyyy-MM-dd") Date end, Model model) {
        long dau = dataService.calculateDAU(start, end);
        model.addAttribute("dauResult", dau);
        model.addAttribute("dauStartDate", start);
        model.addAttribute("dauEndDate", end);
        return "forward:/data";      // 这个相当于转到上面那个路径为data的controller,然后那个controller跳转到页面
    }                                // 直接写上面那个路径也可以

}
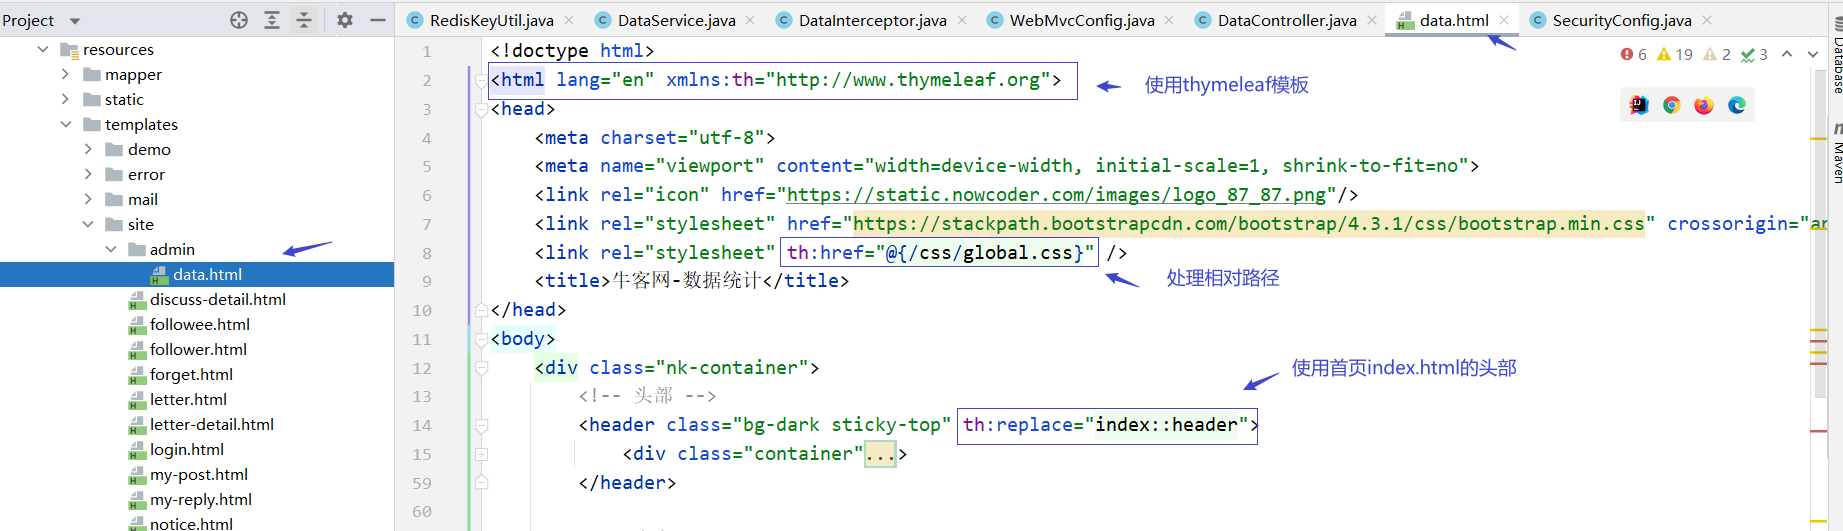
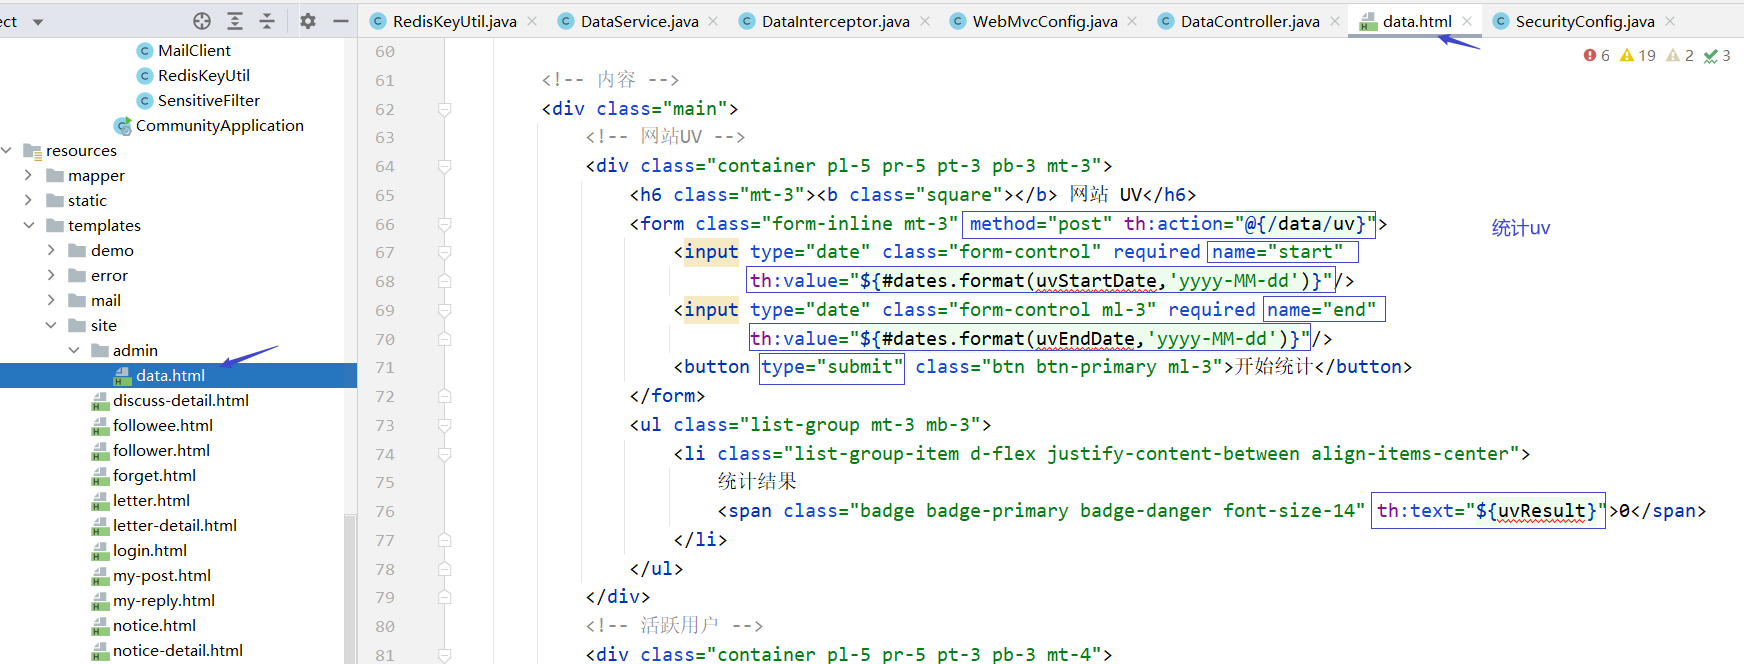
最后就是处理模板:data.html

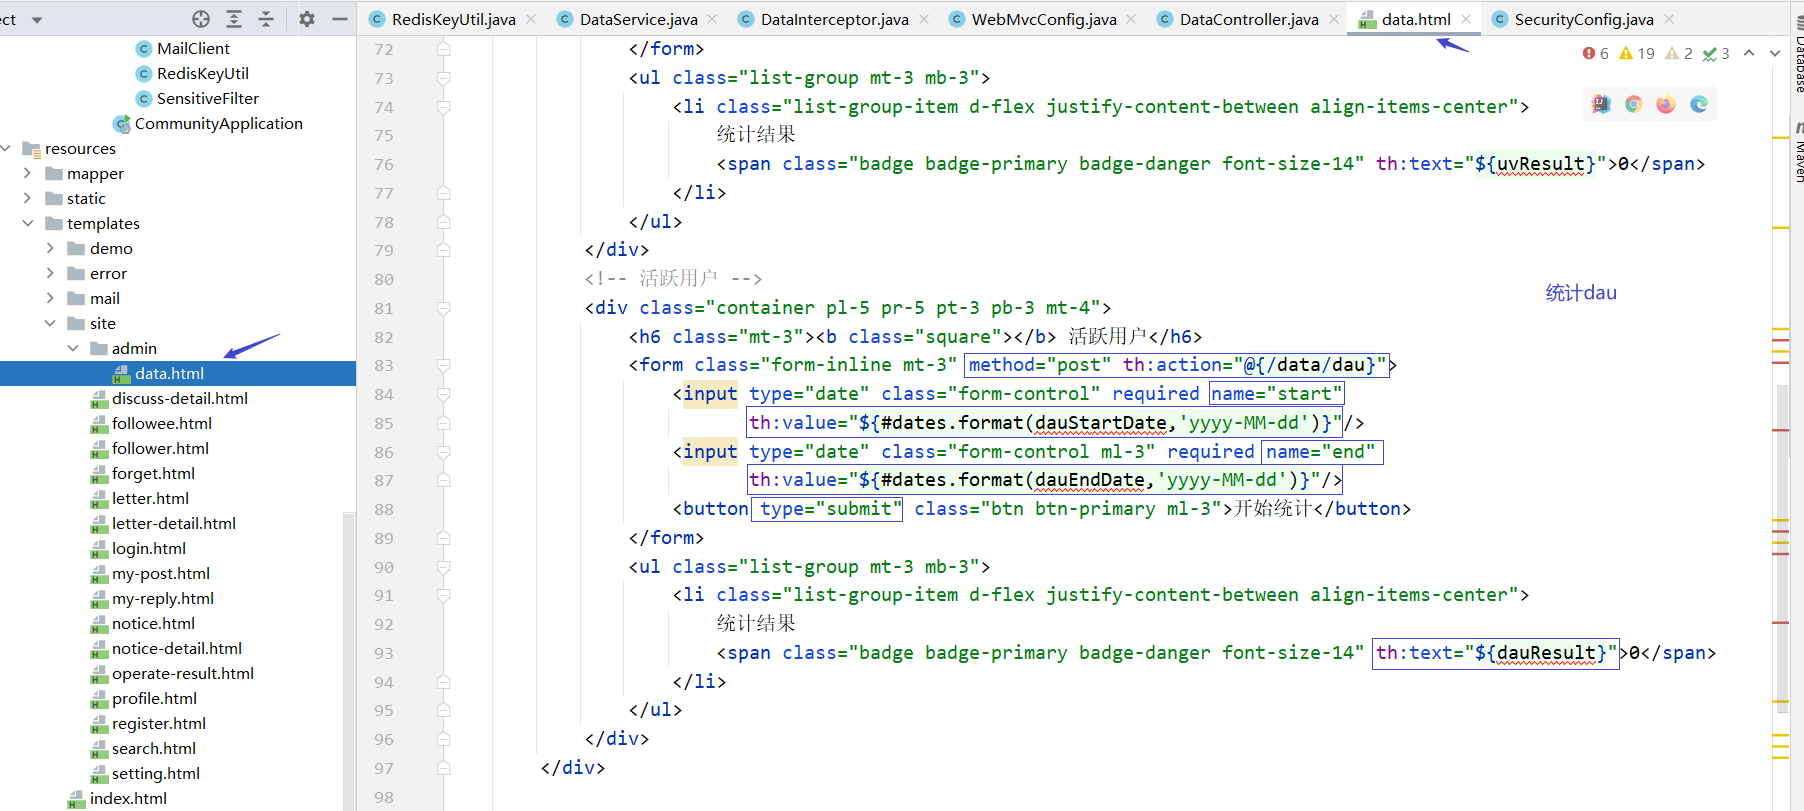
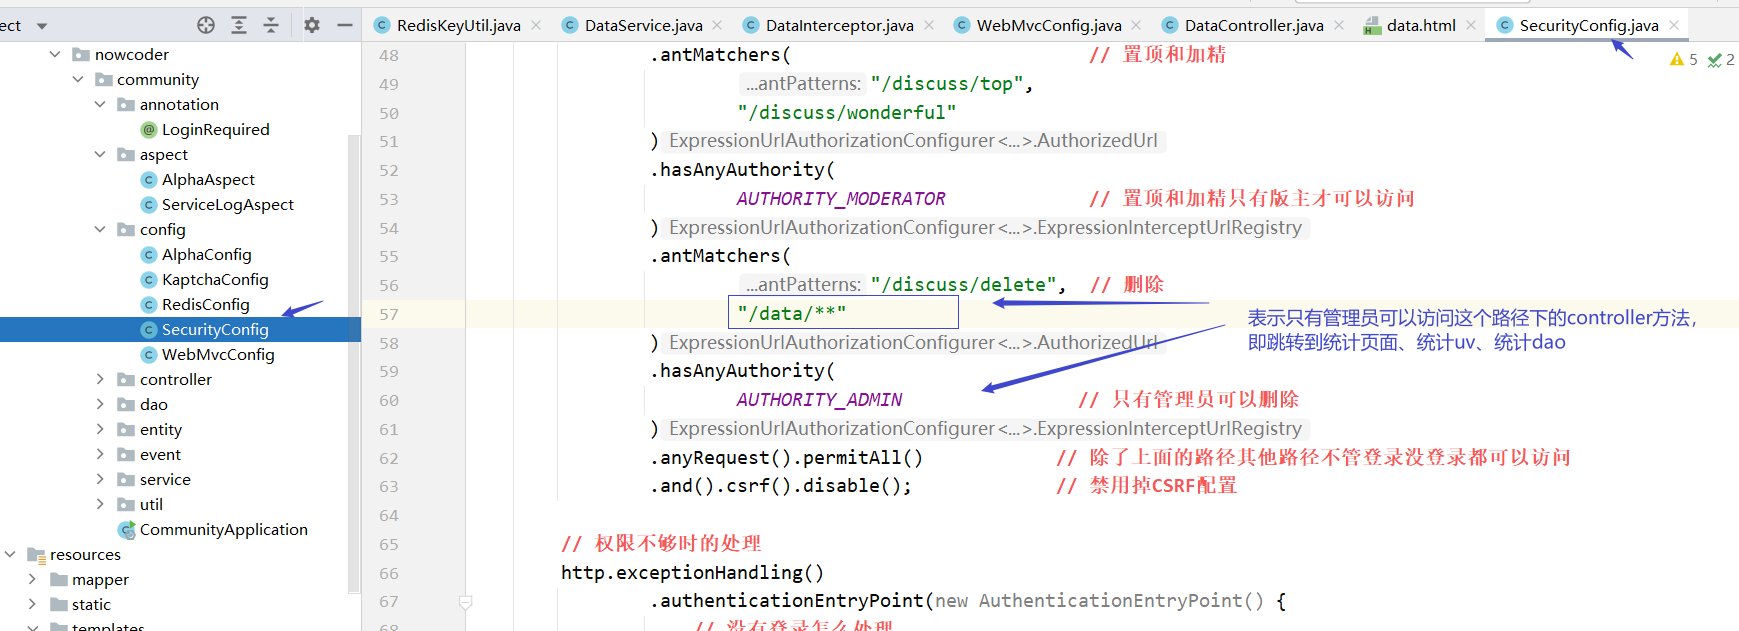
最后配置一下关于网站统计的功能只有管理员可以访问:
测试:
这个功能因为普通用户、版主是没有权限的,只有管理员是有权限的,所以就没有设置按钮,管理员如果想用的话,访问 /data 路径就可以跳转使用


 228
228


 被折叠的 条评论
为什么被折叠?
被折叠的 条评论
为什么被折叠?
 到【灌水乐园】发言


