


Git是一个分布式版本控制系统:记录项目代码
Git 是一个开源的分布式版本控制系统,用于敏捷高效地处理任何或小或大的项目。
Git 是 Linus Torvalds 为了帮助管理 Linux 内核开发而开发的一个开放源码的版本控制软件。
Git 与常用的版本控制工具 CVS, Subversion 等不同,它采用了分布式版本库的方式,不必服务器端软件支持。
Git 与 SVN 区别
Git 不仅仅是个版本控制系统,它也是个内容管理系统(CMS),工作管理系统等。
如果你是一个具有使用 SVN 背景的人,你需要做一定的思想转换,来适应 Git 提供的一些概念和特征。
Git 与 SVN 区别点:
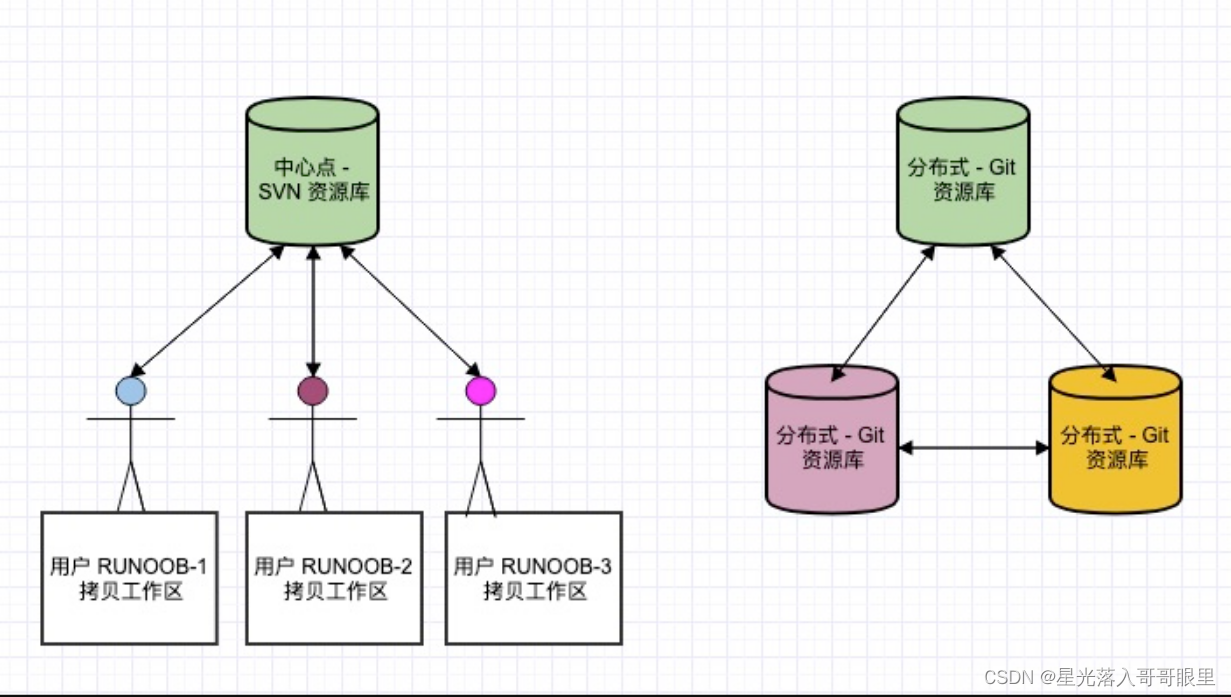
1、Git 是分布式的SVN 不是:这是 Git 和其它非分布式的版本控制系统,例如 SVN,CVS 等最核心的区别。
2、Git 把内容按元数据方式存储而 SVN 是按文件:所有的资源控制系统都是把文件的元信息隐藏在一个类似 .svn、.cvs 等的文件夹里。
3、Git 分支和 SVN 的分支不同:分支在 SVN 中一点都不特别,其实它就是版本库中的另外一个目录。
4、Git 没有一个全局的版本号而 SVN 有:目前为止这是跟 SVN 相比 Git 缺少的最大的一个特征。
5、Git 的内容完整性要优于 SVN:Git 的内容存储使用的是 SHA-1 哈希算法。这能确保代码内容的完整性,确保在遇到磁盘故障和网络问题时降低对版本库的破坏。
理论
Git官网
版本控制是一种记录一个或若个文件内容变化,以便将来查阅特定版本修订情况的系统(记录代码文件的变化),采用版本控制系统(version control system—>VCS)你就可以将某个文件回溯到之前的状态,甚至将整个项目都回退到过去某个时间点的状态,你可以比较文件的变化细节,查出最后是谁修改了哪个地方,从而找出导致怪异问题出现的原因,又是谁在何时报告了某个功能缺陷等等,使用版本控制系统通常还意味着,就算你乱来一气把整个项目中的文件改的改删的删,你也照样可以轻松恢复到原先的样子,但额外增加的工作量却微乎其微。
原理
版本控制系统存在的方式 (VCS version control system):
1、简单的VCS单个数据库记录代码的内容变化
2、集中式的版本控制系统CVCS centralized version control system svn
3、分布式的版本控制系统DVCS distributed version control system git
集中式的缺点是:单节点,会出现宕机的现象,不能及时处理
git特点:
1、直接记录快照,而非差异比较(不用比较差异)
2、Git一般只增加数据(拉取、上传代码)
3、Git保证代码完整性(git在每一次提交上传的时候,会比较远程仓库的信息校验和本地仓库的信息校验是否一样,一样的话继续上传,不一样停止上传,任何事情不可以绕开git操作)
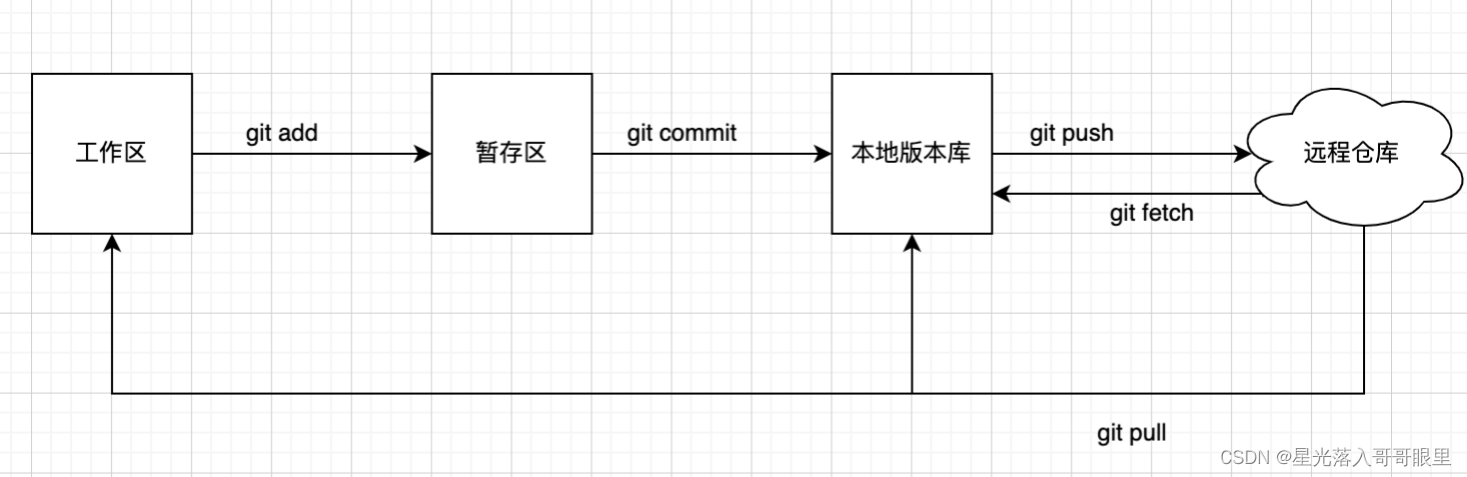
Git常规操作逻辑
1.添加到暂存区add
2.添加到本地仓库commit(新写的代码)
3.上传到远程仓库push
☑ 工作区(Working Directory):开发者直接编辑的地方,只要文件发生了更改,在这就会显示出来,包含追踪与未追踪文件。通过 git add 将工作区文件添加到暂存区。
☑ 暂存区(Stage | Index):数据暂时存放的区域,通过 git commit 将暂存区文件添加到本地版本库。
☑ 本地版本库(Local Commit History):存放所有已经提交的数据,通过 git push 推送到远程仓库。
搭建
wget -O /etc/yum.repos.d/CentOS-Base.repo https://repo.huaweicloud.com/repository/conf/CentOS-7-reg.repo
基础环境
[root@localhost ~]# yum -y install git

# 搭建本地仓库
[root@localhost ~]# mkdir /test
[root@localhost ~]# cd /test/
[root@localhost test]# git init
初始化空的 Git 版本库于 /test/.git/
[root@localhost test]# ls -a
.  ..  .git
编写代码把代码上传到本地仓库当中
[root@localhost test]# vim test.py
#!/usr/bin/python
print("hello")
[root@localhost test]# git add test.py  		//添加到暂存区
# 设置用户名密码
[root@localhost test]# git config --global user.name "zhangsan"
[root@localhost test]# git config --global user.email "zhangsan@163.com"
[root@localhost test]# git commit -m "first"	//-m指定标签(类似于定义一次快照)[保存到本地仓库中]
[master(根提交) 1147922] first
 1 file changed, 2 insertions(+)
 create mode 100644 test.py
[root@localhost test]# git log
···
[root@localhost test]# vim test.py
#!/usr/bin/python
print("hello")
print("12345")
[root@localhost test]# git add test.py
[root@localhost test]# git commit -m "second"
[master 22380c2] second
 1 file changed, 1 insertion(+)
代码的回滚
1.在暂存区中回滚
[root@localhost test]# vim test.py
#!/usr/bin/python
print("hello")
print("12345")
print("12345")
[root@localhost test]# git add test.py
[root@localhost test]# git status
# 位于分支 master
# 要提交的变更:
#   (使用 "git reset HEAD <file>..." 撤出暂存区)
#
#	修改:      test.py
#
[root@localhost test]# git reset HEAD test.py
重置后撤出暂存区的变更:
M	test.py
[root@localhost test]# git checkout -- test.py    #回滚
[root@localhost test]# cat test.py
#!/usr/bin/python
print("hello")
print("12345")
2.在本地仓库当中回滚
[root@localhost test]# vim test.py
#!/usr/bin/python
print("hello")
print("12345")
print("12345")
[root@localhost test]# git add test.py
[root@localhost test]# git commit -m "thrid"
[master e3cfea4] thrid
 1 file changed, 1 insertion(+)
[root@localhost test]# git log  #查看提交的内容
commit e3cfea48d6ca66ba62b295aa40acda3757d93eee
Author: zhangsan <zhangsan@163.com>
Date:   Sat Sep 18 19:38:38 2021 +0800
    thrid

commit 22380c2c75e1ba0e3e5e5c555c0a5f9d99aedf08
Author: zhangsan <zhangsan@163.com>
Date:   Sat Sep 18 19:35:35 2021 +0800
    second

commit 11479220f1d30bb2e8138d9a8243c5946dd508fb
Author: zhangsan <zhangsan@163.com>
Date:   Sat Sep 18 19:34:42 2021 +0800
    first
[root@localhost test]# git reset --hard 22380c2c75e1ba0e3e5e5c555c0a5f9d99aedf08
HEAD 现在位于 22380c2 second
[root@localhost test]# cat test.py
#!/usr/bin/python
print("hello")
print("12345")
删除本地仓库的文件
[root@localhost test]# git rm test.py
rm 'test.py'
[root@localhost test]# git commit -m "delete"
[root@localhost test]# ls
[root@localhost test]# git log
···    delete
分支
[root@localhost test]# git branch 	//查看所在的分支
* master
[root@localhost test]# git branch aa
[root@localhost test]# git branch
  aa
* master

[root@localhost test]# git checkout -b aa		//使用git checkout -b参数来创建一个分支,创建完成分支后会自动切换过去
切换到分支 'aa'
[root@localhost test]# git branch
* aa
  master
git checkout -b等价于	git branch dev/git checkout dev;  git branch 如果后面跟着名字则会创建分支,但不会切换
														  git checkout 后面如果是分支名称则切换过去!
git查看当前所有分支可以使用	  git branch -a
git重命名分支			      git branch -m old-branch new-branch
git删除本地分支			  git branch -D
git删除远程分支			  git push origin --delete/-d	 [注意这里的远程分支名不需要加origin,输入分支名就可以了]
git查看远程仓库分支情况	  git branch --remote/-r
基于某个分支上开出新分支	  git branch <new-branch> <base-branch>
基于某个提交开出新分支		  git branch <new-branch> commit_hash
基于某个tag开出有新分支	  git branch <new-branch> v1.1
查看工作区状态			  git status
查看具体修改内容			  git diff
git commit -am "注释"	  git add . & git commit -m的结合体。
git fetch				  查看远程仓库有没有更新,有更新就下载下来,如果没有更新就没有任何反应
git merge origin/main 	  合并远程分支(本地与远程合并)
git pull				  拉取远程仓库git fetch & git merge
git commit --amend		  修改最近的提交的文本消息。
git stash				  暂存我们代码
git stash pop			  将暂存取出继续开发
git cherry-pick			  将某个提交挑选过来
当你提交了代码到本地,但此时你想撤回这个提交,重新编辑修改一下。这时你可以通过 git reset 来实现。
撤销本地提交(保留修改)	   git reset --soft
撤销本地提交(舍弃修改)	   git reset --hard
撤销远程提交(回滚操作)	   git revert 分支x			git rebase -i HEAD~分支x 进行整理合并提交
git revert <commit_hash>来对指定提交进行回滚,如果遇到冲突就先解决冲突,然后执行git revert --continue继续。
---------------------------------------------------------------------------------------------------
[root@localhost test]# vim test.py
#!/usr/bin/python
print("1")
print("2")
print("3")
[root@localhost test]# git add test.py
[root@localhost test]# git commit -m "aa"
[root@localhost test]# git log
···会出现aa的那张快照
[root@localhost test]# git checkout master
切换到分支 'master'
[root@localhost test]# ls
[root@localhost test]# git log
···发现没有aa提交的那次事务

[root@localhost test]# git merge aa		  //合并分支:更新的原理是【更新log中的快照】
更新 48f74f1..4aeb254
Fast-forward
这里需要说一点,如果你在任何分支下创建文件,没有提交到仓库,那么它在所有仓库都是可见的,比如你在分支dev中创建了一个文件,没有使用git add和git commit提交,此时你切换到master,这个文件依旧存在的,因为你创建的文件在工作目录中,你切换仓库时git只会更新跟仓库有关的文件,无关的文件依然存放在工作区。
[root@localhost test]# cat test.py
#!/usr/bin/python
print("1")
print("2")
print("3")
[root@localhost test]# git log 			 /查看历史提交日志/
···将会发现aa
远程仓库
github注册属于自己的账号
github创建存储库,本地仓库和远程仓库是通过ssh相连
[root@localhost test]# ssh-keygen -t rsa
[root@localhost test]# cat /root/.ssh/id_rsa.pub 		《公钥传到github上面》
···
[root@localhost test]# ssh -T git@github.com	"-T意思是说禁止分配伪终端"    测试是否通过正确的身份验证,并且会话将立即结束
Hi 145d! You've successfully authenticated, but GitHub does not provide shell access.
如果ssh使用此选项登录系统时,由于禁用将无法获得终端;但仍能够获得shell,只不过看起来像在本地也没有很多应有的环境变量,例如命令提示符。
从命令行推送存储库
[root@localhost test]# git remote add origin git@github.com:145d/aaa.git
[root@localhost test]# git push -u origin master						//git push命用于从将本地的分支版本上传到远程并合并
Warning: Permanently added the RSA host key for IP address '13.250.177.223' to the list of known hosts.
···
 * [new branch]      master -> master
分支 master 设置为跟踪来自 origin 的远程分支 master。			"有一部分是截图,所以就不一一展示了"

git push origin master		        将本地的master分支推送到origin主机的master分支
git push --force origin master		如果本地版本与远程版本有差异,但又要强制推送可以使用--force参数
加了参数-u后,以后即可直接用git push代替git push origin master,意思就是我们不用在后面加 origin + 要提交的分支名 ,直接git push即可!
但是前提是,第一次提交需要加 -u参数后,后面的提交就直接可以 git push。
如果你在git push的时候没有带入-u参数,那么config中就不会有branch "master"这一项。去.git/config看配置文件
 [branch "master"]
    remote = origin
    merge = refs/heads/master
# 配置说明,这告诉Git 2件事:
当您在master分支上时,默认的远程分支是origin。
在git pull master分支上使用时(未指定任何远程和分支),请使用默认的remote(源)并合并来自remote master分支的更改。
git克隆
[root@localhost ~]# mkdir /test1
[root@localhost ~]# cd /test1
[root@localhost test1]# git clone git@github.com:145d/aaa.git
[root@localhost test1]# ls
aaa(库名)
[root@localhost test1]# cd aaa/
[root@localhost aaa]# ls
test.py
修改内容 可以上传
[root@localhost aaa]# vim test.py
#!/usr/bin/python
print("hello")
[root@localhost aaa]# git add test.py
[root@localhost aaa]# git config --global user.name "lisi"
[root@localhost aaa]# git config --global user.email "lisi@qq.com"
[root@localhost aaa]# git commit -m "lisi"
[root@localhost aaa]# git push origin master
添加版本的标签
[root@localhost aaa]# git tag v1.0.1
[root@localhost aaa]# git push origin v1.0.1
[root@localhost aaa]# vim test.py
#!/usr/bin/python
print("hello")
print("12345")
[root@localhost aaa]# git add test.py
[root@localhost aaa]# git commit -m "hehe"
[root@localhost aaa]# git push origin master
[root@localhost aaa]# git tag v1.0.2
[root@localhost aaa]# git push origin v1.0.2
[root@localhost aaa]# git tag
v1.0.1
v1.0.2
git中origin的含义
git push命令用于将本地分支的更新,推送到远程主机。它的格式与git pull命令相仿。
git push <远程主机名> <本地分支名>:<远程分支名>
注意:这里的:前后是必须没有空格的。
注意,分支推送顺序的写法是<来源地>:<目的地>,
所以git pull是<远程分支>:<本地分支>,
而git push 是<本地分支>:<远程分支>。
如果省略远程分支名,则表示将本地分支推送与之存在"追踪关系"的远程分支(通常两者同名),如果该远程分支不存在,则会被新建~
[1]git push origin master	》》》这条命令表示,将本地的master分支推送到origin主机的master分支。如果后者不存在,则会被新建。
[2]git push origin :master  》》》如果省略本地分支名,则表示删除指定的远程分支,因为这等同于推送一个空的本地分支到远程分支。
git push origin --delete master	 上面命令表示删除origin主机的master分支。[两者效果相同]
[3]git push origin			》》》如果当前分支与远程分支之间存在追踪关系,则本地分支和远程分支都可以省略。
上面命令表示,将当前分支推送到origin主机的对应分支。
[4]git push					》》》如果当前分支只有一个追踪分支,那么主机名都可以省略。
如果当前分支与多个主机存在追踪关系,则可以使用-u选项指定一个默认主机,这样后面就可以不加任何参数使用git push。
[5]git push -u origin master》》》将本地的master分支推送到origin主机,同时指定origin为默认主机,后面就可以不加任何参数使用git push了
[6]git remote -v			》》》默认的clone后出现的origin 代表的是远程仓库 , origin是远程仓库在本地的别名
master和origin/master 代表的是本地的master指针 和 远程仓库的master指针
如果本地分支名与远程分支名相同
git push <远程主机名> <本地分支名>
git push origin master:本地分支master提交到远端master
当test分支到远端test分支
git push origin test:test
参数:
push:将本地仓库与远程仓库合并
-u:将本地仓库分支与远程仓库分支一起合并,就是说将master的分支也提交上去,这样你就可以在远程仓库上看到你在本地仓库的master中创建了多少分支,不加这个参数只将当前的master与远程的合并,没有分支的历史记录,也不能切换分支
origin:远程仓库的意思,如果这个仓库是远程的那么必须使用这个选项
master:提交本地matser分支仓库
GIT 拉取特定的目录
在进行项目开发的时候,有时候会有这样的需求那就是:我们只希望从Git仓库里取指定的文件或者文件夹出来。在SVN里面,这非常容易实现,因为SVN基于文件方式存储,而Git却是基于元数据方式分布式存储文件信息的,它会在每一次Clone的时候将所有信息都取回到本地,即相当于在你的机器上生成一个克隆版的版本库。因此在Git1.7.0以前,这无法实现,但是幸运的是在Git1.7.0以后加入了Sparse Checkout模式,这使得Check Out指定文件或者文件夹成为可能。
仓库只有一个的情况下,只想拉取某个目录文件;其他文件没用到的会很浪费时间;
关键:Git的sparse checkout模式
大致步骤
1,本地新建文件夹或者执行命令
mkdir newproject && cd newproject
2,目录初始化
git init
3,设置远程仓库地址
git remote add -f origin <origin_url>
点评: 同一项目,不同分支的url是一样的,后续再切换分支。按道理这时候,并没有拉取文件,但是,运行命令的时候,出现了下面的更新项
4,设置sparse checkout模式,允许克隆子目录
git config core.sparsecheckout true
5,设置指定拉取的目录(*是通配符,!是反选;例如 clients/ 表示clients目录下所有)
echo clients/html >> .git/info/sparse-checkout
点评:上述命令中,可变的部分,只有clients/html。改成项目中,想要拉取的目录。
6,拉取
git pull origin master
第6步如果遇到 fatal: Couldn’t find remote ref master;
# 表示主线名称不是master,可以通过分支命令查看git branch -a
git branch -a
remotes/origin/main
根据上面提示,主线名称是main,则执行
git pull origin main
具体
mkdir project_folder && cd project_folder
git init
git remote add -f origin <url>

上面的代码会帮助你创建一个空的本地仓库,同时将远程Git Server URL加入到Git Config文件中。
接下来,我们在Config中允许使用Sparse Checkout模式:
git config core.sparsecheckout true
接下来你需要告诉Git哪些文件或者文件夹是你真正想Check Out的,你可以将它们作为一个列表保存在.git/info/sparse-checkout文件中。
例如:
echo “libs” >> .git/info/sparse-checkout
echo “apps/register.go” >> .git/info/sparse-checkout
echo “resource/css” >> .git/info/sparse-checkout
最后,你只要以正常方式从你想要的分支中将你的项目拉下来就可以了:
git pull origin master
具体您可以参考Git的Sparse checkout文档: http://schacon.github.io/git/git-read-tree.html#_sparse_checkout
解释说明:
“稀疏结帐”允许稀疏地填充工作目录。它使用 skip-worktree 位(参见git-update-index(1))告诉 Git 工作目录上的文件是否值得查看。
“git read-tree”和其他基于合并的命令(“git merge”、“git checkout”……)可以帮助维护跳过工作树位图和工作目录更新。$GIT_DIR/info/sparse-checkout用于定义跳过工作树参考位图。当“git read-tree”需要更新工作目录时,它会根据这个文件重新设置索引中的skip-worktree位,它使用与.gitignore文件相同的语法。如果条目与此文件中的模式匹配,则会在该条目上设置 skip-worktree。否则 skip-worktree 将被取消设置。
然后它将新的跳过工作树值与前一个值进行比较。如果 skip-worktree 从 unset 变为 set,它将添加相应的文件。如果它从设置变为未设置,则该文件将被删除。
虽然$GIT_DIR/info/sparse-checkout通常用于指定哪些文件在其中。您还可以使用否定模式指定哪些文件不在其中。例如,要删除“不需要的”文件:
*
!不需要的
另一个棘手的事情是当您不再需要sparse checkout完全重新填充工作目录。您不能只禁用“sparse_checkout”,因为 skip-worktree 仍在索引中,并且您的工作目录仍然很少填充。您应该使用$GIT_DIR/info/sparse-checkout文件内容重新填充工作目录,如下所示:
*
然后您可以禁用sparse_checkout。默认禁用“git read-tree”和类似命令中的稀疏检出支持。您需要打开core.sparseCheckout以获得稀疏结帐支持
Make effort a habit, not an impulse!


 808
808


 被折叠的 条评论
为什么被折叠?
被折叠的 条评论
为什么被折叠?
 到【灌水乐园】发言


