


用户管理
登录和退出mysql
本地登录客户端命令:mysql -uroot -p'密码'
远程登录:
语法:mysql -u 用户名 -p'密码' -h ip地址 -P 端口号(如果没改端口就不用指定)
例如:mysql -uroot -p'zlp@123' -h192.168.242.136.134 -P 3306
mysql -h192.168.242.134 -P 3306 -uroot -p'zlp@123' -e 'show databases;'
-h:指定主机名 【默认localhost】
-P:mysql服务器端口 【默认3306】 可以修改mysql配置文件vim /etc/my.cnf 修改端口
-u:指定登录用户 【默认root】
-p:指定登陆密码 【默认为空密码】
-e:接sql语句,可以写多条用;隔开
创建用户
可以通过两条命令实现用户创建
1、create user '用户名' @'登录主机' identified by '密码'
mysql> create user 'user1'@'localhost' identified by 'zlp@123';
#客户端主机:
%                        所有主机远程登录
192.168.246.%            192.168.246.0网段的所有主机
192.168.246.252            指定主机
localhost               只允许本地用户登录

#数据库.表名
*.*             所有库下的所有表
web.*           web库下的所有表
web.stu_info    web库下的stu_info表

 #identified by  设置密码
mysql> flush privileges;   #更新授权表
2、grant 权限 on 库.表 to '用户名'@'登陆主机' identified by '密码'
mysql> grant all on *.* to 'user2'@'localhost' identified by 'zlp@123';
 #all 所有权限(不包括授权权限)
 #*.* 所有库下的所有表

grant 权限 on 库.表 to '用户名'@'登陆主机' identified by '密码'; 没有用户时创建用户并授权,有用户时授权    注意:root用授权是grant 授权权限谨慎给予!

mysql> flush privileges;
修改用户名:rename user '旧用户名'@'登录主机' to '新用户名'@'旧登录主机'
删除用户
方法一:
drop user 用户名
mysql> DROP USER 'user1'@’localhost’;

方法二:
delete from mysql.user where user='用户名' and host='登陆主机';
mysql> delete from mysql.user where user='user1' and host='localhost';
修改用户密码
root修改自己的密码
方法一:
mysqladmin -uroot -p'旧密码' password '新密码'

方法二:
mysql> update mysql.user set authentication_string=password('新密码') where user='root' and host='localhost';   #重启mysql,或者刷新授权表

方法三:
alter user 'root'@'localhost' indentified by '新密码';

方法四:
set password=password('新密码');     #给哪个用户修改密码,就在哪个用户下执行
上面方法将会在后面的版本remove,使用下面方法
set password='新密码';
root修改其他用户密码
方法一:
    mysql> SET PASSWORD FOR user3@'localhost'=password('new_password');
    上面的方法会在将来remove,使用下面的方法:
    mysql> SET PASSWORD FOR user3@’localhost’='new_password';

方法二:
    UPDATE mysql.user SET authentication_string=password(‘new_password’)
    	WHERE user=’user3’ AND host=’localhost’;

 方法三:
    alter user 'u1'@'localhost' identified by 'new_password'

 方法四:
    grant select on mysql.user 'u1'@'localhost' identified by 'new_password'
普通用户修改自己密码
    mysql> SET password=password('new_password');

    mysql> select * from mysql.user\G
    mysql> alter user 'wing'@'localhost' identified by 'Zzzlll123!@';
查看现有的密码策略
mysql> SHOW VARIABLES LIKE 'validate_password%';
+--------------------------------------+--------+
| Variable_name                        | Value  |
+--------------------------------------+--------+
| validate_password_check_user_name    | OFF    |
| validate_password_dictionary_file    |        |
| validate_password_length             | 8      |
| validate_password_mixed_case_count   | 1      |
| validate_password_number_count       | 1      |
| validate_password_policy             | MEDIUM |
| validate_password_special_char_count | 1      |
+--------------------------------------+--------+

参数解释:
validate_password_length :#密码最少长度,默认值是8最少是0
validate_password_dictionary_file:#用于配置密码的字典文件,字典文件中存在的密码不得使用。
validate_password_policy: #代表的密码策略,默认是MEDIUM
密码强度检查等级,对应等级为:0/LOW、1/MEDIUM、2/STRONG,默认为1
    0/LOW:只检查长度;
    1/MEDIUM:检查长度、数字、大小写、特殊字符;
    2/STRONG:检查长度、数字、大小写、特殊字符字典文件。
validate_password_number_count :#最少数字字符数,默认1最小是0
validate_password_mixed_case_count :#最少大写和小写字符数(同时有大写和小写),默认为1最少是0
validate_password_special_char_count :#最少特殊字符数,默认1最小是0
找回密码方法
5.6/5.7版本:
1、修改mysql配置文件
在my.cnf中添加skip_grant_tables
[root@localhost~]# vim /etc/my.cnf
......
skip_grant_tables

[root@localhost~]# sustemctl restart mgsqld
2、修改密码
[root@localhost~]# mysql -uroot     #不用密码直接登录mysql数据库
mysql> update mysql.user set authentication_string=password('新密码') where user='root' and host='localhost';
3、注释掉免密登陆后,重启mysql,登陆
vim /etc/my.conf
#skip-grant-tables

systemctl restart mysqld

mysql -uroot -p'密码'
报错处理——了解
问题1:ERROR You must reset your password using ALTER USER statement before executing this statement
解决方案:ALTER USER 'root'@'localhost' IDENTIFIED BY 'Xiaoming250';

创建用户时报错:
mysql> create user 'lll'@'192.168.%' IDENTIFIED BY 'lll123';
ERROR 1819 (HY000): Your password does not satisfy the current policy requirements
报错原因:密码强度不够。
解决方法:(该账号为测试账号,所以采用降低密码策略强度)
mysql> set global validate_password_policy=0;
Query OK, 0 rows affected (0.00 sec)
mysql> set global validate_password_length=4;  (#数据库默认的最低密码长度为4,即使修改为1也是不能成功的,会自动修改为4,除非在mysql配置文件中开启弱密码强度 vim /etc/my.cnf
插入validate_password_policy=0  然后重启mysqld)
Query OK, 0 rows affected (0.00 sec)
mysql> SHOW VARIABLES LIKE 'validate_password%';
+--------------------------------------+-------+
| Variable_name                        | Value |
+--------------------------------------+-------+
| validate_password_dictionary_file    |       |
| validate_password_length             | 4     |
| validate_password_mixed_case_count   | 1     |
| validate_password_number_count       | 1     |
| validate_password_policy             | LOW   |
| validate_password_special_char_count | 1     |
+--------------------------------------+-------+
6 rows in set (0.00 sec)
再次创建用户,成功

报错:
mysql> SET PASSWORD FOR zz@'localhost'=password('Zzzlll!123');
ERROR 1133 (42000): Can't find any matching row in the user table
解决方案:先创建用户zz@'localhost'
报错:
[root@b0505f448652 ~]# mysqladmin -u root -p2 password '4';
mysqladmin: [Warning] Using a password on the command line interface can be insecure.
Warning: Since password will be sent to server in plain text, use ssl connection to ensure password safety.
mysqladmin: unable to change password; error: 'Your password does not satisfy the current policy requirements'
解决方案:在mysql配置文件中开启弱密码强度 vim /etc/my.cnf
插入validate_password_policy=0  然后重启mysqld
权限控制
权限级别
Global level:系统级,所有库,所有表,的权限
Database level:某个数据库中的所有表,的权限
Table level:库中的某个表,的权限
Column level:表中的某个字段,的权限
procs level:某个存储过程,的权限(了解)
proxies level:代理服务器,的权限(了解)
权限列表
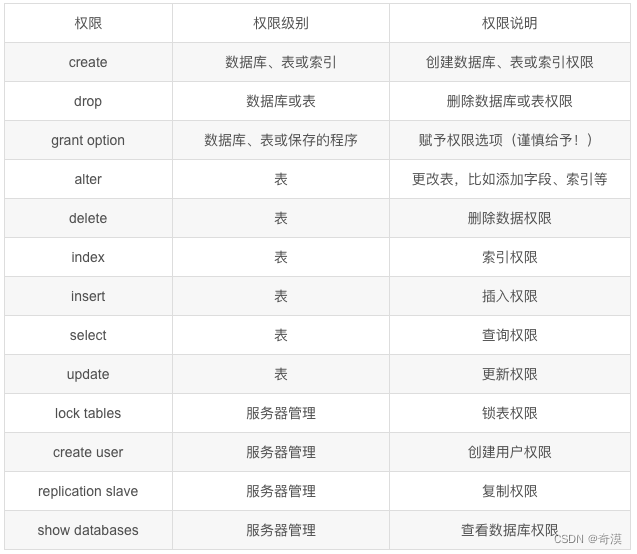
查看权限记录表:
因为超级管理员默认已经设置。所以直接查询权限即可。
Global level
    select * from mysql.user\G

用户字段:root
权限字段:Select_priv
安全字段:*B1DD4ADE47888D9AEC4D705C85230F1B52D2A817
Database level
select * from mysql.db\G;
测试库权限
mysql> create database ttt;
Query OK, 1 row affected (0.00 sec)
mysql> grant all on ttt.* to 'u1'@'localhost' identified by 'Zzzlll@123';
Query OK, 0 rows affected, 1 warning (0.00 sec)
mysql> select * from mysql.db\G
验证:
#mysql -u u1 -pZzzlll@123
>show databases;Table level
select * from mysql.tables_priv\G;
grant all on k0.t1 to 'u1'@'localhost' identified by 'Zzzlll@123';
验证:
#mysql -u u1 -pZzzlll@123
>use k0
>show tables;Column level
select * from mysql.columns_priv\G;
insert into mysql.columns_priv(host,db,user,table_name,column_name,column_priv) values('10.18.44.%','data','ying','t1','id','select');
前提是有库,有表,有权限。赋予权限
用户存在授权
mysql> GRANT  ALL  ON  *.*   TO 'user3'@’localhost’;
              权限    库名.表名   账户名
mysql> FLUSH PRIVILEGES;
用户不存在,创建并授权
mysql> grant all on *.* to 'user2'@'localhost' identified by 'Zzzlll@123';
 #all 所有权限(不包括授权权限)
 #*.* 所有库下的所有表

grant 权限 on 库.表 to '用户名'@'登陆主机' identified by '密码'; 没有用户时创建用户并授权,有用户时授权    注意:root用授权是grant 授权权限谨慎给予!

mysql> flush privileges;
回收权限
语法:revoke 权限 on 数据库.数据表 from '用户'@'登录主机';
被回收的权限必须存在,否则会出错
整个数据库,使用on database.*;
特定的表:使用on database.table;
mysql> revoke select,delete on *.* from 'user2'@'localhost';    #回收指定权限

mysql> revoke all  on *.* from 'user2'@'localhost';         #回收所有权限
查看权限
查看自己的权限
mysql> SHOW GRANTS\G看别人的权限
mysql> SHOW GRANTS FOR tom@'localhost'\G


 1979
1979


 被折叠的 条评论
为什么被折叠?
被折叠的 条评论
为什么被折叠?
 到【灌水乐园】发言


