


一、创建spring容器
首先建立Test类和service类
在Test类中创建spring容器

自定义两个注解@ComponmentScan和@Componment注解,提供扫描路径方法

package com.spring;

import java.lang.annotation.ElementType;
import java.lang.annotation.Retention;
import java.lang.annotation.RetentionPolicy;
import java.lang.annotation.Target;

@Target(ElementType.TYPE)
@Retention(RetentionPolicy.RUNTIME)
public @interface Component {
    String value() default "";
}

package com.spring;

import java.lang.annotation.ElementType;
import java.lang.annotation.Retention;
import java.lang.annotation.RetentionPolicy;
import java.lang.annotation.Target;

@Target(ElementType.TYPE)
@Retention(RetentionPolicy.RUNTIME)
public @interface ComponentScan {
    String value() default "";
}
创建spring容器类和appconfig工具类


二、手写模拟Spring扫描底层实现
创建一个UserService的bean,扫描工具类看是否有通过这个注解得到的类信息。
//spring容器类
public class GaoApplicationContext {
    private  Class configClass;

    public GaoApplicationContext(Class configClass) {
        this.configClass = configClass;

        //扫描工具类看是否有通过这个注解得到的类信息
        //这段代码的意思是从一个类的注解中获取ComponentScan注解,并将其赋值给componentScanAnnotation变量。
        //具体来说,configClass是一个类对象,getAnnotation(ComponentScan.class)是通过反射获取configClass类上的ComponentScan注解。
        //如果configClass类上存在ComponentScan注解,则返回该注解的实例;否则返回null。
        //将返回的注解实例赋值给componentScanAnnotation变量,可以通过该变量来访问注解的属性值。
        //通过这段代码,我们可以在运行时动态地获取类上的注解,并进一步处理注解的属性值。
        //(ComponentScan)是一种强制类型转换的写法,
        //将configClass.getAnnotation(ComponentScan.class)返回的注解实例转换为ComponentScan类型。
        //在Java中,通过反射获取注解实例时,返回的是Annotation类型,而不是具体的注解类型。
        //因此,如果我们需要访问注解的属性值或者调用注解的方法,就需要将其转换为具体的注解类型。这就是使用(ComponentScan)进行类型转换的作用。
        //在这段代码中,configClass.getAnnotation(ComponentScan.class)返回的注解实例被转换为ComponentScan类型,
        //并赋值给componentScanAnnotation变量,以便后续访问注解的属性值
        if (configClass.isAnnotationPresent(ComponentScan.class)){
            ComponentScan componentScanAnnotation = (ComponentScan) configClass.getAnnotation(ComponentScan.class);

            //扫描路径 com.service(并不是扫描service目录下的文件,而是编译后.class文件即target文件夹service下的文件)
            String path = componentScanAnnotation.value();

            path = path.replace(".","/"); //  com/service

            //传相对路径到classLoader里面 D:\test\spring\target\classes\com\service
            ClassLoader classLoader = GaoApplicationContext.class.getClassLoader();
            URL resource = classLoader.getResource(path);

            File file = new File(resource.getFile());

            System.out.println(file);
            //判断resource里面传的是否是一个文件夹
            if (file.isDirectory()){
                //获得所有文件夹的名称
                File[] files = file.listFiles();

                //得到想要的.class文件
                for (File f : files){
                    //得到绝对路径的名字
                    String fileName = f.getAbsolutePath();
                    //判断是否是,class文件
                    //判断你的.class文件名是不是一个bean
                    //就是看你的对象有没有@Componment注解
                    //通过反射判断获是否有@Componment注解
                    if (fileName.endsWith(".class")){

                        //com\service\UserService
                        //获得类名
                        String className = fileName.substring(fileName.indexOf("com"), fileName.indexOf(".class"));
                        className = className.replace("\\",".");
                        System.out.println(className);

                        try {
                            Class<?> clazz = classLoader.loadClass(className);
                            if(clazz.isAnnotationPresent(Component.class)){
                                //  Bean

                            }
                        }catch (ClassNotFoundException e){
                            e.printStackTrace();;
                        }


                    }

                }

            }
        }


    }
    public  Object getBean(String beanName){
        return null;
    }
三、模拟BeanDefinition的生成
创建BeanDifinition类,生成getter()、setter()方法,通过判断是否含有scope注解来进行生成


第二步和第三步总的来说就是先扫描-->BeanDefinition-->beanDefinitionMap,扫描之后创建对象,将对象放入map容器当中,然后将所有的单例都查找出来并且创建对象实例化单例Bean存到单例池里面。

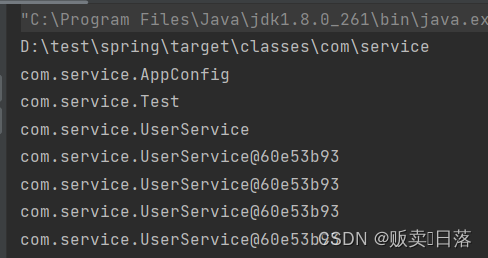
四、测试
我们可以测试一下,在test中获取UserService对象的时候,Userservice中不添加@Scope("prototype")和添加是否不同
可以很明显的看出单例和多例的区别


 1444
1444


 被折叠的 条评论
为什么被折叠?
被折叠的 条评论
为什么被折叠?
 到【灌水乐园】发言


