


目录
一、案例源码
微服务IASS 网关 sentinel 认证授权中心的搭建模板: 微服务IASS 网关 sentinel 认证授权中心的搭建模板
二、网关、sentinel熔断限流搭建
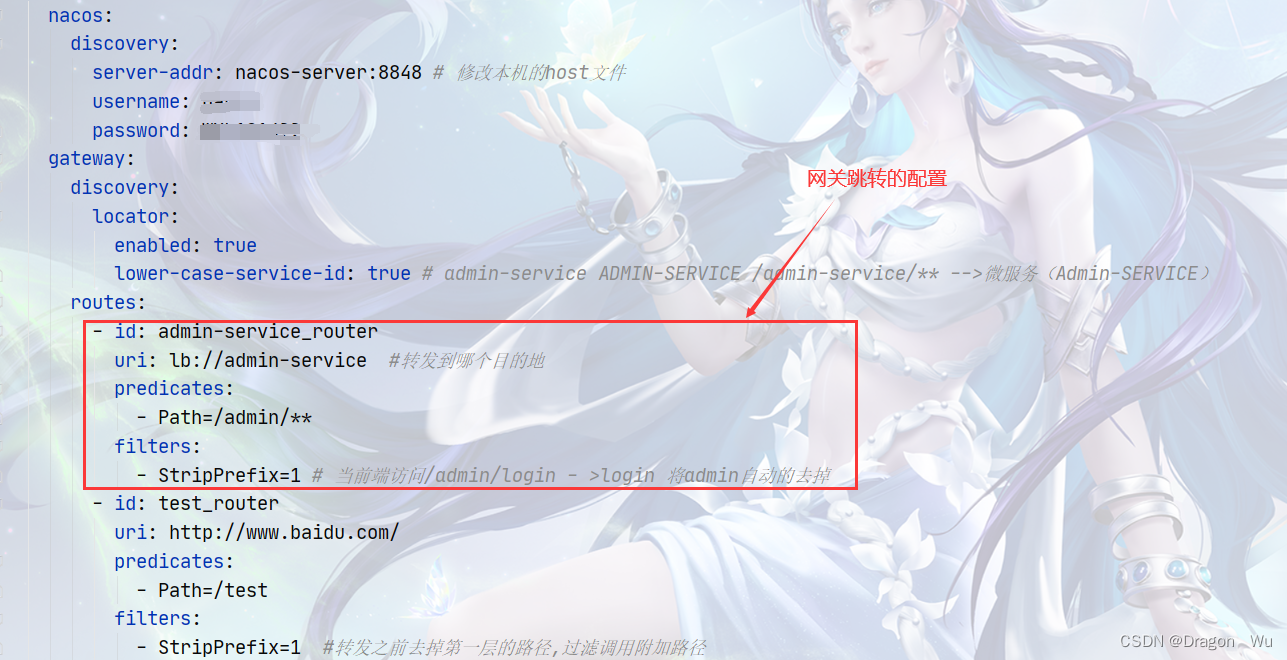
1、网关路由
将网关和对应微服务注册发现到Nacos中,采用网关负载均衡来路由各个微服务集群。
2、网关配置熔断限流策略
通过网关进行的限流策略有两个维度的限流:
1、网关维度;2、API分组维度的限流
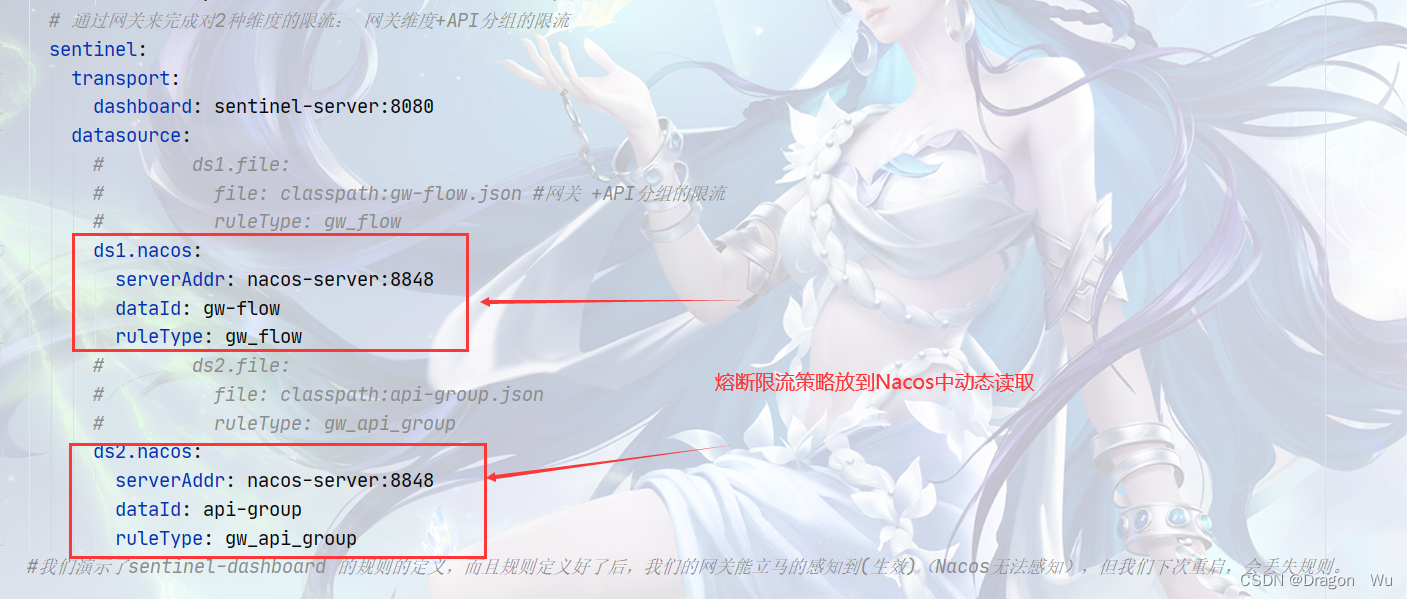
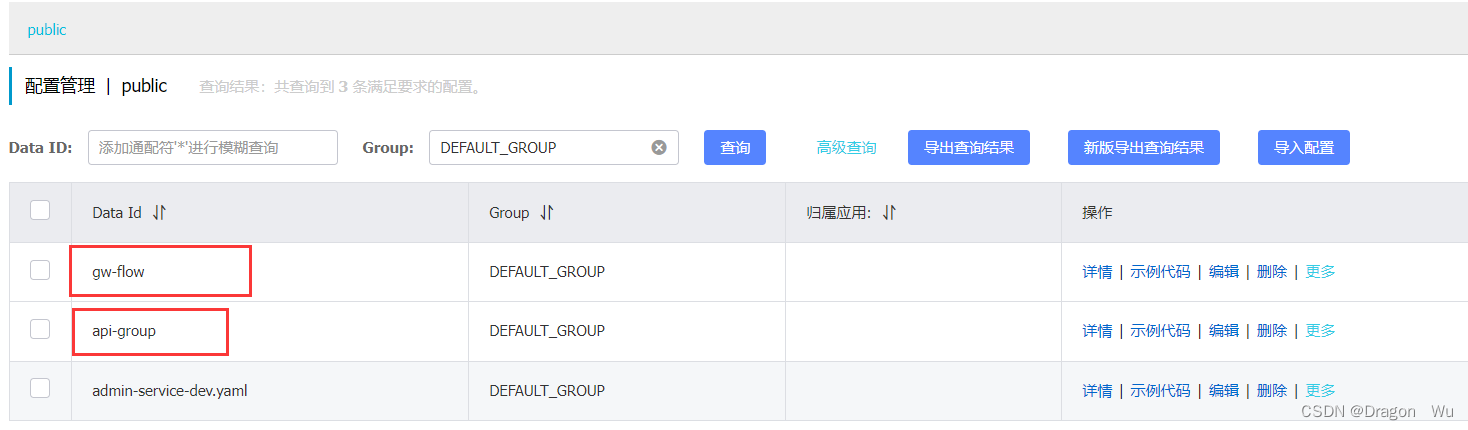
两个维度限流的文件我将其存到Nacos中,便可实现Nacos动态更改熔断限流策略。
要注意的是,虽然熔断限流策略可以被sentinel的可视化操作界面进行动态更改,但更改后的内容也只是缓存在内存里的,若要下次重启仍然保留,需要将该对应的熔断限流策略复制粘贴到,Nacos的对应限流文件里,进行刷新。
网关限流:
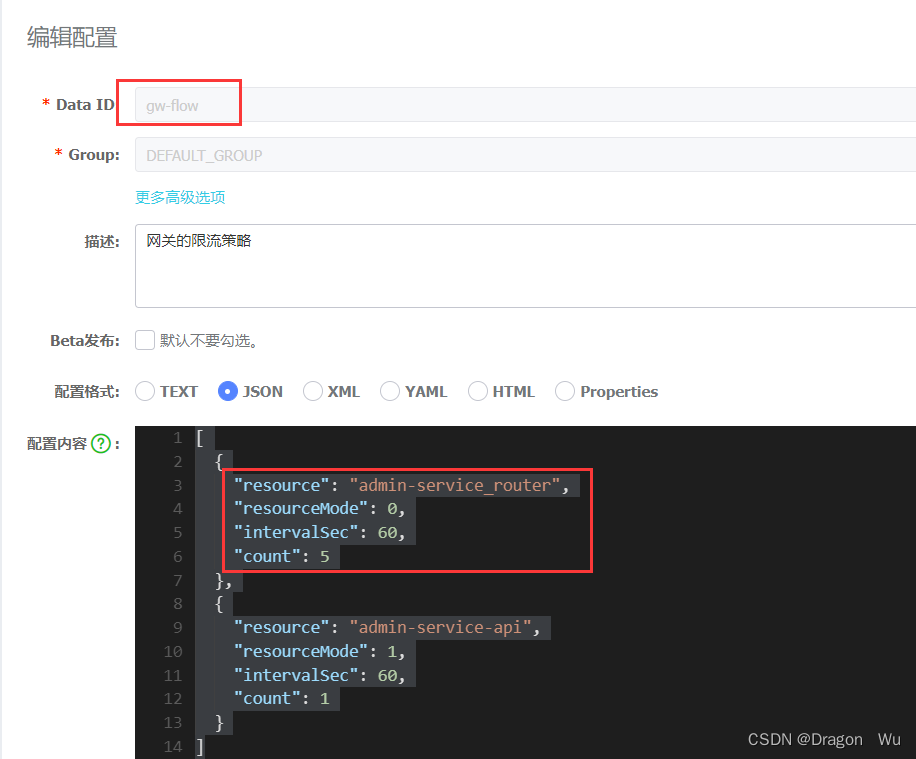

Api分组的限流策略: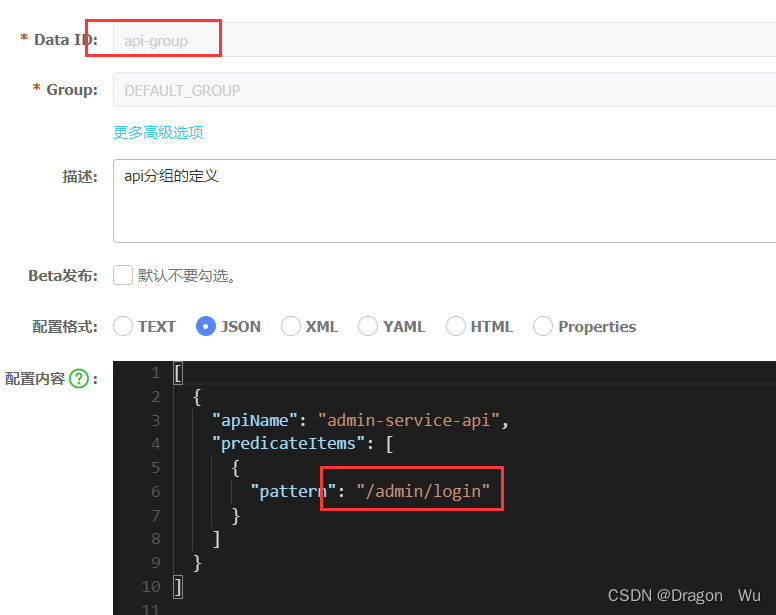

测试结果:
通过访问测试我们可以看到,若该路径在API分组策略里,那么该路径会优先执行api分组限流里的策略,否则执行网关的统一限流策略。
3、网关的Token过滤器
授权服务器会给每个微服务在登录成功时授权对应的token,网关需要对这些请求进行判断已筛选出需要token验证的请求。
package com.dragonwu.filter;

import com.alibaba.fastjson.JSONObject;
import org.apache.commons.lang.StringUtils;
import org.apache.http.HttpHeaders;
import org.springframework.beans.factory.annotation.Autowired;
import org.springframework.beans.factory.annotation.Value;
import org.springframework.cloud.gateway.filter.GatewayFilterChain;
import org.springframework.cloud.gateway.filter.GlobalFilter;
import org.springframework.core.Ordered;
import org.springframework.core.io.buffer.DataBuffer;
import org.springframework.data.redis.core.StringRedisTemplate;
import org.springframework.http.HttpStatus;
import org.springframework.http.server.reactive.ServerHttpResponse;
import org.springframework.stereotype.Component;
import org.springframework.web.server.ServerWebExchange;
import reactor.core.publisher.Flux;
import reactor.core.publisher.Mono;

import java.util.Set;

/**
 * @author DragonWu
 * @since 2022-10-10 12:24
 **/
@Component
public class JwtCheckFilter implements GlobalFilter, Ordered {

    @Autowired
    private StringRedisTemplate redisTemplate;

    @Value("${no.require.urls:/admin/login}")
    private Set<String> noRequireTokenUris;

    /*
    过滤器拦截到用户的请求后做啥
     */
    @Override
    public Mono<Void> filter(ServerWebExchange exchange, GatewayFilterChain chain) {
        //1: 该接口是否需要token才能访问
        if (!isRequireToken(exchange)) {
            return chain.filter(exchange);//不需要token,直接放行
        }
        //2: 若需要token访问,取出用户的token
        String token = getUserToken(exchange);
        //3:判断用户的token是否有效
        if (StringUtils.isEmpty(token)) {
            return buildeNoAuthorizationResult(exchange);
        }
        Boolean hasKey = redisTemplate.hasKey(token);
        if (hasKey != null && hasKey) {
            return chain.filter(exchange);//token有效,直接放行
        }
        return buildeNoAuthorizationResult(exchange);
    }

    /*
    给用户响应一个没有token的错误
     */
    private Mono<Void> buildeNoAuthorizationResult(ServerWebExchange exchange) {
        ServerHttpResponse response = exchange.getResponse();
        response.getHeaders().set("Content-Type", "application/json");
        response.setStatusCode(HttpStatus.UNAUTHORIZED);
        JSONObject jsonObject = new JSONObject();
        jsonObject.put("error", "NoAuthorization");
        jsonObject.put("errorMsg", "Token is Null or Error");
        DataBuffer wrap = response.bufferFactory().wrap(jsonObject.toJSONString().getBytes());
        return response.writeWith(Flux.just(wrap));
    }

    /*
    从请求头里获取用户的token
     */
    private String getUserToken(ServerWebExchange exchange) {
        String token = exchange.getRequest().getHeaders().getFirst(HttpHeaders.AUTHORIZATION);
        return token == null ? null : token.replace("bearer ", "");
    }

    /*
    判断该接口是否需要token才能访问
     */
    private boolean isRequireToken(ServerWebExchange exchange) {
        String path = exchange.getRequest().getURI().getPath();
        if (noRequireTokenUris.contains(path)) {
            return Boolean.FALSE;//不需要token的
        }
        return Boolean.TRUE;
    }

    /*
    拦截器的顺序
     */
    @Override
    public int getOrder() {
        return 0;
    }
}
二、Oauth2授权服务器搭建
1、生成RSA密钥对
密钥对生成见我的这篇文章:
SpringBoot SpringSecurity JWT+Redis+RSA授权登录登出 验证码 前后端分离 分布式_Dragon Wu的博客-CSDN博客
2、授权服务器配置
主要依赖于:
        <dependency>
            <groupId>org.springframework.cloud</groupId>
            <artifactId>spring-cloud-starter-oauth2</artifactId>
        </dependency>
开启授权服务的配置类:
package com.dragonwu.config;
import org.springframework.beans.factory.annotation.Autowired;
import org.springframework.beans.factory.annotation.Qualifier;
import org.springframework.context.annotation.Configuration;
import org.springframework.core.io.ClassPathResource;
import org.springframework.security.authentication.AuthenticationManager;
import org.springframework.security.core.userdetails.UserDetailsService;
import org.springframework.security.crypto.password.PasswordEncoder;
import org.springframework.security.oauth2.config.annotation.configurers.ClientDetailsServiceConfigurer;
import org.springframework.security.oauth2.config.annotation.web.configuration.AuthorizationServerConfigurerAdapter;
import org.springframework.security.oauth2.config.annotation.web.configuration.EnableAuthorizationServer;
import org.springframework.security.oauth2.config.annotation.web.configurers.AuthorizationServerEndpointsConfigurer;
import org.springframework.security.oauth2.provider.token.TokenStore;
import org.springframework.security.oauth2.provider.token.store.JwtAccessTokenConverter;
import org.springframework.security.oauth2.provider.token.store.JwtTokenStore;
import org.springframework.security.oauth2.provider.token.store.KeyStoreKeyFactory;
/**
* @author DragonWu
* @since 2022-10-10 9:56
**/
@EnableAuthorizationServer //开启授权服务器的功能
@Configuration
public class AuthorizationConfig extends AuthorizationServerConfigurerAdapter {
@Autowired
private PasswordEncoder passwordEncoder;
@Autowired
private AuthenticationManager authenticationManager;
@Autowired
@Qualifier("userServiceDetailsServiceImpl")
private UserDetailsService userDetailsService;
/*
添加第三方的客户端
*/
@Override
public void configure(ClientDetailsServiceConfigurer clients) throws Exception {
clients.inMemory()
.withClient("dragon-api")//第三方客户端的名称
.secret(passwordEncoder.encode("dragon-secret"))//第三方客户端的密钥
.scopes("all")//第三方客户端的授权范围
.authorizedGrantTypes("password", "refresh_token")//密码模式、token刷新模式
.accessTokenValiditySeconds(7 * 24 * 3600)//token的有效期
.refreshTokenValiditySeconds(30 * 24 * 3600)//refresh_token的有效期
.and()
///应用之间内部的访问形式
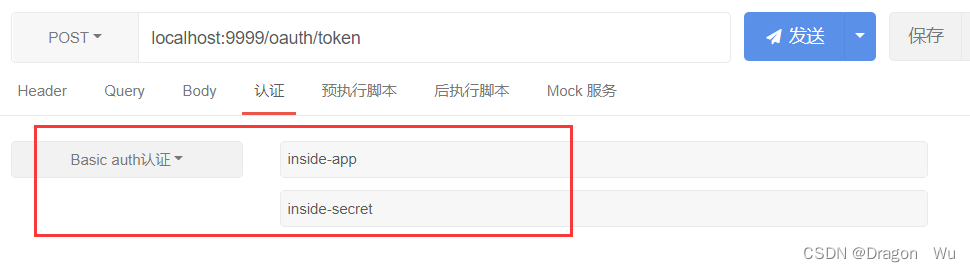
.withClient("inside-app")
.secret(passwordEncoder.encode("inside-secret"))
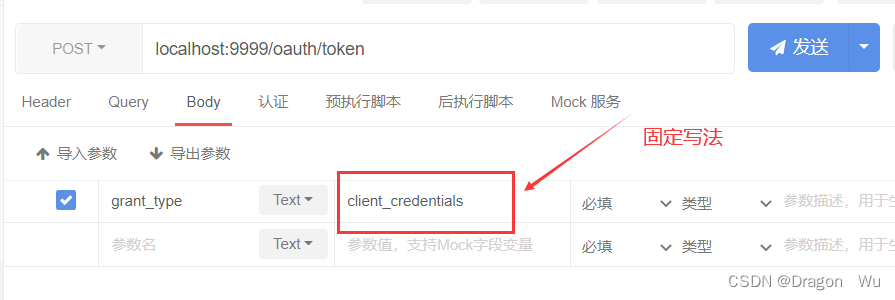
.authorizedGrantTypes("client_credentials")//客户端授权,固定写法
.scopes("all")
.accessTokenValiditySeconds(7 * 24 * 3600);
super.configure(clients);
}
/*
配置验证管理器,UserDetailsService
*/
@Override
public void configure(AuthorizationServerEndpointsConfigurer endpoints) throws Exception {
endpoints.authenticationManager(authenticationManager)
.userDetailsService(userDetailsService)
.tokenStore(jwtTokenStore()) //采用JWT存储token
.tokenEnhancer(jwtAccessTokenConverter()); //token转换器
super.configure(endpoints);
}
/*
JWT token 存储
*/
private TokenStore jwtTokenStore() {
return new JwtTokenStore(jwtAccessTokenConverter());
}
/*
JWT转换器
*/
public JwtAccessTokenConverter jwtAccessTokenConverter() {
JwtAccessTokenConverter tokenConverter = new JwtAccessTokenConverter();
//加载我们的私钥
ClassPathResource classPathResource = new ClassPathResource("keys/dragonwu.jks");
KeyStoreKeyFactory keyStoreKeyFactory = new KeyStoreKeyFactory(classPathResource, "dragonwu".toCharArray());//第二个参数为你生成密钥时输入的password
tokenConverter.setKeyPair(keyStoreKeyFactory.getKeyPair("dragonwu", "dragonwu".toCharArray()));//第一个参数是生成密钥是的alias,第二个是password
return tokenConverter;
}
}
Security的配置类:
package com.dragonwu.config;

import org.springframework.context.annotation.Bean;
import org.springframework.context.annotation.Configuration;
import org.springframework.security.authentication.AuthenticationManager;
import org.springframework.security.config.annotation.web.builders.HttpSecurity;
import org.springframework.security.config.annotation.web.configuration.WebSecurityConfigurerAdapter;
import org.springframework.security.crypto.bcrypt.BCryptPasswordEncoder;
import org.springframework.security.crypto.password.PasswordEncoder;

/**
 * @author DragonWu
 * @since 2022-10-10 10:12
 **/
@Configuration
public class WebSecurityConfig extends WebSecurityConfigurerAdapter {

    /*
    请求说明
     */
    @Override
    protected void configure(HttpSecurity http) throws Exception {
        http.csrf().disable();
        http.authorizeRequests().anyRequest().authenticated();
    }

    /*
        认证管理
         */
    @Bean
    @Override
    protected AuthenticationManager authenticationManager() throws Exception {
        return super.authenticationManager();
    }

    /*
    加密器
     */
    @Bean
    public PasswordEncoder passwordEncoder() {
        return new BCryptPasswordEncoder();
    }

//    public static void main(String[] args) {
//        PasswordEncoder passwordEncoder=new BCryptPasswordEncoder();
//        String encode = passwordEncoder.encode("123456");
//        System.out.println(encode);
//    }
}
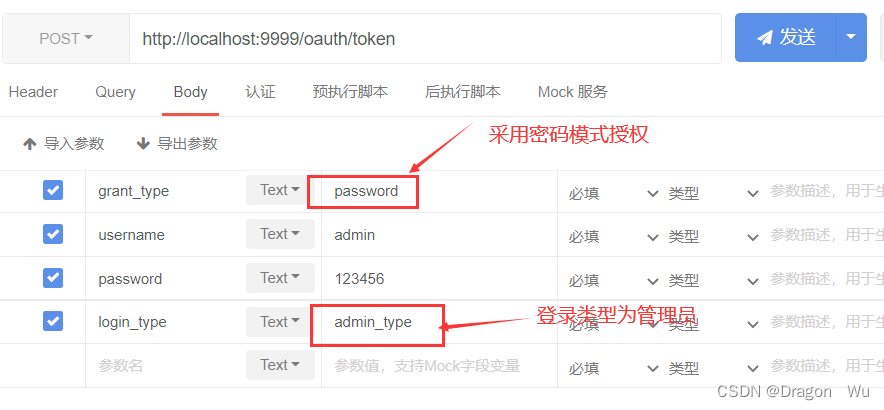
3、授权登录测试
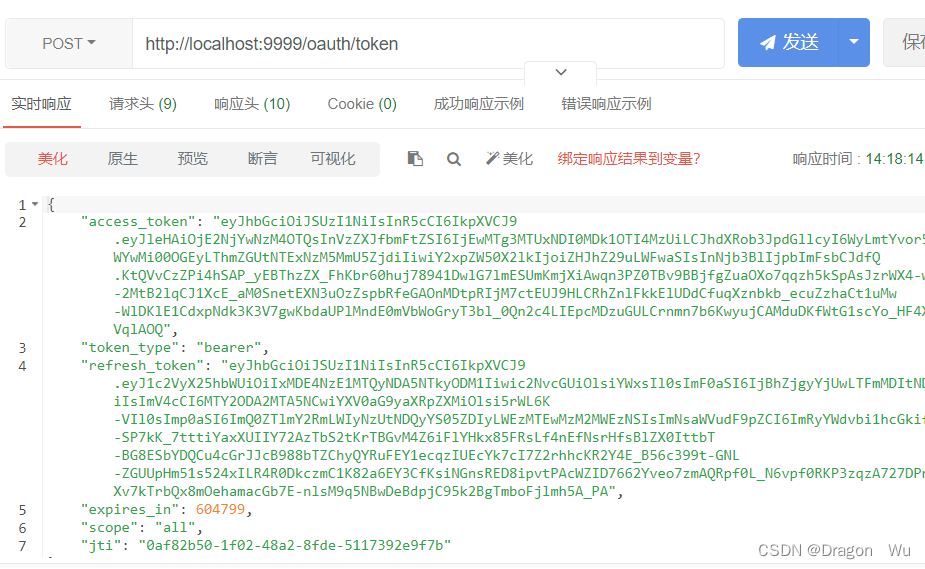
请求成功结果:
用户登录类似,只需要更改对应参数即可:

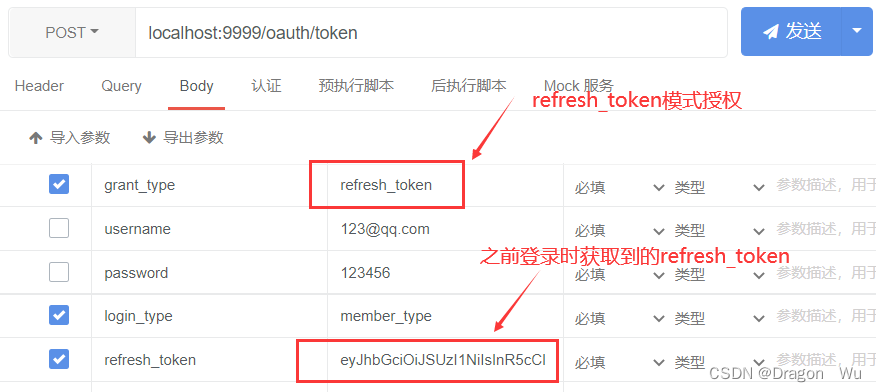
refresh_token进行刷新登录: 与之前登录类似
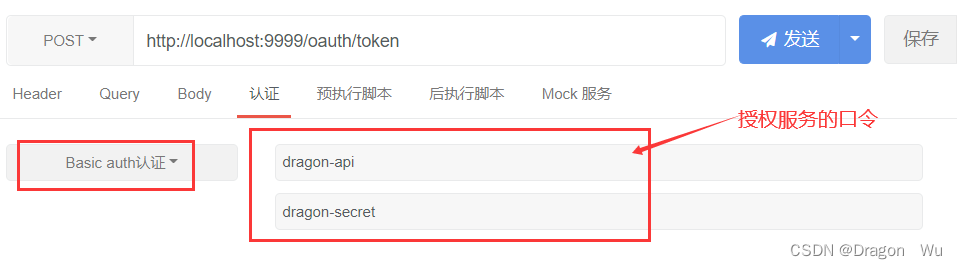
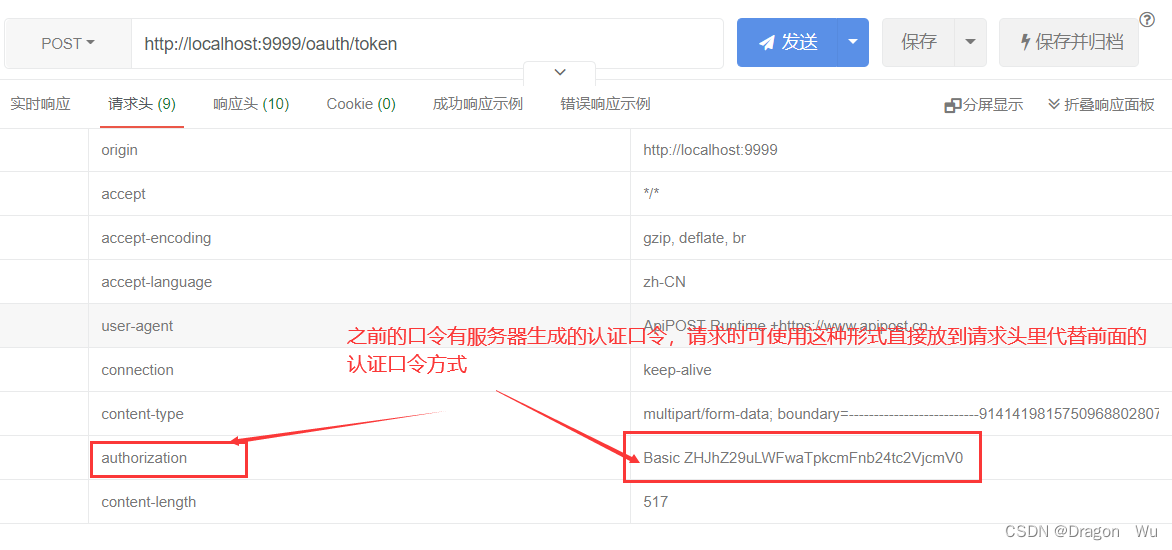
服务器内部登录测试:
不同的是内部登录需要采用内部登录时的口令:
4、客户端登录
开启对应的资源服务器
资源服务器配置类:
package com.dragonwu;

import org.springframework.context.annotation.Bean;
import org.springframework.context.annotation.Configuration;
import org.springframework.core.io.ClassPathResource;
import org.springframework.security.config.annotation.method.configuration.EnableGlobalMethodSecurity;
import org.springframework.security.config.annotation.web.builders.HttpSecurity;
import org.springframework.security.oauth2.config.annotation.web.configuration.EnableResourceServer;
import org.springframework.security.oauth2.config.annotation.web.configuration.ResourceServerConfigurerAdapter;
import org.springframework.security.oauth2.config.annotation.web.configurers.ResourceServerSecurityConfigurer;
import org.springframework.security.oauth2.provider.token.TokenStore;
import org.springframework.security.oauth2.provider.token.store.JwtAccessTokenConverter;
import org.springframework.security.oauth2.provider.token.store.JwtTokenStore;
import org.springframework.util.FileCopyUtils;

import java.nio.charset.StandardCharsets;

/**
 * @author DragonWu
 * @since 2022-10-11 10:14
 **/
@Configuration
@EnableGlobalMethodSecurity(prePostEnabled = true) //开启权限访问注解
@EnableResourceServer //开启资源服务器
public class ResourceServerConfig extends ResourceServerConfigurerAdapter {

    //允许匿名访问的
    private static final String[] ALLOW_ASK = {
            "/login",//管理员登录
            "/user/login",//用户登录
            "/captcha",//验证码
    };
    //总数允许访问的
    private static final String[] ALWAYS_ALLOW_ASK = {
            "/v2/api-docs",
            "/swagger-resources/configuration/ui",//用来获取支持的动作
            "/swagger-resources",//用来获取api-docs的URI
            "/swagger-resources/configuration/security",//安全选项
            "/webjars/**",
            "/swagger-ui.html",//以上为api文档接口访问路径
            "**/public/**" //开放访问的资源
    };

    /*
    访问资源配置
     */
    @Override
    public void configure(HttpSecurity http) throws Exception {
        http.csrf()
                .disable()
                .sessionManagement().disable()
                .authorizeRequests()
                .antMatchers(ALWAYS_ALLOW_ASK).permitAll()
                .antMatchers(ALLOW_ASK).anonymous()
                .antMatchers("/**").authenticated()
                .and().headers().cacheControl();
    }

    /*
     设置公钥
     */
    @Override
    public void configure(ResourceServerSecurityConfigurer resources) throws Exception {
        resources.tokenStore(jwtTokenStore());

    }

    /*
    jwt token存储
     */
    private TokenStore jwtTokenStore() {
        return new JwtTokenStore(accessTokenConverter());
    }

    /*
    公钥解密的token转换器
     */
    @Bean // 放在ioc容器的
    public JwtAccessTokenConverter accessTokenConverter() {
        //resource 验证token(公钥) authorization 产生 token (私钥)
        JwtAccessTokenConverter tokenConverter = new JwtAccessTokenConverter();
        String s = null;
        try {
            ClassPathResource classPathResource = new ClassPathResource("keys/public.key");
            byte[] bytes = FileCopyUtils.copyToByteArray(classPathResource.getInputStream());
            s = new String(bytes, StandardCharsets.UTF_8);
        } catch (Exception ignored) {
        }
        tokenConverter.setVerifierKey(s);
        return tokenConverter;
    }
}
从代码中我们也不难看出,授权服务器拥有私钥可以对JWT token进行生成,而客户端志愿服务器仅有公钥对JWT token进行解密。
客户端访问授权服务器采用OpenFeign来访问
package com.dragonwu.feign;

import com.fasterxml.jackson.annotation.JsonProperty;
import lombok.Data;

/**
 * @author DragonWu
 * @since 2022-10-11 8:48
 **/
@Data
public class JwtToken {
    @JsonProperty("access_token")
    private String accessToken;

    /*
    token的类型
     */
    @JsonProperty("token_type")
    private String tokenType;

    @JsonProperty("refresh_token")
    private String refreshToken;

    /*
    过期时间
     */
    @JsonProperty("expires_in")
    private Long expiresIn;

    /*
    token的范围
     */
    private String scope;

    /*
    颁发的凭证
     */
    private String jti;
}
Feign接口
package com.dragonwu.feign;

import org.springframework.cloud.openfeign.FeignClient;
import org.springframework.http.ResponseEntity;
import org.springframework.web.bind.annotation.PostMapping;
import org.springframework.web.bind.annotation.RequestHeader;
import org.springframework.web.bind.annotation.RequestParam;

/**
 * @author DragonWu
 * @since 2022-10-11 8:52
 **/
@FeignClient(value = "authorization-server")
public interface OAuth2FeignClient {

    @PostMapping("/oauth/token")
    ResponseEntity<JwtToken> getToken(
            @RequestParam("grant_type") String grantType,//授权类型
            @RequestParam("username") String username,//用户名
            @RequestParam("password") String password,//用户密码
            @RequestParam("login_type") String loginType,//登录的类型
            @RequestHeader("authorization") String basicToken//Basic ZHJhZ29uLWFwaTpkcmFnb24tc2VjcmV0 由第三方加密出来的值
    );
}
登录实现类:
package com.dragonwu.service.impl;

import com.alibaba.fastjson2.JSON;
import com.alibaba.fastjson2.JSONArray;
import com.alibaba.fastjson2.JSONObject;
import com.dragonwu.entity.SysMenu;
import com.dragonwu.feign.JwtToken;
import com.dragonwu.feign.OAuth2FeignClient;
import com.dragonwu.model.LoginResult;
import com.dragonwu.service.ISysMenuService;
import com.dragonwu.service.SysLoginService;
import org.springframework.beans.factory.annotation.Autowired;
import org.springframework.beans.factory.annotation.Value;
import org.springframework.http.HttpStatus;
import org.springframework.http.ResponseEntity;
import org.springframework.security.core.authority.SimpleGrantedAuthority;
import org.springframework.security.jwt.Jwt;
import org.springframework.security.jwt.JwtHelper;
import org.springframework.stereotype.Service;

import java.util.List;
import java.util.stream.Collectors;

/**
 * @author DragonWu
 * @since 2022-10-11 8:42
 **/
@Service
public class SysLoginServiceImpl implements SysLoginService {

    @Autowired
    private OAuth2FeignClient oAuth2FeignClient;

    @Value("${basic.token:Basic ZHJhZ29uLWFwaTpkcmFnb24tc2VjcmV0}")
    private String basicToken;

    @Autowired
    private ISysMenuService sysMenuService;

    @Override
    public LoginResult login(String username, String password) throws RuntimeException{
        System.out.println("用户:"+username+"开始登录...");
        //1、获取token 远程调用authorization-server 的该服务
        ResponseEntity<JwtToken> tokenResponseEntity = oAuth2FeignClient.getToken("password", username, password, "admin_type", basicToken);
        if(tokenResponseEntity.getStatusCode()!= HttpStatus.OK){
            throw new RuntimeException("token获取失败");
        }
        JwtToken jwtToken=tokenResponseEntity.getBody();
        System.out.println("远程调用授权服务器成功,获取的token为:"+ JSON.toJSONString(jwtToken));
        assert jwtToken != null;
        String token=jwtToken.getAccessToken();

        //2、查询我们的菜单数据
        Jwt jwt= JwtHelper.decode(token);//解析jwt
        String jwtJsonStr=jwt.getClaims();//获得解析后的数据
        JSONObject jwtJson=JSON.parseObject(jwtJsonStr);//将解析后的数据转为json格式
        Long userId=Long.valueOf(jwtJson.getString("user_name"));//json中的user_name就是之前登录时存入的用户id

        List<SysMenu> menus=sysMenuService.getMenuByUserId(userId);//通过用户id获取到对应的菜单

        //3、权限数据怎么查询-->不需要查询的,因为我们的jwt里面已包含了
        JSONArray authoritiesJsonArray=jwtJson.getJSONArray("authorities");
        List<SimpleGrantedAuthority> authorities=authoritiesJsonArray.stream()//组装我们的权限数据
                .map(authorityJson->new SimpleGrantedAuthority(authorityJson.toString()))
                .collect(Collectors.toList());

        return new LoginResult(token,menus,authorities);
    }
}
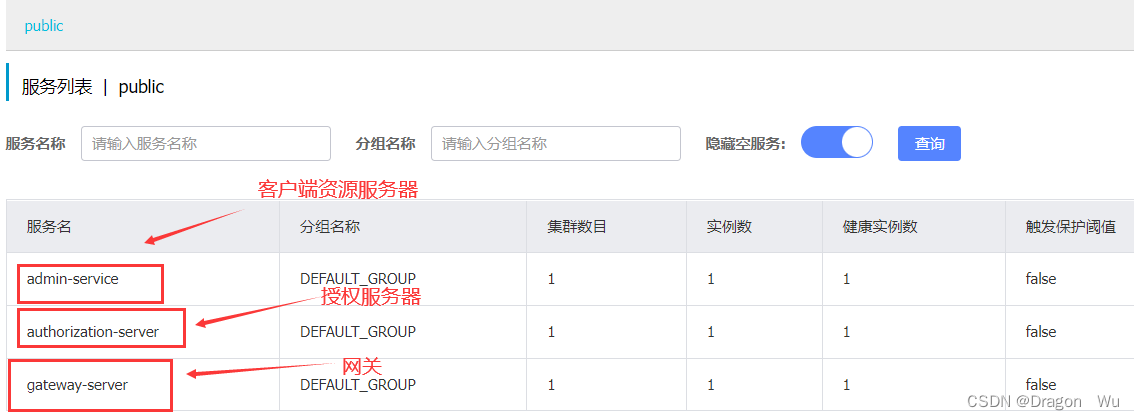
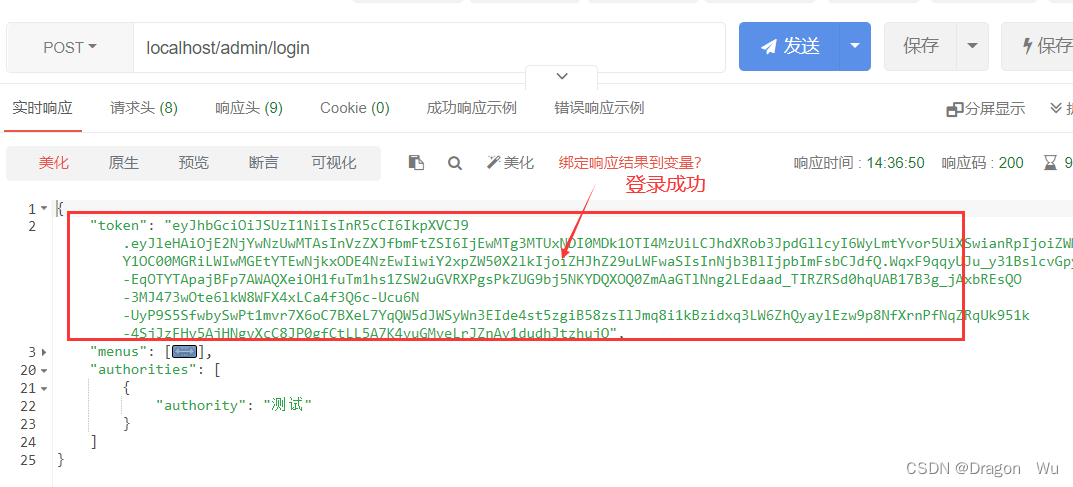
三、最终登录测试
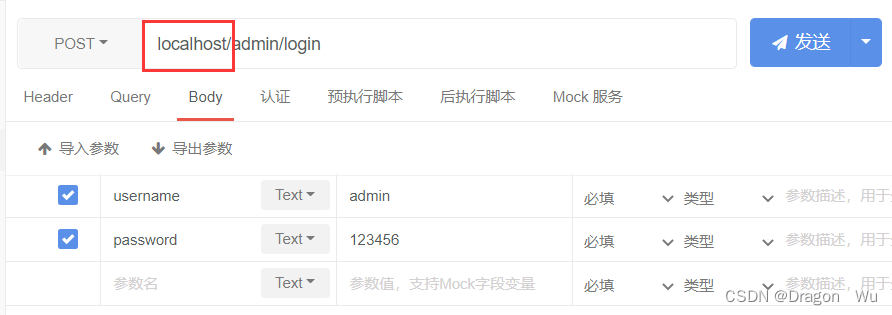
可以看到次时我们通过网关去访问admin-service的login接口,admin-service此时做资源服务器,通过authorization-server进行授权登录。
请求路线:
url-->gateway-->admin-service-->authorization-server
--授权成功,颁发token-->admin-service-->响应。
案例见代码,后续还会优化代码。


 618
618


 被折叠的 条评论
为什么被折叠?
被折叠的 条评论
为什么被折叠?
 到【灌水乐园】发言


