


实现:使用pyautogui库和pyperclip库,实际打包还涉及了OpenCV和Pillow库
自动化功能模块:(由于注释写得较多,这里不多赘述)
RPA.py
import subprocess
import time

import pyautogui
import pyperclip

pyautogui.FAILSAFE = True  # 防故障安全措施
release_list = []  # 释放键位列表,避免强行终止时有键位没有松开
start_width, start_height = pyautogui.size().width, pyautogui.size().height  # 获取启动时屏幕分辨率


def cc(coord):  # 坐标转换
    """因为指定坐标时是基于刚开始启动时的分辨率,可能与现在的分辨率不同,适应分辨率变化需要坐标转换"""
    width, height = pyautogui.size().width, pyautogui.size().height
    coord = coord.split(',')
    x, y = int(coord[0]), int(coord[1])
    real_x, real_y = int(x * width / start_width), int(y * height / start_height)
    return real_x, real_y


def read_txt(file):  # 读取txt文件
    f = open(file, 'r', encoding='utf-8')
    str_list = f.read().split('\n')
    return str_list


def mouse_drag(work):  # 鼠标拖动事件
    coord_list = work.split('>')
    start_coord = coord_list[0]
    end_coord = coord_list[1]
    start_x, start_y = cc(start_coord)
    end_x, end_y = cc(end_coord)
    pyautogui.moveTo(start_x, start_y)
    pyautogui.mouseDown()
    pyautogui.moveTo(end_x, end_y, duration=0.5)  # 拖动到指定坐标
    pyautogui.mouseUp()


def mouse_click(img, click_times, click_site):  # 鼠标点击事件
    location = pyautogui.locateCenterOnScreen('img/' + img, confidence=0.9)
    if location is not None:
        pyautogui.moveTo(location.x, location.y, 0.3, pyautogui.easeOutQuad)  # 逐渐变慢
        time.sleep(0.1)
        pyautogui.click(location.x, location.y, clicks=click_times, interval=0.2, button=click_site)
        return True
    print("未找到匹配图片!", img)
    return False


def condition_click(work):  # 条件点击事件
    way = work.split('&')
    click_img, yes, no = way[0], way[1], way[2]
    if mouse_click(click_img, 1, 'left'):
        yes_list = yes.split('*')
        for y in yes_list:
            row_work(y)
    else:
        no_list = no.split('*')
        for n in no_list:
            row_work(n)


def row_work(order_str):  # 处理一行命令
    order = order_str.split('#')
    choice, work = order[0], order[1]
    if choice.isdigit():  # 鼠标模块
        if choice == '0':
            time.sleep(float(work))  # 等待(秒)
        elif choice == '1':
            mouse_click(work, 1, 'left')  # 左键单击
        elif choice == '2':
            mouse_click(work, 2, 'left')  # 左键双击
        elif choice == '3':
            mouse_click(work, 1, 'right')  # 右键单击
        elif choice == '4':
            mouse_click(work, 2, 'right')  # 右键双击
        elif choice == '5':
            pyautogui.scroll(int(work))  # 滚轮
        elif choice == '6':
            mouse_drag(work)  # 拖动
        elif choice == '7':
            real_x, real_y = cc(work)
            pyautogui.click(real_x, real_y, duration=0.2)  # 点击指定坐标
        elif choice == '8':
            condition_click(order_str[2:])  # 条件点击
    elif choice.islower():  # 键盘模块
        if choice == 'a':
            pyautogui.press(work)  # 按一下
        elif choice == 'b':
            pyautogui.keyDown(work)  # 按住
            release_list.append(work)
        elif choice == 'c':
            pyautogui.keyUp(work)  # 松开
        elif choice == 'd':
            pyperclip.copy(work)  # 键盘输入
            pyautogui.hotkey('ctrl', 'v')
        elif choice == 'e':
            pyautogui.write(work, interval=0.05)  # 键盘打字
        elif choice == 'cmd':
            subprocess.Popen(work, shell=True)  # 执行cmd


def main():  # 解析命令
    text = read_txt('自动化.txt')
    for row in text:
        if row:
            work_times, order_list = 1, [row]
            if row[0:2] == '重复':
                row_list = row.split('=')
                work_times = int(row_list[0][2:-1])  # 获取重复次数
                order_list = row_list[1].split('+')
            for i in range(work_times):
                for order in order_list:
                    row_work(order)
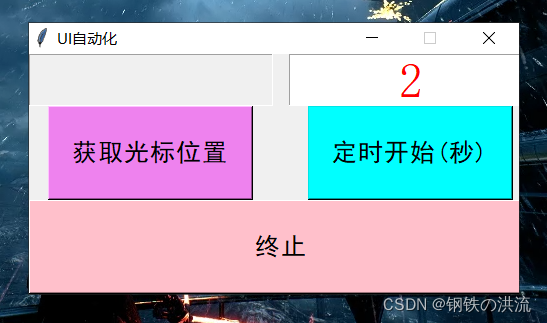
为了方便使用,再写一个界面调用RPA.py,进行线程管理并稍加扩展:
UI.py
import ctypes
import inspect
import threading
import time
from tkinter import Tk, Entry, StringVar, Button, DISABLED, NORMAL

import pyautogui

import RPA


def _async_raise(tid, exctype):
    """在id为tid的线程中引发异常 """
    if not inspect.isclass(exctype):
        exctype = type(exctype)
    res = ctypes.pythonapi.PyThreadState_SetAsyncExc(ctypes.c_long(tid), ctypes.py_object(exctype))
    if res == 0:
        raise ValueError("无效的线程id")
    elif res != 1:
        ctypes.pythonapi.PyThreadState_SetAsyncExc(tid, None)
        raise SystemError("PyThreadState_SetAsyncExc 失败")


class UI:
    def __init__(self):
        """初始化一个界面"""
        self.window = Tk()
        self.window.title('UI自动化')
        window_width, window_height = 490, 240
        self.window.geometry("%dx%d+%d+%d" % (       # 设置窗口大小 窗口居中显示
            window_width, window_height, (RPA.start_width - window_width) / 2, (RPA.start_height - window_height) / 2))
        self.window.resizable(False, False)  # 规定窗口不可缩放
        # 定义组件
        self.coord, self.cdt = StringVar(), StringVar()    # 坐标,倒计时
        self.cdt.set('2')
        self.save_input, self.t, self.last_id = '', None, 0
        self.close, self.exit_t1 = False, False      # 主窗口退出的标志,t1退出标志
        entry1 = Entry(self.window, width=10, textvariable=self.coord, state="readonly",
                       fg='blue', font=('宋体', 29), justify='center')
        self.entry2 = Entry(self.window, width=10, textvariable=self.cdt, font=('宋体', 29),
                            fg='red', justify='center')
        self.button1 = Button(self.window, width=15, height=3, text='获取光标位置', font=('黑体', 15),
                              bg='violet', command=self.run1)
        self.button2 = Button(self.window, width=15, height=3, text='定时开始(秒)', font=('黑体', 15),
                              bg='cyan', command=self.run2)
        self.button3 = Button(self.window, width=38, height=3, text='终止', font=('黑体', 15), bg="pink",
                              command=self.stop_thread)
        # 设置界面布局
        entry1.grid(row=0, column=0, columnspan=2)
        self.entry2.grid(row=0, column=3, columnspan=2)
        self.button1.grid(row=1, column=0, columnspan=2)
        self.button2.grid(row=1, column=3, columnspan=2)
        self.button3.grid(row=2, column=1, columnspan=3)
        self.window.protocol("WM_DELETE_WINDOW", self.close_ui)     # 拦截窗体关闭事件
        self.window.mainloop()

    def run1(self):
        t1 = threading.Thread(target=self.update_location)
        t1.setDaemon(True)
        t1.start()

    def run2(self):
        get_input = self.entry2.get()
        if get_input and get_input.isdigit():  # 数据检测
            self.save_input = get_input
            self.t = threading.Thread(target=self.execute)
            self.t.setDaemon(True)
            self.t.start()

    def stop_thread(self):
        self.exit_t1 = True     # 终止线程t1
        if self.t and self.t.ident != self.last_id:
            _async_raise(self.t.ident, SystemExit)  # 终止线程t
            if not self.close:
                self.button2["text"] = "定时(秒)"
                self.button2['state'] = NORMAL
                self.last_id = self.t.ident
                self.window.after(0, self.cdt.set(self.save_input))  # 恢复定时倒计时
        if not self.close:
            self.button1["text"] = "获取光标位置"
            self.button1['state'] = NORMAL
            self.window.after(0, self.coord.set(''))  # 清空坐标输入框
        """键鼠释放"""
        pyautogui.mouseUp()  # 释放鼠标
        RPA.release_list = list(set(RPA.release_list))     # 键位释放列表去重
        for key in RPA.release_list:    # 释放键位,防止卡键
            pyautogui.keyUp(key)
        RPA.release_list.clear()    # 清空列表

    def update_location(self):  # 更新光标位置
        self.exit_t1 = False
        self.button1['state'] = DISABLED
        self.button1["text"] = "点击终止取消"
        while not self.close and not self.exit_t1:
            self.get_location()
            time.sleep(0.05)     # 如果不设为守护线程,更新速度太快会使直接退出时子线程t1无法关闭(主线程和子线程间切换太快)

    def execute(self):  # 执行命令函数
        self.button2['state'] = DISABLED
        second = int(self.save_input)
        while second:
            time.sleep(1)
            second -= 1
            self.window.after(0, self.cdt.set(str(second)))
        self.button2["text"] = "执行中"
        try:
            RPA.main()
        except Exception as e:  # 如果执行出错,避免卡死,捕获一下异常
            pyautogui.alert(text=str(e), title='出错提示')  # 弹窗显示错误
        self.window.after(0, self.cdt.set(self.save_input))     # 恢复定时倒计时
        self.last_id = self.t.ident  # 更新last_id
        self.button2["text"] = "定时(秒)"
        self.button2['state'] = NORMAL

    def get_location(self):     # 获取光标位置
        location = pyautogui.position()
        location = str(location.x) + "," + str(location.y)
        self.window.after(0, self.coord.set(location))

    def close_ui(self):    # 关闭前先隐藏主窗口,预留几秒给主线程关闭子线程的时间,再关闭主窗口
        self.close = True   # 关闭子线程t1
        self.window.withdraw()  # 隐藏窗口
        self.stop_thread()  # 关闭子线程t
        time.sleep(2)   # 等待t线程完全退出
        self.window.destroy()


if __name__ == '__main__':
    UI()
打包成exe,最终效果图:
文件目录结构:

阅读使用文档即可会编写指令。


 1万+
1万+


 被折叠的 条评论
为什么被折叠?
被折叠的 条评论
为什么被折叠?
 到【灌水乐园】发言


