


目录
学习目标:
egg入⻔
egg路由
egg控制器
egg服务
egg中间件1 egg入⻔
1.1 初始化
$ mkdir app && cd app
$ npm init egg --type=simple $ cnpm install
$ npm start
...
$ npm stop
1.2 目录结构
1.3 内置对象
这里介绍一下框架中内置的一些基础对象,包括从 Koa 继承而来的 4 个对象
(Application, Context, Request, Response) 以及框架扩展的一些对象(Controller,
Service, Helper, Config, Logger)Application
全局应用对象,在一个应用中,只会实例化一个,它继承自 Koa.Application,在它
上面我们可以挂载一些全局的方法和对象。/* 可以通过 ctx.app 访问到 Application 对象 在继承于 Controller, Service 基类的实例中,可以通过 this.app 访问到 Application */ // app/controller/user.js class UserController extends Controller { async fetch() { this.ctx.body = this.ctx.app.cache.get(this.ctx.query.id); } }Context
Context 是一个请求级别的对象,继承自 Koa.Context。在每一次收到用户请求时,
框架会实例化一个 Context 对象,这个对象封装了这次用户请求的信息,并提供了
许多便捷的方法 来获取请求参数或者设置响应信息。框架会将所有的 Service 挂载
到 Context 实例上,一些插件也会将一些其他的方法和对象挂载到它上面。// app/controller/user.js class UserController extends Controller { async fetch() { this.ctx.body = ""; } }Request
Request 是一个请求级别的对象,继承自 Koa.Request。封装了 Node.js 原生的
HTTPRequest 对象,提供了一系列辅助方法获取 HTTP 请求常用参数。Response
Response 是一个请求级别的对象,继承自 Koa.Response。封装了 Node.js 原生的
HTTP Response 对象,提供了一系列辅助方法设置 HTTP 响应。// 可以在 Context 的实例上获取到当前请求的 Request(ctx.request) 和 Response(ctx.response) 实例。 // app/controller/user.js class UserController extends Controller { async fetch() { const { app, ctx } = this; const id = ctx.request.query.id; ctx.response.body = app.cache.get(id); } }Controller
框架提供了一个 Controller 基类,并推荐所有的 Controller 都继承于该基类实现。
这个Controller 基类有下列属性:
ctx - 当前请求的 Context 实例。
app - 应用的 Application 实例。
config - 应用的配置。
service - 应用所有的 service。
logger - 为当前 controller 封装的 logger 对象。Service
框架提供了一个 Service 基类,并推荐所有的 Service 都继承于该基类实现。
Helper
Helper 用来提供一些实用的 utility 函数。它的作用在于我们可以将一些常用的动作
抽离在helper.js 里面成为一个独立的函数,这样可以用 JavaScript 来写复杂的逻
辑,避免逻辑分散各 处,同时可以更好的编写测试用例。Helper 自身是一个类,
有和 Controller 基类一样的属性, 它也会在每次请求时进行实例化,因此 Helper上的所有函数也能获取到当前请求相关的上下文 信息。
// app/controller/user.js
class UserController extends Controller {
async fetch() {
const { app, ctx } = this;
const id = ctx.query.id;
const user = app.cache.get(id);
ctx.body = ctx.helper.formatUser(user);
}
}
// app/extend/helper.js
module.exports = {
formatUser(user) {
return only(user, [ 'name', 'phone' ]);
}
};
Config
我们推荐应用开发遵循配置和代码分离的原则,将一些需要硬编码的业务配置都放
到配置文件中,同时配置文件支持各个不同的运行环境使用不同的配置,使用起来
也非常方便,所有框 架、插件和应用级别的配置都可以通过 Config 对象获取到。
我们可以通过 app.config 从 Application 实例上获取到 config 对象,也可以在
Controller, Service, Helper 的实例上通过this.config 获取到 config 对象。
Logger框架内置了功能强大的日志功能,可以非常方便的打印各种级别的日志到对应的日
志文件 中,每一个 logger 对象都提供了 4 个级别的方法logger.debug() logger.info() logger.warn() logger.error()2 egg路由
Router 主要用来描述请求 URL 和具体承担执行动作的 Controller 的对应关系, 框架
约定 了 app/router.js 文件用于统一所有路由规则。通过统一的配置,我们可以避免
路由规则逻 辑散落在多个地方,从而出现未知的冲突,集中在一起我们可以更方便
的来查看全局的路由规则'use strict'; module.exports = app => { const { router, controller } = app; router.get('/', controller.home.index); router.get('/student/findById', controller.student.findById); router.post('/student/saveOrUpdate', controller.student.saveOrUpdate); router.delete('/student/deleteById', controller.student.deleteById); router.post('/student/pageQuery', controller.student.pageQuery); };3 egg控制器
Controller 负责解析用户的输入,处理后返回相应的结果。框架推荐 Controller 层主
要对用户的请求参数进行处理(校验、转换),然后调用对应的 service 方法处理业
务,得到业务结 果后封装并返回。
3.1 获取请求参数query、queries
const query = this.ctx.query;
const queries = this.ctx.queries
routerParams
const params=this.ctx.params;body
const data=this.ctx.request.body;header
ctx.headers,ctx.header,ctx.request.headers,ctx.request.header:这几个方法是等
价的,都是获取整个 header 对象。ctx.get(name) ctx.request.get(name):获取请求
header 中 的一个字段的值,如果这个字段不存在,会返回空字符串。我们建议用
ctx.get(name) 而不是 ctx.headers['name'],因为前者会自动处理大小写。ctx.host ctx.protocol ctx.ips ctx.ipcookie
let count = ctx.cookies.get('count');
count = count ? Number(count) : 0;
ctx.cookies.set('count', ++count);
session
通过 Cookie,我们可以给每一个用户设置一个 Session,用来存储用户身份相关的
信息,这份信息会加密后存储在 Cookie 中,实现跨请求的用户身份保持。const ctx = this.ctx; // 获取 Session 上的内容 const userId = ctx.session.userId; const posts = await ctx.service.post.fetch(userId);3.2 调用Service
我们并不想在 Controller 中实现太多业务逻辑,所以提供了一个 Service 层进行业务
逻辑 的封装,这不仅能提高代码的复用性,同时可以让我们的业务逻辑更好测试。
在 Controller 中 可以调用任何一个 Service 上的任何方法,同时 Service 是懒加载
的,只有当访问到它的时候 框架才会去实例化它。const res = await ctx.service.post.create(req);3.3 发送HTTP响应
status
this.ctx.status=201;body
绝大多数的数据都是通过 body 发送给请求方的,和请求中的 body 一样,在响应中
发送的 body,也需要有配套的 Content-Type 告知客户端如何对数据进行解析。
作为一个 RESTful 的 API 接口 controller,我们通常会返回 Content-Type 为
application/json 格式的 body,内容是一个 JSON 字符串。
作为一个 html ⻚面的 controller,我们通常会返回 Content-Type 为 text/html 格
式的 body,内容是 html 代码段。this.ctx.body = { name: 'egg', category: 'framework', language: 'Node.js' }; this.ctx.body = '<html><h1>Hello</h1></html>';重定向
ctx.redirect(url)4 egg服务
简单来说,Service 就是在复杂业务场景下用于做业务逻辑封装的一个抽象层,提
供这个抽 象有以下几个好处:
保持 Controller 中的逻辑更加简洁。
保持业务逻辑的独立性,抽象出来的 Service 可以被多个 Controller 重复调用。
将逻辑和展现分离,更容易编写测试用例,const { Service } = require('egg') class StudentService extends Service { async findById(id) { let sql = "select * from tbl_student where id = ?" let student = await this.app.mysql.query(sql, [id]); return student; } // student {id,name,gender,birth} async saveOrUpdate(student) { let result = null; if (student.id) { result = await this.app.mysql.update('tbl_student', student) } else { result = await this.app.mysql.insert('tbl_student', student) } return result; } async deleteById(id) { let result = await this.app.mysql.delete('tbl_student', { id }) } } module.exports = StudentService;5 egg-mysql
5.1 安装
$ cnpm install --save egg-mysq5.2 配置
// config/plugin.js
'use strict';
/** @type Egg.EggPlugin */
module.exports = {
mysql: {
enable: true, package: 'egg-mysql',
}
};
// config.default.js //...
const userConfig = {
// myAppName: 'egg',
mysql: {
// 单数据库信息配置
client: {
// host
host: '121.199.29.84',
user: 'briup',
password: 'briup',
database: 'briup-sc',
port: '3306',
},
// 是否加载到 app 上,默认开启
app: true,
// 是否加载到 agent 上,默认关闭
agent: false,
}
};
//..
5.3 基本使用
// service/student.js
const { Service } = require('egg')
class StudentService extends Service {
async findById(id) {
let student = await this.app.mysql.query('select * from
tbl_student where id = ? ', [id])
//let student = await this.app.mysql.get('tbl_student',{id})
return student;
}
}
module.exports = StudentService;
5.4 快捷方法
insert(table,{})
table为表名,{} 为插入的字段与值的映射对象
mysql.insert('tbl_student', { name: "terry", gender: "男" })
// insert into tbl_student (name,gender) values("terry","男")
get(table,{})
table为表名,{}为where条件
mysql.get('tbl_student', { id: 1 })
// select * from tbl_student where id = 1;
select(table,{})
table为表名,{} 为对象,对象中包含了wher、columns、orders、limit、offset等属
性mysql.select('tbl_student', { where: { gender: "男" }, columns: ['name', 'gender'], // 要查询的表字段 orders: [['id', 'desc'], ['name', 'desc']], // 排序方式 limit: 10, // 返回数据量 offset: 0, }) /* select name,gender from tbl_student where gender="男" order by id desc, name desc limit 0,10; */update(table,{}[,options])
table为表名,{}为更新后的值,默认根据id来更新
mysql.update(tbl_student, { id: 1, name: "terry", gender: '女' })
mysql.update(tbl_student, { id: 1, name: "terry", gender: '女' }, {
where: { id: 1 }
})
/*
update tbl_student
set name = 'terry',gender = '女' where id = 1;
*/
delete(table,{})
table为表名,{}为删除条件
mysql.delete(tbl_student, { id: 1 })
//delete from tbl_student where id = 1;
任务安排
中间件
jwt
1 中间件1.1 中间件
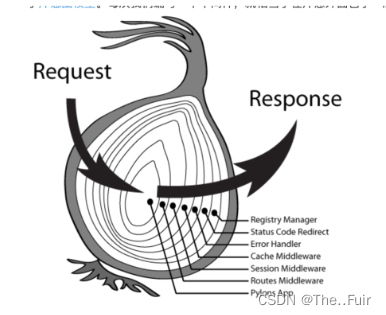
Egg 是基于 Koa 实现的,所以 Egg 的中间件形式和 Koa 的中间件形式是一样的,都
是基 于洋葱圈模型。每次我们编写一个中间件,就相当于在洋葱外面包了一层。
module.exports = options => {
return async function gzip(ctx, next) {
await next();
//----
}
}1.2 统一异常处理
通过同步方式编写异步代码带来的另外一个非常大的好处就是异常处理非常自然,
使用try catch 就可以将按照规范编写的代码中的所有错误都捕获到。这样我们可以
很便捷的编写一个自定义的错误处理中间件。// error_handler.js let Message = require('../utils/Message'); module.exports = () => { return async function errorHandler(ctx, next) { try { await next(); } catch (err) { // 所有的异常都在 app 上触发一个 error 事件,框架会记录一条错误日志 ctx.app.emit('error', err, ctx); const status = err.status || 500; // 生产环境时 500 错误的详细错误内容不返回给客户端,因为可能包含敏感信 息 const error = status === 500 ? 'Internal Server Error' : err.message; // 从 error 对象上读出各个属性,设置到响应中 ctx.body = Message.error(error); if (status === 422) { ctx.body.data = err.errors; } ctx.status = status; } }; }; // config.default.js config.middleware = ['errorHandler'];2 jwt
https://www.jianshu.com/p/576dbf44b2ae
使用jwt进行用户身份认证非常方便。其语法格式如下:jwt.sign(payload, secretOrPrivateKey, [options, callback]) jwt.verify(token, secretOrPublicKey, [options, callback])payload
为一个对象,后期可以根据token解析出这个对象的信息
secretOrPrivateKey秘钥
optionsalgorithms : HS256 exp : Math.floor(Date.now() / 1000) + (60 * 60),
安装:$ cnpm install egg-jwt --save// plugins.js jwt : { enable: true, package: 'egg-jwt', }, // config.default.js jwt:{ secret:"888888" },controller中处理登录
const { Controller } = require('egg');
const Message = require('../utils/Message')
class UserController extends Controller {
// 验证token,请求时在header配置
Authorization = `Bearer ${token}`
async login() {
const { ctx, app } = this;
const data = ctx.request.body;
// 验证用户信息代码....
const token = app.jwt.sign({ username: data.username, },
app.config.jwt.secret, {
expiresIn: '60s',
});
ctx.body = Message.success({ token });
}
}
module.exports = UserController;


06-28
 1636
1636
1636
08-10
04-22
417
417
“相关推荐”对你有帮助么?
-

 非常没帮助
非常没帮助 -

 没帮助
没帮助 -

 一般
一般 -

 有帮助
有帮助 -

 非常有帮助
非常有帮助
提交

 被折叠的 条评论
为什么被折叠?
被折叠的 条评论
为什么被折叠?
 到【灌水乐园】发言


