


 本文档介绍了如何在SpringBoot 2.3.5RELEASE项目中集成Knife4j 3.0.3版本,快速构建Swagger3的接口文档。通过修改pom.xml文件引入相关依赖,创建配置类启用Swagger3,并配置Docket,然后编写测试Controller。启动应用后,访问http://localhost:17790/doc.html可查看生成的API文档。
快速使用
springboot版本 2.3.5RELEASE, Knife4j版本2.0.7
- pom 文件修改
<dependencies>
       <dependency>
           <groupId>org.springframework.boot</groupId>
           <artifactId>spring-boot-starter-web</artifactId>
       </dependency>
       <dependency>
           <groupId>com.github.xiaoymin</groupId>
           <artifactId>knife4j-spring-boot-starter</artifactId>
           <version>3.0.3</version>
       </dependency>

       <dependency>
           <groupId>org.springframework.boot</groupId>
           <artifactId>spring-boot-starter-test</artifactId>
           <scope>test</scope>
           <exclusions>
               <exclusion>
                   <groupId>org.junit.vintage</groupId>
                   <artifactId>junit-vintage-engine</artifactId>
               </exclusion>
           </exclusions>
       </dependency>
   </dependencies>
- 创建swagger配置类
@Configuration
@EnableOpenApi
@EnableKnife4j
public class BeanConfig {

    @Bean
    public Docket createRestApi() {
        // Swagger 2 使用的是:DocumentationType.SWAGGER_2
        // Swagger 3 使用的是:DocumentationType.OAS_30
        return new Docket(DocumentationType.OAS_30)
                // 定义是否开启swagger,false为关闭,可以通过变量控制
                .enable(true)
                // 将api的元信息设置为包含在json ResourceListing响应中。
                .apiInfo(new ApiInfoBuilder()
                        .title("在线教育系统")
                        // 描述
                        .description("在线教育系统api")
                        .contact(new Contact("biienu", "中国", "biienu@163.com"))
                        .version("1.0.0")
                        .build())
                // 分组名称
                .groupName("1.0")
                .select()
                // 要扫描的API(Controller)基础包
                .apis(RequestHandlerSelectors.basePackage("com.biienu.controller"))
                //                .apis(RequestHandlerSelectors.withMethodAnnotation(ApiOperation.class))
                .paths(PathSelectors.any())
                .build();
    }
}
- 编写controller类进行测试
@Api(tags = "首页模块")
@RestController
public class IndexController {

    @ApiImplicitParam(name = "name",value = "姓名",required = true)
    @ApiOperation(value = "向客人问好")
    @GetMapping("/sayHi")
    public ResponseEntity<String> sayHi(@RequestParam(value = "name")String name){
        return ResponseEntity.ok("Hi:"+name);
    }
}
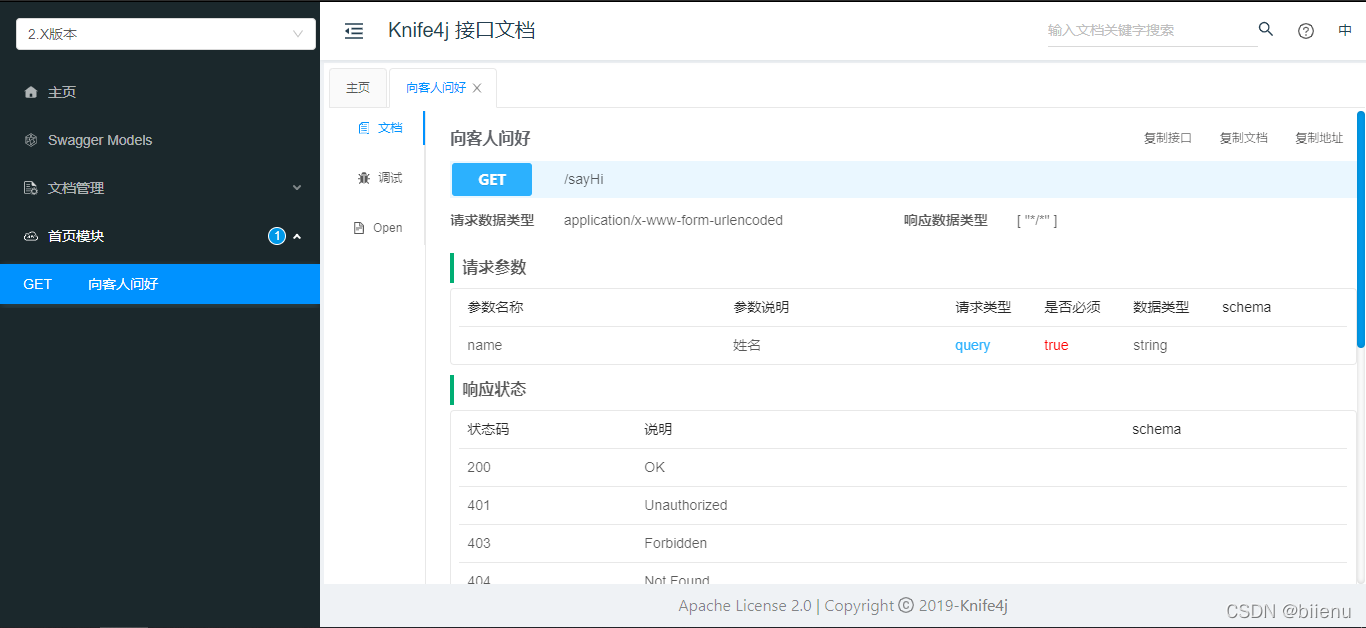
- 启动spring boot 工程, 访问
http://localhost:17790/doc.html
web页面如下 :
参考官网资料https://doc.xiaominfo.com/knife4j/documentation/get_start.html


 21万+
21万+

 被折叠的 条评论
为什么被折叠?
被折叠的 条评论
为什么被折叠?
 到【灌水乐园】发言


