


目录
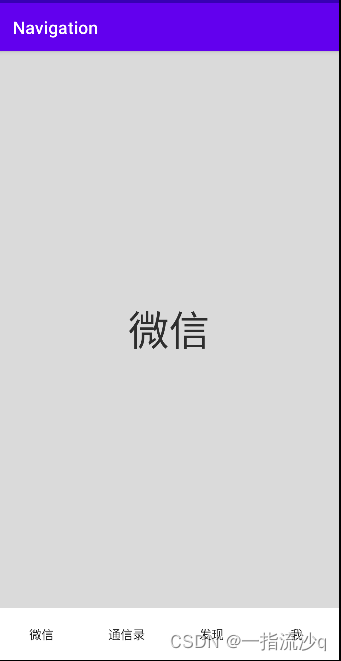
一、效果展示
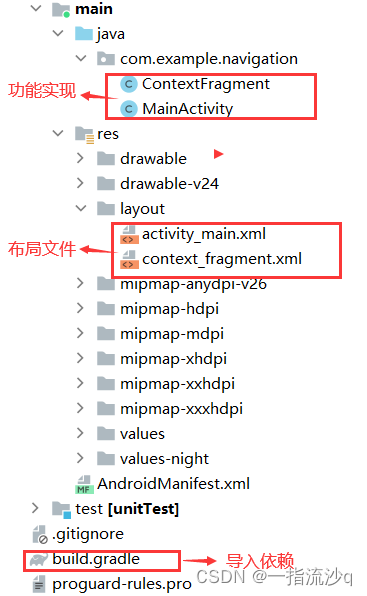
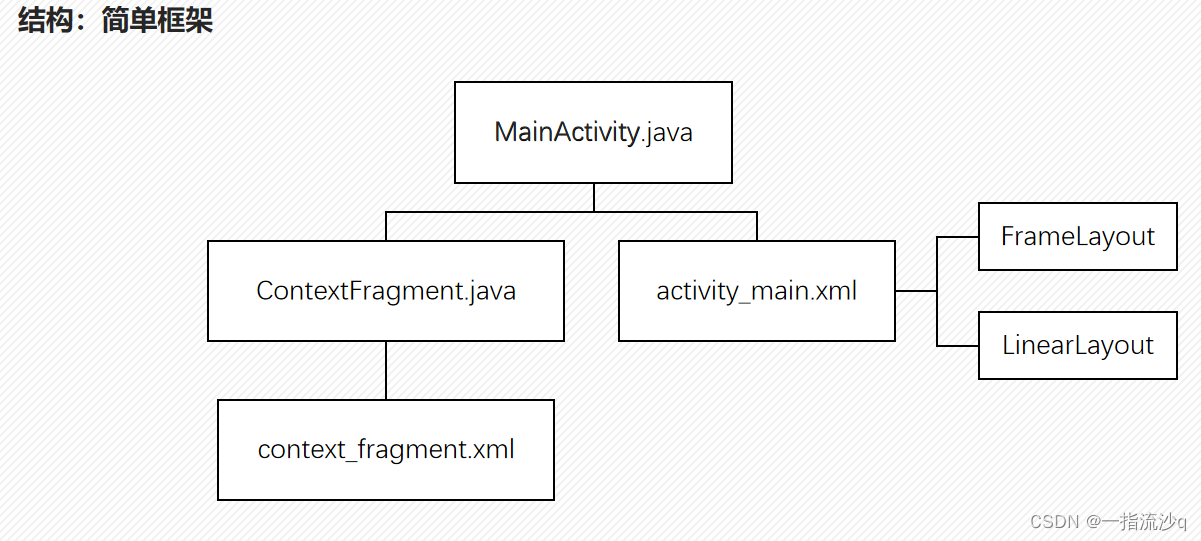
二、整体结构

三、代码
build.gradle
dependencies {
     //添加以下两行代码
    implementation fileTree(dir: 'libs', include: ['*.jar'])
    implementation  'androidx.recyclerview:recyclerview:1.2.1'

    implementation 'androidx.appcompat:appcompat:1.4.1'
    implementation 'com.google.android.material:material:1.5.0'
    implementation 'androidx.constraintlayout:constraintlayout:2.1.3'
    testImplementation 'junit:junit:4.13.2'
    androidTestImplementation 'androidx.test.ext:junit:1.1.3'
    androidTestImplementation 'androidx.test.espresso:espresso-core:3.4.0'
}
MainActivity.java
package com.example.navigation;

import android.graphics.Color;
import android.os.Bundle;
import android.view.View;
import android.widget.Button;
import android.widget.LinearLayout;

import androidx.appcompat.app.AppCompatActivity;
import androidx.fragment.app.Fragment;
import androidx.fragment.app.FragmentManager;
import androidx.fragment.app.FragmentTransaction;

import java.util.ArrayList;
import java.util.List;

public class MainActivity extends AppCompatActivity implements View.OnClickListener {

    public String[] btnTitles = new String[]{"微信","通信录", "发现","我"};// 按钮标题
    public List<Fragment> contextFragments = new ArrayList<>();// 用来存放Fragments的集合
    public LinearLayout linearLayout;

    @Override
    protected void onCreate(Bundle savedInstanceState) {
        super.onCreate(savedInstanceState);
        setContentView(R.layout.activity_main);
        init();// 初始化控件
    }
    private void init() {
        // 初始化按钮
        initButton();

        // 初始化Fragment
        initFragment();
    }

    public void initButton() {
        // 获取存放按钮的LinearLayout
        linearLayout = findViewById(R.id.buttonLayout);

        // 遍历按钮标题数组,动态添加按钮
        for (String btnStr: btnTitles) {

            Button btn = new Button(this);
            btn.setText(btnStr);
            btn.setTag(btnStr);// 存放Tag,值为按钮标题文本

            // 设置按钮样式
            btn.setBackgroundColor(Color.WHITE);
            LinearLayout.LayoutParams btnLayoutParams =
                    new LinearLayout.LayoutParams(0, LinearLayout.LayoutParams.MATCH_PARENT, 1);

            // 添加点击事件
            btn.setOnClickListener(this);

            // 将按钮加入LinearLayout
            linearLayout.addView(btn, btnLayoutParams);
        }
    }

    /**
     * 初始化Fragment
     */
    public void initFragment() {

        // 获取FragmentManager
        FragmentManager fragmentManager = getSupportFragmentManager();
        // 开始事务管理
        FragmentTransaction transaction = fragmentManager.beginTransaction();

        // 添加按钮对应的Fragment
        for (String btnStr: btnTitles) {

            // 声明一个ContextFragment
            ContextFragment contextFragment = new ContextFragment();

            // 将ContextFragment添加到contextFrameLayout,并设置tag为按钮的标题
            // (这里的Tag和按钮的Tag是一样的,按钮点击事件中用按钮的Tag查找Fragment)
            transaction.add(R.id.contextFrameLayout, contextFragment, btnStr);

            // 设置ContextFragment中文本的值,这里用Bundle传值
            Bundle bundle = new Bundle();
            bundle.putString("textValue", btnStr);
            contextFragment.setArguments(bundle);

            // 将contextFragment加入Fragment集合中
            contextFragments.add(contextFragment);
        }
        // 提交事务
        transaction.commit();

        // 显示第一个Fragment,隐藏其它的Fragment
        showFragment(btnTitles[0]);
    }
    public void showFragment(String tag) {
        FragmentManager fragmentManager = getSupportFragmentManager();
        FragmentTransaction transaction = fragmentManager.beginTransaction();

        // 遍历contextFragments
        for (Fragment fragment: contextFragments) {
            if (fragment.getTag().equals(tag)) {// tag一样,显示Fragment
                transaction.show(fragment);
            } else {// 隐藏Fragment
                transaction.hide(fragment);
            }
        }
        transaction.commit();
    }

    @Override
    public void onClick(View view) {
        // 显示相应的Fragment
        showFragment(view.getTag().toString());
    }
}
ContextFragment.java
package com.example.navigation;

import android.os.Bundle;
import android.view.LayoutInflater;
import android.view.View;
import android.view.ViewGroup;
import android.widget.TextView;

import androidx.fragment.app.Fragment;

public class ContextFragment extends Fragment {

    TextView textView;

    @Override
    public View onCreateView(LayoutInflater inflater, ViewGroup container, Bundle savedInstanceState) {

        View view = inflater.inflate(R.layout.context_fragment, container, false);

        // 获取文本控件
        textView = view.findViewById(R.id.content_text);

        // 获取Bundle,该对象是Activity创建Fragment时,传入的
        Bundle bundle = getArguments();
        if (bundle != null) {
            String textValue = bundle.getString("textValue");// 将文本框的值赋值为传入的textValue
            textView.setText(textValue);
        }

        return view;
    }
}
activity_main.xml
<?xml version="1.0" encoding="utf-8"?>
<LinearLayout xmlns:android="http://schemas.android.com/apk/res/android"
    android:layout_width="match_parent"
    android:layout_height="match_parent"
    android:background="#FFFFFF"
    android:orientation="vertical">

    <!-- 用来存放Fragment -->
    <FrameLayout
        android:id="@+id/contextFrameLayout"
        android:layout_width="match_parent"
        android:layout_height="0dp"
        android:layout_weight="1"
        android:background="#dadada"></FrameLayout>

    <!-- 用来存放按钮 -->
    <LinearLayout
        android:id="@+id/buttonLayout"
        android:layout_width="match_parent"
        android:layout_height="60dp"
        android:orientation="horizontal"></LinearLayout>
</LinearLayout>
context_fragment.xml
<?xml version="1.0" encoding="utf-8"?>
<LinearLayout xmlns:android="http://schemas.android.com/apk/res/android"
    android:layout_width="match_parent"
    android:layout_height="wrap_content"
    android:layout_gravity="center"
    android:orientation="vertical">

    <TextView
        android:id="@+id/content_text"
        android:layout_width="wrap_content"
        android:layout_height="wrap_content"
        android:layout_gravity="center_horizontal"
        android:text="内容"
        android:textSize="47sp" />

</LinearLayout>参考博客:Android碎片Fragment之多标签切换效果(微信和QQ底部多标签切换) - 简书 (jianshu.com)


 368
368


 被折叠的 条评论
为什么被折叠?
被折叠的 条评论
为什么被折叠?
 到【灌水乐园】发言


