


Rust学习笔记
文章目录
1.0 Rust概述
最近因为接触到一个有趣的前端桌面应用新方案tauri,由于tauri的后端是rust,因此提起了我对rust的兴趣。
Rust语言的特点
- 高性能 - Rust 速度惊人且内存利用率极高。由于没有运行时和垃圾回收,它能够胜任对性能要求特别高的服务,可以在嵌入式设备上运行,还能轻松和其他语言集成。
- 可靠性 - Rust 丰富的类型系统和所有权模型保证了内存安全和线程安全,让您在编译期就能够消除各种各样的错误。
- 生产力 - Rust 拥有出色的文档、友好的编译器和清晰的错误提示信息, 还集成了一流的工具 —— 包管理器和构建工具, 智能地自动补全和类型检验的多编辑器支持, 以及自动格式化代码等等。
rust适合的领域
- 网络编程
- 游戏编程
- web后端与wasm
- 命令行工具
- 操作系统
- 嵌入式
1.1 安装、配置开发环境
安装rust
这里不过多赘述。
linux
curl --proto '=https' --tlsv1.2 https://sh.rustup.rs -sSf | sh
如果安装成功,将出现下面这行:
Rust is installed now. Great!
windows
rust编译工具:https://www.rust-lang.org/zh-CN/tools/install)
Windows 上安装 Rust 需要有 C++ 环境,有两种方式可供选择:
x86_64-pc-windows-msvc(官方推荐)x86_64-pc-windows-gnu
在安装时可自行选择。
配置开发环境
推荐vscode作为rust的开发工具
Visual Studio Code下载地址:https://code.visualstudio.com/Download
插件:
- rust-analyzer(必装)
- Better TOML(推荐)
- crates(推荐)
- Error Lens(推荐)
1.2 cargo
Cargo 是什么
Cargo 是 Rust 的构建系统和包管理器。
Rust 开发者常用 Cargo 来管理 Rust 工程和获取工程所依赖的库。
cargo常用指令
cargo build构建你的项目cargo run运行你的项目cargo test测试你的项目cargo doc构建你的项目的文档cargo publish发布你的库至crates.io
快速开始
cargo new [项目名]
修改国内源
[source.crates-io]
registry = "https://github.com/rust-lang/crates.io-index"
# 指定镜像
replace-with = '镜像源名' # 如:tuna、sjtu、ustc,或者 rustcc
# 注:以下源配置一个即可,无需全部
# 中国科学技术大学
[source.ustc]
registry = "https://mirrors.ustc.edu.cn/crates.io-index"
# >>> 或者 <<<
registry = "git://mirrors.ustc.edu.cn/crates.io-index"
# 上海交通大学
[source.sjtu]
registry = "https://mirrors.sjtug.sjtu.edu.cn/git/crates.io-index/"

# 清华大学
[source.tuna]
registry = "https://mirrors.tuna.tsinghua.edu.cn/git/crates.io-index.git"

# rustcc社区
[source.rustcc]
registry = "https://code.aliyun.com/rustcc/crates.io-index.git"
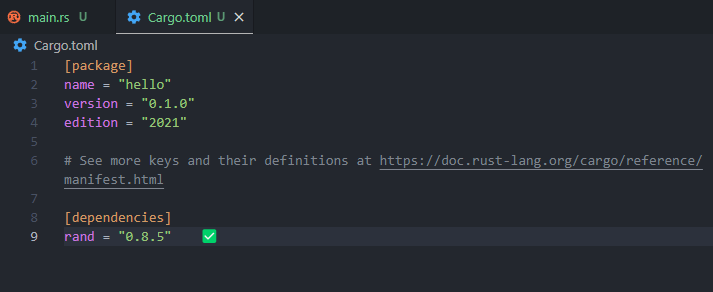
添加包(依赖)
比如添加一个随机数的包
只需去crates.io搜索rand
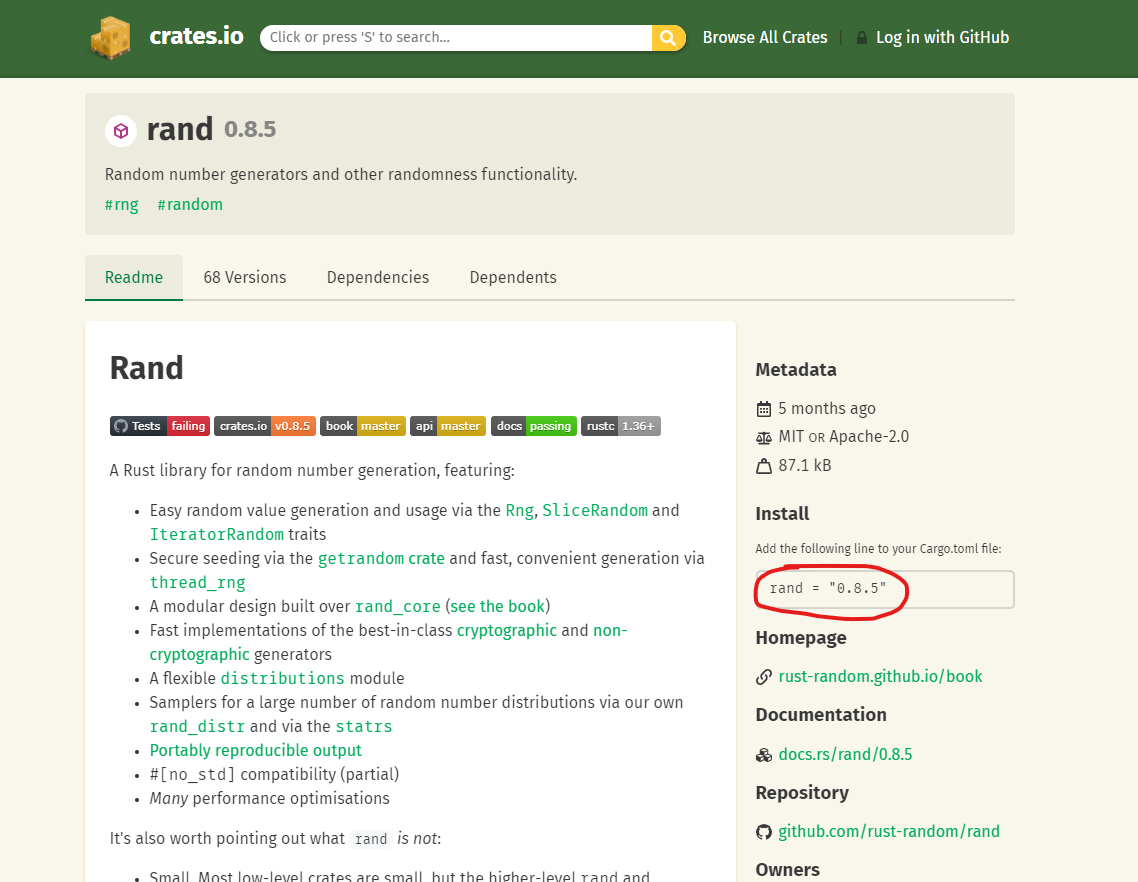
将其添加至Cargo.toml中的[dependencies]下
2.1 rust变量和基础数据类型
变量
变量是什么
- 将数据分配到临时内存位置,为了让程序员更好地操作内存
- 可以被赋值于任何的值和类型
- rust中
let声明变量 - rust中的变量
默认是不可变的!,前置mut可以使其为可变的ImmutableMutable
输入一个字符串并输出,main.rs:
// 标准库io包
use std::io;
fn main() {
    let mut input: String = String::new();
    println!("Hello, world!");
    match io::stdin().read_line(&mut input) {
        Ok(_) => {
            println!("Wow : {}", input);
        }
        _ => {}
    }
}
命令行执行cargo run
rust 基本数据类型
Integer 整型
| Size | Signed | Unsigned |
|---|---|---|
| 8 bit | i8 | u8 |
| 16 bit | i16 | u16 |
| 32 bit | i32 | u32 |
| 64 bit | i64 | u64 |
| 128 bit | i128 | u128 |
| arch(系统架构有关) | isize | usize |
Float 浮点型
| Size | Float |
|---|---|
| 32 bit | f32 |
| 64 bit | f64 |
Boolean 布尔型
true
false
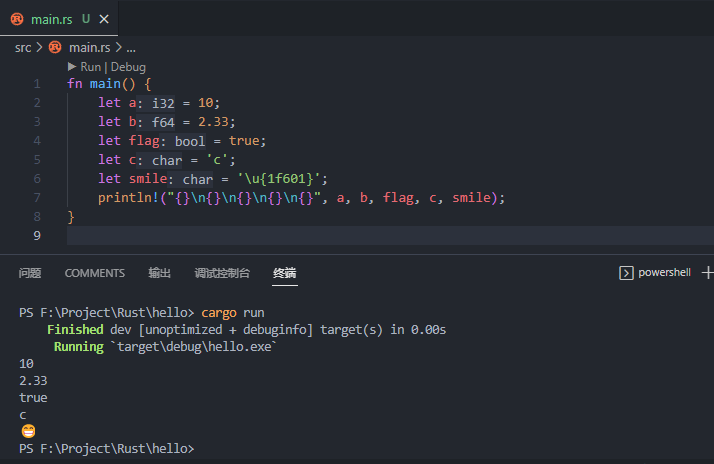
Character 字符类型
单引号
let a = 'a';
let smile = '\u{1f601}';
&str 字符串类型
双引号
let cat: &str = "car";
tips:若不写类型也会自动推导,如下:
宏
!表示宏
println!:打印信息到终端
有关于宏,我会在后续高级教程中再去写一遍,宏是rust中比较复杂的一个东西,大致分为两类:声明式宏( declarative macros ) macro_rules! 和三种过程宏( procedural macros ):
#[derive],在之前多次见到的派生宏,可以为目标结构体或枚举派生指定的代码,例如Debug特质- 类属性宏(Attribute-like macro),用于为目标添加自定义的属性
- 类函数宏(Function-like macro),看上去就像是函数调用
2.2 控制流(control flow)
Execution Flow
语句
if
else if
else
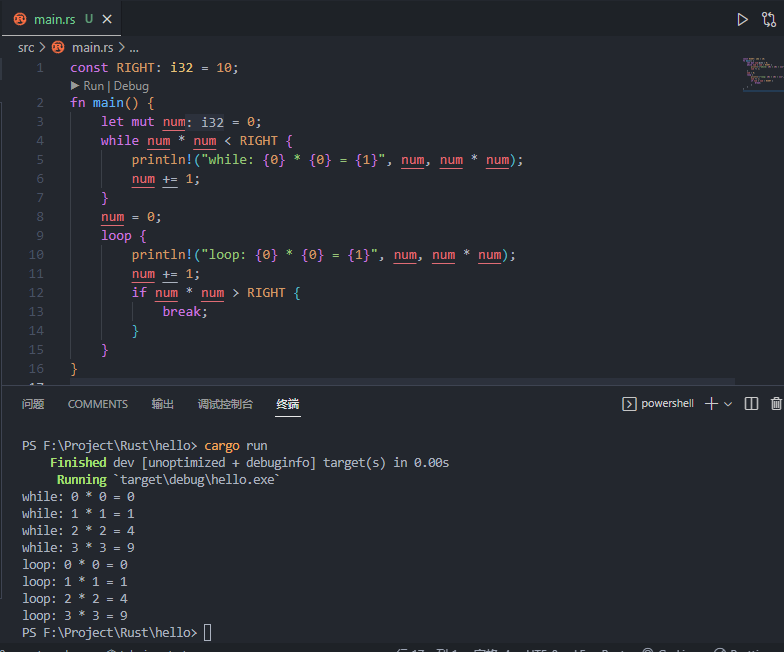
循环
looping或iteration
关键字:
-
loop无尽的循环 -
while有条件的循环 -
for -
break -
continue
loop and while
因为loop是无尽的循环,所以需要通过break退出:
for
fn main() {
    for 元素 in 集合 {
      // 使用元素
    }
}
| 使用方法 | 等价使用方式 | 所有权 |
|---|---|---|
for item in collection | for item in IntoIterator::into_iter(collection) | 转移所有权 |
for item in &collection | for item in collection.iter() | 不可变借用 |
for item in &mut collection | for item in collection.iter_mut() | 可变借用 |
Match
和if...else类似,但是必须写出所有条件下的执行代码
于if...else不同的是:
match会在编译时检查错误if...else则不会,只会在运行时报错
use rand::Rng;

fn main() {
    let mut rng = rand::thread_rng();
    let num = rng.gen_range(0..10);
    match num {
        1 => println!("first"),
        2 => println!("second"),
        3 => println!("third"),
        _ => println!("other"),
    }
}
可以用下划线_表示其它所有情况
tips:在 Rust 中 _ 的含义是忽略该值或者类型的意思,如果不使用 _,那么编译器会给你一个 变量未使用的 的警告。
2.3 函数
普通函数
从之前的示例代码可以看出来,fn就是定义函数的关键字
fn function(a:i32, b:i32) -> i32 {
    a + b
}
tips:最后一行不加;自动作为返回值返回
Closure 闭包
- 函数中的函数
- 匿名函数
- lambda表达式
fn main() {
    let add = |a: i32, b: i32| -> i32 { a + b };
    let res = add(1, 2);
    println!("{}", res);
}
3.1 枚举 Enum
枚举可以是多个不同的枚举类型之一
主要作用:
- 提高代码的可读性
- 提供标识给编译器(提高性能)
系统的枚举
- Result
- Option
代码
// 便于打印
#[derive(Debug)]
enum Position {
    One,
    Two,
}
fn main() {
    // 打印复合类型
    println!("{:?}", Position::One);
}
3.2 结构体
- rust中没有class
struct
- 包含多段数据的类型
- 每一段数据被称为
field属性 - 访问属性用
.
#[derive(Debug)]
struct Rectangle {
    width: i32,
    height: i32,
}
fn main() {
    let rect = Rectangle {
        width: 5,
        height: 10,
    };
    println!("{}", rect.width);
    println!("{:#?}", rect);
}
struct 方法
- 关联函数
- 实例方法
- 构造函数
- Self
示例1
#[derive(Debug)]
struct Rectangle {
    width: i32,
    height: i32,
}

impl Rectangle {
    // 关联函数
    fn area(width: i32, height: i32) -> i32 {
        width * height
    }
    // 实例方法
    fn cal(&self) -> i32 {
        self.width * self.height
    }
    // 构造函数
    fn new(width: i32, height: i32) -> Self {
        Rectangle { width, height }
    }
}

fn main() {
    let rect = Rectangle {
        width: 5,
        height: 10,
    };
    let num1 = Rectangle::area(5, 5);
    println!("{}", num1);
    println!("{}", rect.cal());
    let rect2 = Rectangle::new(5, 5);
    println!("{:#?}", rect2);
}
示例2
#[derive(Debug)]
struct Person {
    name: String,
    age: i32,
}

impl Person {
    // 可能在外部调用,使用pub关键字
    pub fn new(name: String, age: i32) -> Self {
        Person { name, age }
    }
}

fn main() {
    let person1 = Person::new("Star-tears".to_string(), 18);
    println!("{:#?}", person1);
}
- &self
- &mut self
- self
- mut self
示例3
#[derive(Debug)]
struct Person {
    name: String,
    age: i32,
}

impl Person {
    // 可能在外部调用,使用pub关键字
    pub fn new(name: String, age: i32) -> Self {
        Person { name, age }
    }
    fn greet(&self) -> String {
        format!("Hi {}", self.name)
    }
    fn add_age(&mut self, n: i32) {
        self.age += n;
    }
}

fn main() {
    let mut person1 = Person::new("Star-tears".to_string(), 18);
    println!("{:#?}", person1);
    println!("{}", person1.greet());
    person1.add_age(3);
    println!("{}", person1.age);
}
&为引用,但默认是不可变的,如果希望可变,需要加mut关键字
3.3 Tuples 元组
- 相似类型有数组、切片,但在rust中不常用,常用Vector
元组
- 匿名存储数据
- 不可变
元组的用处
- 函数返回
- 提取变量
代码
fn a_tuple() -> (i32, i32) {
    (0, 1)
}

fn main() {
    println!("{:?}", a_tuple());
    let (a, b) = a_tuple();
    println!("a: {}, b: {}", a, b);
}
4.1 所有权机制(OwnerShip)
OwnerShip Model
OwnerShip规则
- 每个值都有一个变量称为所有者
- 每个值只能有一个所有者
- 当所有者超出作用域时,值被销毁
Stack 和 Heap
- Stack存储已知大小的数据 快 基础数据类型等
- Heap存储未知大小的数据 慢 Struct等
move
浅拷贝加失效
fn main() {
    let a = "abc".to_string();
    let b = a; // a失效
}
其它语言在这样子的赋值时大多数只做一个浅拷贝,但在rust里,它是把所有权交给b,将a失效
clone
- 深度拷贝
- 开辟新的空间
fn main() {
    let a = "abc";
    let b = a;
    println!("{}, {}", a, b);
}
输出如下:
    Finished dev [unoptimized + debuginfo] target(s) in 0.01s
     Running `target\debug\hello.exe`
abc, abc
引用
reference
- 通过
&可以获得值的引用 - 未获得值的所有权,那么它就不会在作用域结束后被销毁
- 这种情况叫借用borrowed
struct A {
    a: i32,
}
fn change_a(a: &mut A) {
    a.a = 233;
    println!("{}", a.a);
}

fn main() {
    let mut a = A { a: 1 };
    println!("{}", a.a);
    change_a(&mut a);
    println!("{}", a.a);
}
注意
在同一作用域下,对某一块数据:
- 可以有多个不可变引用
- 只能有一个可变的引用
- 不能同时拥有一个可变引用和一个不可变引用
Copy 和 Clone
这两个都是特质(trait)
Copy traitClone trait
#[derive(Debug, Clone, Copy)]
struct Person<'a> {
    name: &'a str,
    age: i32,
}

fn main() {
    let person = Person {
        name: "Star-tears",
        age: 18,
    };
    let pp = person;
    println!("{:?}", person);
}
tips:手动标注name作用域与结构体实例作用域一致
4.2 生命周期 lifetime
生命周期
- 避免
dangling referfence(避免悬垂引用) - rust中所有的引用都有自己的生命周期,表示引用有效的作用域
- 一般为隐式的,但不可推断时会报错,需要手动标注生命周期
手动标识生命周期
-
fn longest(x: &str, y: &str) -> &str -
生命周期最短的为有效
-
尽量不要用
'static -
省略规则
- 每个引用类型的参数都有自己的生命周期
- 只有一个输入生命周期参数,那么输出生命周期就为该生命周期
- 有
&self或&mut self,那么输出生命周期就为该self生命周期
-
生命周期机制还在完善
5.1 常用数据类型
String
-
&str: String slices 不可变的-
let ss = "ss";
-
-
String objects
-
let mut s = String::new(); -
let s = String::from("star"); -
let s = "s".to_string(); -
通过
format!生成let s = format!("{}", 233);
-
String methods
- len()
- push 字符
- push_str 字符串
- replace
Vector
构造
let mut arr = Vec::new();
let arr = vec![1,2,3];
let arr = vec![1;20];
push 和 remove
arr.push(2);
arr.remove(0);
更新
num[3] = 5;
num.get(3)
fn main() {
    let mut num: Vec<i32> = vec![0; 20];
    num.push(1);
    match num.get(20) {
        Some(n) => println!("{}", n),
        None => {}
    }
}
遍历
- iter
fn main() {
    let mut num: Vec<i32> = vec![0; 20];
    num.push(1);
    for it in num.iter() {
        println!("{}", it);
    }
}
5.2 HashMap
-
散列函数
- 散列函数把消息或数据压缩成摘要,使得数据量变小,将数据的格式固定下来。该函数将数据打乱混合,重新创建一个叫散列值(hash values, hash codes, hash sums, 或hashes)的指纹
-
HashMap由链表加数组组成,它的底层结构是一个数组,而数组的元素是一个单向链表
-
HashMap 的键可以是布尔型、整型、字符串,或者任意实现了 Eq 和 Hash trait 的其他类型
-
HashMap 也是可增长的,但 HashMap 在占据了多余空间时还可以缩小自己
use std::collections::HashMap;

fn main() {
    let mut str_map = HashMap::new();
    str_map.insert("star", 18);
    str_map.insert("tears", 19);
    println!("{:#?}", str_map);
    match str_map.get(&"star") {
        Some(v) => println!("{:#?}", v),
        _ => {}
    }
}
6.1 特质和泛型(Trait && generics)
Traits
- 与接口和抽象类类似
- 给结构体添加定义的行为
impl trait_demo for struct_demo
struct Steve {
    name: String,
}

impl Person for Steve {
    fn new(name_str: String) -> Self {
        Steve { name: name_str }
    }

    fn language(&self) -> &str {
        "Steve"
    }
}

struct Alex {
    name: String,
}

impl Person for Alex {
    fn new(name_str: String) -> Self {
        Alex { name: name_str }
    }

    fn language(&self) -> &str {
        "Alex"
    }
    fn eat_food(&self) {
        println!("Eat fish!");
    }
}

trait Person {
    fn new(name_str: String) -> Self;
    fn language(&self) -> &str;
    fn eat_food(&self) {
        println!("Eat food");
    }
}

fn main() {
    let a = Steve::new("Star_tears".to_string());
    let b = Alex::new("T_dream".to_string());
    a.eat_food();
    b.eat_food();
}
-
返回枚举
-
fn get_trait -> Box<dyn trait_name>
-
泛型
- 泛型程序设计(
generic programming)是程序设计语言的一种风格或范式 - 泛型运行程序员在强类型程序设计语言中编写代码时使用一些以后才指定的类型,在实例化时作为参数指明这些类型
trait Bark {
    fn bark(&self) -> String;
}

struct Dog {
    species: String,
}

struct Cat {
    color: String,
}

impl Bark for Dog {
    fn bark(&self) -> String {
        format!("{} barking", self.species)
    }
}

fn bark<T: Bark>(b: T) {
    println!("{}", b.bark());
}

fn main() {
    let dog = Dog {
        species: "white dog".to_string(),
    };
    bark(dog);
}


 7275
7275


 被折叠的 条评论
为什么被折叠?
被折叠的 条评论
为什么被折叠?
 到【灌水乐园】发言


